Добавил:
Опубликованный материал нарушает ваши авторские права? Сообщите нам.
Вуз: Предмет: Файл:

Professional Visual Studio 2005 (2006) [eng]

.pdf
Скачиваний:
132
Добавлен:
16.08.2013
Размер:
21.9 Mб
Скачать

Chapter 47

Service Installer

Also requiring some discussion is writing an installer for a Windows Service application. You create an installer the same way you would create an installer for a Windows application. However, a Windows Service installer not only needs to install the files into the appropriate location, it also needs to register the service so it appears in the services list. This is easily done using the ServiceInstaller and ServiceProcessInstaller components (you’ll probably need to add these to the Toolbox, as they are not visible by default). An instance of each of these components needs to be dragged onto the designer surface of the installer.

The ServiceInstaller class is used to specify the display name (the name of the service as it will appear in the Windows services list), the service name (the name of the service class that will be executed when the service is run), and the startup type (whether it is manually started or automatically started when Windows starts up). For each service you want to install you need to create a separate instance of the ServiceInstaller class, specifying a different display and service name. Only a single instance of the ServiceProcessInstaller class is required, which is used to specify the account information that the service(s) will run as. In the following example, the InstallerforService constructor specifies that the class Service1 should be installed as a service, and that it should automatically start using the NetworkService account:

Imports System.ComponentModel

Imports System.Configuration.Install

Public Class InstallerForService

Private Const cServiceDisplayName As String = “My Generic Service” Private Const cStartAfterInstall As String = “STARTAFTERINSTALL” Private Const cNETProcessName As String = “Net”

Private Const cNETStart As String = “Start “”{0}””” Private Const cNETWaitTimeout As Integer = 5000

Private Const cNETWaitError As String = “WARNING: Process took longer than expected to start, it may need to be restarted manually”

Public Sub New()

MyBase.New()

‘This call is required by the Component Designer. InitializeComponent()

‘Add initialization code after the call to InitializeComponent Me.ServiceInstaller1.DisplayName = cServiceDisplayName Me.ServiceInstaller1.ServiceName = GetType(Service1).ToString Me.ServiceInstaller1.StartType = ServiceProcess.ServiceStartMode.Automatic Me.ServiceProcessInstaller1.Account = _

ServiceProcess.ServiceAccount.NetworkService

End Sub

Private Sub InstallerForService_AfterInstall(ByVal sender As Object, _ ByVal e As InstallEventArgs) _

Handles Me.AfterInstall ‘Retrieve the user input (unchecked box can return empty string,

676

Deployment: ClickOnce and Other Methods

‘whereas a checked box will return “1”)

Dim startString As String = Me.Context.Parameters(cStartAfterInstall) If startString = “” Then Return

Dim shouldStart As Boolean = CBool(startString) If Not shouldStart Then Return

‘Service should be started, so create a process and wait for completion Dim proc As Process = Process.Start(CreateNetStartProcessInfo)

If Not proc.WaitForExit(cNETWaitTimeout) Then MsgBox(cNETWaitError)

End Sub

Private Function CreateNetStartProcessInfo() As ProcessStartInfo Dim x As New ProcessStartInfo(cNETProcessName, _

String.Format(cNETStart, cServiceDisplayName)) x.WindowStyle = ProcessWindowStyle.Hidden

Return x End Function

End Class

Also included in this listing is an event handler for the AfterInstall event that is used to start the service on completion of the installation process. By default, even when the startup is set to automatic, the service will not be started by the installer. However, when uninstalling the service, the installer does attempt to stop the service.

The user interface for this deployment project includes a Checkboxes (A) dialog using the User Interface view for the project. Refer to Figure 47-11 for a view of the default user interface. Right-click the Start node and select Add Dialog from the context menu. Highlight the dialog titled Checkboxes (A) from the Add Dialog window and click OK. This will insert the new dialog at the end of the installation process. The order of the dialogs can be adjusted using the Move Up/Down items from the right-click context menu on the nodes in the User Interface window.

Selecting Properties Window from the right-click context menu on the new dialog will bring up the Properties window. Set the property identifier for Checkbox1 to STARTAFTERINSTALL and the set the Visible property for the remaining checkboxes to false. As discussed earlier in the chapter, you also needed to add /STARTAFTERINSTALL=[STARTAFTERINSTALL] to the CustomActionData property for the assembly in the Custom Actions view of the deployment project. With this user input you can decide whether to start the service when the installer completes.
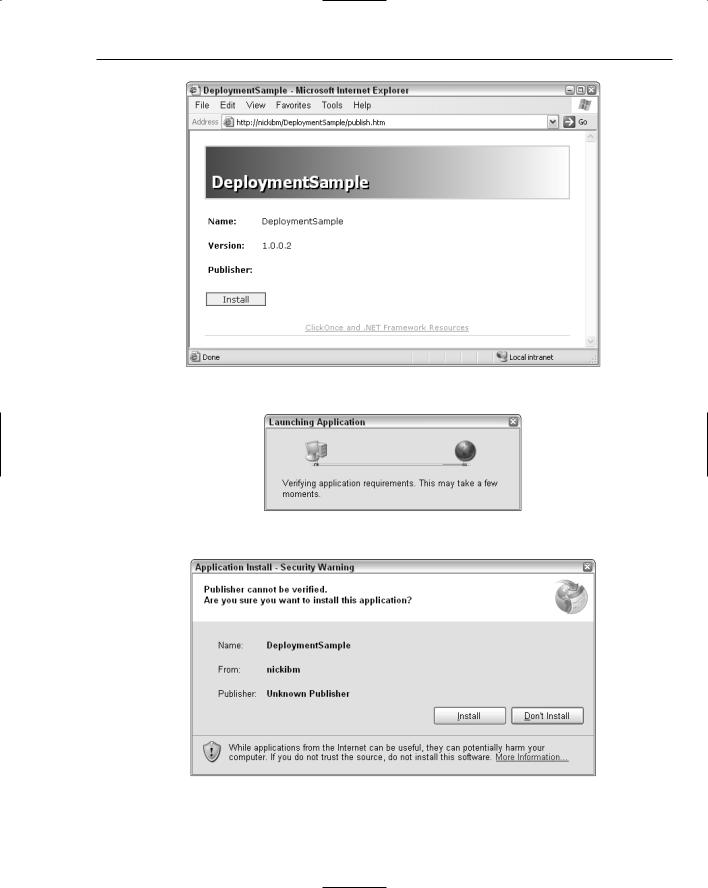
ClickOnce

Using a Windows installer is a sensible approach for any application development. However, deploying an installer to thousands of machines, and then potentially having to update them, is a daunting task. Although management products help reduce the burden associated with application deployment,

web applications often replace rich Windows applications because they can be dynamically updated, affecting all users of the system. ClickOnce is a new technology — included in version 2.0 of the .NET Framework — that enables you to build self-updating Windows applications. This section shows you how to use Visual Studio 2005 to build applications that can be deployed and updated using ClickOnce.

677

Chapter 47

Click to Deploy

To demonstrate the functionality of ClickOnce deployment, this section uses a simple application, DeploymentSample, which initially displays an empty form. Begin with a freshly created WindowsApplication, which of course has a single blank form. This can be created by clicking File New Project Windows Application. Without making any changes, you can run this from within Visual Studio 2005 and the form is displayed. To deploy this application, “click once” on the Publish Now button in the Publish tab of the project settings window, as shown in Figure 47-15.

Figure 47-15

Publishing the application deploys the current version of the application to the location defined in the Publishing Location path (in this case, http://localhost/DeploymentSample/) along with a deployment manifest that details the application components and security. Although the publish location appears as a drop-down list, it is only populated with previous locations to which you have published the application, so initially it will be empty. Clicking the ellipses button displays the Open Web Site dialog, which assists you in specifying the publishing location. After this process has completed, the installation URL is launched, as shown in Figure 47-16.

Clicking the Install button at this location displays the Launching Application dialog, shown in Figure 47-17, while the requirements for the application are being retrieved from the server. This step is similar to the role of the Setup.exe for the traditional Windows Installer.

After information about the DeploymentSample application has been downloaded, a security warning is launched, as shown in Figure 47-18. In this case, the security warning is raised because although the deployment manifest has been signed, it has been signed with a certificate that is not known on the machine on which it is being installed.

678

Deployment: ClickOnce and Other Methods

Figure 47-16

Figure 47-17

Figure 47-18

679

Chapter 47

Three options are available when it comes to signing the deployment manifest. By default,

Visual Studio 2005 creates a test certificate to sign the manifest, which has the format application name_TemporaryKey.pfx and is automatically added to the solution (this happens when the application is first published using the Publish Now button, as shown on Figure 47-15). While this certificate can be used during development, it is not recommended for deployment. The other alternatives are to purchase a third-party certificate, from a company such as VeriSign, or to use the certificate server within Windows Server 2003 to create an internal certificate.

The advantage of getting a certificate from a well-known certificate authority is that it can automatically be verified by any machine. Using either the test certificate or an internal certificate requires installation of that certificate in the appropriate certificate store. Figure 47-19 shows the Signing tab of the project properties window, where you can see that the ClickOnce manifest is being signed with a certificate that has been generated on the local computer. An existing certificate can be used by selecting it from the store or from a file. Alternatively, another test certificate can be created.

Figure 47-19

If you want your application to install with a known publisher, you need to add the test certificate into the root certificate store on the machine on which you’re installing the product. Because this also happens to be the deployment machine, you can do this by clicking More Details. This opens a dialog that outlines the certificate details, including the fact that it can’t be authenticated. (If you are using the certificate created by default by Visual Studio 2005, you will need to use the Select from File button to re-select the generated certificate, and then use the More Details button. There seems to be an issue here in that the details window does not show the Install Certificate button without this additional step.) Clicking Install Certificate enables you to specify that the certificate should be installed into the Trusted Root Certification Authorities store. This is not the default certificate store, so you need to browse for it. Because this is a test certificate you can ignore the warning that is given, but remember that you should not use this certificate in production. Now when you publish your application and try to install it, you will see that the dialog has changed, looking similar to the one shown in Figure 47-20.

680

Deployment: ClickOnce and Other Methods

Figure 47-20

Although you have a known publisher, you are still being warned that additional security permissions need to be granted to this application in order for it to execute. Clicking the rather minimalist More Information hyperlink opens a more informative dialog, shown in Figure 47-21. As with the security coding within Windows XP SP2, there are three icons: green for positive security, red for potential security weaknesses, and yellow for informative or best practice guidance.

Figure 47-21

ClickOnce deployment manifests are rated on four security dimensions. You’ve just seen how you

can specify a well-known publisher, critical for safe installation of an application. By default, ClickOnce publishes applications as full trust applications, giving them maximum control over the local computer.

681

Chapter 47

This is unusual, as in most other cases Microsoft has adopted a security-first approach. To run with full trust, the application requires additional security permissions, which might be exploited. The

DeploymentSample application will be available online and offline; and while this isn’t a major security risk, it does modify the local file system. Lastly, the location from which the application is being installed is almost as important as the publisher in determining how dangerous the application might be. In this case, the application was published within the local network so it is unlikely to be a security threat.

Because this application doesn’t really do anything, you can decrease the trust level that the application requires. As shown in Figure 47-22, this application is made a partial trust application based on the Local Intranet zone. This changes the Machine Access icon to green, leaving only the Installation icon yellow. Unfortunately, the only way you can get this to be green would be to not install the application, which means that it would not be available offline.

Figure 47-22

Ideally, you would like to be able to bypass the Application Install dialog and have the application automatically be granted appropriate permissions. You can do this by adding the certificate to the Trusted Publishers store. Even for well-known certificate authorities, in order for the application to install automatically, the certificate needs to be added to this store. With this completed, you are presented with the dialog shown in Figure 47-23 as the application downloads. Once the application has completed downloading, it is installed onto the local computer, shortcuts are added to the Start menu, and the application is launched.

682

Deployment: ClickOnce and Other Methods

Figure 47-23

Click to Update

At some point in the future you might make a change to your application — for example, you might add a button to the simple form you created previously. ClickOnce supports a powerful update process that enables you to publish the new version of your application in the same way you did previously, and all existing versions will be upgraded the next time they are online. In Figure 47-15 you saw that the deployment manifest was assigned a version number, and at least in this case it automatically increments each time you publish the application. When you publish the new version of your application, any existing users will be prompted to update their application to the most recent version, as shown in Figure 47-24.

Figure 47-24

One of the most powerful features of ClickOnce deployment is that it tracks a previous version of the application that was installed. This means that at any stage, not only can it do a clean uninstall, it can also roll back to the earlier version. The application can be rolled back or uninstalled from the Add/ Remove Programs list on the Control Panel.

683

Chapter 47

Other Techniques

To round off the discussion on application deployment, this section covers some other manual techniques you can use.

XCopy

One of the most appealing features of .NET assemblies is that they do not require any sort of registering in order to function. This means that a .NET application can be copied from one directory to another, between machines, or even e-mailed to a colleague. As long as the destination computer has a compatible version of the .NET Framework installed, the application will run.

Clearly, some care needs to be taken to ensure that any configuration files are updated accordingly. Some

.NET applications do install shared assemblies into the GAC, so unless it is your application and you know what dependencies it has, it is always worthwhile to use the installer that shipped with it.

Publish Website

An alternative for distributing web applications is to publish them via the Publish Website item on the Build menu. Figure 47-25 displays the options that are available, including the capability to pre-compile and sign the assemblies for a web site.

Figure 47-25

Copy Web Project

Once a web site has been published, it is important that you have some way of updating it. Instead of just repeatedly publishing the web site, you can use the Copy Web Site tool, shown in Figure 47-26, to synchronize files between your development project and the web site. This tool can be accessed from the right-click context menu in the Solution Explorer.

684

Deployment: ClickOnce and Other Methods

Figure 47-26

Summar y

This chapter walked you through the details of building installers for various types of applications. Building a good-quality installer can make a significant difference in how professional your application appears. ClickOnce also offers an important alternative for those who want to deploy their application to a large audience. Lastly, there are tools (including XCopy, Publish Website, and Copy Web Project) for those who just need to copy an application or update a web site.

685