
Professional Visual Studio 2005 (2006) [eng]
.pdf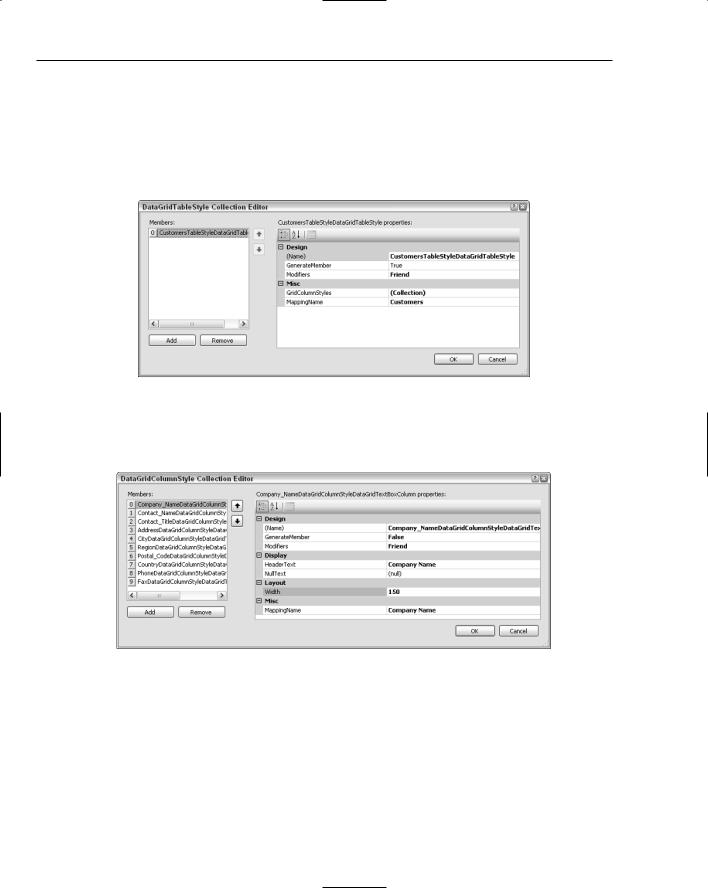
Chapter 44
In Figure 44-3 you can see that the Company column is relatively narrow, and it is unlikely that many company names are going to be that short. To change the width of this column, you need to edit the column styling information. When building applications using the full .NET Framework, use the property called Columns for the DataGridView to control how the columns are arranged. This is also accessible from the smart tag associated with this control. The DataGrid for mobile applications does not have this property; the column layout information is buried in the TableStyles property. Selecting this property from the Property grid opens the Table Style Collection Editor, shown in Figure 44-4.
Figure 44-4
To adjust the column layout information, select the GridColumnStyles property, which in turn opens another Collection Editor window, this time for editing column styles, as shown in Figure 44-5.
Figure 44-5
Selecting the Company entry in the Members list, adjust the width to 150, as shown in Figure 44-5, which is a more reasonable width for this field. The MappingName property is also important, as it is used to associate a field in the Data Source with this column. In this case, the MappingName property is linked to the Company Name field. The editor has some built-in smarts that determine what fields are available from the associated Data Source. Selecting the MappingName property reveals a drop-down list of the available fields. While on this screen, you can remove several of the Customer fields, as they don’t need to be visible on this opening screen.
616
Advanced Device Application Programming
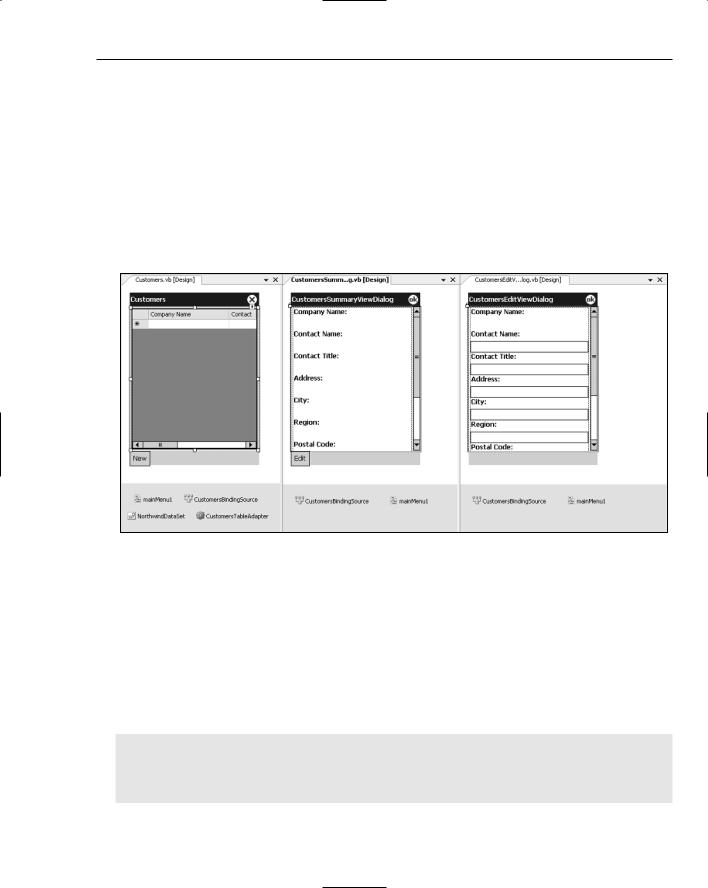
Going back to Figure 44-3, you can see a couple of smart tag tasks for the DataGrid. Of importance here is the capability to Generate Data Forms. Selecting this option automatically generates forms for viewing and editing information for Customers selected from the DataGrid. Before generating the forms, you need to configure the Data Sources window so you get only the fields you want available for editing. In this case, you don’t want the Company Name to be changed, so select Label from the display type drop-down for that item. Now you can generate the data forms using the smart tag on the DataGrid. Depending on the number of fields in the table, this process might take a few minutes, but eventually it will not only generate the forms, with appropriate controls rendered to display and edit data fields, but also wire up appropriate event handlers. Figure 44-6 illustrates the three customer forms you now have. On the left is the customer list, in the middle is the summary information form for the customer, and on the right is the customer edit form. You will notice that for the Company Name field, a label was generated instead of a textbox, thereby preventing editing of this field.
Figure 44-6
The one problem introduced in making the Company Name field read-only for editing is that the same form is used for creating a new record. As such, you need to provide a mechanism for assigning a company name to a new record. This can be done in the Click event handler for the New menu item.
Double-clicking this menu item takes you to the generated event handler, where you can call an InputBox to get the company name for the new record. Notice in the following code snippet that you also need to provide the Customer ID field for this new record. Here you make a call to a method that ensures the ID will be unique. Pass in the company name as a seed for the unique ID:
Private Sub NewMenuItemMenuItem_Click(ByVal sender As Object, _ ByVal e As EventArgs) _
Handles NewMenuItemMenuItem.Click Dim newCompanyName As String = InputBox(“Please enter the new company name:”)
If newCompanyName = “” Then Return
Dim customer As NorthwindDataSet.CustomersRow = _ CType(CType(CustomersBindingSource.AddNew,Data.DataRowView).Row, _
617

Chapter 44
NorthwindDataSet.CustomersRow)
customer.Company_Name = newCompanyName
customer.Customer_ID = GenerateUniqueCustomerID(newCompanyName) Dim customerEditDialog As CustomersEditViewDialog = _
CustomersEditViewDialog.Instance(Me.CustomersBindingSource)
customerEditDialog.ShowDialog() End Sub
So far you have an application that enables you to browse the summary list of customers using a DataGrid, view the full information about a customer using the summary form, and add or edit a customer using the edit form. The next part in this scenario involves linking Order information so orders for a particular customer appear on the customer summary page. This information could also be added to the edit page using this process, but for brevity, only add it to the summary page.
From the Data Sources window, drag the Orders node to the customer summary form. This requires some fiddling, as the existing controls are docked, but eventually you should be able to get it laid out with the DataGrid at the bottom of the list of customer attributes. Notice that it has again added a NorthwindDataSet, a table adapter, and a binding source to the nonvisual area of the design surface. Unfortunately, the generated bindings will not link the orders with the customer you’re viewing, because it is referencing a new instance of the NorthwindDataSet.
Before correcting the issue with the data binding, you need to inject a step here to create the summary and edit forms for the Order information. Unfortunately, when you correct the data binding, you lose the ability to generate these forms. In the same way you created the customer summary and edit forms, select the Generate Data Forms smart tag task from the Orders DataGrid. As before, this adds a New item to the existing menu, which can be renamed New Order to prevent confusion with the Edit menu item.
To correct the issue with the data binding, you need to select the OrdersBindingSource and change the DataBinding property to be the CustomerBindingSource. In the DataMember property, select Orders_ FK00 to set up the relationship between the two binding sources. You should also remove the additional NorthwindDataSet and TableAdapter, leaving the form looking like the one shown in Figure 44-7.
The last thing you need to do to display the list of orders for a customer is to retrieve the orders from the database by creating a second TableAdapter for the NorthwindDataSet that will be used to fill the Orders table. Return to the Customers form and you can easily add an OrdersTableAdapter by dragging it onto the form from the Toolbox. When you added the NorthwindDataSet, these strongly typed adapters were added to the solution, and were subsequently added to the Components tab of the Toolbox. To activate the TableAdapter, call the Fill method as part of the Load event for the form:
Private Sub CustomersSummaryViewDialog_Load(ByVal sender As System.Object, _ ByVal e As System.EventArgs) Handles MyBase.Load
If NorthwindDataSetUtil.DesignerUtil.IsRunTime Then Me.CustomersTableAdapter.Fill(Me.NorthwindDataSet.Customers) Me.OrdersTableAdapter1.Fill(Me.NorthwindDataSet.Orders)
me.EmployeesTableAdapter1.Fill(me.NorthwindDataSet.Employees) End If
End Sub
In this code snippet, notice that the TableAdapter for Employees has been filled. This adapter also needs to be added to the CustomersSummaryViewDialog form, just as you did for Orders.
618

Advanced Device Application Programming
Figure 44-7
The order summary and order edit forms currently list all the attributes of the Order, including the Customer ID and Employee ID. Because you have arrived at this order via the Customer summary page, you don’t need that field displayed. The Employee ID field is not really that useful unless you have committed all these IDs to memory. This would be more useful if it displayed a name instead of an ID. To do this, you can combine the information from the Employees table.
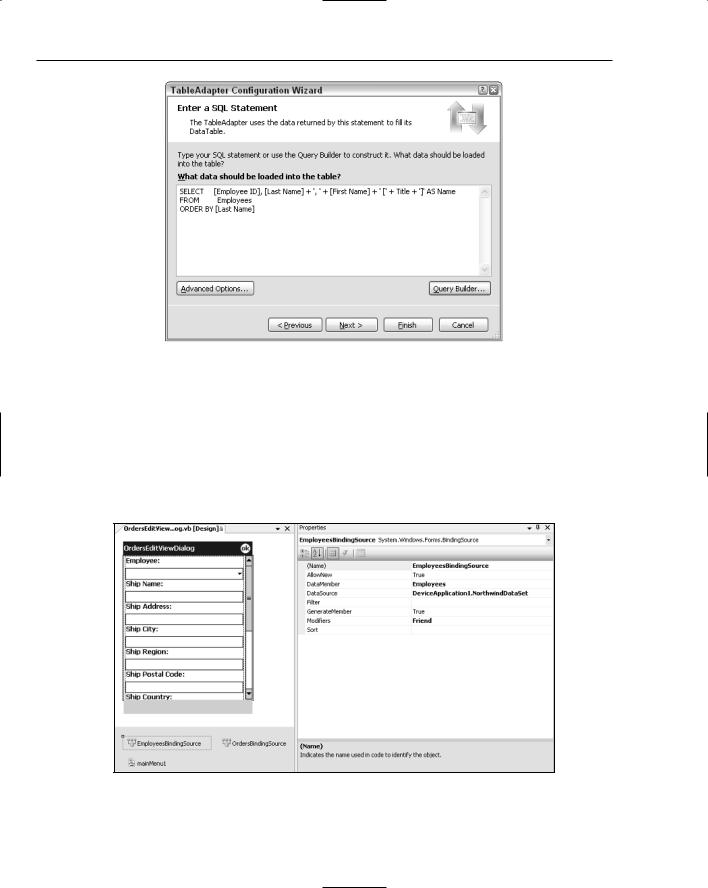
You already have the information from the Employees table loaded into the NorthwindDataSet, so all you need to do is select the correct record from that table based on the Employee ID of the Order and display the name of the employee. Unfortunately, the Employees table currently returns First and Last Name fields, which makes it difficult to display, as you need to bind to a single field. To correct this, edit the Employee information via the NorthwindDataSet by double-clicking the NorthWind.XSD in the Solution Explorer. This opens the DataSet designer. Right-click on the Employees entity and select Configure to open the TableAdapter Configuration Wizard. Here you can change the information retrieved from the database to include a concatenated Name field, for displaying information, and the Employee ID field, for data binding. You can remove all the other fields, resulting in a SQL statement that should appear as shown in Figure 44-8.
In Figure 44-8, the return values are ordered by last name so they are easier to identify. Clicking Finish regenerates the NorthwindDataSet with only these two fields in the Employees table.
619
Chapter 44
Figure 44-8
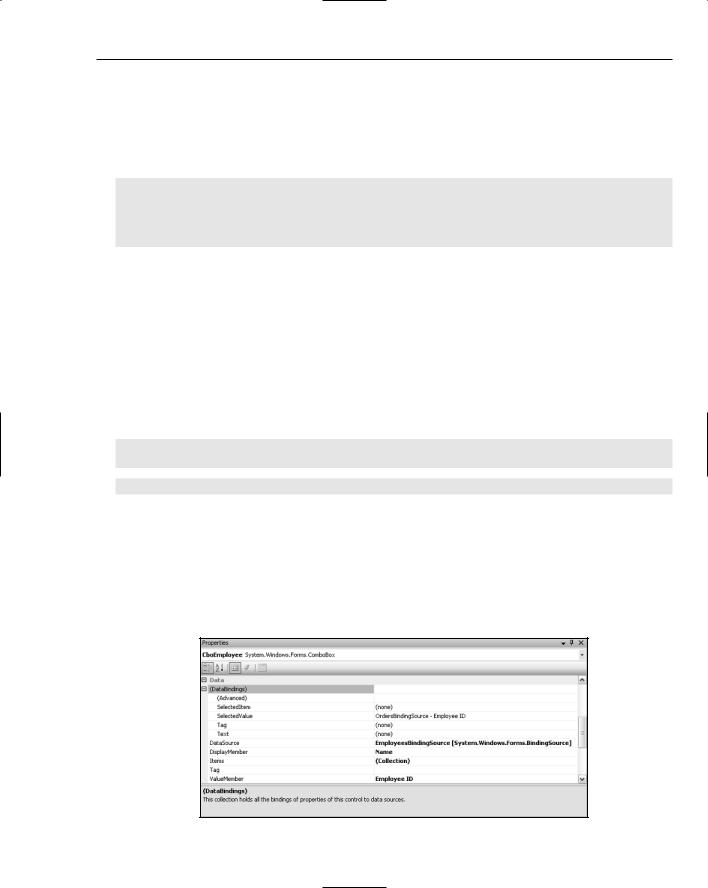
The next step in the process is to add a data-bound field to both the summary and edit dialogs for Order information. Ideally, you want a label on the summary dialog and a drop-down list for the edit dialog. Begin with the edit dialog because it is the easier of the two to implement. This dialog, as it was automatically generated, contains text fields for Order ID, Customer ID, and Employee ID. Because the first two of these are not editable, remove both the Order ID and Customer ID fields and their associated labels from the dialog. In addition, remove the text field under the Employee ID label, rename the label to read Employee, and finally add a Combobox to the form. The final result, after a bit of rearranging, should look similar to what is shown in Figure 44-9.
Figure 44-9
620
Advanced Device Application Programming
Figure 44-9 also shows a new EmployeeBindingSource, which will be used to populate the Employees drop-down list. This is created by dragging a new BindingSource component from the Toolbox onto the form and renaming it EmployeeBindingSource. The DataSource for this BindingSource has been set to
NorthwindDataSet, but you will notice that unlike previous examples there is no NorthwindDataSet on this form. The following generated code snippet shows that it specifies a type to bind to, rather than an actual object:
‘
‘EmployeesBindingSource
‘
Me.EmployeesBindingSource.DataMember = “Employees” Me.EmployeesBindingSource.DataSource = GetType(DeviceApplication1.NorthwindDataSet)
Setting the DataSource to a type is useful for design-time manipulation. However, at runtime you must change this DataSource to point to an actual Data Source so there is data to bind to. As such, you need to set the DataSource property equal to the NorthwindDataSet that is populated on the Customers form by modifying the auto-generated Instance method, highlighted below. Although this method appears in the OrdersEditViewDialog.Designer.vb file, which you should normally avoid modifying, this particular method will not be overwritten by subsequent changes to the layout of the form:
Public Shared Function Instance(ByVal bindingSource As BindingSource) _
As OrdersEditViewDialog System.Windows.Forms.Cursor.Current = Cursors.WaitCursor
If (defaultInstance Is Nothing) Then
defaultInstance = New DeviceApplication1.OrdersEditViewDialog defaultInstance.OrdersBindingSource.DataSource = bindingSource defaultInstance.EmployeesBindingSource.DataSource = _
My.Forms.CustomersSummaryViewDialog.NorthwindDataSet
End If defaultInstance.CboEmployee.Focus()
defaultInstance.AutoScrollPosition = New System.Drawing.Point(0, 0) defaultInstance.OrdersBindingSource.Position = bindingSource.Position System.Windows.Forms.Cursor.Current = System.Windows.Forms.Cursors.Default Return defaultInstance
End Function
The last thing you need to do to wire up the Employees drop-down list is to both set the DataSource property, to populate the drop-down, and bind the SelectedValue property, to provide two-way binding for the Order. Select the drop-down list and configure the Data properties so they match Figure 44-10.
Figure 44-10
621
Chapter 44
In Figure 44-10 the drop-down list is populated using the EmployeesBindindSource as the DataSource, displaying the Name attribute in the list and using the Employee ID attribute for the value of the items in the list. The drop-down list is also data-bound to the Employee ID attribute on the
OrdersBindingSource.
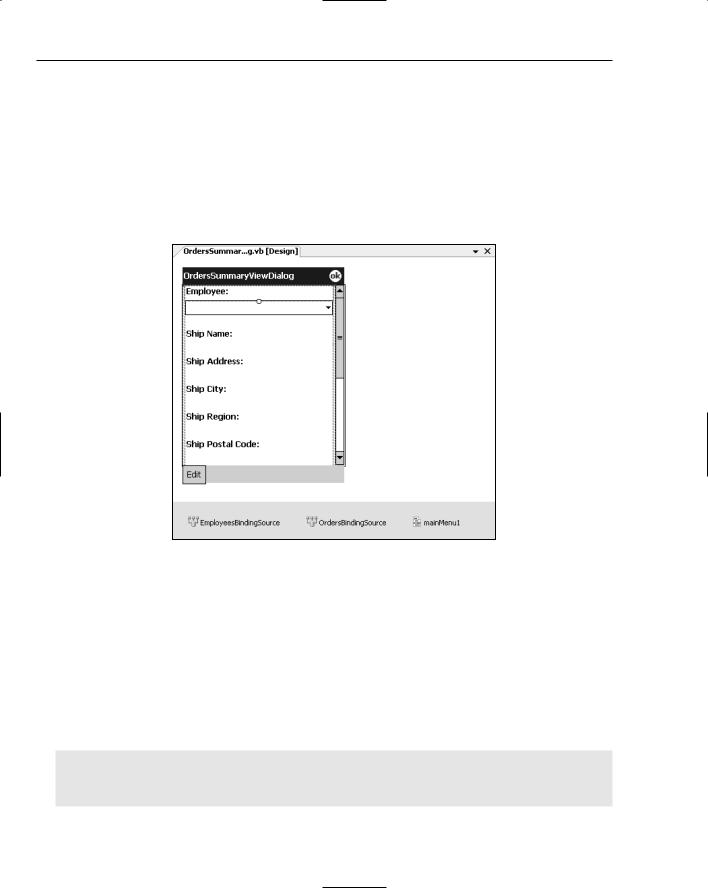
This completes the edit dialog for Order information. The Orders summary dialog is done in a similar manner, so begin by copying both the EmployeeBindingSource and the Employees drop-down from the edit dialog and pasting them onto the summary dialog. Again, the summary dialog presents the Order ID and Customer ID, which are not really required and can be removed. After tidying up, the summary dialog should look similar to Figure 44-11.
Figure 44-11
Because this is a summary dialog, you don’t really want the Employee information to be presented in a drop-down list. A simple option here is to disable the drop-down list. However, this makes the interface look a little untidy. To fix this issue, bind the current value of the drop-down list to the Employee label. Again, this can be done in the Instance method for this form, along with binding the DataSource property of the EmployeesBindingSource to the NorthwindDataSet, as you did previously:
Public Shared Function Instance(ByVal bindingSource As BindingSource) _
As OrdersSummaryViewDialog System.Windows.Forms.Cursor.Current = Cursors.WaitCursor
If (defaultInstance Is Nothing) Then
defaultInstance = New DeviceApplication1.OrdersSummaryViewDialog defaultInstance.OrdersBindingSource.DataSource = bindingSource defaultInstance.EmployeesBindingSource.DataSource = _
My.Forms.CustomersSummaryViewDialog.NorthwindDataSet.Employees
defaultInstance.Employee_IDLabel.DataBindings.Add _
(“Text”, defaultInstance.CboEmployee, “Text”)
622

Advanced Device Application Programming
End If
defaultInstance.AutoScrollPosition = New System.Drawing.Point(0, 0) defaultInstance.OrdersBindingSource.Position = bindingSource.Position System.Windows.Forms.Cursor.Current = System.Windows.Forms.Cursors.Default Return defaultInstance
End Function
From this code snippet, you can see that the Text property of the Employee drop-down, CboEmployee, is bound to the Text property of the Employee label, Employee_IDLabel. You can now set the Visible property of the drop-down list to False so only the label is visible at runtime.
This completes the scenario for working with Customers and Orders. Clearly, this example could be extended to work with OrderDetails, which requires a Product list lookup, using the same process you just walked through.
ResultSet
So far this chapter has focused on using automatically generated DataSets to work with data from a SQL Mobile database. This was generated by MSDataSetGenerator, which was the custom tool assigned to the NorthwindDataSet.xsd file. A much lighter weight alternative is available using a SQLCeResultSet. A little documented fact is that you can again get Visual Studio 2005 to do the heavy lifting by using the MSResultSetGenerator to automatically generate strongly typed result sets.
To create a ResultSet, begin as you would for creating a DataSet — by adding a new DataSource. This will in fact add a DataSet to your solution, but this is a result of the MSDataSetGenerator being used instead of the MSResultSetGenerator. Once you have created the Data Source, select the XSD file in the Solution Explorer and bring up the Properties window. Change the custom tool property to be MSResultSetGenerator in order to update your solution to include a strongly typed ResultSet. Once generated, the ResultSet can be used in a similar fashion to the DataSet.
Windows Mobile 5.0
Microsoft’s much anticipated release of Windows Mobile 5.0 last year gave mobile developers access to the next generation of APIs. The improvements included managed APIs for existing functionality, as well as a Notification Broker that enables developers to tap into system events. This section tackles how you can get started developing for Windows Mobile 5.0 devices.
SDK Download
The first thing you need to do before you get started building applications for Windows Mobile 5.0 devices is to download the Windows Mobile 5.0 SDK, available from the Windows Mobile Developer Center at http://msdn.microsoft.com/mobility/windowsmobile/default.aspx, where you can follow the links to downloads of SDKs and emulators. Due to space limitations on the disks that ship with Visual Studio 2005, the SDKs and emulators for Windows Mobile 5.0 were not included, and unfortunately they are quite a large download.
There are two SDKs, one for Pocket PC and one for Smartphone, so if you are doing development for both types of devices, you need to download both of them. After you install the SDK, you will notice
623
Chapter 44
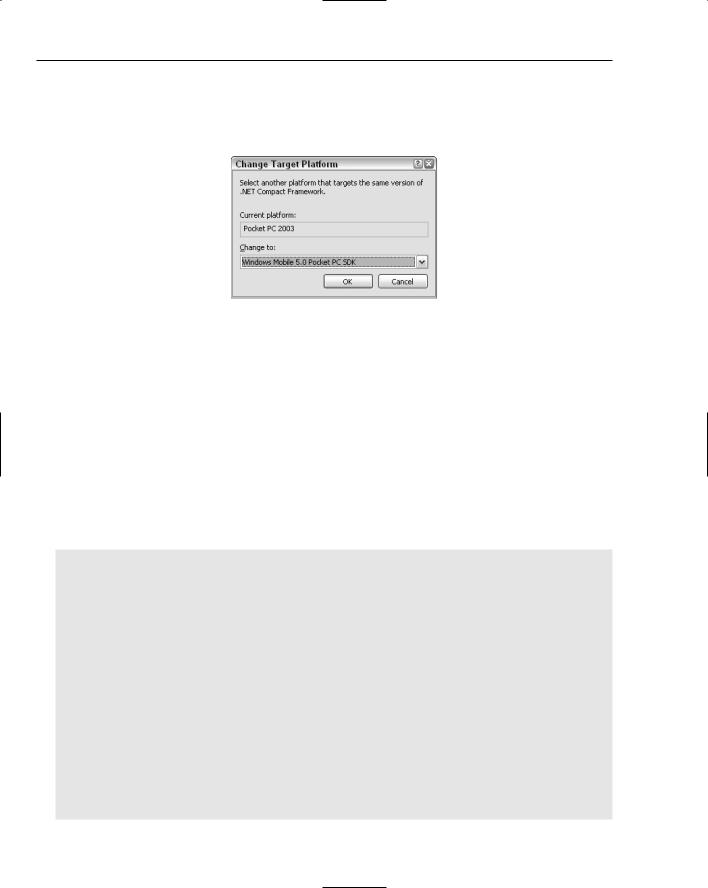
that additional project types appear under the Smart Device node in the New Project dialog. Alternatively, if you have a Pocket PC 2003 project, you can upgrade the project by selecting Change Target Platform from the right-click context menu for that project in the Solution Explorer. This opens the Change Platform Dialog shown in Figure 44-12.
Figure 44-12
Managed APIs
To access the Windows Mobile 5.0 managed APIs, you need to add references to the WindowsMobile assemblies. This can be done using the Add Reference item from the project’s right-click context menu off the Solution Explorer. Six assemblies are listed with the prefix Microsoft.WindowsMobile in the
.NET tab of the Add Reference dialog. The functionality can be broken down according to the namespaces that are included.
Configuration
The configuration namespace includes a single class, the ConfigurationManager, which is used to test and process an XML configuration file that can be used to configure a device. For example, the following code adds the Microsoft web site to the list of favorites:
Imports Microsoft.WindowsMobile Imports System.Xml
Public Class Form1
Private Sub configurationExample(ByVal sender As System.Object, _ ByVal e As System.EventArgs) _
Handles SampleButton.Click
Dim configDoc As XmlDocument = New XmlDocument() configDoc.LoadXml( _
“<wap-provisioningdoc>” + _
“<characteristic type=””BrowserFavorite””>” + _
“<characteristic type=””Microsoft””>” + _
“<parm name=””URL”” value=””http://www.microsoft.com””/>” + _ “</characteristic>” + _
“</characteristic>” + _ “</wap-provisioningdoc>” _
)
Configuration.ConfigurationManager.ProcessConfiguration(configDoc, False)
End Sub
End Class
624

Advanced Device Application Programming
In addition to the ProcessConfiguration method, which applies changes on the device, there is also a TestConfiguration method that can be used to validate a particular configuration file without any impact on the device on which the code is being run.
Forms
The Forms namespace has managed wrappers for three forms that can be used to collect an image from a camera (CameraCaptureDialog), select a contact (ChooseContactDialog), and select an image (SelectPictureDialog). The following code snippet makes use of each of the dialogs:
Imports Microsoft.WindowsMobile
Public Class Form1
Private Sub Example(ByVal sender As System.Object, _
ByVal e As System.EventArgs) Handles SampleButton.Click
Dim camera As New Forms.CameraCaptureDialog camera.Mode = Forms.CameraCaptureMode.Still
camera.StillQuality = Forms.CameraCaptureStillQuality.High camera.Title = “Get me a picture!!!”
If camera.ShowDialog() = Windows.Forms.DialogResult.OK Then MsgBox(“Photo taken.....stored as” & camera.FileName)
End If
Dim picture As New Forms.SelectPictureDialog picture.CameraAccess = True
picture.SortOrder = Forms.SortOrder.DateDescending
If picture.ShowDialog() = Windows.Forms.DialogResult.OK Then MsgBox(“Found that picture - “ & picture.FileName)
End If
Dim contact As New Forms.ChooseContactDialog contact.RequiredProperties = New PocketOutlook.ContactProperty() _
{PocketOutlook.ContactProperty.Email1Address} contact.ChooseContactOnly = True
If contact.ShowDialog Then
MsgBox(“Contact selected - “ & contact.SelectedContactName) End If
End Sub End Class
PocketOutlook
The PocketOutlook namespace includes a series of classes that make sending and receiving e-mail and SMS messages straightforward. As the following sample shows, writing an e-mail is as easy as starting an Outlook session, putting the e-mail together, and sending it:
Imports Microsoft.WindowsMobile
Public Class Form1
Private Sub POOMExample(ByVal sender As System.Object, _
ByVal e As System.EventArgs) Handles
SampleButton.Click
Using poom As New PocketOutlook.OutlookSession
Dim email As New PocketOutlook.EmailMessage
email.To.Add(New
PocketOutlook.Recipient(“destination@randomaccount.com”))
625
