Добавил:
Опубликованный материал нарушает ваши авторские права? Сообщите нам.
Вуз: Предмет: Файл:

Professional Visual Studio 2005 (2006) [eng]

.pdf
Скачиваний:
132
Добавлен:
16.08.2013
Размер:
21.9 Mб
Скачать

Chapter 40

It’s remarkably easy to do and only requires creating a small text file and adding a single entry to the Windows registry. The following walkthrough creates a blank solution file that is used as a template for creating new solutions. It then binds that template to Visual Studio’s solution handling in the Windows registry, enabling you to easily create solution files in your file system.

While it is remarkably easy, Peter Provost was first to blog about this shortcut on his site www.peter provost.org/.

1.Open Notepad or any other text editor you prefer and add the following text:

Microsoft Visual Studio Solution File, Format Version 9.00

# Visual Studio 2005

Global

GlobalSection(SolutionProperties) = preSolution

HideSolutionNode = FALSE

EndGlobalSection

EndGlobal

2.This text is all you need for an absolute bare-bones definition for a Visual Studio 2005 solution, so save the file as Visual Studio Solution.sln. This filename will be used to generate what appears in the right-click New menu, so make sure you name it something that you’ll recognize. Save the file to the Windows\ShellNew directory.

3.Edit the Windows registry by running regedit. Navigate to the [HKEY_CLASSES_ROOT]\.sln node in the tree. This is used to specify how Windows (and Visual Studio) will handle .sln files. Add a new Key entry and name it ShellNew.

4.In the ShellNew key, add a new String value named FileName. Set the value of this String to be the same as the filename you used earlier, so if you’ve been following along exactly, you should enter the value Visual Studio Solution.sln.

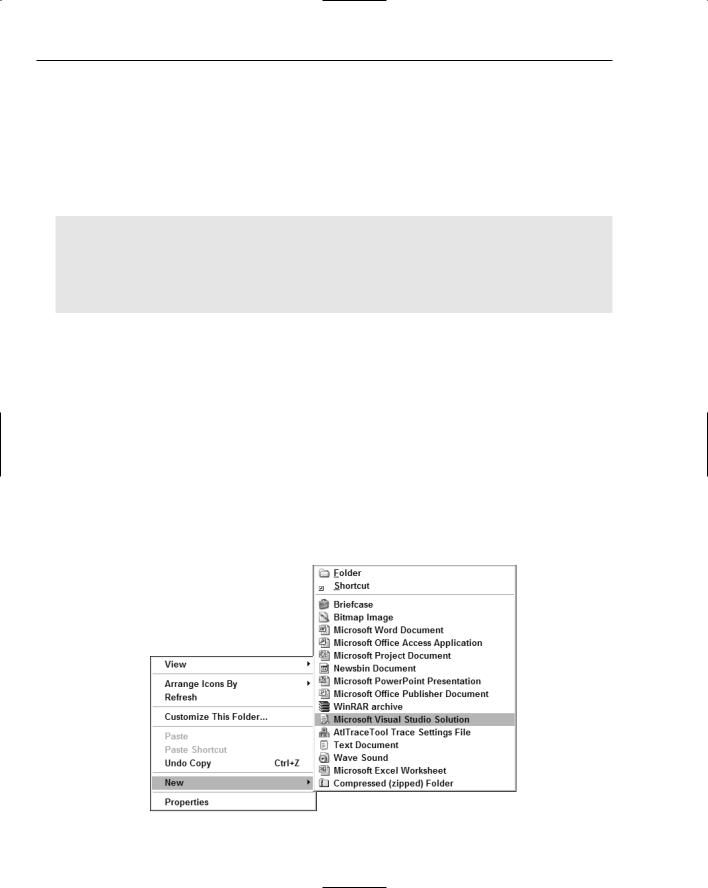
That’s all you need to do. Open Windows Explorer and navigate to a folder in which you want to create a new Visual Studio solution. Right-click and open the New submenu from the context menu. You should find a new entry to choose, which will create a new, empty solution file (see Figure 40-6).

Figure 40-6

546

Tips, Hacks, and Tweaks

Keyword Color-Coding

Visual Studio 2005 color-codes your code modules with different colors based on the syntax. Keywords, literals, and other special phrases and words are marked up with different colors to make it easier for you to determine which code is doing what. However, code contained in files that have an unusual extension, or that is written in a completely different language, does not have the automatic benefit of this coloring.

Fortunately, through a back door you can add your own file types and keywords to Visual Studio 2005 so that keywords will be color-coded in your specialized files. Like the previous tip, this undocumented feature requires the creation of a text file and an entry in the Windows registry. The following walkthrough shows you how to perform all the steps necessary to provide color-coding to a special file type.

1.The first task in providing color-coding is to specify which words should be recognized by Visual Studio as keywords. Create a new text file in Notepad and type each keyword on its own line. For this example, create a fictitious file type called .pd that only has two keywords: MyKeyWord and HerKeyWord. The file contents should appear as shown here:

MyKeyWord

HerKeyWord

2.Save this file with a name of usertype.dat in the Common7\IDE subfolder of your Visual Studio 2005 installation directory. By default, the full path will be C:\Program Files\Microsoft Visual Studio 8\Common7\IDE. The file usertype.dat can be used to specify any additional keywords for the existing languages too, such as the many C++ MFC classes.

3.Now you need to add an entry to the Windows registry for the new file type. Edit the registry by running regedit and navigate to HKEY_LOCAL_MACHINE\SOFTWARE\ Microsoft\VisualStudio\8.0\Languages\File Extensions.

4.Add a new key named .pd. Set the Default value to the following GUID:

{B2F072B0-ABC1-11D0-9D62-00C04FD9DFD9}

This is the secret to enabling Visual Studio’s proper processing of the file. Because C++ can have many different file types, which sometimes don’t have proper language formatting, you can “borrow” the C++ GUID for your own file types. Compare the GUID listed here to the one found in the .cpp key and you’ll find that they’re the same.

5.You’re now good to go. Create a text file and name it myTest.pd. Add the following lines of “code” to it:

MyKeyWord varName As MyType

HerKeyWord = varName

6.Save the file and open it in Visual Studio 2005. You should see that the two keywords have been color-coded with your default keyword color (see Figure 40-7 for an example).

Because the figures in this book are grayscale, you’ll have to take it on trust that the keywords are, in fact, color-coded.

You can use this technique to add file types of other programming languages such as PHP and their associated keywords to Visual Studio’s color-coding format engine.

547

Chapter 40

Figure 40-7

Other Tips

The following two tips are worth mentioning, but didn’t fit into either of the preceding major categories.

Disable Add-Ins Loading on Startup

Sometimes an add-in may be malfunctioning and cause unexpected issues in your Visual Studio 2005 experience, or you may just want to bypass an add-in that you’re currently working on yourself.

Either way, you can cause Visual Studio to bypass its add-in loading at startup by holding the left Shift key down when you start the IDE. When started this way, no add-ins at all will be loaded.

Alternatively, you can allow Visual Studio to load the add-ins at startup and then disable them individually in the Add-in Manager, which is accessible from the Tools menu.

Add-ins are discussed at length in Chapters 32 and 33.

Multi-Monitor Layouts

An ever-growing number of developers are using multiple-monitor setups for their development efforts. Visual Studio 2005 has a number of features that enable you to customize its layout to suit a multiplemonitor setup. These features are discussed elsewhere in this book, but it’s worth listing the different aspects of the IDE that could be used:

IDE Feature

Multi-Monitor Usage


Undockable Tool Windows

You can undock any of the tool windows within the IDE


and position them anywhere in the desktop setup. This


enables you to maximize your code editing and form design


workspace on one screen while floating the windows in


your preferred order on the other screen.

Vertical Tab Group

You can have multiple documents open at the same time. If


you position the split of the editors along the monitor joins,


then you’ll effectively have two editors side by side without


any awkward monitor joins in the middle of code.


548


Tips, Hacks, and Tweaks


IDE Feature

Multi-Monitor Usage


Debugging

Have your Visual Studio IDE open on the secondary monitor


when working on Windows applications. When debugged, at


startup these will show by default on the primary monitor,


providing you with a full view of both application and code


at all times.


You can do the same thing when debugging web applica-


tions, or position your web browser on the secondary moni-


tor and your IDE on the primary one so that you get the same


effect.


Summar y

This chapter showed you a multitude of tips and tweaks to get the most out of your Visual Studio 2005 setup. Along the way, you were introduced to other settings, keyboard shortcuts, and even intriguing entries in the Windows registry. Why not take a closer look at these additional features and see what else you can do to customize your experience?

549

Creating Web Applications

When Microsoft released the first version of Visual Studio .NET, one of the most talked about features was the capability to create full-blown web applications in a very similar way to Windows applications. This arrival introduced the concept of developing feature-rich applications that ran over the web in a wholly integrated way. However, Microsoft went a little too far in making web development the same as Windows development, and some programmers were confused about how to create web applications.

Visual Studio 2005 rectifies that by separating the creation of web-based solutions from the Windows-based project types, but it still provides the integrated development environment. Therefore, you get the best of both worlds — a single consistent development experience coupled with a distinction between Windows and web application programming. In this chapter you’ll learn how to create web applications in Visual Studio 2005 as well as look at some of the new web components that Microsoft has introduced to make your development life a little (and in some cases, a lot) easier.

Creating Web Projects

Creating a web project in Visual Studio 2005 is slightly different from creating a regular Windowstype project. With normal Windows applications and services, you pick the type of project, name the solution, and click OK. Each language has its own set of project templates and there are no real options related to creating the project. Web development is different because you can now create the development project in different locations, from the local file system to a variety of FTP and HTTP locations that are defined in your system setup, including the local IIS server or remote FTP folders.

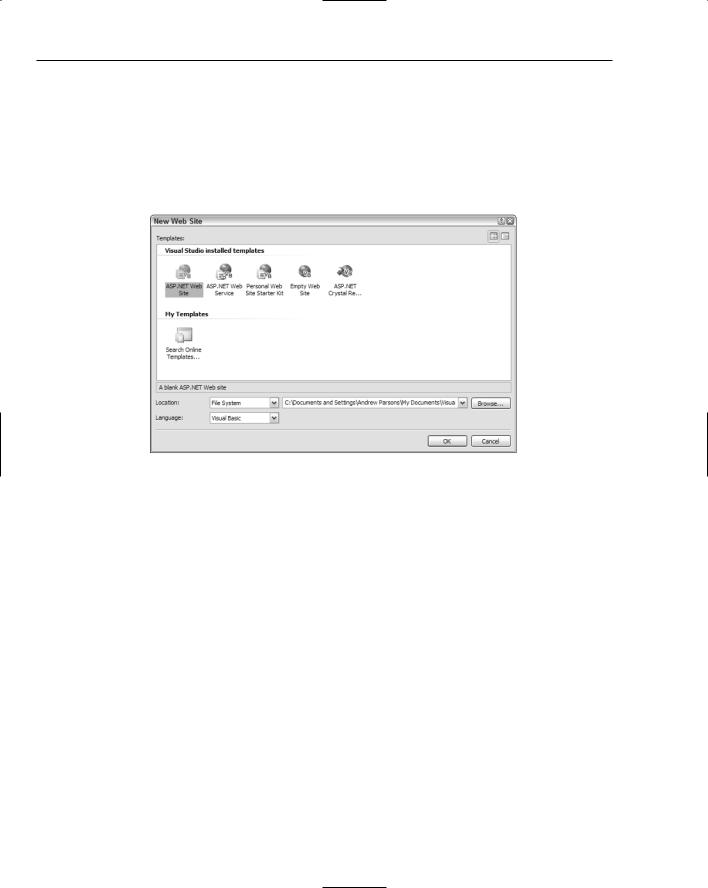
Because of this major difference in creating web-based applications and services, Microsoft has separated out the web project types into their own command and dialog. On the File menu of Visual Studio 2005 is a new command called New Web Site. Invoking this command displays the New Web Site dialog, where you can choose the type of project template you want to use (see Figure 41-1).
Chapter 41

In some languages, the File menu structure is slightly different. Instead of having File New Project and File New Web Site, languages such as C# will have a File New submenu that contains Project and Web Site as options.

Most likely, you’ll use two main types of project: the ASP.NET Web Site and ASP.NET Web Service templates. The other templates provide variations on the Web Site template. Regardless of which type of web project you’re creating, the lower section of the dialog enables you to choose where to create the project as well as what language should be used as a base for the project.

Figure 41-1

You have a choice of Visual Basic, C#, and J#, but Visual Studio will default to the language you chose when first configuring the IDE’s layout. If you are using the general developer environment or a language other than these three, the dialog will default to Visual Basic.

The more important choice you have to make is where the web project will be created. By default, Visual Studio expects you to develop the web site or service locally using the normal file system. The default location is in the My Documents folder for the current user, but you can change this by overtyping the value, selecting an alternative location from the drop-down list, or clicking the Browse button.

The Location drop-down list also contains HTTP and FTP as options. Selecting HTTP will change the value in the Filename area to a default location in the localhost web server, while FTP provides a blank ftp:// prefix ready for you to type in the destination folder. Either way, you can also overtype the value or click the Browse button to change the intended location of the project.

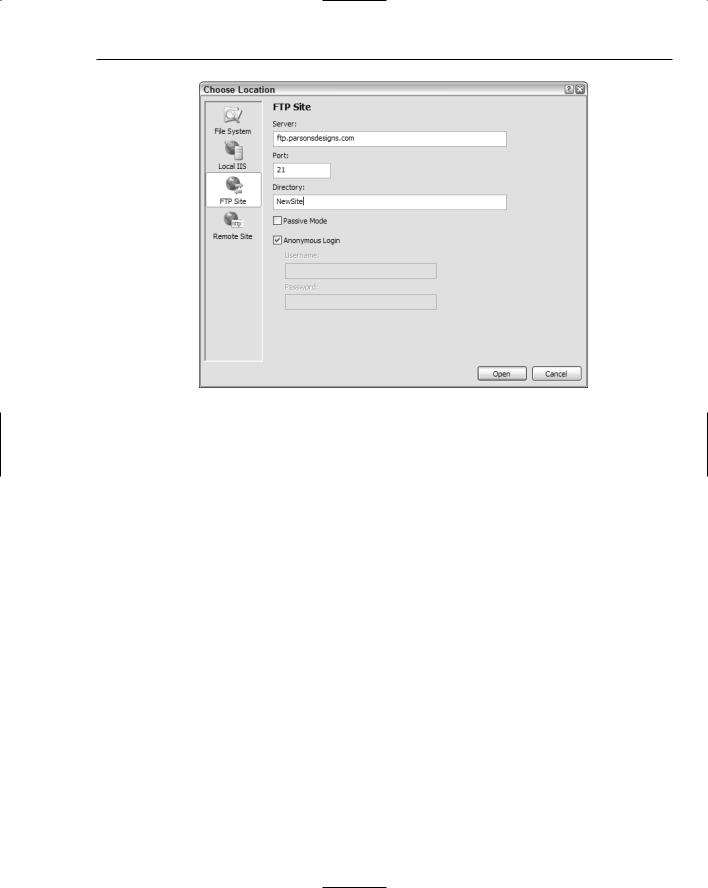
The Choose Location dialog (shown in Figure 41-2) enables you to specify where the project should be stored. Note that this isn’t necessarily where the project will be deployed, as you can specify a different destination for that when you’re ready to ship, so don’t expect that you are specifying the ultimate final destination here.

The File System option enables you to browse through the folder structure known to the system, including the My Network Places folders, and gives you the option to create subfolders where you need them. This is the easiest way of specifying where you want the web project files, and the easiest to locate later, but most local web development is normally saved to the //localhost folder (normally

C:\Inetpub\wwwroot).

552

Creating Web Applications

Figure 41-2

While you could specify this folder with the File System option, a better option is to use the Local IIS location type and browse through the //localhost server Default Web Site folders. This is because it will also contain virtual directory entries that point to web sites not physically located within the folder structure within //localhost, but aliases to elsewhere in the file system or network. You can create your application in a new web application folder or create a new virtual directory entry in which you browse to the physical file location and specify an alias to appear in the web site list.

The FTP Site location type is shown in Figure 41-2, which gives you the option to log in to a remote FTP site anonymously or with a specified user. When you click Open, Visual Studio saves the FTP settings for when you create the project, so be aware that it won’t test whether the settings are correct until it’s ready to actually create the project files and save them to the specified destination.

You can save your project files to any FTP server to which you have access, even if that FTP site doesn’t have .NET installed. However, you will not be able to run it without .NET, so you will only be able to use it as a file store.

The last location type is Remote Site, which enables you to connect to a remote server that has FrontPage extensions installed on it. If you have such a site, you can simply specify the location where you want the new project to be saved and Visual Studio 2005 will confirm that it can create the folder through the FrontPage extensions.

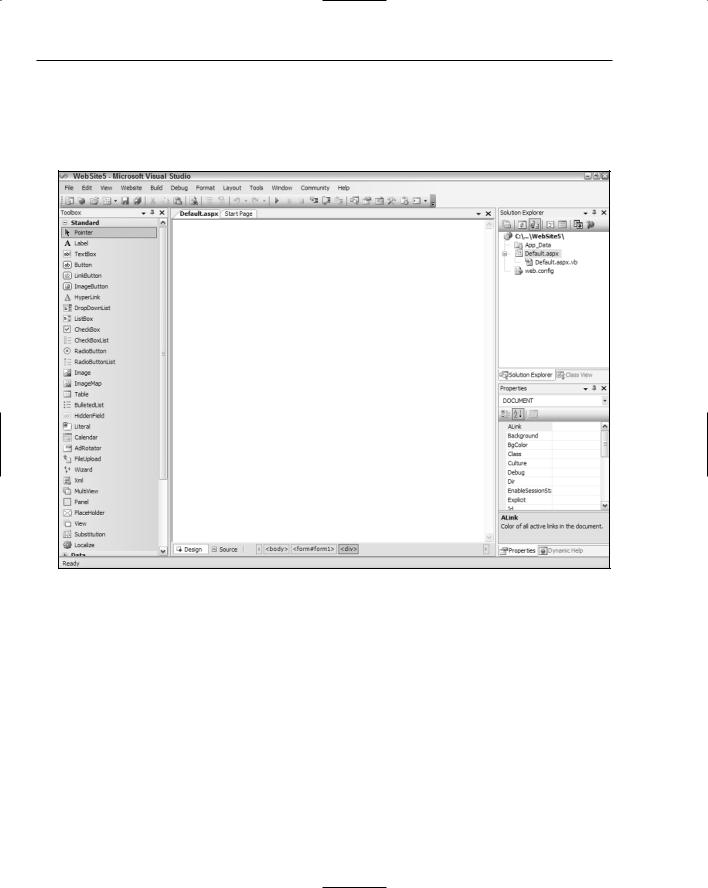
Once you’ve chosen the intended location for your project, clicking the OK button tells Visual Studio 2005 to create the project files and propagate them to the desired location. After the web application has finished initializing, Visual Studio opens the Default.aspx page and populates the Toolbox with the components available to you for web development (remember that you can customize the Toolbox to include additional components, as explained in Chapter 3).

553

Chapter 41

The first thing you should notice with the main workspace area in the IDE is that below the design surface for the web page is a toolstrip containing buttons to switch between Design and Source view of the ASPX page and a text hierarchical notation indicating where you are currently positioned in the HTML (see Figure 41-3). As you navigate around the HTML, this text area will change to highlight the current HTML element.

Figure 41-3

When you are finished editing your site’s pages, you can use the normal functionality of Visual Studio 2005 to run the web page into the browser. By default, the Web.config file that controls how the web site will run will have debugging turned off. To run the web site without debugging from within Visual Studio, press the Ctrl+F5 keyboard shortcut.

Dynamic Compilation

Perhaps one of the biggest changes in Visual Studio 2005 web development is that the compilation of the code behind the web pages is actually done as needed. Previously, the code had to be compiled into a binary DLL, which would then be invoked by the ASP.NET services when .NET components needed the code.

The new method of compiling the code behind dynamically is much preferred, as it enables you to directly edit the code without having to recompile in Visual Studio. As long as the files are saved, the

.NET services on the web server will do the rest.

554

Creating Web Applications

Web Services

Creating a web services project is done in much the same way, with the same location options for placing the project files. Like previous versions of Visual Studio, the default ASMX page is generated with a sample “Hello World” web method defined for you to use as a template. However, be aware that unlike previous versions, the sample is not commented out and will be published as an available method in your web service unless you delete it.

Personal Web Site Starter Kit

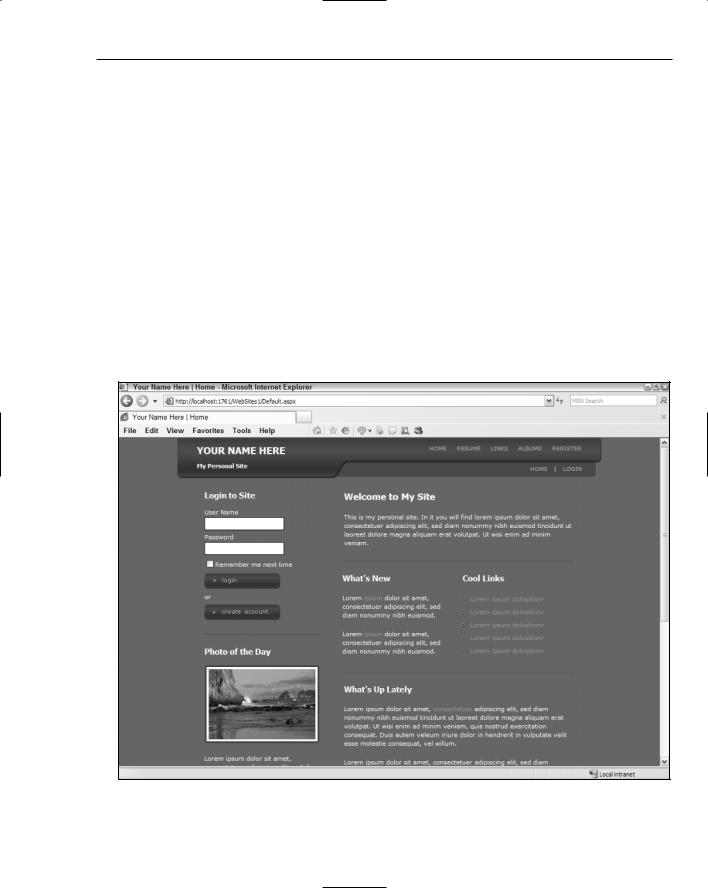
An excellent resource to investigate for best practices and good use of a lot of the new features found in ASP.NET 2.0 components and design is the Personal Web Site Starter Kit project. This is one of the derivatives of the main Web Site project type but generates everything you need to build a personal website, complete with SQL Server Express database, multiple CSS themes, master-detail pages, user management, and more.

Figure 41-4 shows the Personal Web Site Starter Kit in action, with the dark theme applied in its default configuration. The photo of the day section is a great example of the kind of effect you can achieve with normal web controls and two lines of code.

Figure 41-4

555