Добавил:
Опубликованный материал нарушает ваши авторские права? Сообщите нам.
Вуз: Предмет: Файл:

Professional Visual Studio 2005 (2006) [eng]

.pdf
Скачиваний:
132
Добавлен:
16.08.2013
Размер:
21.9 Mб
Скачать

Chapter 39

Regular Expressions in .NET Programming

The System.Text.RegularExpressions namespace contains a number of classes representing regular expressions and objects used in regular expression programming. You can use these to implement various search and replace functions in your applications, starting with the Regex object, which contains a single regular expression, and then using the objects that represent match results on various forms.

The next couple of pages detail the main objects in the RegularExpressions namespace and how you can best use them in your own Visual Studio 2005 projects.

Regex

The Regex class represents a single regular expression. It is immutable, which means once you create it, you cannot change it. However, you can perform a series of functions against the regular expression within the Regex object to achieve your searching (and replacement) goals.

To create a Regex object in C#, you can first define it and then instantiate it with the regular expression pattern, as shown here:

Regex myRegex;

myRegex = new Regex(“regularExpressionPattern”);

As mentioned with the earlier example, you’ll need to add a reference to the System.Text.RegularExpressions namespace to the top of the module that contains this code.

Once instantiated, you can call upon a variety of methods and properties to establish the state of the regular expression against a search string. The list of methods includes the following:

Match: Searches a given string and returns a single Match object for the first text that is matched by the regular expression pattern

Matches: Searches a given string and returns a MatchCollection object for all locations that are matched by the pattern stored in the Regex object

IsMatch: Returns True if the provided string contains the pattern

Split: Splits the given string into an array of substrings using the regular expression pattern as the delimiter

Replace: Replaces any instances of text that match the pattern in the Regex object with the provided expression

The following function returns true if the string provided as an argument is in the U.S. date format of month/day/year by using the IsMatch method of the Regex class:

Boolean IsUSDate(String input)

{

return Regex.IsMatch(input, “”\b(?<month>\d{1,2})/(?<day>\d{1,2})/(?<year>\d{2,4})\b “);

}

536

Regular Expressions

You can provide additional options to the constructor of the Regex object that will affect how it is created and used. For example, you can choose to have the regular expression compiled rather than left as a pattern. This will result in faster execution during the majority of the application, but will slow down the startup process as it compiles the expression.

Other useful Regex options include IgnoreCase to enforce case-insensitive matching, Multiline, which will interpret ^ and $ as the beginning of lines as well as the entire string, and Singleline, which will interpret the period (.) to match any character.

To specify options during the construction of the Regex object, change the instantiation to take a second parameter that consists of the options you need. For example:

Dim myRegEx As New Regex(“regularExpressionPattern”, _

RegexOptions.Compiled Or RegexOptions.Multiline)

Match

The Match object is used to represent a single match of the regular expression. When the Match method of the Regex object is used, it returns a Match object that contains the matching text. You can use the Success property of the Match object to determine whether there was a match or not, and access the substring that matched the pattern with the ToString property.

The following code shows how a Match object can be used in C# to find the word book in a string:

Regex myReg = new Regex(“book”);

// Find a single match in the string.

Match myMatch = myReg.Match(“This book is great”); if (myMatch.Success)

{

Console.WriteLine(“Found match “ + myMatch.ToString() + “ at position “ + myMatch.Index);

}

You can use the NextMatch method to search the string from the point of the last matched substring to retrieve the next substring that matches the regular expression pattern.

MatchCollection

When dealing with a search string that could result in multiple matches, however, you’re better off using the Matches method of the Regex object and assigning the result to a MatchCollection. The MatchCollection object contains a series of Match objects, each representing a single substring from the string searched.

You can use this class to navigate through a series of matches in a given string, as the following Visual Basic sample demonstrates:

Dim myMatches As MatchCollection

Dim myRegex As New Regex(“book”)

537

Chapter 39

myMatches = myRegex.Matches(“This book is OK, but that book is better.”)

For Each myMatch As Match In MyMatches

Console.WriteLine(“Match found at “ + myMatch.Index.ToString)

Next

Running this code will produce the following output:

Match found at 5

Match found at 26

Replacing Substrings

The Replace method of Regex is used to replace matched portions of a given string with the specified replacement. While the most simplistic form of this function can just replace the substrings with a literal string, the value of the Replace method becomes evident when you use it in conjunction with backreferences.

A backreference is a way of finding a repeating group of text. Once implemented in a regular expression, every subsequent use of the backreference alias will use the same substring that was matched.

Returning to the sample code used earlier to convert a date format, you can see the way backreferences can be used:

NewDateYMD = Regex.Replace(OldDateMDY, _ “\b(?<month>\d{1,2})/(?<day>\d{1,2})/(?<year>\d{2,4})\b”, _ “${year}-${month}-${day}”)

In this example, the three required parts of the matched substring are assigned backreference aliases of month, day, and year. When these backreferences are subsequently used further along in the regular expression’s Replace functionality, the regular expression engine takes whatever content was stored in the backreference variables and replaces the references with the substring.

Summar y

Regular expressions are a woefully underutilized yet powerful resource for the Visual Studio developer. Whether you need to perform complex searches on your code or data, regular expressions provide you with a way to match extensive patterns that can include conditional and repeating blocks without sacrificing performance with lengthy code. In addition, with the introduction of the Expression Builder options in the Find and Replace dialog, you can now easily create search criteria for looking through your projects and solutions.

538

Tips, Hacks, and Tweaks

Ever wondered if you can color-code different code files other than the ones supplied by Visual Studio 2005? Maybe you wished you could paint vertical guidelines on your code editor to ensure that your code blocks are lining up the way you want them to. What about those of you using dual-monitor setups — is there a way to manage the layout of the IDE to use them effectively?

These questions and others are answered in this chapter, where you’ll dive into the Windows registry and play around with different settings to achieve exactly the system you want. In addition, you’ll learn some techniques that will reduce the tedium of performing common tasks by replacing them with keyboard shortcuts and lesser-known features of the IDE.

IDE Shor tcuts

The integrated development environment of Visual Studio 2005 is a perfect place to start. The next set of tips let you in on features that are either undocumented or often overlooked in the documentation to the degree that you will likely never notice them.

The Open With Dialog

Visual Studio comes with a number of built-in editors, and it tries to open each file type with the appropriate editor. There are editors for XML and HTML as well as a general code editor for Visual Basic and C# and other languages, and specialized editors for visual form design, binary files, and resource files.

What you may not be aware of is that you can easily choose a different editor for a file. To open a file with a different editor, right-click its entry in the Solution Explorer and choose the Open With command from the context menu. This displays the Open With dialog (shown in Figure 40-1), in which you can choose from the various editors registered in Visual Studio 2005.
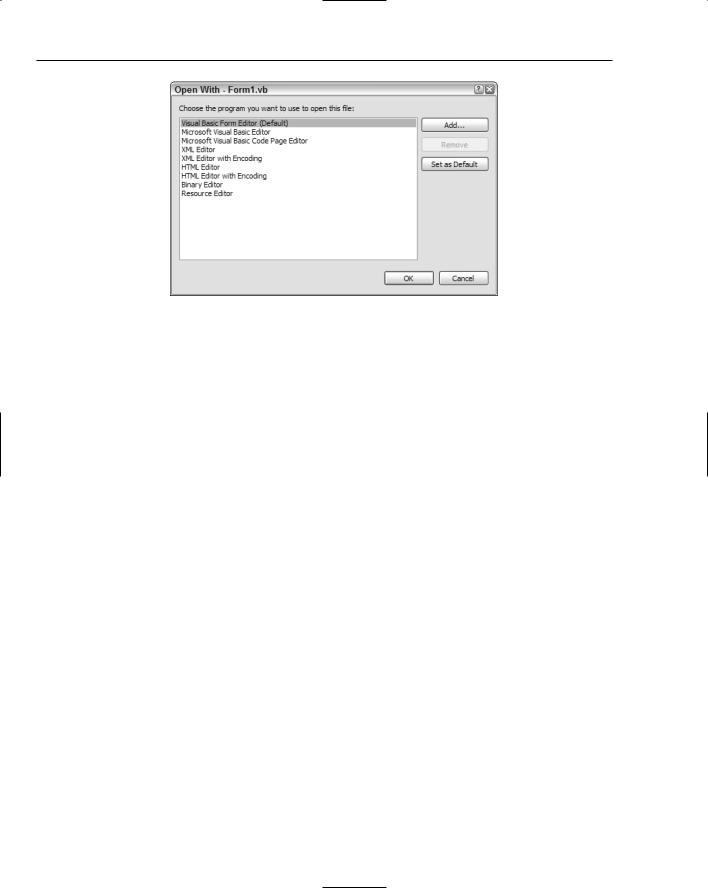
Chapter 40

Figure 40-1

You’re not restricted to the built-in editors, however; you can add as many other editors as you require. The following walkthrough shows you how to add the standard Windows Notepad as an additional editor for Visual Basic code:

1.Locate a Visual Basic code file in the Solution Explorer (any file that has an extension of .vb). Right-click its entry and select Open With.

2.When the Open With dialog window is displayed, click the Add button to add a new editor to the list.

3.Click the ellipsis button next to the Program Name text box to browse the file system on the computer. Navigate to your Windows installation directory (by default, C:\Windows), select NOTEPAD.EXE, and click Open.

4.The Friendly Name field defaults to NOTEPAD.EXE, so overtype this with the friendlier “Notepad.” Click OK to save the entry to the editor list.

5.Select the Notepad entry in the editor list and click OK. Visual Studio starts up an instance of Notepad and uses it to open the selected file.

The Open With command will display a set of editors that are registered for the particular file type, so if you add Notepad for Visual Basic code files (.vb), you’ll also need to add it to other file types if you want it available in their Open With list.

Accessing the Active Files List

When you have many files open, sometimes it can be hard to keep track of where each file is in the tabbed list along the top of the main workspace area. In most cases, you’ll only be able to see three or four tabs at a time, with the rest shown in the Active Files drop-down list. This list is accessed through the button next to the close button in the top-right corner of the workspace (see Figure 40-2).

The frustrating aspect of this way of organizing your files is that it can interrupt your workflow when you have to access the list using your mouse. Fortunately, even this list has a keyboard shortcut bound

540

Tips, Hacks, and Tweaks

to it. Press Ctrl+Alt+the down arrow and the Active Files list will be displayed. Once displayed, it then retains the focus for you to use the arrow keys to scroll up and down the list to choose which file you want to view.

Figure 40-2

Changing Font Size

In Chapter 26 you saw how macros work in Visual Studio 2005. Along with building your own macros, Visual Studio ships with dozens of pre-defined macros ready for your use. What you may not realize is that you can assign keyboard shortcuts to macros and make them even more useful.

One common problem for some development teams is the different font size requirements when editing code. Some developers prefer as much code on screen as possible, and therefore keep the font size small, while others require the font size to be larger than average. Previous versions of Visual Studio relied on third-party add-ins to provide a font zooming feature to the IDE, similar to that found in Microsoft Word.

However, with the macros supplied with Visual Studio 2005, and the capability to bind them to keyboard shortcuts, you don’t need to go digging around the Internet looking for a suitable add-in. Follow this task list to bind shortcut keystrokes to macros to increase and decrease the font size in the editor windows:

1.Open the Keyboard page in the main options window by using Tools Options to bring up the Options dialog, and then navigate to the Keyboard page in the Environment group. This won’t be visible if your Options dialog is only showing the basic set, so check the Show All Settings checkbox if you need to (for Visual Basic environmental setups only).

2.Filter the command list by entering the text fontsize. As a result, the command list is reduced to three entries. These three entries represent macros that perform the following functionality:

Macros.Samples.Accessibility.DecreaseTextEditorFontSize: Decreases the font size in the text editor by 2 points.

541

Chapter 40

Macros.Samples.Accessibility.IncreaseTextEditorFontSize: Increases the font size in the text editor by 2 points.

Macros.Samples.Accessibility.UpdateTextEditorFontSizeToMatchDisplayProperties: Sets the font size to match the Windows system setting.

3.Now you need to assign the keystrokes. Because the shortcuts are to be available only within the text editor, change the Use New Shortcut In drop-down list to Text Editor (this also avoids clashes with other areas of the IDE that use some of the shortcut combinations you’re about to implement). Select the first entry in the command list, position the cursor in the Press Shortcut Keys text box, and press Ctrl, Shift, and the down arrow simultaneously. Click the Assign button to bind the shortcut.

4.Repeat this process with the second entry in the command list but this time use Ctrl, Shift, and the up arrow.

5.Finally, repeat the process one more time with the last entry, setting the shortcut to Ctrl+Shift+=. Click OK to save the settings and you’re ready to zoom in and out on your code window any time. Use the Ctrl+Shift+= shortcut to return the font size to the default setting.

Making Rectangular Selections

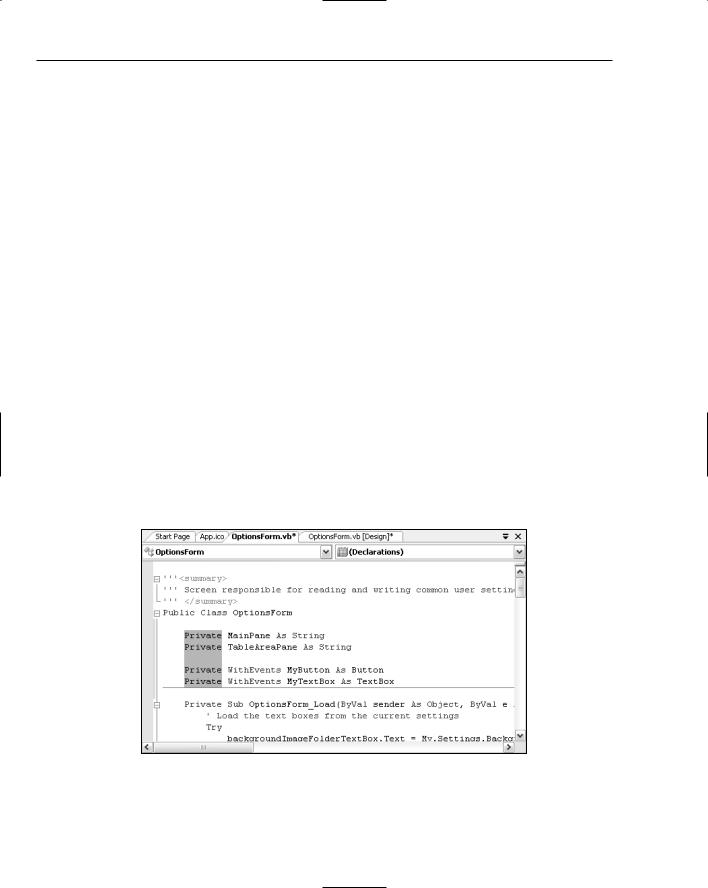
You may wonder when you would use the next tip, but chances are good that once you’ve used it, you’ll realize how handy it can be. You can make a rectangular selection in your code listing that selects a part of a section of lines. The sample shown in Figure 40-3 illustrates the feature in action, with the Private keyword selected on four successive lines.

This block can be deleted, cut, or copied to another section of your program. The behavior is inherited from similar functionality in Microsoft Word, and you can access it in the same way. First, press and hold the Alt key. Now, simply click and drag your mouse pointer from one corner of the intended area to select to the opposing corner.

Figure 40-3

542

Tips, Hacks, and Tweaks

Go To Find Combo

The Go To Find Combo (yes, that’s what it’s called!) is one of the more useful features found on the toolbars of Visual Studio, and one of the least used. The Go To Find Combo is part of the default standard toolbar in most configurations (see Figure 40-4), but Visual Basic developers were left out and will need to add it manually to the toolbar.

Figure 40-4

In its standard mode, you can use it to find simple strings of text. Type the string you’re looking for and press Enter, and Visual Studio will attempt to locate the search text in the active document. You can cycle through the instances of the search criteria by repeatedly pressing Enter.

However, there are less obvious ways to use the Go To Find Combo (although the name does give them away). Here are some other uses for the Combo:

Text Entered

Shortcut Keys

Effect


Number

Ctrl+G

Replicates the Go To command to navigate


directly to a given line number without the


need for an additional dialog box

Filename

Ctrl+Shift+G

Locates the file in the Solution Explorer

Programming Keyword

F1

Opens the Document Explorer and navigates


to the help topic associated with the keyword


that was entered

Function Name

F9

Adds or removes a breakpoint from the start of


the function with the name that was entered

> any command

Enter

The > character indicates that the text should


be interpreted as a command alias, just as it


would be in the Command Window


You can access the Go To Find Combo by using the Ctrl+/ keyboard shortcut.

As mentioned previously, this feature is not active by default in the Visual Basic configuration of the IDE. You can customize the standard toolbar to include the Go To Find Combo just as you would any modern toolbar. Right-click in the toolbar region of the IDE and select Customize from the context menu. Display the Commands tab and then select the Edit category. Scroll through the list of commands until you locate the Go To Find Combo and then click and drag it to the position you want it to occupy on the toolbar.

You’ll also want to set up keyboard shortcuts for some of the functionality shown in the preceding table (for instance, Ctrl+G is set up to display the Immediate window, rather than the Go To Line Number dialog). In addition, to access the Go To Find Combo from the keyboard, Visual Basic programmers will find that the Ctrl+/ shortcut is unassigned, so it can be used to replicate the behavior of the other IDE configurations.

543

Chapter 40

To assign any of these shortcuts, follow the steps shown in the previous walkthrough, which outlines how to assign shortcuts to macros.

Forced Reformat

Visual Studio 2005 does a good job at applying formatting to your code automatically (much better than previous versions), but every now and then it will get out of sync and lose track of your code indentation levels and stop formatting it in other ways too.

You can always perform a forced reformat of your code by using the Edit Advanced Format Document menu command (which in Visual Basic has a keyboard shortcut chord of Ctrl+K, Ctrl+D), or just a segment of the code by first selecting it and then using Edit Advanced Format Selection (or the chord Ctrl+K, Ctrl+F).

If you perform a forced reformat and the code remains unformatted, you likely have a syntactical compilation error obstructing the Visual Studio IDE from applying formatting. Fix any errors in the Error List and perform the forced reformat again.

Word Wrapping

Those long lines of code can be hard to read when they trail off the screen. Visual Studio 2005 provides an option to wrap the lines so they are visible in their entirety. This setting can be found in the Text Editor group of options and can be set for all or specific languages on the General page.

Underneath the Word Wrap option is an additional option to show visual glyphs when lines are wrapped. While this option is not enabled by default, you may find it useful to display the glyphs if you’re used to a language such as Visual Basic in which code statements must reside on a single line without a specific line continuation character.

Registr y Hacks

This next set of tips enables you to customize the appearance and functionality of Visual Studio 2005 by delving into the Windows registry. As with any other advice you may have read concerning the Windows registry, you must be careful with your changes, as doing the wrong thing can have disastrous results.

However, if you’re comfortable with adding entries to the registry, you will find these extra features easy to implement.

Vertical Guidelines

Ever needed to line up blocks of code that are so far apart that they are not visible on the screen at the same time? This can happen in large functions when dealing with enclosing blocks such as loops and conditional blocks in which you want indenting to occur consistently.

While Visual Studio does a good job of automatically indenting, sometimes it gets it wrong, and other times it doesn’t do it at all (such as in text files). This tweak enables you to add vertical guidelines to the text editor code windows so that you can easily line up code when desired.

544

Tips, Hacks, and Tweaks

Sara Ford of Microsoft was the first person to bring this to the general developer community’s attention, although she insists on not taking credit for the discovery, saying that the internal editor team gave her the tip first. Her blog can be found at http://blogs.msdn.com/saraford/default.aspx.

1.Shut down Visual Studio 2005 if it’s currently active and open the Windows Registry Editor by running regedit.

2.Locate the key [HKEY_CURRENT_USER]\Software\Microsoft\ VisualStudio\8.0\Text Editor. Create a new String value with a name of Guides.

3.Set the value of this new String to the following text:

RGB(255,0,0) 4, 20, 50

This sets vertical guidelines at columns 5, 21, and 51 (the values are zero-based) and colors them red. Start Visual Studio 2005, open a module for editing, and check how the vertical guidelines displayed (Figure 40-5 shows the guidelines with this setting applied).

You can customize the appearance of the guidelines by changing the RGB value to your own preferred color scheme. Each column number should be separated by commas, and you can have up to 13 guidelines defined at any one time.

Figure 40-5

To remove the guidelines, simply delete the entry from the Windows registry.

Right-Click New Solution

Some developers prefer to create their solution file and associated folder structure prior to creating the individual projects. However, Visual Studio 2005 doesn’t really allow for that kind of behavior, preferring to control creation of files and defaulting to a set location. You can change this location, of course, but it could be handy to be able to easily create your own solution files where you want first.

545