Добавил:
Опубликованный материал нарушает ваши авторские права? Сообщите нам.
Вуз: Предмет: Файл:

Professional Visual Studio 2005 (2006) [eng]

.pdf
Скачиваний:
132
Добавлен:
16.08.2013
Размер:
21.9 Mб
Скачать

Chapter 31

Figure 31-12

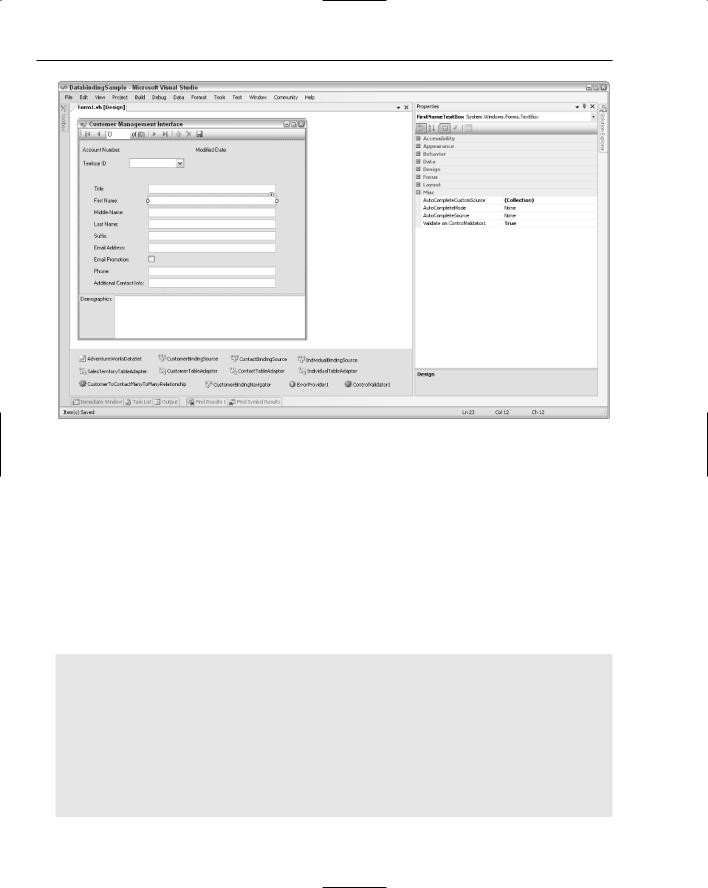
The ControlValidator has an ErrorProvider property that can be used to specify an ErrorProvider control on the form. This is not a requirement, however, and validation will proceed without one being specified. If this property is set, the validation process will automatically set the Error string property for the control being validated.

What you’re currently missing is a set of business rules to use for validation. This is accomplished using a rules class that implements the IRulesList interface. Each rule is a predicate — in other words, a method that returns true or false based on a condition. The following code defines a CustomerValidationRules class that exposes two rules that determine whether the First Name and TerritoryID fields contain valid data. Each rule is attributed with the ValidationAttribute, which determines the column that the rule validates, and the Error string, which can be displayed if the validation fails. The column specified in the Validation attribute needs to match the field to which the control is data bound:

Imports System

Imports DatabindingSample.ControlValidator

Public Class CustomerValidationRules

Implements IRulesList

Public Shared ReadOnly Property Instance() As CustomerValidationRules

Get

Return New CustomerValidationRules

End Get

End Property

Public ReadOnly Property Rules() As Predicate(Of IRulesList.RuleParams)() _

416

Data Binding and Object Data Sources

Implements IRulesList.Rules

Get

Return New Predicate(Of IRulesList.RuleParams)() { _

AddressOf TerritoryId, _

AddressOf FirstName}

End Get

End Property

<Validation(“TerritoryID”, “TerritoryID must be >0”)> _

Public Function TerritoryId(ByVal data As IRulesList.RuleParams) As Boolean Try

If Not TypeOf (data.NewData) Is Integer Then Return False Dim newVal As Integer = CInt(data.NewData)

If newVal > 0 Then Return True Return False

Catch ex As Exception Return False

End Try End Function

<Validation(“FirstName”, “First Name must be specified”)> _

Public Function FirstName(ByVal data As IRulesList.RuleParams) As Boolean Try

Dim newVal As String = TryCast(data.NewData, String) If newVal = “” Then Return False

Return True Catch ex As Exception

Return False End Try

End Function End Class

The last task that remains is to add the following line to the form’s Load method to associate this rules class to the ControlValidator:

Me.ControlValidator1.AddRules(CustomerValidationRules.Instance)

To add more rules to this form, all you need to do is add the rule to the CustomerValidationRules class and enable validation for the appropriate control.

DataGridView

So far you’ve been working with standard controls, and you’ve seen how the BindingNavigator enables you to scroll through a list of items. Sometimes it is more convenient to display a list of items in a grid. This is where the DataGridView is useful, as it enables you to combine the power of the BindingSource with a grid layout.

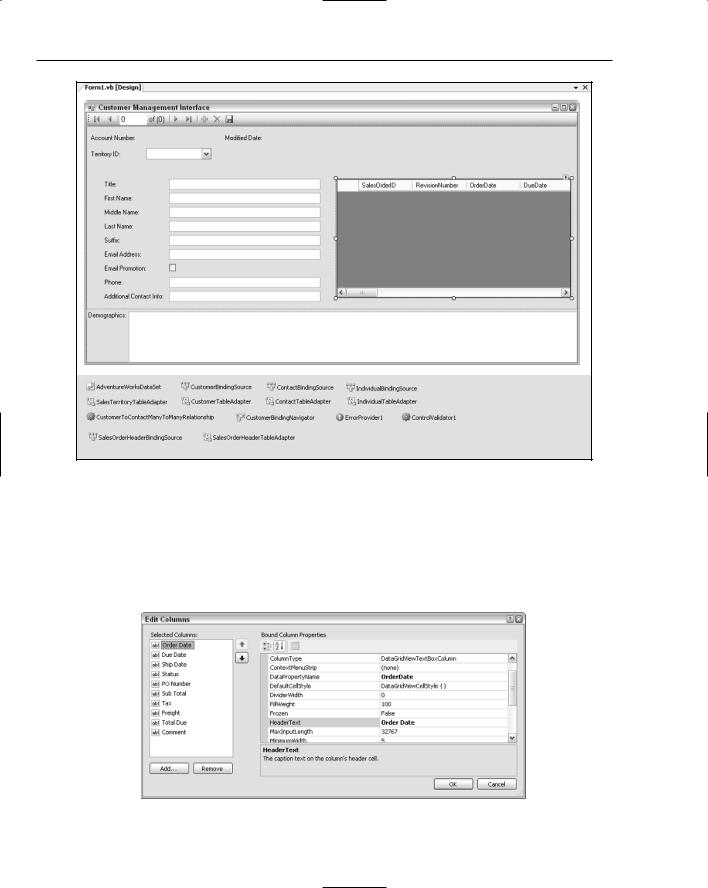
Extending the Customer Management Interface, add the list of orders to the form using the DataGridView. Returning to the Data Sources window, select the SalesOrderHeader node from under the Customer node. From the drop-down list, select DataGridView and drag the node into an empty area on the form. This adds the appropriate BindingSource and TableAdapter to the form, as well as a DataGridView showing each of the columns in the SalesOrderHeader table, as shown in Figure 31-13.

417

Chapter 31

Figure 31-13

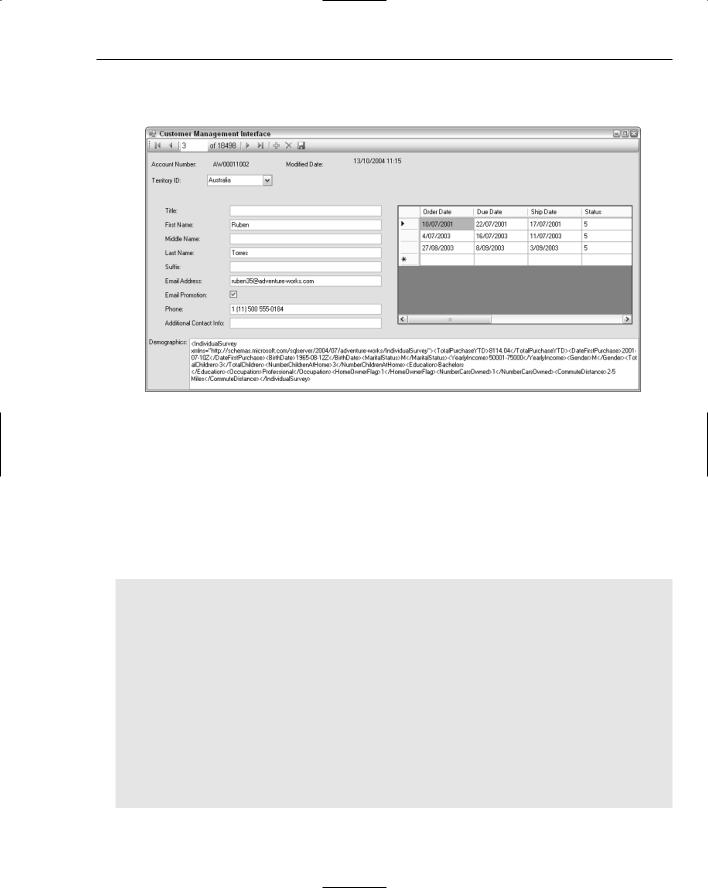
Unlike working with the Details layout, when you drag the DataGridView onto the form it ignores any settings you might have specified for the individual columns. Instead, every column is added to the grid as a simple text field. To modify the list of columns that are displayed, you can either use the smart tag for the newly added DataGridView or select Edit Columns from the right-click context menu. This will open the Edit Columns dialog (shown in Figure 31-14), in which columns can be added, removed, and reordered.

Figure 31-14

418

Data Binding and Object Data Sources

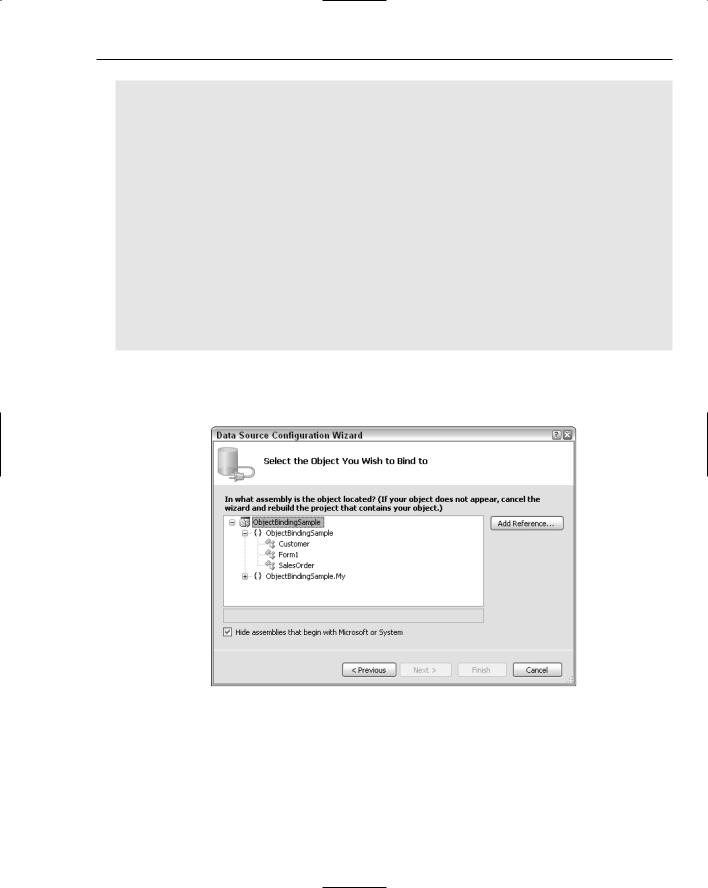
After specifying the appropriate columns, the finished application can be run; and the list of orders will be visible for each of the customers in the database. The final version is illustrated in Figure 31-15.

Figure 31-15

Object Data Source

In a number of projects, an application is broken up into multiple tiers. Quite often it is not possible to pass around strongly typed DataSets, as they may be quite large, or perhaps the project requires custom business objects. In either case, it is possible to take the data-binding techniques you just learned for DataSets and apply them to objects. For the purposes of this discussion, use the following Customer and

SalesOrder classes:

Public Class Customer Private m_Name As String

Public Property Name() As String Get

Return m_Name End Get

Set(ByVal value As String) m_Name = value

End Set End Property

Private m_Orders As New List(Of SalesOrder)

Public Property Orders() As List(Of SalesOrder)

Get

Return m_Orders

End Get

419

Chapter 31

Set(ByVal value As List(Of SalesOrder)) m_Orders = value

End Set End Property

End Class

Public Class SalesOrder

Implements System.ComponentModel.IDataErrorInfo

Private m_Description As String

Public Property Description() As String Get

Return m_Description End Get

Set(ByVal value As String) m_Description = value

End Set End Property

Private m_Quantity As Integer

Public Property Quantity() As Integer Get

Return m_Quantity End Get

Set(ByVal value As Integer) m_Quantity = value

End Set End Property

Private m_DateOrdered As Date

Public Property DateOrdered() As Date Get

Return m_DateOrdered End Get

Set(ByVal value As Date) m_DateOrdered = value

End Set End Property

Public ReadOnly Property ErrorSummary() As String _

Implements System.ComponentModel.IDataErrorInfo.Error

Get

Dim summary As New System.Text.StringBuilder Dim err As String = ErrorItem(“Description”) If Not err = “” Then summary.AppendLine(err) err = ErrorItem(“Quantity”)

If Not err = “” Then summary.AppendLine(err) err = ErrorItem(“DateOrdered”)

If Not err = “” Then summary.AppendLine(err) Return summary.ToString

End Get

420

Data Binding and Object Data Sources

End Property

Default Public ReadOnly Property ErrorItem(ByVal columnName As String) _

As String Implements System.ComponentModel.IDataErrorInfo.Item

Get

Select Case columnName Case “Description”

If Me.m_Description = “” Then _

Return “Need to order item description” Case “Quantity”

If Me.m_Quantity <= 0 Then _

Return “Need to supply quantity of order” Case “DateOrdered”

If Me.m_DateOrdered > Now Then _

Return “Need to specify a date in the past”

End Select Return “”

End Get End Property

End Class

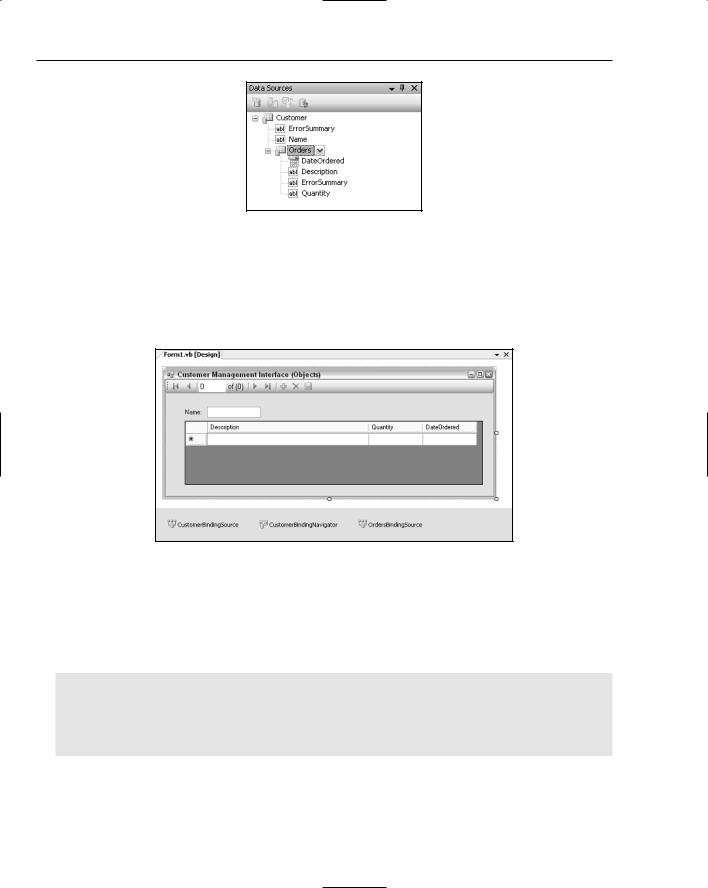
To use data binding with custom objects, follow roughly the same process as you did with DataSets. Add a new Data Source via the Data Sources window. This time, select an Object Data Source type. Doing so will display a list of available classes within the solution, as shown in Figure 31-16.

Figure 31-16

Select the Customer class and complete the wizard to add the Customer class, along with the nested list of orders, to the Data Sources window, as shown in Figure 31-17.

421

Chapter 31

Figure 31-17

As you did previously, you can select the type of control you want for each of the fields before dragging the Customer node onto the form. Doing so adds a CustomerBindingSource and a CustomerNavigator to the form. If you set the Orders list to be a DataGridView and drag that onto the form, you will end up with the layout shown in Figure 31-18. As you did previously with the DataGridView, again opt to modify the default list of columns using the Edit Columns dialog accessible from the smart tag dialog.

Figure 31-18

Unlike binding to a DataSet that has a series of TableAdapters to extract data from a database, there is no automatically generated fill mechanism for custom objects. The process of generating the Customer objects is usually handled elsewhere in the application. All you have to do here is issue the following code snippet to link the existing list of customers to the CustomerBindingSource so they can be displayed:

Private Sub Form1_Load(ByVal sender As System.Object, _

ByVal e As System.EventArgs) Handles MyBase.Load Me.CustomerBindingSource.DataSource = GetCustomers()

End Sub

Public Function GetCustomers() As List(Of Customer)

422

Data Binding and Object Data Sources

Dim cust As New List(Of Customer)

‘Populate customers list.....

eg from webservice

Return cust


End Function


Running this application provides a simple interface for working with customer objects.

IDataErrorInfo

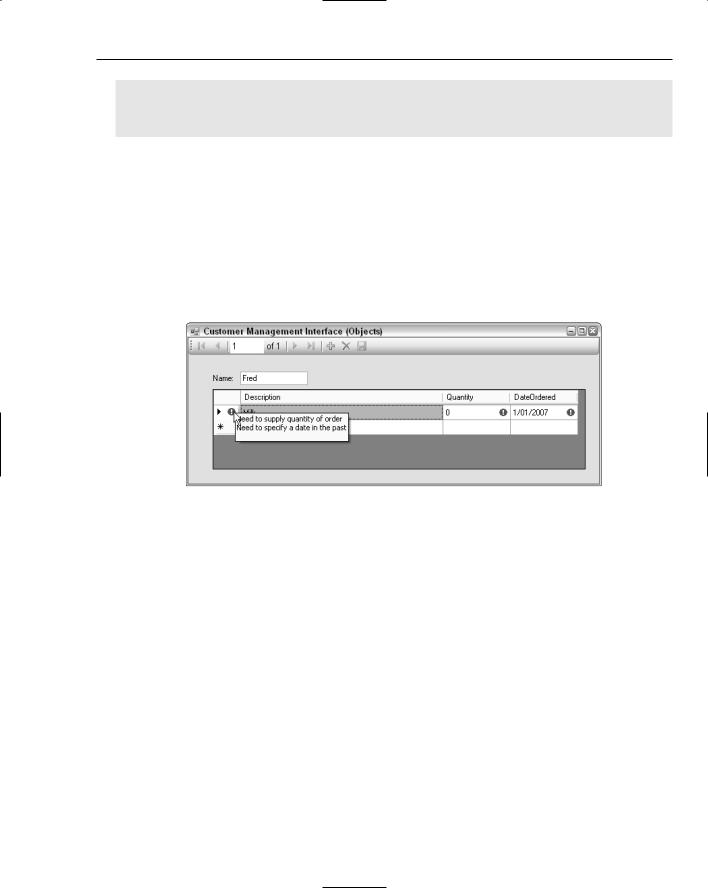
You will notice in the code provided earlier that the SalesOrder object implements the IDataErrorInfo interface. This is an interface that is understood by the DataGridView and can be used to validate custom objects. As you did in the earlier application, you need to add an ErrorProvider to the form. Instead of manually wiring up events in the ErrorProvider control, in conjunction with the DataGridView use the IDataErrorInfo interface to validate the SalesOrder objects. The running application is shown in Figure 31-19, where an invalid date and no quantity have been specified for a SalesOrder.

Figure 31-19

The icon at the end of the row provides a summary of all the errors. This is determined by calling the Error property of the IDataError interface. Each of the columns in turn provides an icon to indicate which cells are in error. This is determined by calling the Item property of the IDataError interface.

Application Settings

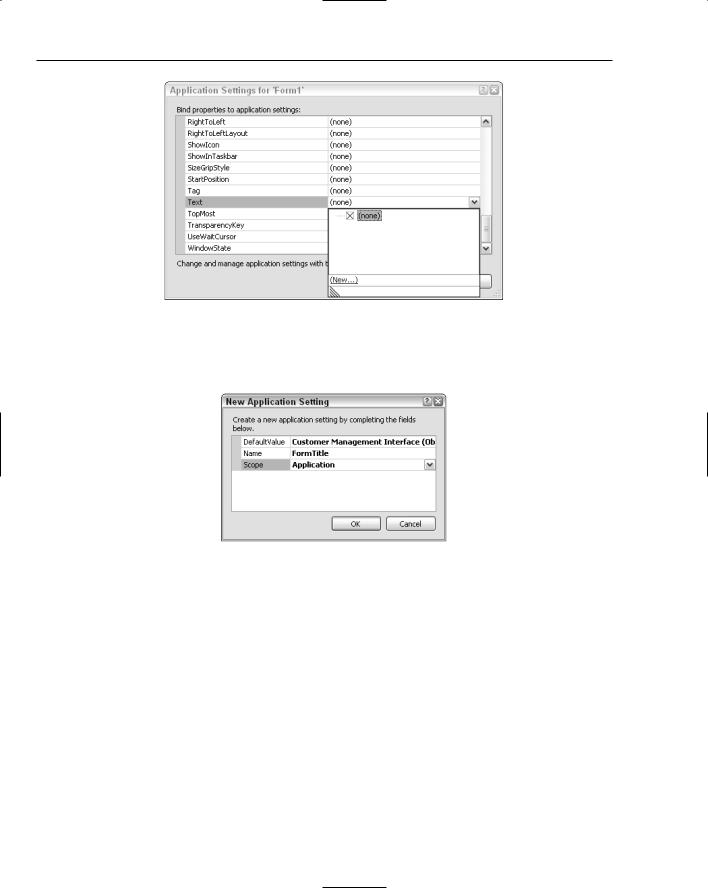
Visual Studio 2005 also provides support for binding application settings to control properties. This section illustrates this concept with the Text property of the form, but it could be any property on any control. Open the form designer, expand the Application Settings node in the Properties window, and select the Property Bindings node. This opens the Application Settings dialog, shown in Figure 31-20.

The left column indicates the properties to which you can bind an application setting. In Figure 31-20, the down arrow next to the Text property has been clicked. At the moment, there are no application settings, so click the New link to open the New Application Setting dialog shown in Figure 31-21, which enables you to create an application setting to which the Text property can be bound.

423

Chapter 31

Figure 31-20

Once you complete the application setting, you can dynamically change the text on this form by changing the FormTitle setting in the Application Settings file.

Figure 31-21

Summar y

It is hoped that this chapter has given you an appreciation for how the BindingSource, Binding Navigator, and other data controls work together to give you the ability to rapidly build data applications. Because the new controls support working with either DataSets or your own custom objects, they can significantly reduce the amount of time it takes you to write an application.

In subsequent chapters you will return to working with some of the data controls that work with device applications, and you’ll learn how to build mobile applications that work with SQL Mobile.

424

Add-Ins

Visual Studio 2005 has an enormous set of features right out of the box. In addition, for automating repetitive tasks, the development environment comes with a comprehensive macro system, including a standalone IDE and debugging environment. Occasionally, however, you’ll encounter a situation where the existing toolset doesn’t quite meet your requirements. Fortunately, Visual Studio 2005 doesn’t leave you hanging, as it provides a full extensibility model that you can program against to create your own add-ins.

In this chapter you’ll learn how to manage any third-party add-ins you have installed, as well as create new add-ins for your own use. The discussion covers some of the more commonly used objects and methods, and explains how to debug and deploy your add-ins successfully.

The Add-In Manager

The Add-in Manager is a utility that controls the loaded state of any add-ins defined to the Visual Studio 2005 IDE. To access the Add-in Manager, use the Tools Add-In Manager menu command. All add-ins available to the particular application will be displayed in a list along with their current loading status and availability (see Figure 32-1).

Locate the add-in you wish to load and tick the checkbox next to it. If you want the add-in to start whenever the IDE is loaded, then check the Startup box, whereas if the add-in is to be loaded when the Visual Studio environment is run through the command line (such as when performing command-line builds), then you should check the Command Line box.

The lower half of the dialog displays any descriptive text associated with the add-in so you can verify the functionality that will be made available.