

Professional Visual Studio 2005 (2006) [eng]
.pdfChapter 25
folders, depending on whether they are a template for a single file or a full project. However, the one common element between all template folders is that they contain a .vstemplate file. This file is an XML document that determines what happens when the template is used:
<VSTemplate Version=”2.0.0” xmlns=”http://schemas.microsoft.com/developer/vstemplate/2005” Type=”Project”>
<TemplateData>
<Name>Application Template</Name>
<Description>Default Application template</Description> <ProjectType>VisualBasic</ProjectType> <SortOrder>1000</SortOrder> <CreateNewFolder>true</CreateNewFolder> <DefaultName>Application Template</DefaultName> <ProvideDefaultName>true</ProvideDefaultName> <LocationField>Enabled</LocationField> <EnableLocationBrowseButton>true</EnableLocationBrowseButton> <Icon>__TemplateIcon.ico</Icon>
</TemplateData>
<TemplateContent>
<Project TargetFileName=”StarterProject.vbproj” File=”StarterProject.vbproj” ReplaceParameters=”true”>
<ProjectItem ReplaceParameters=”true” TargetFileName=”AboutForm.vb”>AboutForm.vb</ProjectItem>
<ProjectItem ReplaceParameters=”true” TargetFileName=”AboutForm.Designer.vb”>AboutForm.Designer.vb</ProjectItem>
<ProjectItem ReplaceParameters=”true” TargetFileName=”AboutForm.resx”>AboutForm.resx</ProjectItem>
<ProjectItem ReplaceParameters=”true” TargetFileName=”ApplicationEvents.vb”>ApplicationEvents.vb</ProjectItem>
<ProjectItem ReplaceParameters=”true” TargetFileName=”MainForm.vb”>MainForm.vb</ProjectItem>
<ProjectItem ReplaceParameters=”true” TargetFileName=”MainForm.Designer.vb”>MainForm.Designer.vb</ProjectItem>
<ProjectItem ReplaceParameters=”true” TargetFileName=”MainForm.resx”>MainForm.resx</ProjectItem>
<Folder Name=”My Project” TargetFolderName=”My Project”> <ProjectItem ReplaceParameters=”true”
TargetFileName=”Application.myapp”>Application.myapp</ProjectItem> <ProjectItem ReplaceParameters=”true”
TargetFileName=”Application.Designer.vb”>Application.Designer.vb</ProjectItem> <ProjectItem ReplaceParameters=”true”
TargetFileName=”AssemblyInfo.vb”>AssemblyInfo.vb</ProjectItem> <ProjectItem ReplaceParameters=”true”
TargetFileName=”Resources.resx”>Resources.resx</ProjectItem> <ProjectItem ReplaceParameters=”true”
TargetFileName=”Resources.Designer.vb”>Resources.Designer.vb</ProjectItem> <ProjectItem ReplaceParameters=”true”
TargetFileName=”Settings.settings”>Settings.settings</ProjectItem> <ProjectItem ReplaceParameters=”true”
TargetFileName=”Settings.Designer.vb”>Settings.Designer.vb</ProjectItem>
</Folder>
<ProjectItem ReplaceParameters=”true” TargetFileName=”SplashForm.vb”>SplashForm.vb</ProjectItem>
336

Code Generation Templates
<ProjectItem ReplaceParameters=”true” TargetFileName=”SplashForm.Designer.vb”>SplashForm.Designer.vb</ProjectItem>
</Project>
</TemplateContent>
</VSTemplate>
This sample illustrates the MyTemplate.vstemplate that was generated for the project template created earlier. At the top of the sample, the VSTemplate node contains a Type attribute that determines whether this is an Item template (“Item”), a Project template (“Project”), or a Multiple Project template (“ProjectGroup”). The remainder of the sample is divided into TemplateData and TemplateContent. The TemplateData block includes information about the template itself, such as the name, description, and icon that will be used to represent the template in the New Project dialog, whereas the Template Content block defines the structure of the template.
In the preceding example, the content starts with a Project node, which indicates the project file to use. The files contained in this template are listed using the ProjectItem nodes. Each node contains a Target FileName attribute that can be used to specify the name of the file as it will appear in the project created from this template. In the case of an Item template, the Project node is missing and ProjectItems are contained within the TemplateContent node.
For more information on the vstemplate file, the full schema is available at C:\Program Files\ Microsoft Visual Studio 8\Xml\Schemas\1033\vstemplate.xsd.
Extending Templates
Building templates based on existing items and projects limits what you can do because it assumes that every project or scenario will require exactly the same items. Instead of creating multiple templates for each different scenario (for example, one that has a main form with a black background and another that has a white background), with a bit of user interaction you can accommodate multiple scenarios from a single template. Therefore, this section takes the project template created earlier and tweaks it so users can specify the background color for the main form. In addition, you’ll build an installer for both the template and the wizard that you will create for the user interaction.
To add user interaction into a template, you need to implement the IWizard interface in a class library that is then strongly signed and placed in the GAC on the machine on which the template will be executed. Earlier releases of Visual Studio 2005 had the capability to use a nonsigned assembly placed within the template zip folder. However, despite being an incredibly useful way to deploy templates, this was deemed a security risk and removed. As such, to deploy a template that uses a wizard, you also need to deploy the wizard assembly to the GAC.
Template Project Setup
Before plunging in and implementing the IWizard interface, follow these steps to set up your solution so you have all the bits and pieces in the same location, which will make it easy to make changes, perform a build, and then run the installer:
337

Chapter 25
1.As you did earlier, start with the StarterProject solution on which you based the initial project template. Make sure that this solution builds and runs successfully before proceeding. Any issues with this solution will be harder to detect later, as the error messages that appear when a template is used are somewhat cryptic.
2.Into this solution add a Class Library project, in which you will place the IWizard implementation. You will also need to add a Setup project to the solution. To do this, select the Setup Wizard template and follow the prompts so that the Primary Output from the Class Library is included in the installer.
3.To access the IWizard interface, add references to the Class Library project to both EnvDTE.dll and Microsoft.VisualStudio.TemplateWizardInterface.dll, both located at
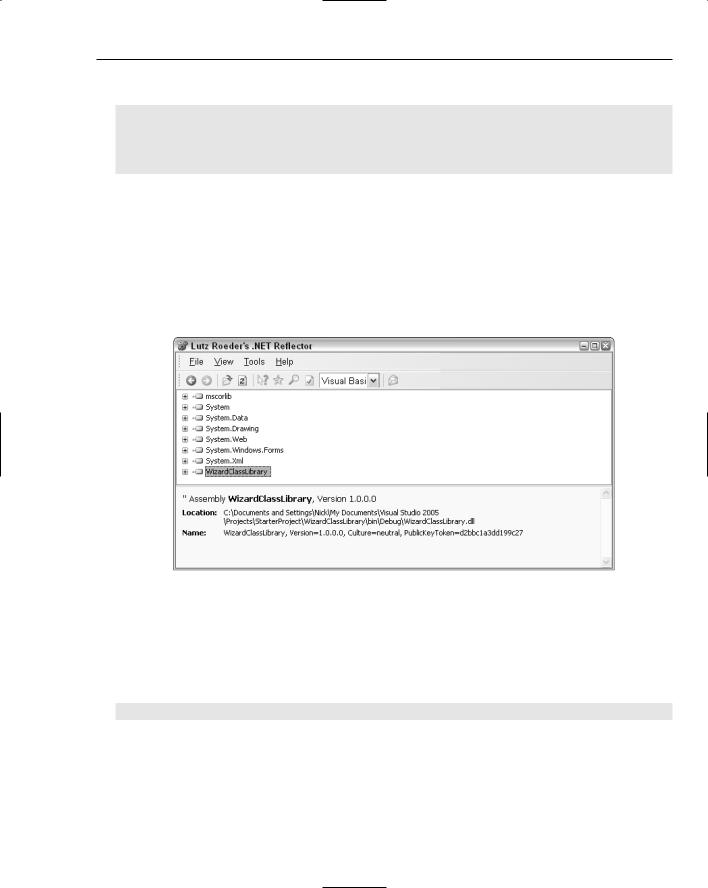
C:\Program Files\Microsoft Visual Studio 8\Common7\IDE\PublicAssemblies\. This should result in a solution that looks similar to what is shown in Figure 25-9.
Figure 25-9
As shown in Figure 25-9, both the primary output and content files from the Class Library project have been added to the installer. This action also adds a number of dependencies to the installer. Because the template will only be used on a machine with Visual Studio 2005, you don’t need any of these dependencies. Exclude them by clicking the Exclude menu item on the right-click context menu.
4.By default, when you add project outputs to the installer, they are added to the Application folder. In this case, add the primary output of the class library to the GAC, and place the content files for the class library into the user’s Visual Studio Templates folder. Before you can move these files, right-click the Installer project and select View File System from the context menu to open the File System view.
5.By default, the File System view contains the Application Folder (which can’t be deleted), the User’s Desktop, and the User’s Programs Menu. Remove the two User folders by selecting Delete from the right-click context menu.
338


Macros
Macros are a great way to automate simple tasks, and with Visual Studio 2005 you can easily create and maintain a full library of macros to perform all kinds of functions. Even better, the default installation comes with dozens of pre-built macros that you can immediately use in the Visual Studio IDE.
A macro is a set of commands grouped together into a batchlike, interpretative function. Instead of manually performing each of the commands in turn, you can run one macro function that will invoke the commands in sequence. Visual Studio 2005 macros are organized into complete Macro projects, which can contain multiple modules that in turn can contain multiple macros.
This organizational structure enables you to group macros into logical categories as well as divide your macro collection into manageable blocks. Keeping the macros organized into separate projects also enables you to share groups of macros with other developers more easily.
In this chapter you’ll take a look at the structure of a macro and learn how to create and use them effectively.
The Macro Explorer
To review the macros currently defined in an instance of Visual Studio, you can use the Macro Explorer tool window (see Figure 26-1). This window shares space with the Solution Explorer by default and can be accessed with the Tools Macros Macro Explorer menu command.
Each macros project loaded in Visual Studio 2005 is represented by a root node in the tree view, with the macros themselves divided into the modules that contain them. You can use the Macro Explorer to load or create additional macros projects by right-clicking the top level Macros node and choosing Load Macro Project or New Macro Project from the context menu.