

Pro .NET 2.0 Code And Design Standards In CSharp (2006) [eng]
.pdf
A P P E N D I X A
■ ■ ■
Environment Variables and
Remote Proxy Example
Environment Variables
To be able to call the C# compiler from the command line, you need to make your environment settings aware of the existence of the compiler (csc.exe). You can tell whether your computer recognizes the compiler by typing “csc” at the command prompt (accessing the command prompt is discussed in the section “Remote-Proxy Pattern Example—Using the Command Line,” later in this appendix). If your settings have not been configured, then you should get a message advising that the system doesn’t recognize csc, at the command prompt. If your settings have been configured, then you will get a different message advising that “no inputs have been specified,” but a few lines above this you will see that the csc has been called and at least it is recognized by environmental settings, so you need take no further action.
■Note In this example, we set up the environment variables to globally recognize the C# compiler (csc.exe) so that we can use it from the command prompt. However, you can access the command prompt through Visual Studio (Start All Programs Microsoft Visual Studio 2005 Visual Studio Tools Visual Studio 2005 Command Prompt), in the file location where Visual Studio resides—so you could set up the example that way. However, this example has been written using Visual Studio 2005 Beta 2 (running on Windows XP Version 5.1.2600), and that functionality was not wired at the time of writing. We have gone back to basics and set up the environment variables so that we run the example outside of Visual Studio. Although it is laborious, you do get to set all that the compiler does, which is quite interesting.
257

258 A P P E N D I X A ■ E N V I R O N M E N T VA R I A B L E S A N D R E M OT E P R OX Y E X A M P L E
However, for people who need to set the environment variable in environmental settings, here we go.
1.Click the Start button, select Control Panel, and then select System.
2.In the System Properties dialog, click the Advanced tab, which should look like Figure A-1.
Figure A-1. System Properties dialog
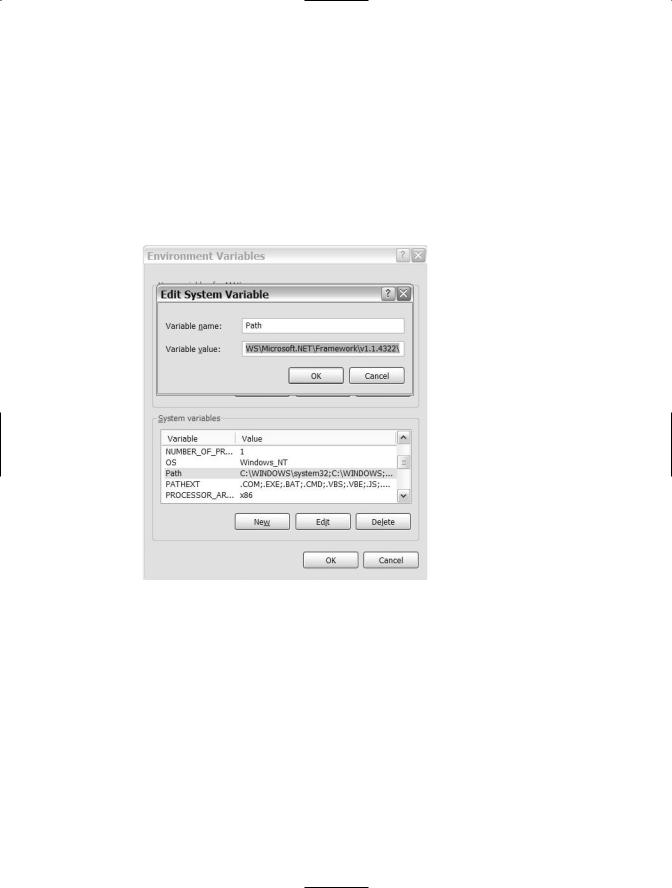
3.Click the Environment Variables button, which will take you to the Environment Variables dialog. In the “System variables” list box, select “Path,” as shown in Figure A-2.

A P P E N D I X A ■ E N V I R O N M E N T VA R I A B L E S A N D R E M OT E P R OX Y E X A M P L E |
259 |
Figure A-2. Environment Variables dialog
■Caution Before editing Environment Variables (Path), make a local backup copy of the Path (refer to step 4).
4.We will shortly change the Path variable, but before proceeding we will make a backup copy of the current Path setting. While Path is highlighted, in the “System variables” list box, click the Edit button, then hold down the Ctrl button and press “C” to copy the Path to the clipboard. Now create a folder on your C drive and call it “Environment Variables” (C:\Environment Variables). Open up Notepad and press Ctrl-V; the Path variable should now be in Notepad. Save the Notepad file with a useful name: “EnvironVariablesPath_09_12_2005.”
5.You can do a search (Start Search All files and folders) and type in “csc.exe” and note where your csc.exe is located. It should be located under “Windows\ Microsoft.NET\Framework\version number.” (Note: Your search will likely find multiple copies of csc.exe.)
•Now move back to the Environment Variables dialog (you should still have the Path variable highlighted). Click on the Edit button in the Environment Variables dialog, and the Edit System Variable dialog appears (see Figure A-3). Click the path in the “Variable value” text box, and click on the text in the text box to de-highlight the variable.
260A P P E N D I X A ■ E N V I R O N M E N T VA R I A B L E S A N D R E M OT E P R OX Y E X A M P L E
•Now press the right-arrow keyboard button (or hit the End keyboard button) until you come to the end of the path, and then place a “;” immediately after the last variable (i.e., there should be no spaces between variables).
•Now enter the path where the csc.exe file is located. The following is the path that I have for v2.0 Beta 2, which I have added after the “;” C:\WINDOWS\Microsoft.NET\ Framework\v2.0.50215\. (Select the V2.0 version of csc.exe, just in case an older version causes unexpected results.) As this is the last variable in the list, it is not followed by a “;”, which Figure A-3 illustrates.
Figure A-3. Edit System Variable dialog
6.Click OK, OK, and OK to exit the remaining dialogs. Make sure you also close any open command windows.
7.Now open up a fresh command window and key in “csc,” and hopefully csc will be recognized; however, you should receive an error message advising that “no inputs have been specified.” If you don’t get this message, but the previous message about csc not being recognized, then you can try a few things: revisit the entry that you keyed in the Path variable and verify that it points to where csc.exe is located on your disk; ensure that you have typed the address correctly; check to see that there are no spaces between the previous variable and the variable you entered; or try rebooting your computer. Note: csc will need to be recognized by Windows before you can advance to using the command line.
A P P E N D I X A ■ E N V I R O N M E N T VA R I A B L E S A N D R E M OT E P R OX Y E X A M P L E |
261 |
Remote-Proxy Pattern Example: Using the
Command Line
In the Remote-Proxy pattern, we have chosen to use TCP as a protocol, which requires us to develop a server application (Server.exe) and not rely on IIS as the server. We are running the example outside of Visual Studio (VS). By doing it this way—even though it is laborious—we get to experience everything that is happening.
In the example, our endpoint is to have the Server.exe application run in one domain and expose the “Question-Answer service” (ProxyRemote) and have that service called by the Client.exe application, which runs in another domain. Using this setup, we can mimic what would happen if we were running the example on two computers. Now we will slowly walk through all the steps.
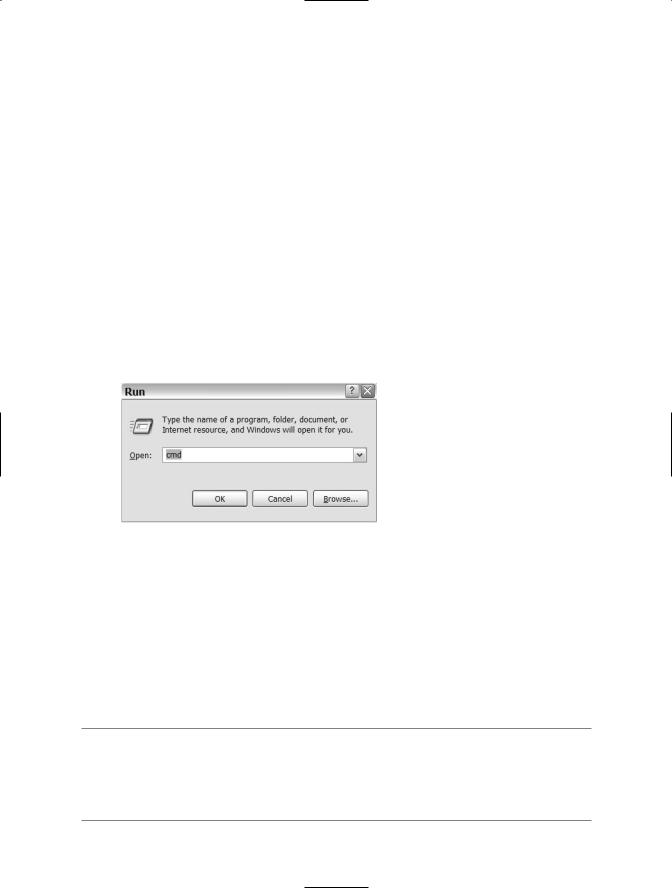
1.The command line is the prompt “>”, which is located in the command box, which is found by clicking the Start button and then “Run . . .” on the menu. After this, the Run dialog box should appear, as shown in Figure A-4; then key in “cmd” and click OK to open the command box.
Figure A-4. Run dialog
2.You should now be looking at the command box with its flashing cursor. Before we continue, however, do the following:
•Open up two instances of Windows Explorer (one for each work area: “US” and “UK”) and create two folders: “C:\ModelT\US_Server” and “C:\ModelT\UK_Client.”
•In the “US_Server” folder, place a copy of ProxyRemoteServer.cs and Server.cs.
•In the “UK_Client” folder, place a copy of Client.cs.
■Tip If you want to key the code into the above files, the full script appears under the respective class heading in the discussion of the Remote-Proxy pattern. To enter code outside of VS, enter the script into a Notepad file and then, for example, save as: “ProxyRemoteServer.cs”—include the quote marks to prevent Notepad from saving the file as a “txt” rather than as a “cs” file.
262A P P E N D I X A ■ E N V I R O N M E N T VA R I A B L E S A N D R E M OT E P R OX Y E X A M P L E
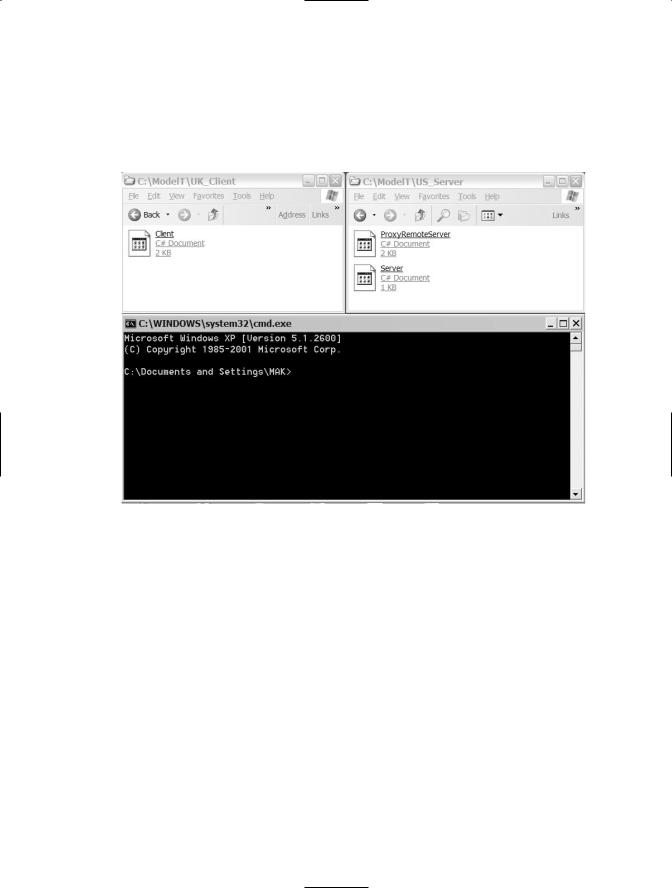
3.When trying to understand what is going on, it is a good idea to open up a window for each work area. We will be working in three work areas: the US_Server folder, the UK_Client folder, and the command box. Now arrange the two instances of Windows Explorer and the command box as shown in Figure A-5.
Figure A-5. Setup of work areas
4.Before we go any further, let’s get oriented by looking at Figure A-5. We have the Client.cs resident in the UK_Client folder and ProxyRemoteServer.cs and Server.cs files resident in the US_Server folder, below which we have the command box, in which we will key in commands. Now we will key commands on the command line, and after each command we will see new files appear in the respective folders.
5.At this point I am assuming that the prompt in your command box is not within the C:\modelt\ root directory; if it is, then omit the c:\modelt\ part of the following command. We want to get the command line to point to the US_Server folder. In the command box, at the prompt enter the following:
cd c:\modelt\us_server
and then press Enter. Note that the command line is not case sensitive, so you can use lowercase rather than exact syntax, if you prefer. The command prompt should now be pointing at the US_Server folder, as Figure A-6 shows.

A P P E N D I X A ■ E N V I R O N M E N T VA R I A B L E S A N D R E M OT E P R OX Y E X A M P L E |
263 |
Figure A-6. US_Server folder dialog
6.If you look in the ProxyRemoteServer.cs file (open it using Notepad), you will find that there are three class definitions: IDesignEngineer, ChiefDesignEngineer, and ProxyChiefDesignEngineer. Also note that they are all part of the Patterns.
ProxyRemoteServer namespace (which is indicated at the top of the file). The “cs” file is really just a convenient way for a developer to maintain the concept of a class definition; however, the csc allows us to place one or dozens of classes in the same file. When a cs file is compiled into Intermediate Language (IL), the cs file context is dispensed with by the complier, and the Common Language Runtime (CLR) manages classes and other types within the context of namespaces (e.g., Patterns.ProxyRemoteServer. IDesignEngineer), which reside in a given assembly (DLL). Note that once we build the
ProxyRemoteServer DLL, we will no longer use any of the cs files (all of the functionality will be compiled and accessible from the ProxyRemoteServer DLL).
7.We are now ready to use the C# compiler (csc.exe) to build the ProxyRemoteServer DLL (or assembly). With the command prompt pointing at c:\modelt\us_server, key in the following:
csc /t:library proxyremoteserver.cs
and then press Enter. This will build the DLL, which you should see appear in the US_Server folder. If you missed it but would like to see it, you can delete the DLL and rerun the command line.

264 A P P E N D I X A ■ E N V I R O N M E N T VA R I A B L E S A N D R E M OT E P R OX Y E X A M P L E
■Tip If you don’t want to retype the command line (and who does?), then simply press the function key F8, and the command line which was entered previously will reappear. You will have to scroll the cursor to the end of the line by pressing the right arrow, and once at the end of the command line, press Enter to run the command again. Alternatively, if you use the up-arrow keyboard button, it lets you go back several commands, and the down-arrow lets you go the other way.
By the way, if you want to see all the available switch statements (e.g., /t), then key “csc /help” at the command-line prompt.
8.Okay, so what exactly does csc /t:library proxyremoteserver.cs mean? This is a command that calls the C# compiler. The csc invokes the C# compiler (the csc stands for
c sharp compiler). The compiler is passed a switchkey “/” followed by “t:library,” which tells the compiler to build a DLL out of the target file, which is proxyremoteserver.cs. (To effect this in VS, you have to open a class library project, define your classes, and select the Build command from the menu—VS calls the C# compiler and puts
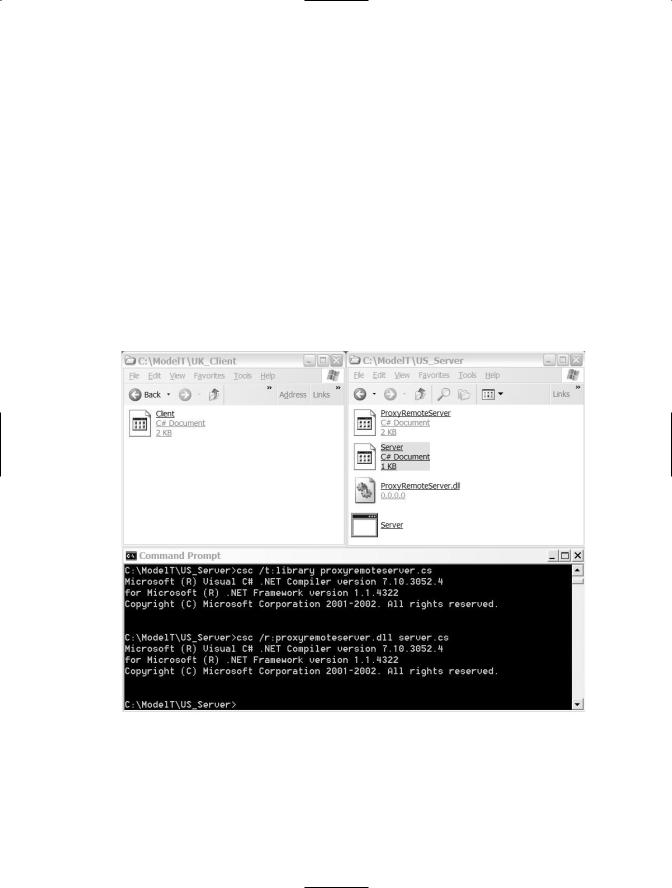
a copy of the compiled DLL in the bin directory.) Your screen should now show the ProxyRemoteServer DLL in the US_Server folder, as shown in Figure A-7.
Figure A-7. ProxyRemoteServer.cs dialog
A P P E N D I X A ■ E N V I R O N M E N T VA R I A B L E S A N D R E M OT E P R OX Y E X A M P L E |
265 |
9.We now need to register the ProxyRemoteServer DLL against Server.cs. If you look inside
Server.cs, you will see that it has the statement using Patterns.ProxyRemoteServer; this statement refers to ProxyRemoteServer DLL. Server.cs needs to reference the DLL to gain access to the functionality of IDesignEngineer, ChiefDesignEngineer, and ProxyChiefDesignEngineer. To register the DLL, we need to use the command line (which should still be pointing to the US_Server folder, as per Figure A-7). Key the following into the command line:
csc /r:proxyremoteserver.dll server.cs
and press Enter. This time the compiler has done two things instead of just one. The compiler (csc) is passed /r:proxyremoteserver.dll, which means reference the metadata in the file proxyremoteserver.dll with server.cs file. This is all well and good, but in the US_Server folder we now have a fourth file, Server.exe, so where does that come from? Having referenced the DLL with Server.cs, the compiler then simply compiles Server.cs into an executable file, as shown in Figure A-8.
Figure A-8. ProxyRemoteServer.dll dialog
10.So from the perspective of the US_Server folder, our task now is complete. We have an executable server program (Server.exe) that references all the functionality in
ProxyRemoteServer.dll.