

Beginning CSharp Game Programming (2005) [eng]
.pdf190 Chapter 7 Direct3D
Fonts
The D3DX library also provides a handy Font class for you to use. In the past, you would have to make your own font textures or go around messing with GDI to draw fonts. Well, no more!
Creating a System Font
The .NET framework has fonts built into it using the System.Drawing.Font class. This class can be used to represent any kind of system font, which are usually true-type files (.ttf). In order to draw fonts in your game, you need to first access a system font. Luckily for you, this is incredibly easy:
System.Drawing.Font sysfont;
sysfont = new System.Drawing.Font(
“Arial”, 16,
System.Drawing.FontStyle.Bold |
System.Drawing.FontStyle.Italic );
This code creates a new object that represents the Arial font, with a size of 16 points, using a bold and italic style. You combine flags using the binary or operator, as seen in the code. Table 7.7 lists the available styles.
|
Table 7.7 |
Font Styles |
|
|
Style |
Description |
|
|
Bold |
Text is in bold, thick letters |
|
|
Italic |
Text is slanted |
|
|
Regular |
No effect |
|
|
Strikeout |
Text has a line through the center |
|
|
Underline |
Text has a line underneath |
|
|
|
|
|
Creating a Direct3D Font
Now that you have a system font, you can go ahead and make a Direct3D font:
Direct3D.Font font;
font = new Direct3D.Font( graphics, font );
All you need to do is pass in a reference to the graphics device and a reference to the windows font object, and you’re all set to go!

Fonts 191
Drawing Text
Now that you have your font classes all set up, you can just cut to the chase and start drawing text. Marvelous!
Draw text using the DrawText function of Direct3D.Font. Here’s a sample:
Rectangle rect = new Rectangle( 0, 0, 640, 100 ); dxfont.DrawText(
“Hello there!”, rect,
Direct3D.DrawTextFormat.NoClip,
Color.CornflowerBlue );
This code creates a rectangle that represents a box at the top of your rendering window, 640 pixels wide and 100 pixels tall. This is the rendering area that the font will be drawn into.
The next step is to draw the text “Hello there!” inside of that rectangle, using the NoClip text formatting option and the color cornflower blue.
You really only have to be concerned with the formatting options, which allow you to tell the renderer exactly how you want the text drawn. Table 7.8 lists the most useful options.
Table 7.8 Useful DrawTextFormat Values
Value |
Purpose |
WordBreak |
If the text is longer than the box you give it, this option will break the text up |
|
onto the next line or however many lines it needs to fit the entire text. |
VerticalCenter |
Centers the text vertically |
Top |
Forces the text to be drawn at the top of the rectangle (default) |
Bottom |
Forces the text to be drawn at the bottom of the rectangle |
SingleLine |
Forces text to be drawn on a single line, ignoring newline characters. |
NoClip |
By default, the Font class clips the text into the rectangle you provide, so nothing |
|
is drawn outside the box. This disables that feature and makes drawing faster. |
Center |
Centers the text horizontally |
Right |
Forces the text to be drawn at the right margin |
Left |
Forces the text to be drawn at the left margin (default) |
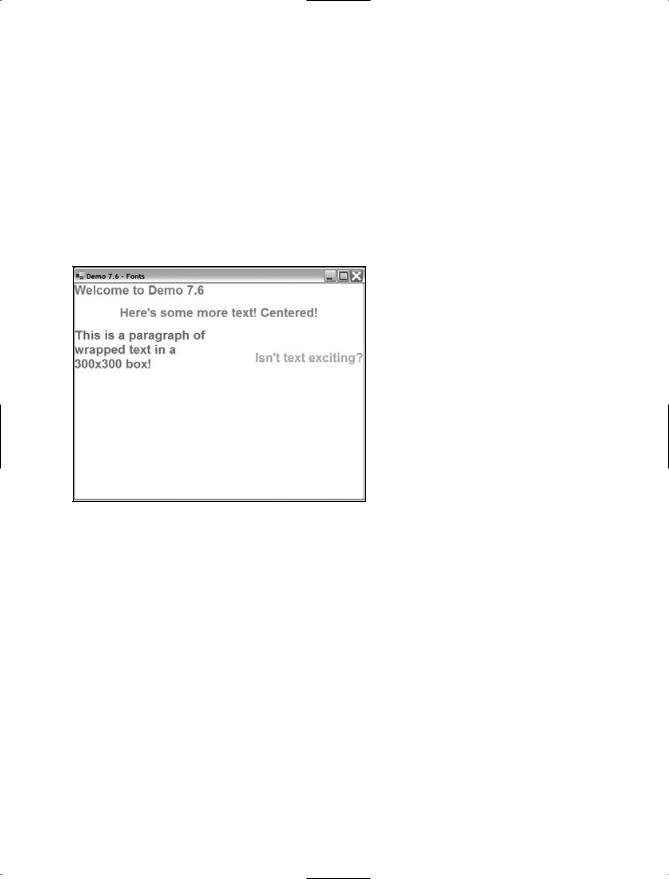
Demo 7.6
Demo 7.6 demonstrates the various font options that you can use. Overall, this is a remarkably simple demo.

192Chapter 7 Direct3D
The first step is to declare the font resources:
Font windowsfont = null; Direct3D.Font dxfont = null;
And then initialize the resources when the program is loaded:
public void InitializeResources()
{
windowsfont = new System.Drawing.Font(
“Arial”, 16, System.Drawing.FontStyle.Bold ); dxfont = new Direct3D.Font( graphics, windowsfont );
}
Finally, all I do is just draw a bunch of text strings on the screen inside of the Render function:
graphics.Clear( Direct3D.ClearFlags.Target, Color.White , 1.0f, 0 ); graphics.BeginScene();
Rectangle rect = new Rectangle( 0, 0, 640, 100 ); dxfont.DrawText(
“Welcome to Demo 7.6”, rect,
Direct3D.DrawTextFormat.NoClip,
Color.CornflowerBlue );
rect = new Rectangle( 0, 50, 640, 100 ); dxfont.DrawText(
“Here’s some more text! Centered!”, rect, Direct3D.DrawTextFormat.Center | Direct3D.DrawTextFormat.NoClip, Color.PaleVioletRed );
rect = new Rectangle( 0, 100, 300, 300 ); dxfont.DrawText(
“This is a paragraph of wrapped text in a 300x300 box!”, rect,
Direct3D.DrawTextFormat.WordBreak |
Direct3D.DrawTextFormat.NoClip,
Color.MediumOrchid );
rect = new Rectangle( 0, 150, 640, 300 ); dxfont.DrawText(
Summary 193
“Isn’t text exciting?”, rect,
Direct3D.DrawTextFormat.Right |
Direct3D.DrawTextFormat.NoClip,
Color.LawnGreen );
graphics.EndScene();
graphics.Present();
This demonstration produces the output seen in Figure 7.15.
Figure 7.15 The output from Demo 7.15
Summary
This has been the biggest chapter in the book so far, and I’ve got some bad news for you: You’ve barely just scratched the surface of Direct3D. I really wasn’t kidding when I said that Direct3D is one of the largest and most complex APIs in the world. There is just an incredible amount of things inside the API that allow you to make some really unbelievable games.
There’s a ton of things that I just didn’t have room to cover, such as vertex buffers, index buffers, lighting, 3D transformation calculations, meshes, vertex shaders, pixel shaders, volume textures, fog, depth buffers, keyframe animation, point sprites, particles…. But don’t be discouraged! You’ve already got a good head start and you can start making your own 2D games right now if you wanted to. The next subject this book is going to go over is input and sound programming, which are smaller (but still very important) parts of game programming.

194 Chapter 7 Direct3D
What You Learned
The main concepts that you should have picked up from this chapter are:
How to create a Direct3D Device.
What a back buffer is.
How to make sure a device is available for you to use.
What display formats (pixel formats) are.
How the updated framework looks.
How to handle multitasking in fullscreen mode.
How to draw a triangle.
How to use colors and alpha blending.
How textures and texture coordinates work.
How to use D3DX to load a texture quickly.
How to use triangle strips and fans to optimize your geometry.
How to use D3DX to handle sprites for you easily.
How to load fonts and draw text.
Review Questions
These review questions test your knowledge on the important concepts exposed to you in this chapter. The answers can be found in Appendix A.
7.1.What’s the difference between a hardware device and a software device?
7.2.Why would you prefer to use a hardware device over a software device?
7.3.Why are back buffers used?
7.4.Why is 32-bit color preferred to 16-bit color?
7.5.What is alpha information?
7.6.Why bother handling multitasking?
7.7.Why does Direct3D draw primarily triangles?
7.8.What purpose do textures serve?
7.9.How can you optimize your geometry so that you don’t waste time and space working on duplicate vertexes?
7.10.Why use the D3DX library?

Summary 195
On Your Own
There is so much you can do on your own from what you’ve learned in this chapter. With the way the AdvancedFramework’s sprite system is set up, you can move a camera around in world-space to make the sprites move around on the screen, but the framework isn’t as complex as it could be. Look into using matrixes and the Direct3D.Sprite.SetWorldViewLH function to make the sprite engine able to rotate and zoom the camera as well. You should take note that this function has been removed from the D3DX library in DirectX 9.0c, so if that’s what version you’re using, look into using the Direct3D.Sprite.Draw2D functions with matrixes instead. You can accomplish some really neat effects that way.
This page intentionally left blank
chapter 8
DirectInput
You’ve seen some rudimentary input programming already, in Chapters 6 and 7. Those chapters used Windows events to determine when a key was pressed on the keyboard. While handling input like that is great for things like Windows applications, it’s not really suitable for a game environment. Games typically require quick handling of input and more control over the actual devices—control that standard Windows events just don’t give you. That’s why there’s DirectInput, the DirectX API that gives you as much control as possible over an input device.
In this chapter, you will learn:
How to get information from keyboards.
How to get information from mice.
How to get information from game devices like joysticks and steering wheels.
How to use force feedback to send data back to a game device.
Keyboards
The keyboard was one of the very first computer input devices available. It’s difficult to find a PC without a keyboard nowadays, and you can probably assume that anyone playing a PC game has a keyboard.
The Advanced Framework from Demo 7.1 includes code that creates a keyboard, but I didn’t go over what it all meant.
Just as in Direct3D, the DirectInput API has a Device class that represents actual input devices:
DirectInput.Device keyboard = null;
197

198 Chapter 8 DirectInput
Creating a Device
Once you’ve created a variable to store your device, you need to create the device:
keyboard = new DirectInput.Device( DirectInput.SystemGuid.Keyboard );
The constructor for a Device takes a globally unique identifier (GUID) as its parameter. A GUID is simply a 128-bit number that has been assigned to each device on your system. As a keyboard and a mouse are assumed to exist on a PC system, DirectInput has a class that returns the GUID of the keyboard and mouse devices for you; the class is named DirectInput.SystemGuid. The Keyboard member returns the GUID of the system keyboard and the Mouse member returns the GUID of the system mouse.
The next step is to set the cooperation level of the device:
keyboard.SetCooperativeLevel(
this,
DirectInput.CooperativeLevelFlags.Background |
DirectInput.CooperativeLevelFlags.NonExclusive );
A common theme you should see in game programming is that you do not own the machine you’re running on. That keyboard belongs to the user, not your program. This means you have to tell DirectInput how you want to access the device. Table 8.1 lists all the flags you can use.
It’s a good idea to create devices like the keyboard and the mouse with the NonExclusive flag because they are used by everything. If you don’t want your program grabbing input while your window is minimized, then you should use Foreground mode. Unfortunately, if you do that, your devices become unacquired whenever someone switches out of the program, and your program will have to reacquire them manually. I prefer to use Background mode and just not gather input while the application is minimized.
The next step after setting a cooperation level is to acquire the device:
keyboard.Acquire();
And now you can use the keyboard with DirectInput instead of Windows event messages.
Table 8.1 Input Device Cooperation Flags
Flag |
Meaning |
NoWindowsKey |
The windows key is disabled (keyboards only) |
Background |
The device can be accessed even when your app is in the background |
Foreground |
Device can only be used when your application is the active one |
Exclusive |
Program requests to use device exclusively |
NonExclusive |
Device can be shared among other programs |
Keyboards 199
Gathering Input by Polling
There are two ways to gather input from a keyboard. The first method is by polling the keyboard and asking it, “Which keys are pressed right now?” Another method is to use an event notifier; this is very similar to what you’ve seen already with the windows OnKeyDown events. (I won’t be going over the second method because it involves multithreading, which is a topic this book doesn’t have room to cover.)
Here’s how to poll the keyboard:
DirectInput.Key[] keys = keyboard.GetPressedKeys();
The GetPressedKeys function only works with keyboards, and it returns an array of DirectInput.Keys, which is just an enumeration representing the various keys on a keyboard. Here are a few examples of DirectInput.Key values: DirectInput.Key.Return,
DirectInput.Key.Q, DirectInput.Key.Numpad6, and so on. There’s a ton of them.
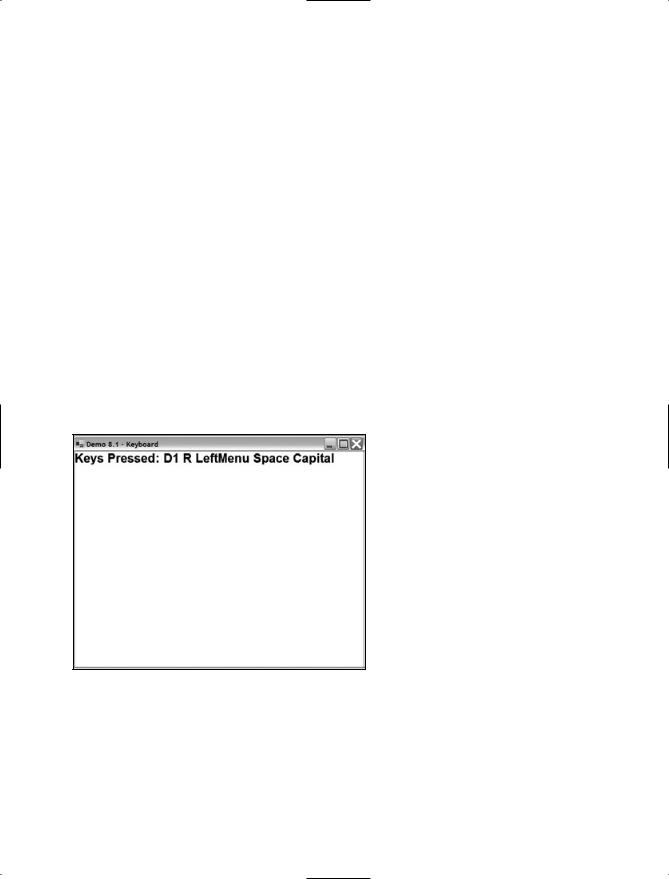
Demo 8.1 shows you interactively how getting keyboard data works by printing out a string containing all the keys pressed. Figure 8.1 shows the demo in action. As the code really is amazingly simple, I’m not going to bother showing it here; you already know all the basics about getting keyboard data this way, anyway (it only takes one line!).
Figure 8.1 This demo uses polling to get keyboard data.
The screenshot shows that the keys 1, R, Left+Alt, Space, and Caps Lock are pressed down. DirectInput uses odd names for the keys sometimes; for example, Left+Alt is called DirectInput.Key.LeftMenu, for some odd reason. Look at your SDK docs for a complete listing of key names.