

Beginning ASP.NET 2.0 With CSharp (2006) [eng]
.pdfChapter 11
Try It Out |
Configuring Visibility, Access, and Authorization |
1.Take a look at the code in the web.sitemap file. This file contains the same code that is used in the live Wrox United application. The following is an extract from that file, highlighting the use of the roles attribute:
...
<siteMapNode title=”Fan Club” url=”FanClub.aspx”>
<siteMapNode title=”Add Match Report” url=”FanClub/FanClubMatchReport.aspx” description=”Add a match report”
roles=”FanClubMember” />
<siteMapNode title=”Upload Pictures” url=”FanClub/FanClubPictures.aspx” description=”Upload pictures or video of a match” roles=”FanClubMember” />
</siteMapNode>
...
<siteMapNode title=”Administration” url=”Admin/Admin.aspx” roles=”Reporter,Owner,Manager,Administrator”> <siteMapNode title=”Edit News” url=”Admin/EditNews.aspx”
description=”Edit club news” roles=”Reporter,Owner,Manager,Administrator” />
<siteMapNode title=”Schedule Match” url=”Admin/ScheduleMatch.aspx” description=”Schedule a Match”
roles=”Manager,Owner” />
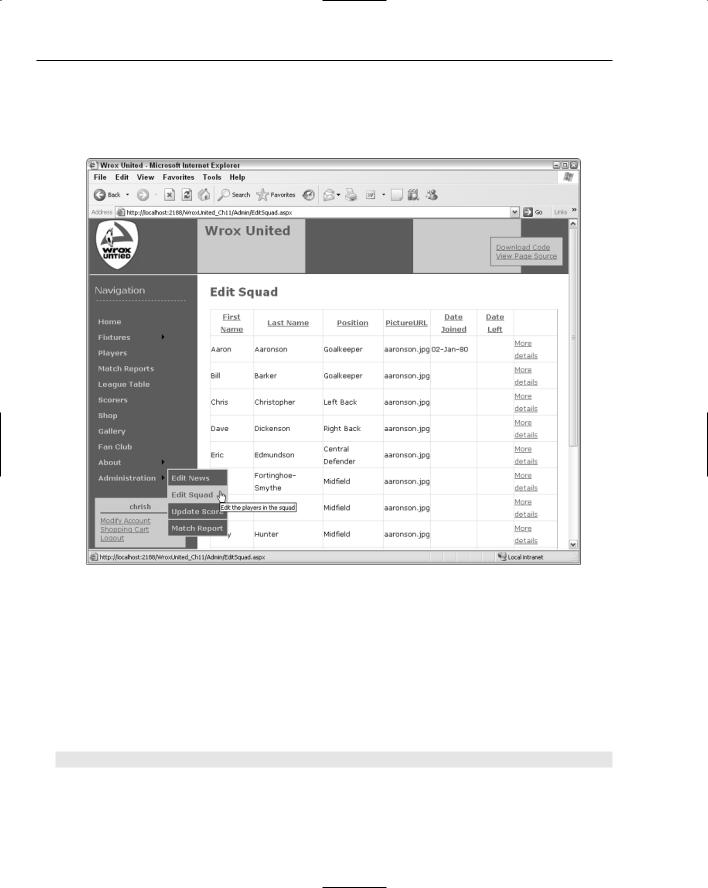
<siteMapNode title=”Edit Squad” url=”Admin/EditSquad.aspx” description=”Edit the players in the squad” roles=”Owner” />
<siteMapNode title=”Update Score” url=”Admin/MatchScore.aspx” description=”Edit the score for a match in progress” roles=”Reporter” />
<siteMapNode title=”Match Report” url=”Admin/MatchReport.aspx” description=”Upload or edit a match report” roles=”Reporter” />
<siteMapNode title=”Shop” url=”Admin/UpdateProducts.aspx” description=”Update products” roles=”Administrator” />
</siteMapNode>
...
2.Take a look at the Web.config stored in the root of the Admin folder. Notice that no specific locations are defined in this file, hence the only permission currently active on that folder is to deny access to all users:
<?xml version=”1.0” encoding=”utf-8”?> <configuration>
<system.web>
<authorization>
<deny users=”*” /> </authorization>
</system.web>
</configuration>
The result of these two configuration specifications is demonstrated if you run the site and log in, as Figure 11-14 shows using login ChrisH (password chrish@123).
398

Roles and Profiles
Figure 11-14
Chris is a reporter, so he can see the Administration link, and he can see the links to Edit News, Update Score, and Match Report. However, if he clicks any of those links, he goes straight back to the front page of the site — access has been denied.
3.Close your browser window before continuing — it’s time to make some configuration changes. The next step is to allow access to certain resources in the Admin section of the site by role. Open the Web.config for the Admin folder and add just the following highlighted code:
<?xml version=”1.0” encoding=”utf-8”?> <configuration>
<system.web>
<authorization> <deny users=”*” />
</authorization>
</system.web>
<location path=”Admin.aspx”> <system.web>
<authorization>
<allow roles=”Reporter,Administrator,Owner,Manager” /> </authorization>
</system.web>
</location>
</configuration>
399

Chapter 11
4.Run the site again and log in as ChrisH.You will now be able to click the Administration link itself and see the Admin.aspx page, shown in Figure 11-15.
Figure 11-15
5.The only problem is that you still can’t actually update scores or match reports until you add the remaining permissions. Close your browser window again before continuing because you’ll be making further configuration changes.
6.Add the following code to complete the Web.config file for the Admin section — and notice that one of the permissions isn’t quite correct:
...
<location path=”Admin.aspx”> <system.web>
<authorization>
<allow roles=”Reporter,Administrator,Owner,Manager” /> </authorization>
</system.web>
</location>
<location path=”EditNews.aspx”> <system.web>
<authorization>
<allow roles=”Reporter,Administrator,Owner,Manager” />
400

Roles and Profiles
</authorization>
</system.web>
</location>
<location path=”MatchScore.aspx”> <system.web>
<authorization>
<allow roles=”Reporter” /> </authorization>
</system.web>
</location>
<location path=”MatchReport.aspx”> <system.web>
<authorization>
<allow roles=”Reporter” /> </authorization>
</system.web>
</location>
<location path=”EditSquad.aspx”> <system.web>
<authorization>
<allow roles=”Owner,Reporter” /> </authorization>
</system.web>
</location>
<location path=”ScheduleMatch.aspx”> <system.web>
<authorization>
<allow roles=”Owner,Manager” /> </authorization>
</system.web>
</location>
<location path=”UpdateProducts.aspx”> <system.web>
<authorization>
<allow roles=”Administrator” /> </authorization>
</system.web>
</location>
<location path=”UserAdmin.aspx”> <system.web>
<authorization>
<allow roles=”Administrator” /> </authorization>
</system.web>
</location>
<location path=”CreateUser.aspx”> <system.web>
<authorization>
<allow roles=”Administrator” /> </authorization>
</system.web>
</location>
</configuration>
401
Chapter 11
7.In the permissions for the EditSquad.aspx page, notice that the Reporter role has just been granted access. The web.sitemap page hasn’t been modified, so see if you can guess what will be displayed when the page is run. Try it again, running the site and logging in as ChrisH once more and see what happens (see Figure 11-16).
Figure 11-16
8.This is the final result — not only can you see the Edit Squad link, but you can actually go to the Edit Squad page and modify members of the squad. You need to make just one last change to fix this problem — after all, reporters aren’t supposed to be able to modify membership of a team.
Again, you also need to close the browser window before continuing so that your changes take effect as expected.
9.Open the Admin folder’s Web.config file again and edit the following highlighted line:
<location path=”EditSquad.aspx”> <system.web>
<authorization>
<allow roles=”Owner” /> </authorization>
</system.web>
</location>
402

Roles and Profiles
10.Run the site again, and you will find that if you log in as any of the users who are only members of the Reporters role (ChrisH, John, or ChrisU), you will be able to view the Edit News, Update Score, and Match Report links and page content.
11.One last change to make. This time, modify the web.sitemap file as follows:
<siteMapNode title=”Match Report” url=”Admin/MatchReport.aspx description=”Upload or edit a match report” roles=”Reporter” />
<siteMapNode title=”Shop” url=”Admin/UpdateProducts.aspx” description=”Update products” roles=”Administrator, Reporter” />
</siteMapNode>
12.Run the page one last time and log in as a Reporter. You will be able to see the link to the Shop page in the Administration section, but if you click the link, you will be taken straight back to the default page. Fix this by removing the Reporter role from the SiteMapNode for the
UpdateProducts.aspx page.
How It Works
This example highlighted the somewhat delicate nature of keeping your web.sitemap and Web.config file data up to date with current business-case requirements. If you want to allow users to browse a site anonymously, a common configuration decision is to prompt users when it’s time for them to log in, and then display a link that they will want to click but forcing them to authenticate before enabling them to view the page.
In this example, you saw that the settings for authorization will control which links are available to each user role. The web.sitemap file can then be used to display additional links to a user. These are links to content that the user doesn’t have permission to access, to indicate that a facility exists (in this case, the Update Products facility in the Admin section) but that the user needs to log in as a sufficiently privileged user before the link will work.
Here’s a look at the most important bits in the code. From the Web.config file for the Admin folder on the site, the shaded lines of code specify that only administrators can add or update products:
<location path=”UpdateProducts.aspx”> <system.web>
<authorization>
<allow roles=”Administrator” /> </authorization>
</system.web>
</location>
Compare this with the addition to the siteMapNode that was made in the last part of the example:
<siteMapNode title=”Shop” url=”Admin/UpdateProducts.aspx” description=”Update products” roles=”Administrator, Reporter” />
This particular combination results in a Reporter being able to see a link, but being unable to access the contents of the link.
403

Chapter 11
If the opposite is true, and the authorization level specified in the Web.config file contains more roles than the web.sitemap file, the authorization will take precedence. Hence, when you changed the permissions for the EditSquad.aspx page and logged in as a Reporter, the link appeared in the navigation menu, and the page could be accessed:
<location path=”EditSquad.aspx”> <system.web>
<authorization>
<allow roles=”Owner,Reporter” /> </authorization>
</system.web>
</location>
Working with Roles in Code
Up to this point in the chapter, all of the customization that you looked at concerned the use of configuration files to lock down access to parts of the site based on user roles. In addition to these techniques, it’s possible to work with roles programmatically in code. This technique has been employed to some extent in the process of applying discounts to shop prices for members of the Fan Club. Many other different methods exist that you can use for working with roles, but the most commonly used is the
IsInRole() method.
The following code extract (which you will encounter again in Chapter 13) shows this in action:
public double MemberDiscount
{
get
{
if (HttpContext.Current.User.IsInRole(“FanClubMember”))
{
return (this.SubTotal * MemberDiscountPercentage);
}
return 0;
}
}
This code resides within the Shopping.cs class file used when users purchase items from the shop. The important piece in this code is the statement that applies the discount to users who are members of the Fan Club, using the User.IsInRole() method call.
The IsInRole() method takes, as an input, a string that is the name of the role to test. As the name of the method suggests, the result will indicate whether or not the user belongs to the role, hence the return value for the method is either true (yes, the user belongs to the requested role) or false (no, the user is not a member of that role). This technique is used again as part of the shopping process:
if (Context.User.IsInRole(“FanClubMember”))
{
SubTotalLabel.Text = string.Format(“Sub-Total:{0,35:C}”, Profile.Cart.SubTotal); MemberDiscount.Text = string.Format(“Member Discount:{0:C}”, _
Profile.Cart.MemberDiscount);
DiscountPanel.Visible = true;
}
404

Roles and Profiles
In this extract (from ShoppingCart.ascx.cs), the same test is made. There are slight differences between the two calls. The first employs the HttpContext.Current object:
if (HttpContext.Current.User.IsInRole(“FanClubMember”))
{
...
The second call employs the Context object:
if (Context.User.IsInRole(“FanClubMember”))
{
...
You don’t really need to worry about why there is a difference between the two method calls in the context of this chapter, because the actual method that is being called is the same in both cases. However, in case you have a more inquisitive nature, here’s what’s going on.
In the first case, because the code lives within a separate class file (not a code-beside file for an aspx page or ascx user control), the code could theoretically be called by a different application entirely, outside of the web environment. When users request a web page, they do so within a context. This context will contain a small amount of information along with each request that the user makes, which is understood by the web server. If the user is anonymous, the server will know that the current context represents an anonymous user. If the user has logged in, this small bit of information indicates that the request has come from an authenticated user. The context of a logged-in user states that the request comes from a specific user ID, which ASP.NET can interrogate to find out which roles the user belongs to.
The current context is freely available to web pages and user controls, but classes need to be told a bit more information before they will compile. The actual context that’s being used on the web page is the current context of the HTTP request, hence the class needs to have the HttpContext.Current version of the context, rather than the context that is available to all requests to a web page.
Enabling User Profiles
Enabling roles on a web site is a good way to open up or hide resources to users, and it also provides limited metadata about the users themselves. Just by being a member of the Reporters group, you can assume that John regularly attends matches and submits scores as they happen. However, this is very limited metadata, and it doesn’t give you much more insight into who John is, or what he is interested in. This is where you can start to adopt ASP.NET’s user profiles technology to store more information about a user.
For example, if you are a member of a web site that sells a wide variety of goods, you can buy goods from that site by creating a very basic user profile that validates your e-mail address, and can be used to process and track orders. However, on many shopping sites, you can take this “enrollment” process much further and supply additional information to your user account and say, “I like products like this.” When you revisit the site, you may then find that the front page changes to show you more items that you are interested in buying, and less of those you’re not so enamored with.
405

Chapter 11
This sort of information can be used to extend a simple user account by creating a user profile for storing this additional information; hence you can specify that you have no interest in owning a PlayStation or Xbox, because you only play games on my PC, and the site will be less likely to show you offers related to PS2 or Xbox editions of games. Furthermore, the sales team behind the web site may send out targeted e-mails to customers who have expressed an interest in a certain type of product, with the aim of increasing sales.
One of the uses for user profiles is to create areas of a site that are tailored specifically to the currently logged-in user, giving that user a more personalized view of the site. This technique — called personalization — can be used to develop a My Site style area of a web site, where you can amend your own user profile settings, and view information directly relevant to you. In larger corporations, you’ll find that the idea of a personalized area of a web or intranet application is quite commonly used — anyone who has ever used SharePoint Portal Server (or similar Portal-style application)
will be familiar with the idea of a My Site area.
As far as SharePoint is concerned, the My Site area of a portal can be highly customized to display your calendar and inbox (linked to an Exchange server), or to store custom lists of links to areas of the portal that you may be interested in. Although you’re not going to build anything as involved as this in this book, SharePoint Portal Server is one of the best examples of personalization, and doubtless the many other Portal-style applications available for purchase will offer similar levels of personalization.
ASP.NET 2.0 has some great tools available for developing simple profiles with relative ease, so in the next section of this chapter, you explore how these tools can be used to customize a site, and you look at how the Wrox United application uses profiles.
Building a Profile
There are two parts to building a profile. The first is to define what items you want to store. The second is to add functionality to a page to both add and edit information in a user profile.
To define which items you want to store in a profile, you add a list of items, and the type of data each item will contain, to the root Web.config file for a site. For example:
<profile enabled=”true”> <properties>
<add name=”MemberName”/> <add name=”Name”/>
<add name=”Address”/> <add name=”City”/> <add name=”County”/> <add name=”PostCode”/>
<add name=”Country”/>
<add name=”Mailings” type=”System.Boolean”/> <add name=”Email”/>
<add name=”Theme”/>
<add name=”Cart” serializeAs=”Binary” type=”Wrox.Commerce.ShoppingCart” allowAnonymous=”true”/>
</properties>
</profile>
406

Roles and Profiles
The list of profiles specified is actually the set of properties to be stored for all registered users of the Wrox United application. The default type of data to store is textual data (string data), so for those items without a specific type attribute, the data type is assumed to be string.
Two items on this list are not strings. The first is the Mailings property. This is a Boolean value (true or false) that can be used to store a simple choice. For example, does the user want to receive e-mail concerning the current news about the club or not? You can control the input for this value on a web page by simply including a check box that the user can click as a simple yes or no response to a question. This is an example of using a standard .NET type, and you could add profile properties using different types, such as storing an age in an Integer, or a date of birth in a DateTime.
The other non-string data type being used in this case is a custom type called Wrox.Commerce
.ShoppingCart. This type is explained in more detail in Chapter 13. For now, you should know that this type will store details of the current user’s shopping cart, so that if they fill the cart with items on one visit to the site, but choose not to purchase those items at that time, the data about the items stored in the cart will remain. In this way, when they next log in, the items are still in their cart. It also dictates whether anonymous users can fill a shopping cart. Because this is set to true, anyone coming to the site can fill a basket with items, so it’s up to you to make sure that you create a profile for them when they check out. You’ll come back to this point a bit later in this chapter in the “Managing Anonymous Shopping Carts” section.
A custom type is an object that has been defined by code to meet the requirements of a specific scenario. The code is contained in a class that has been developed to describe the properties and methods available to objects based on that particular type definition. For example, a String object has a ToString() method, but a DateTime object has ToString(), ToShortDateString, and ToLongDateString() methods, among others. You can write a custom type, like the ShoppingCart in this example, that has a specific set of properties and methods available,
so a ShoppingCart object will have an Update() method and a SubTotal() method.
To store some data in a profile, the following syntax can be used in a code file for a web page:
Profile.Name = “Chris Hart”;
Or, similarly, you can use this syntax to use a value entered by a user to populate the Name information in the Profile:
Profile.Name = txtName.Text;
This will cause the profile to store whatever the user has entered as the value of a text box on a page. So, to retrieve a value from a profile and display it on a page, you use the opposite syntax:
txtName.Text = Profile.Name;
This is all quite simple. The next section looks at it in context.
407