

- •Table of Contents
- •About this manual
- •Welcome!
- •VST Connections: Setting up input and output busses
- •About this chapter
- •Setting up busses
- •Using the busses
- •Setting up Groups and FX channels
- •About monitoring
- •External instruments/effects
- •The Project window
- •Background
- •Window Overview
- •Operations
- •Options
- •Playback and the Transport panel
- •Background
- •Operations
- •Options and Settings
- •Recording
- •Background
- •Basic recording methods
- •Audio recording specifics
- •MIDI recording specifics
- •Options and Settings
- •Recovery of audio recordings after system failure
- •Fades, crossfades and envelopes
- •Creating fades
- •The Fade dialogs
- •Creating crossfades
- •The Crossfade dialog
- •Auto Fades and Crossfades
- •Event Envelopes
- •The Arranger track
- •Introduction
- •Setting up the Arranger track
- •Working with arranger events
- •Flattening the Arranger chain
- •Live Mode
- •Arranging your music to video
- •Folder tracks
- •About folder tracks
- •Handling folder tracks
- •Working with folder parts
- •Using markers
- •About markers
- •The Marker window
- •Using the Marker track
- •Marker key commands
- •Editing markers in the Project Browser
- •The Transpose functions
- •Introduction
- •Transposing your music
- •Other functions
- •The mixer
- •About this chapter
- •Overview
- •Configuring the mixer
- •The audio-related channel strips
- •The MIDI channel strips
- •The common panel
- •The input and output channels
- •Basic mixing procedures
- •Audio specific procedures
- •MIDI specific procedures
- •Utilities
- •VST Mixer Diagrams
- •Control Room
- •Background
- •Configuring the Control Room
- •The Control Room Overview
- •The Control Room Mixer
- •Control Room operations
- •Studios and Studio Sends
- •Direct Monitoring and latency
- •WK-Audio’s ID Controller
- •Audio effects
- •About this chapter
- •Overview
- •Insert effects
- •Send effects
- •Setting up send effects
- •Using the Side-Chain input
- •Using external effects
- •Making settings for the effects
- •Effect presets
- •VST Instruments and Instrument tracks
- •Introduction
- •VST Instrument channels vs. instrument tracks
- •VST Instrument channels
- •Instrument tracks
- •Comparison
- •Automation considerations
- •What do I need? Instrument channel or Instrument track?
- •Instrument Freeze
- •VST instruments and processor load
- •Using presets for VSTi configuration
- •About latency
- •External instruments
- •Surround sound
- •Background
- •Operations
- •Automation
- •Introduction
- •Enabling and disabling the writing of automation data
- •What can be automated?
- •The Automation panel
- •Virgin territory vs. the initial value
- •Automation modes
- •Automation performance utilities
- •The Settings section
- •Hints and further options
- •Automation track operations
- •Working with automation curves
- •Audio processing and functions
- •Background
- •Audio processing
- •Applying plug-ins
- •The Offline Process History dialog
- •Batch Processing
- •Freeze Edits
- •Detect Silence
- •The Spectrum Analyzer
- •Statistics
- •The Sample Editor
- •Background
- •Window overview
- •General Operations
- •Options and settings
- •Audio Warp realtime processing / Tempo matching audio to the project tempo
- •Working with hitpoints and slices
- •Free Warp
- •Realtime pitch-shifting of audio events
- •Flattening the realtime processing
- •The Audio Part Editor
- •Background
- •Opening the Audio Part Editor
- •Window overview
- •Operations
- •Common methods
- •Options and Settings
- •The Pool
- •Background
- •Window overview
- •Operations
- •VST Sound
- •Introduction
- •The MediaBay
- •Introduction
- •Window overview
- •Browsing for media files
- •Finding files in the Viewer section
- •Previewing files in the Scope section
- •The Tag Editor
- •Media management
- •Track Presets
- •Introduction
- •Types of track presets
- •VST presets
- •Browsing for presets
- •Creating a track preset
- •Creating tracks from track presets or VST presets
- •Applying track presets
- •Previewing track and VST presets
- •Inserts and EQ settings from track presets
- •Track Quick Controls
- •Introduction
- •Setting up the Quick Controls tab
- •Options and settings
- •Setting up quick controls on an external remote controller
- •MIDI realtime parameters and effects
- •Introduction
- •Basic track settings
- •MIDI Modifiers
- •MIDI effects
- •Managing plug-ins
- •MIDI processing and quantizing
- •Introduction
- •The Quantizing functions
- •Making your settings permanent
- •Dissolve Part
- •Repeat Loop
- •Other MIDI functions
- •The MIDI editors
- •About editing MIDI
- •Opening a MIDI editor
- •Key Editor operations
- •Edit In-Place
- •List Editor operations
- •Introduction
- •Opening the Logical Editor
- •Window overview
- •Selecting a preset
- •Setting up filter conditions
- •Selecting a function
- •Specifying actions
- •Applying the defined actions
- •Working with presets
- •The Input Transformer
- •The Project Logical Editor
- •Introduction
- •Opening the Project Logical Editor
- •Window overview
- •Selecting a preset
- •Setting up filter conditions
- •Selecting a function
- •Specifying actions
- •Applying the defined actions
- •Working with presets
- •Working with System Exclusive messages
- •Introduction
- •Bulk dumps
- •Recording System Exclusive parameter changes
- •Editing System Exclusive messages
- •Working with the Tempo track
- •Background
- •Operations
- •Process Tempo
- •The Process Bars dialog
- •Options and settings
- •The Beat Calculator
- •Merge Tempo From Tapping
- •The Time Warp tool
- •The Project Browser
- •Window Overview
- •Editing tracks
- •The Track Sheet
- •Overview
- •Printing the Track Sheet
- •Export Audio Mixdown
- •Introduction
- •Mixing down to an audio file
- •The available file formats
- •Synchronization
- •Background
- •Synchronization signals
- •Synchronizing the transport vs. synchronizing audio
- •Making basic settings and connections
- •Synchronization settings
- •Timecode Preferences
- •Machine Control
- •Setting up Machine Control
- •Working with VST System Link
- •Preparations
- •Activating VST System Link
- •Application examples
- •Video
- •Background
- •Before you start
- •Operations
- •The Edit Mode
- •Working with film transfers
- •Compensating for film transfers to video
- •ReWire
- •Introduction
- •Launching and quitting
- •Activating ReWire channels
- •Using the transport and tempo controls
- •How the ReWire channels are handled in Nuendo
- •Routing MIDI via ReWire2
- •Considerations and limitations
- •File handling
- •Working with Projects
- •Startup Options
- •Working with libraries
- •Revert
- •Importing audio
- •Exporting and importing OMF files
- •Exporting and importing AAF files
- •Exporting and importing AES31 files
- •Exporting and importing OpenTL files
- •Importing XSend projects from Liquid
- •Exporting and importing standard MIDI files
- •Exporting and importing MIDI loops
- •Exporting and importing tracks
- •Other Import/Export functions
- •Cleanup
- •Customizing
- •Background
- •Workspaces
- •The Setup dialogs
- •Customizing track controls
- •Configuring the main menu items
- •About preference presets
- •Appearance
- •Applying track and event colors
- •Where are the settings stored?
- •Key commands
- •Introduction
- •Setting up key commands
- •Setting up tool modifier keys
- •The default key commands
- •Index

The following options are available:
Option |
Description |
Do Nothing |
Nuendo launches without opening a project. |
Open Last |
The last saved project is opened on launch. |
Project |
|
Open ’Default’ |
The default template is opened, see “Setting up a default |
Template |
template” on page 488. |
Show Open |
The Open dialog opens on launch, allowing you to manu- |
Dialog |
ally locate and open the desired project. |
Show Template |
The Template dialog opens on launch, allowing you to |
Dialog |
create a new project from one of the templates. |
Show Open |
The Open Document Options dialog opens on launch, |
Options Dialog |
see below. It allows you to make a different choice each |
|
time you launch Nuendo. |
|
|
Nuendo Open Document Options Dialog
This dialog will open in two cases:
•If you launch Nuendo with the option “Show Open Options Dialog” selected on the “On Startup” pop-up menu in the Preferences (General page).
•If you hold down [Ctrl]/[Command] while launching Nuendo.
Working with libraries
A library is a stand-alone Pool that is not associated with a project file (for more information about Pools, see “The Pool” on page 296). You can use libraries to store sound effects, loops, video clips, etc., and transfer media from a library into a project by using drag and drop. The following library functions are available on the File menu:
New Library
Creates a new library. Just as when creating new projects, you will be asked to specify a project folder for the new library (in which media files will be stored). The library will show up as a separate Pool window in Nuendo.
Open Library
Opens a file dialog for opening a saved library file.
Save Library
Opens a file dialog for saving the library file (file extension “.npl”).
Revert
If you select “Revert” from the File menu, you will be asked whether you really want to revert to the last saved version of the project. If you click “Revert”, all changes you have made since saving will be discarded.
If you have recorded or created new audio files since saving, you will be asked whether you want to delete or keep these.
The Open Document Options Dialog.
The dialog lists your recently used projects.
•To open a project, select it and click the “Open Selection” button.
•To open another project not listed here, click the “Open Other…” button.
A file dialog opens that allows you to look for the desired file on your disk.
•To create a new project, click the “New Project” button.
490
File handling
Importing audio
ÖFor exporting Audio, see the chapter “Export Audio Mixdown” on page 437.
ÖFor the option “Replace Audio in Video File”, see “Replacing the audio in a video file” on page 474.
Importing audio files
For information on audio file import preferences, please see “Audio file import options” on page 41. For information on import into the Pool and import options, see “Import Medium…” on page 306.
Importing audio CD tracks
You can import audio from audio CDs into Nuendo projects in two ways:
•To import the CD tracks directly into project tracks, choose the “Audio CD…” option from the Import submenu on the File menu.
The imported audio CD track(s) will be inserted on the selected audio track(s) at the project cursor position.
•To import the CD tracks into the Pool, select “Import Audio CD” from the Media menu.
This might be the preferred method if you want to import several CD tracks in one go. For more information, see “Importing audio CD tracks” on page 308.
Selecting one of the Import Audio CD menu items brings up the following dialog:
To import one or more tracks, proceed as follows:
1.If you have more than one CD drive, select the correct one from the Drives pop-up menu top left.
On opening the CD, the program tries to retrieve the track names from CDDB (a CD database). If no connection to CDDB can be established or the CD track names are not found, you can manually change the generic track name in the Default Name field, see below.
2.Activate the “Secure Mode” option, if you want to use a Secure Read mode.
Activate this if you encounter problems when trying to import an audio CD. Error checking and correction will be done during the process. Note that this mode will take more time.
3.In the Windows version, select the data transfer speed from the Speed pop-up menu.
While you normally want to use the fastest possible speed, you may have to select a slower speed for flawless audio extraction.
4.Activate the Copy checkbox for every audio file you want to import.
You can also select a copy section for every file, see below.
491
File handling
5.Click on Copy to generate a local copy of the audio file(s) or section(s).
The copied files are listed at the bottom of the dialog. By default, imported audio CD tracks will be stored as Wave files (Windows) or AIFF files (Mac) in the Audio folder of the current project. To change the folder, click Folder and select another one from the dialog. During copying, the button is labeled “Stop”; click it to stop the process.
6.Click OK to import the copied audio files into the project, or click Cancel to stop the import and discard the copied files.
• If you import more than one audio file into project tracks, a dialog opens in which you have to choose whether to insert the tracks on one track or on different ones.
The new track(s) are displayed in the Project window. New audio clips are created and added to the Pool.
The columns in the “Import from Audio CD” dialog have the following functionality:
Column |
Description |
Copy |
Activate the checkbox in this column for the track you |
|
want to copy/import. To activate more than one check- |
|
box, click and drag over the checkboxes (or press [Ctrl]/ |
|
[Command] or [Shift] and click). |
#Number of track.
CD Track |
When you import an audio CD track, the file will be |
|
named according to the name in this column. The names |
|
are pulled automatically from CDDB, if possible. You can |
|
rename a track by clicking in the Track column and typing |
|
a new name. You can also apply a generic name to all au- |
|
dio CD tracks, if no name was available in CDDB. |
Length |
The length of the audio CD track in minutes and seconds. |
Size |
The file size of the audio CD track in MegaBytes. |
Copy Start |
You can copy a section of a track if you like. This indi- |
|
cates the start of the section to be copied in the track. By |
|
default, this is set to the start of the track (0.000) but you |
|
can adjust this on the copy selection ruler (see below). |
Copy End |
Indicates the end of the section to be copied in the track. |
|
By default, this is set to the end of the track but you can |
|
adjust this on the copy selection ruler (see below). |
|
|
By default, the complete tracks are selected.
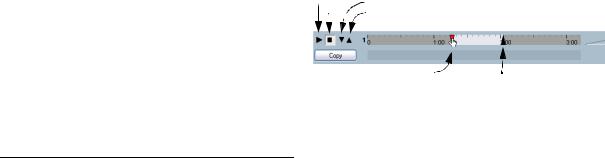
• If you want to copy and import a section of an audio CD track only, select the track in the list and specify the start and end of the selection to be copied by dragging the handles in the copy selection ruler.
Use the start and end audition buttons to fine tune the selection boundaries.
Play |
|
Play start of selection |
|
Stop |
Play end of selection |
|
|
|
|
|
|
|
Start of selection handle |
End of selection handle |
|
Ö Note that you can import sections of several audio CD tracks by selecting them in turn and adjusting the selection. The start and end settings for each track will be displayed in the list.
•You can audition the selected audio CD track by clicking the Play button.
The track will be played back from selection start to selection end (or until you click the Stop button).
•The arrow up/down buttons allow you to audition the start and end of the selection only.
The arrow down button will play a short snippet beginning at the start of the selection, while the arrow up button will play a snippet starting just before the end of the selection.
•In case no connection to CDDB could be established or no CD track names were found, you can change the generic audio file name in the Default Name field.
The imported audio files be will be named accordingly, i.e. <default name> 01 etc.
Ö Note that if there is a track name for a specific audio CD track in the list, the corresponding audio file will use that name instead.
• To open the CD drive, click on the Eject button at the top of the dialog.
492
File handling

Importing Audio from Video files
While you can automatically extract the audio when importing a video file (see “Extracting audio from a video file” on page 472), it is also possible to import the audio from a video file without importing the video itself:
1.Pull down the File menu and select “Audio from Video File…” from the Import submenu.
2.In the file dialog that opens, locate and select the video file and click Open.
The audio in the selected video file is extracted and converted to a Wave file in the project’s Audio folder.
• A new audio clip is created and added to the Pool. In the Project Window, an event referencing the audio file will be inserted on the selected track at the project Cursor position. If no track was selected, a new track will be created.
This works just like when importing regular audio files.
Ö For importing video files, see “Importing a video file” on page 470.
Importing ReCycle files
ReCycle by Propellerhead Software is a program designed especially for working with sampled loops. By “slicing” a loop and making separate samples of each beat, ReCycle makes it possible to match the tempo of a loop and edit the loop as if it was built of individual sounds. Nuendo can import two file types created by ReCycle:
•REX files (export file format of the first versions of ReCycle, extension “.rex”).
•REX 2 files (file format of ReCycle 2.0 and later, extension “.rx2”).
Proceed as follows:
1.Select an audio track and move the project cursor to where you want the imported file to start.
You probably want to import REX files to tempo based audio tracks, since this will allow you to change the tempo later on (having the imported REX file automatically adjust).
2.Select “Audio File…” from the Import submenu on the File menu.
3.Select REX files or REX 2 files with the file type popup menu in the file dialog.
4. Locate and select the file and click Open.
The file is imported and automatically adjusted to the current Nuendo tempo.
Unlike a regular audio file, the imported REX file will consist of several events, one for each “slice” in the loop. The events will automatically be placed in an audio part on the selected track and positioned so that the original internal timing of the loop is preserved.
5. If you now open the part in the Audio Part Editor, you can edit each slice separately by muting, moving and resizing events, adding effects and processing, etc.
You can also adjust the tempo and have the REX file automatically follow (provided that its track is tempo based).
Ö You can achieve similar results by using Nuendo’s own loop slicing features, see “Working with hitpoints and slices” on page 278.
Importing compressed audio files
Nuendo can import (and export, see “Mixing down to an audio file” on page 438) several common audio compression formats. The procedure is the same as when importing any non-compressed audio file, with one important thing to note:
• When you import a compressed audio file, Nuendo will create a copy of the file and convert this to Wave format (Windows) or AIFF format (Mac OS X) before importing it. The original compressed file will not be used in the project.
The imported file will be placed in the designated project Audio folder.
The resulting Wave/AIFF file will be several times larger than the original compressed file.
493
File handling