

• The “Locators to Selection” item on the Transport menu (default key command [P]) sets the locators to encompass the current selection.
• If you click the jog wheel during playback, playback will automatically stop.
This is available if you have selected one or several events or made a selection range.
• You can also adjust the locators numerically on the Transport panel.
Clicking the L/R buttons in the locator section on the Transport panel will move the project cursor to the respective locator. If you press [Alt]/[Option] and click the L or R button, the corresponding locator will be set to the current project cursor position.
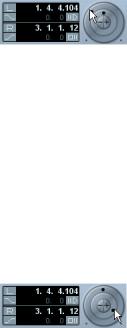
The Shuttle Speed control
The shuttle speed control (the outer wheel on the Transport panel) allows you to play the project at any playback speed, forwards or backwards. This provides a quick way to locate or “cue” to any position in the project.
•Turn the shuttle speed wheel to the right to start playback.
The further to the right you move the wheel, the faster the playback speed.
•If you turn the wheel to the left instead, the project will play backwards.
Similarly, the playback speed depends on how far to the left you turn the wheel.
Project scrubbing – the Jog Wheel
The middle wheel on the Transport panel serves as a jog wheel. By clicking and dragging it to the right or left you will move the playback position manually forwards or backwards – much like scrubbing on a tape deck. This helps you pinpoint exact locations in the project.
• Note that the jog wheel is an “endless dial” – you can turn it as many times as needed to move to the desired location.
The faster you turn the wheel, the faster the playback speed.
The nudge position buttons
The + and – buttons in the middle of the Shuttle/Jog section allow you to nudge the project cursor position to the right or left, respectively. Each time you click a nudge button, the project cursor is moved by one frame.
Options and Settings
The “Return to Start Position on Stop” preference
This setting is found on the Transport page in the Preferences (found on the File menu under Windows, or on the Nuendo menu under Mac OS X).
•If “Return to Start Position on Stop” is activated when you stop playback, the project cursor will automatically return to the position where recording or playback last started.
•If “Return to Start Position on Stop” is deactivated, the project cursor will remain at the position where you stop playback.
Pressing Stop again will return the project cursor to the position where recording or playback last started.
About track disable/enable
For audio tracks, the track context menu contains an item named “Disable Track”. This shuts down all disk activity for the track, as opposed to using Mute, which merely turns down the output volume for a track. For example, if you often record “alternative takes” you can easily build up a large number of takes on different tracks. Even though these tracks are muted, they are actually still “playing back” from the hard disk during playback. This puts an unnecessary load on your disk system, so using “Disable Track” is recommended for such situations.
• Select “Disable Track” for tracks that you want to keep in the project for later use (but don’t want to play back now).
Select “Enable Track” from the track context menu to re-enable disabled tracks.
62
Playback and the Transport panel
Playback functions
Apart from the standard transport controls on the Transport panel, you can also find a number of functions that can be used to control playback on the Transport menu. The items have the following functionality:
Option |
Description |
Postroll from |
Starts playback from the beginning or end of the |
Selection Start/End |
currently selected range and stops after the time |
|
set in the Postroll field on the Transport panel. |
Preroll to Selection |
Starts playback from a position before the start or |
Start/End |
end of the currently selected range and stops at |
|
the selection start or end, respectively. The play- |
|
back start position is set in the Preroll field on the |
|
Transport panel. |
Play from Selection |
Activates playback from the beginning or end of |
Start/End |
the current selection. |
Play until Selection |
Activates playback two seconds before the start or |
Start/End |
end of the current selection and stops at the selec- |
|
tion start or end, respectively. |
Play until Next Marker |
This activates playback from the project cursor and |
|
stops at the next marker. |
Play Selection Range |
This activates playback from the start of the current |
|
selection and stops at the selection end. |
Loop Selection |
This activates playback from the start of the current |
|
selection and keeps starting over again when |
|
reaching the selection end. |
|
|
The functions listed above (except “Play until Next Marker”) are only available if you have selected one or more events or made a selection range.
Ö In the Preferences dialog (Editing–Audio page) you will find the option “Treat Muted Audio Events like Deleted”. When you activate this option, any events overlapped by a muted event will become audible.
About Chase
Chase is a function that makes sure your MIDI instruments sound as they should when you locate to a new position and start playback. This is accomplished by the program transmitting a number of MIDI messages to your instruments each time you move to a new position in the project, making sure all MIDI devices are set up correctly with regard to program change, controller messages (such as MIDI Volume), etc.
For example, let’s say you have a MIDI track with a program change event inserted at the beginning. This event makes a synth switch to a piano sound.
At the beginning of the first chorus you have another program change event which makes the same synth switch to a string sound.
You now play back the song. It begins with the piano sound and then switches to the string sound. In the middle of the chorus you stop and rewind to some point between the beginning and the second program change. The synth will now still play the string sound although in this section it really should be a piano!
The Chase function takes care of that. If program change events are set to be chased, Nuendo will track the music back to the beginning, find the first program change and transmit it to your synth, setting it to the correct sound.
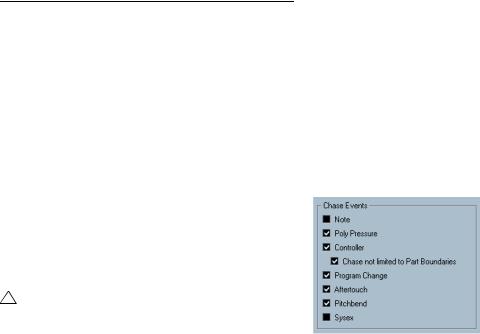
The same thing can apply to other event types as well. The Chase Events settings in the Preferences (MIDI page) determine which event types will be chased when you locate to a new position and start playback.
Ö Event types for which the checkbox is activated here will be chased.
• In the Chase Events section of the Preferences (MIDI page), you will find the option “Chase not limited to Part Boundaries”.
When you activate this option, MIDI controllers are also chased outside the part boundaries, i.e. the Chase will be performed on the part touched by the cursor as well as on all the parts to the left of it. Please note that this option should be deactivated for very large projects, as it considerably slows down operations such as positioning and soloing. When you deactivate this option, the MIDI controllers are only chased within the parts under the position cursor.
63
Playback and the Transport panel