

4
Playback and the Transport panel
Background
This chapter describes the various methods available for controlling Playback and Transport functions in Nuendo.
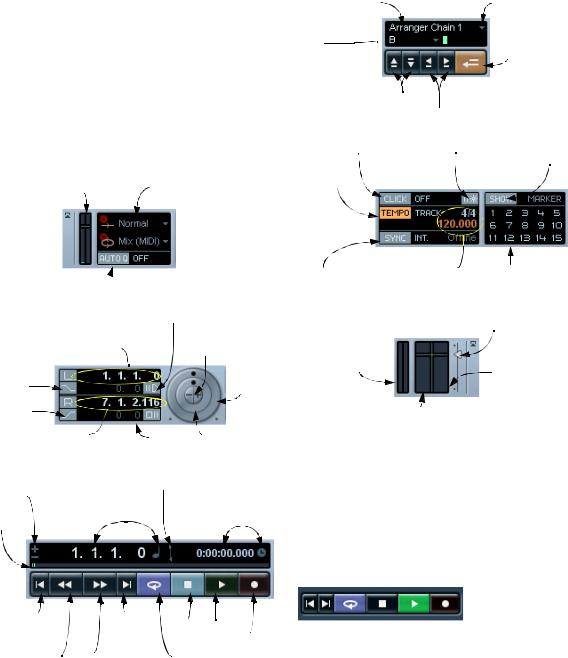
The Transport panel
Below you can find a brief description of each item on the Transport panel.
The pictures below show the Transport panel with all controls visible and in their default position. The Transport panel is divided into sections, from left to right.
CPU load and Disk Cache meters |
Record mode pop-up menu |

 Cycle Record mode pop-up menu
Activates Auto Quantize
|
Preroll setting and on/off switch |
||||
Left locator: record start point, punch |
|
Nudge +/- 1 Frame |
|||
in point and beginning of Cycle |
|
||||
Activates |
|
|
|
Shuttle |
|
punch in |
|
|
|
speed |
|
Activates |
|
|
|
|
|
punch out |
|
|
|
|
|
Right locator: punch out |
Postroll setting |
|
Jog Wheel |
||
point and end of Cycle |
and on/off switch |
(project scrubbing) |
|||
Nudge position |
|
Exchange time formats |
|||
right/left |
Primary Time Display |
|
|
||
|
Secondary Time Display |
||||
Position |
and format pop-up |
||||
and format pop-up |
|||||
slider |
|
|
|||
|
|
|
|
||
Active Arranger |
Arranger Selector |
chain |
|
Current Arranger
item  Activate Arranger Mode
Previous/Next Arranger items
First/Last repeat of current Arranger item
Metronome click on/off |
Precount on/off Show Markers (opens |
|
Marker window) |
Tempo track on/off 
Synchronization |
The tempo and time |
Jump to Marker |
on/off |
signature display |
|
Output Level Control (for the Control Room channel, if the Control Room is enabled, or for the Main Mix output bus, see below).
MIDI In Activity
(left meter)/
MIDI Out activity
Audio output activity and Clipping indicator (top)
Audio input activity and Clipping indicator (Default Input channel)
Ö Note that the Output Activity and Clipping indicator as well as the Output Level Control refer to the Control Room channel if the Control Room is activated. If the Control Room is disabled, these controls refer to the Main Mix Output bus as defined on the Outputs tab in the VST Connections window. For information on the Control Room, see the chapter “Control Room” on page 151.
• The main Transport functions (Cycle/Stop/Play/Record) can also be shown on the toolbar.
Go to previous |
Go to next |
Stop Play |
|
marker or |
|||
marker or |
|||
project start |
project end |
Record |
|
Rewind |
Fast forward |
Cycle on/off |
In addition, various play options are available on the Transport menu.
59
Playback and the Transport panel

Hiding and showing the Transport Panel
The Transport panel is shown by default when you launch a new project. To hide or show it, select “Transport Panel” on the Transport menu (or use a key command – by default [F2]).
About Preroll and Postroll
These items are described in the chapter “Recording”, see “About Preroll and Postroll” on page 83.
Changing the Transport panel setup
You can customize the appearance of the Transport panel by right-clicking anywhere on the panel and selecting/deselecting the desired options on the pop-up menu that appears.
This is described in detail in the section “Customizing via the setup context menus” on page 506.
The numeric keypad
In the default Key Command settings, various Transport panel operations are assigned to the numeric keypad on the computer keyboard. The keypads are slightly different on PC and Macintosh computers:
Numeric Key |
Function |
[Enter] |
Play |
[+]Fast Forward
[-] |
Rewind |
[*]Record
[÷] (Win)/[/] (Mac) |
Cycle On/Off |
[,]Return to Zero
[0]Stop
[1]Go to Left Locator
[2]Go to Right Locator
[3-9] |
Go to marker 3 to 9 |
|
|
Operations
Setting the project cursor position
There are several ways to move the project cursor position:
•By using Fast Forward and Rewind.
•By using the Jog/Shuttle/Nudge control on the Transport panel (see “The Shuttle Speed control” on page 62).
•By dragging the project cursor in the lower part of the ruler.
•By clicking in the ruler.
Double-clicking in the ruler moves the cursor and starts/stops playback.
•If the option “Locate when Clicked in Empty Space” is activated in the Preferences (Transport page) you can click anywhere in an empty section of the Project window to move the cursor position.
•By changing the value in any of the position displays.
•By using the position slider above the transport buttons in the Transport panel.
The range of the slider relates to the Length setting in the Project Setup dialog. Hence, moving the slider all the way to the right will take you to the end of the project.
•By using markers (see “About markers” on page 110).
•By using playback options (see “Playback functions” on page 63).
•By using the Arranger function (see “The Arranger track” on page 98).
•By using functions on the Transport menu.
The following functions are available:
Function |
Description |
Locate Selection/ |
Moves the project cursor to the beginning or end of the |
Locate Selection |
current selection. For this to be available, you must |
End |
have selected one or more events or parts, or made a |
|
selection range. |
Locate Next/ |
This moves the project cursor to the closest marker to |
Previous Marker |
the right or left (see “About markers” on page 110). |
Locate Next/ |
This moves the project cursor forwards or backwards |
Previous Event |
respectively, to the closest beginning or end of any |
|
event on the selected track(s). |
|
|
60
Playback and the Transport panel
ÖIf Snap is activated when dragging the project cursor, the Snap value is taken into account. This is helpful for finding exact positions quickly.
ÖThere are also numerous key commands available for moving the project cursor (in the Transport category in the Key Commands dialog).
For example, you can assign key commands to the “Step Bar” and “Step Back Bar” functions, allowing you to move the project cursor in steps of one bar, backwards and forwards.
About the Transport panel display formats
Primary time display (left) and secondary time display (right).
The time unit shown in the ruler can be independent from the time unit shown in the main time display on the Transport panel. This means that you can display timecode in the transport position display and bars and beats in the ruler, for example. In addition, there is a secondary time display to the right of the primary time display which is also independent, giving you three different time units shown at the same time (in the Project window, you can also create additional ruler tracks – see “Using multiple rulers – ruler tracks” on page 32).
The following rules apply:
•If you change the time format of the primary time display on the Transport panel, the time format of the ruler will be changed as well.
This is the same as changing the display format in the Project Setup. Therefore, to have different display formats in the ruler and the main time display you should change the format in the ruler.
•The primary time display format is set on the pop-up menu to the right in the main position display.
•The secondary time display is completely independent, and the display format is set on the pop-up menu to the right in the secondary time display.
•You can swap time formats between the primary and secondary time displays by clicking the double arrow symbol between them.
The left and right locators
The left and right locators are a pair of position markers used for specifying punch-in and punch-out positions during recording, and as boundaries for cycle playback and recording.
Ö When cycle mode is activated on the Transport panel, the area between the left and right locator will be repeated (cycled) on playback.
However, if the right locator is positioned before the left, this will work as a “jump” or “skip mode” – when the project cursor reaches the right locator it will immediately jump to the left locator position and continue playback from there.
There are several ways to set locator positions:
• To set the left locator, press [Ctrl]/[Command] and click at the desired position in the ruler.
Similarly, pressing [Alt]/[Option] and clicking in the ruler sets the right locator. You can also drag the locator “handles” directly in the ruler.
The locators are indicated by the “flags” in the ruler. The area between the locators is highlighted in the ruler and in the Project window (see “Appearance” on page 511). Note that if the right locator is before the left locator, the color of the ruler between the locators will change (from blue to red).
•Click and drag in the upper half of the ruler to “draw” a locator range.
If you click on an existing locator range, you can drag to move it.
•Pressing [Ctrl]/[Command] and pressing [1] or [2] on the numeric keypad sets the left or right locator to the project cursor position.
Similarly, you can press [1] or [2] on the numeric keypad (without [Ctrl]/ [Command]) to set the project cursor position to the left or right locator position. Note that these are default key commands – you can change these if you like.
• This setting also determines the time format displayed for the left and right locators on the Transport panel.
• By creating cycle markers you can store any number of left and right locator positions, which can be recalled by simply double-clicking on the corresponding marker (see “About cycle markers” on page 111).
61
Playback and the Transport panel