

- •Table of Contents
- •About this manual
- •Welcome!
- •VST Connections: Setting up input and output busses
- •About this chapter
- •Setting up busses
- •Using the busses
- •Setting up Groups and FX channels
- •About monitoring
- •External instruments/effects
- •The Project window
- •Background
- •Window Overview
- •Operations
- •Options
- •Playback and the Transport panel
- •Background
- •Operations
- •Options and Settings
- •Recording
- •Background
- •Basic recording methods
- •Audio recording specifics
- •MIDI recording specifics
- •Options and Settings
- •Recovery of audio recordings after system failure
- •Fades, crossfades and envelopes
- •Creating fades
- •The Fade dialogs
- •Creating crossfades
- •The Crossfade dialog
- •Auto Fades and Crossfades
- •Event Envelopes
- •The Arranger track
- •Introduction
- •Setting up the Arranger track
- •Working with arranger events
- •Flattening the Arranger chain
- •Live Mode
- •Arranging your music to video
- •Folder tracks
- •About folder tracks
- •Handling folder tracks
- •Working with folder parts
- •Using markers
- •About markers
- •The Marker window
- •Using the Marker track
- •Marker key commands
- •Editing markers in the Project Browser
- •The Transpose functions
- •Introduction
- •Transposing your music
- •Other functions
- •The mixer
- •About this chapter
- •Overview
- •Configuring the mixer
- •The audio-related channel strips
- •The MIDI channel strips
- •The common panel
- •The input and output channels
- •Basic mixing procedures
- •Audio specific procedures
- •MIDI specific procedures
- •Utilities
- •VST Mixer Diagrams
- •Control Room
- •Background
- •Configuring the Control Room
- •The Control Room Overview
- •The Control Room Mixer
- •Control Room operations
- •Studios and Studio Sends
- •Direct Monitoring and latency
- •WK-Audio’s ID Controller
- •Audio effects
- •About this chapter
- •Overview
- •Insert effects
- •Send effects
- •Setting up send effects
- •Using the Side-Chain input
- •Using external effects
- •Making settings for the effects
- •Effect presets
- •VST Instruments and Instrument tracks
- •Introduction
- •VST Instrument channels vs. instrument tracks
- •VST Instrument channels
- •Instrument tracks
- •Comparison
- •Automation considerations
- •What do I need? Instrument channel or Instrument track?
- •Instrument Freeze
- •VST instruments and processor load
- •Using presets for VSTi configuration
- •About latency
- •External instruments
- •Surround sound
- •Background
- •Operations
- •Automation
- •Introduction
- •Enabling and disabling the writing of automation data
- •What can be automated?
- •The Automation panel
- •Virgin territory vs. the initial value
- •Automation modes
- •Automation performance utilities
- •The Settings section
- •Hints and further options
- •Automation track operations
- •Working with automation curves
- •Audio processing and functions
- •Background
- •Audio processing
- •Applying plug-ins
- •The Offline Process History dialog
- •Batch Processing
- •Freeze Edits
- •Detect Silence
- •The Spectrum Analyzer
- •Statistics
- •The Sample Editor
- •Background
- •Window overview
- •General Operations
- •Options and settings
- •Audio Warp realtime processing / Tempo matching audio to the project tempo
- •Working with hitpoints and slices
- •Free Warp
- •Realtime pitch-shifting of audio events
- •Flattening the realtime processing
- •The Audio Part Editor
- •Background
- •Opening the Audio Part Editor
- •Window overview
- •Operations
- •Common methods
- •Options and Settings
- •The Pool
- •Background
- •Window overview
- •Operations
- •VST Sound
- •Introduction
- •The MediaBay
- •Introduction
- •Window overview
- •Browsing for media files
- •Finding files in the Viewer section
- •Previewing files in the Scope section
- •The Tag Editor
- •Media management
- •Track Presets
- •Introduction
- •Types of track presets
- •VST presets
- •Browsing for presets
- •Creating a track preset
- •Creating tracks from track presets or VST presets
- •Applying track presets
- •Previewing track and VST presets
- •Inserts and EQ settings from track presets
- •Track Quick Controls
- •Introduction
- •Setting up the Quick Controls tab
- •Options and settings
- •Setting up quick controls on an external remote controller
- •MIDI realtime parameters and effects
- •Introduction
- •Basic track settings
- •MIDI Modifiers
- •MIDI effects
- •Managing plug-ins
- •MIDI processing and quantizing
- •Introduction
- •The Quantizing functions
- •Making your settings permanent
- •Dissolve Part
- •Repeat Loop
- •Other MIDI functions
- •The MIDI editors
- •About editing MIDI
- •Opening a MIDI editor
- •Key Editor operations
- •Edit In-Place
- •List Editor operations
- •Introduction
- •Opening the Logical Editor
- •Window overview
- •Selecting a preset
- •Setting up filter conditions
- •Selecting a function
- •Specifying actions
- •Applying the defined actions
- •Working with presets
- •The Input Transformer
- •The Project Logical Editor
- •Introduction
- •Opening the Project Logical Editor
- •Window overview
- •Selecting a preset
- •Setting up filter conditions
- •Selecting a function
- •Specifying actions
- •Applying the defined actions
- •Working with presets
- •Working with System Exclusive messages
- •Introduction
- •Bulk dumps
- •Recording System Exclusive parameter changes
- •Editing System Exclusive messages
- •Working with the Tempo track
- •Background
- •Operations
- •Process Tempo
- •The Process Bars dialog
- •Options and settings
- •The Beat Calculator
- •Merge Tempo From Tapping
- •The Time Warp tool
- •The Project Browser
- •Window Overview
- •Editing tracks
- •The Track Sheet
- •Overview
- •Printing the Track Sheet
- •Export Audio Mixdown
- •Introduction
- •Mixing down to an audio file
- •The available file formats
- •Synchronization
- •Background
- •Synchronization signals
- •Synchronizing the transport vs. synchronizing audio
- •Making basic settings and connections
- •Synchronization settings
- •Timecode Preferences
- •Machine Control
- •Setting up Machine Control
- •Working with VST System Link
- •Preparations
- •Activating VST System Link
- •Application examples
- •Video
- •Background
- •Before you start
- •Operations
- •The Edit Mode
- •Working with film transfers
- •Compensating for film transfers to video
- •ReWire
- •Introduction
- •Launching and quitting
- •Activating ReWire channels
- •Using the transport and tempo controls
- •How the ReWire channels are handled in Nuendo
- •Routing MIDI via ReWire2
- •Considerations and limitations
- •File handling
- •Working with Projects
- •Startup Options
- •Working with libraries
- •Revert
- •Importing audio
- •Exporting and importing OMF files
- •Exporting and importing AAF files
- •Exporting and importing AES31 files
- •Exporting and importing OpenTL files
- •Importing XSend projects from Liquid
- •Exporting and importing standard MIDI files
- •Exporting and importing MIDI loops
- •Exporting and importing tracks
- •Other Import/Export functions
- •Cleanup
- •Customizing
- •Background
- •Workspaces
- •The Setup dialogs
- •Customizing track controls
- •Configuring the main menu items
- •About preference presets
- •Appearance
- •Applying track and event colors
- •Where are the settings stored?
- •Key commands
- •Introduction
- •Setting up key commands
- •Setting up tool modifier keys
- •The default key commands
- •Index
29
The Project Logical Editor
Introduction
On the Edit menu you will find the function “Project Logical Editor…” that opens a Project Logical Editor for the entire project. It works similar as the Logical Editor on the MIDI menu, see “The Logical Editor, Transformer and Input Transformer” on page 387. The most important difference is, that the Logical Editor for MIDI works on event level whereas the Project Logical Editor works on project level, and is therefore a very powerful tool for “search and replace” functions in your project.
Ö The MIDI events in the MIDI parts will not be affected by the Project Logical Editor operations. If you want to change MIDI notes or controller data, you have to use the Logical Editor, see “The Logical Editor, Transformer and Input Transformer” on page 387.
When we speak of “events” in this chapter, we refer to all the Project window elements that can be modified with the Project Logical Editor, e.g. MIDI parts, audio events and parts, Transpose parts, Arranger parts, automation events, etc.
The Project Logical Editor allows you to create “macros”, e.g. for special track type operations on tracks that are named identically. You can use its functions to delete all muted MIDI parts or to toggle the open state of all folder tracks in your project, etc.
Included with the Project Logical Editor are a number of presets that give you an impression of the great possibilities that this feature offers, see “Selecting a preset” on page 401. Many of them can also be used as starting points when you set up your own editing operations.
The principle for the Project Logical Editor is this:
• You set up filter conditions to find certain events.
This could be events of a certain type, with certain attributes or values or on certain positions, in any combination. You can combine any number of filter conditions and make composite conditions using AND/OR operators.
By combining filter conditions, functions and the specific actions, you can perform very powerful processing.
The Project Logical Editor allows all kind of settings that may not always make sense. Experiment a bit before applying your edits to important projects. You can undo the operations by using the Undo command on the Edit menu.
Opening the Project Logical Editor
1. Open the desired project.
All elements in the project will be affected, you do not have to make any selection.
2. Select “Project Logical Editor…” from the Edit menu.
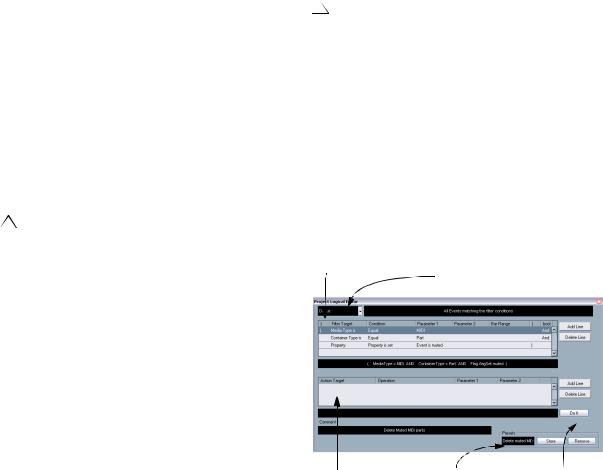
Window overview
This is the filter condition |
This is where you select a function |
list, specifying which |
(Transform, Delete, etc.). The field to the |
events to look for. |
right shows an additional explanation of |
|
the selected function. |
This is the action |
This is where you load, |
The “Do It” button |
list, specifying e.g. |
store and handle pre- |
performs the task |
how to change the |
sets. See “Working with |
you have set up. |
found events. |
presets” on page 409. |
|
• You select the basic function to be performed.
The options are Transform (changing properties of the found events), Delete (removing the events) and Select (selecting the found events).
• You set up a list of actions, which specify exactly what should be done.
This is not necessary for all functions. For example, the Delete function does not require any additional action specifications – it simply removes all found events.
400
The Project Logical Editor
Selecting a preset
To understand the Project Logical Editor, it might be a good idea to start by exploring the included presets. These are found on the Presets pop-up menu at the bottom of the window, to the right.
•To load a preset, select it from the Presets pop-up menu.
The window will show the settings stored in the preset. As the preset is not applied to the events yet, you can load different presets just to study them without affecting any events. You can also edit the preset before applying it.
•To apply the loaded preset (i.e. to perform the operations defined in the Project Logical Editor), click Do It.
Ö You can also open the Edit menu and select Presets directly from the “Process Project Logical Editor” submenu.
This allows you to apply a preset directly, without having to open the Project Logical Editor.
For information on how to create and handle your own presets, see “Working with presets” on page 409.
Setting up filter conditions
General procedure
The upper list is where you set up the filter conditions, determining which elements to find. The list contains one or several conditions, each on a separate line.
Ö If you want to start from scratch (as opposed to basing your settings on an existing preset), you may want to initialize the settings by selecting the Init option from the Presets pop-up menu.
•To add a new line (condition), click the Add Line button to the right.
The new line is added at the bottom of the list. If there are many lines, you may need to use the scrollbar to the right to view them.
•To remove a line, select it and click the Delete Line button to the right.
You set up a filter condition line by clicking in the columns and selecting options from the pop-up menus that appear. Here is a brief description of the columns:
Column |
Description |
Left bracket |
This is used for “bracketing” several lines together when |
|
creating conditions with multiple lines and the boolean |
|
operators And/Or. See “Combining multiple condition li- |
|
nes” on page 406. |
Filter Target |
Here you select which property to look for when finding |
|
elements. Your choice here affects the available options |
|
in the other columns as well, see below! |
Condition |
This determines how the Project Logical Editor should |
|
compare the property in the Filter Target column to the |
|
values in the Parameter columns (see the separate table |
|
below). The available options depend on the Filter Target |
|
setting. |
Parameter 1 |
Here you set which value the element properties should |
|
be compared to (depending on the Filter Target). |
|
For example, if the Filter Target is “Position” and Condi- |
|
tion is “Equal”, the Project Logical Editor will look for all |
|
elements starting at the position you specify in the Pa- |
|
rameter 1 column. |
Parameter 2 |
This column is only used if you have selected one of the |
|
“Range” options in the Condition column. Typically, this |
|
allows you to find all elements with values inside (or out- |
|
side) the range between Parameter 1 and Parameter 2. |
Bar Range |
This column is only used if the Filter Target is “Position” |
|
and one of the “Bar Range” options is selected in the |
|
Condition column. In these cases, you use the Bar Range |
|
column to specify “zones” within each bar (allowing you |
|
to find e.g. all elements on or around the first beat of ev- |
|
ery bar). See “Searching for elements at certain positi- |
|
ons” on page 404. |
Right bracket |
This is used for “bracketing” several lines together. See |
|
“Combining multiple condition lines” on page 406. |
bool |
This allows you to insert the boolean operators And/Or, |
|
when creating conditions with multiple lines. See “Com- |
|
bining multiple condition lines” on page 406. |
|
|
Below, the different Filter Targets (and their corresponding Condition and Parameter options) are described in more detail.
401
The Project Logical Editor
Searching for Media types
1.Select Media Type in the Filter Target pop-up menu.
This allows you to find elements of certain types of media only.
2.Open the pop-up menu in the Parameter 1 column and select the desired option.
When the Filter Target is set to Media type, the pop-up menu lists the available media types. The following table lists what will be found:
Media Type |
Description |
Audio |
If no container type is specified, this finds audio events, |
|
audio parts and audio tracks. |
MIDI |
If no container type is specified, this finds MIDI parts and |
|
MIDI tracks. |
Automation |
If no container type is specified, this finds automation |
|
events and automation tracks. |
Marker |
If no container type is specified, this finds marker events |
|
and marker tracks. |
Transpose |
If no container type is specified, this finds transpose |
|
events and transpose tracks. |
Arranger |
If no container type is specified, this finds Arranger |
|
events and Arranger tracks. |
|
|
3. Open the pop-up menu in the Condition column and select the desired condition.
For media types, the following options are available:
Condition |
Description |
Equal |
…finds the Media Type set up in the Parameter 1 column. |
All Types |
…finds all Media Types. |
|
|
If, e.g. you have set up the Project Logical Editor like this…
Searching for Container types
1.Select Container Type in the Filter Target pop-up menu.
This allows you to find parts, events or tracks.
2.Open the pop-up menu in the Parameter 1 column and select the desired option.
When the Filter Target is set to Container type, the pop-up menu lists the available container types. The following table lists what will be found:
Container Type |
Description |
Folder Track |
This finds all folder tracks, included FX Channel and |
|
Group Channel folders. |
Track |
This finds all kinds of tracks. |
Part |
This finds audio, MIDI and Instrument parts. Folder |
|
parts will not be found. |
Event |
This finds automation points, markers, audio events, |
|
arranger events and transpose events. |
|
|
3. Open the pop-up menu in the Condition column and select the desired condition.
For container types, the following options are available:
Condition |
Description |
Equal |
…finds the Container Type set up in the Parameter 1 col- |
|
umn. |
All Types |
…finds all Container Types. |
|
|
If, e.g. you have set up the Project Logical Editor like this…
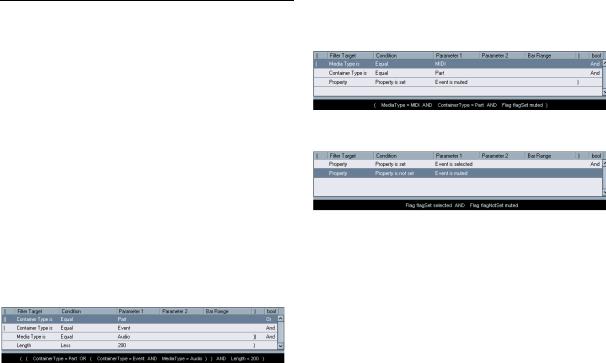
…the Project Logical Editor will find all Marker events and tracks in the project.
…the Project Logical Editor will find all Folder tracks in the project.
This Filter Target is very powerful in combination with the Media type Filter Target:
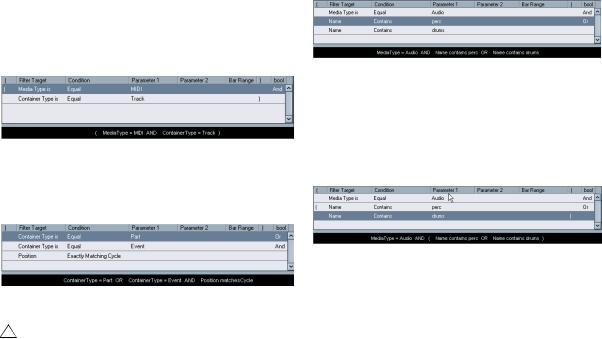
Here, the Project Logical Editor will find all MIDI and Instrument parts in the project.
402
The Project Logical Editor
Combining Media type and Container type
The combination of the Filter Targets Media type and Container represents a vesatile tool for logical operations:
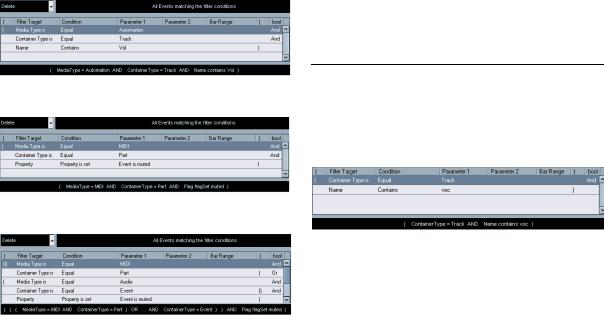
Here, the Project Logical Editor will find all Automation tracks (not events) in the project whose name contains vol.
Here, the Project Logical Editor will find all MIDI and Instrument parts (not tracks) in the project that are muted.
Searching for Names
1.Select Name on the Filter Target pop-up menu.
2.Enter the desired name, or a part of a name in the Parameter 1 column.
3.Open the pop-up menu in the Condition column and select the desired condition.
For names, the following options are available:
Condition |
Description |
Equal |
…is the exact same string as set up in the Parameter 1 |
|
column. |
Contains |
…contains the set string. |
|
|
If, e.g. you have set up the Project Logical Editor like this…
Here, the Project Logical Editor will find all MIDI and Instrument parts (not tracks) or all audio events (not parts or tracks) in the project that are muted.
…the Project Logical Editor will find all tracks in the project whose name contains “voc”.
Ö To take most advantage of this feature, we recommend you to use a standard nomenclature in your projects (Drums, Perc, Voc, etc.).
403
The Project Logical Editor
Searching for elements at certain positions
1. Select Position in the Filter Target pop-up menu.
This allows you to find elements starting at certain positions, either relative to the start of the project or within each bar.
2. Open the pop-up menu in the Condition column and select the desired condition.
For positions, the following options are available:
Condition |
Description |
Equal |
…has the exact same value as set up in the Parameter 1 |
|
column. |
Unequal |
…has any value other than the one set up in the Parame- |
|
ter 1 column. |
Bigger |
…has a value higher than the one set up in the |
|
Parameter 1 column. |
Bigger or Equal |
…has a value that is the same as or higher than the one |
|
set up in the Parameter 1 column. |
Less |
…has a value lower than the one set up in the |
|
Parameter 1 column. |
Less or Equal |
…has a value that is the same as or lower than the one |
|
set up in the Parameter 1 column. |
Inside Range |
…has a value that is between the values set up in the Pa- |
|
rameter 1 and Parameter 2 columns. Note that Parameter |
|
1 should be the lower value and Parameter 2 the higher. |
Outside Range |
…has a value that is not between the values set up in the |
|
Parameter 1 and Parameter 2 columns. |
Inside Bar |
…is within the “zone” set up in the Bar Range column, in |
Range |
each bar within the current selection. |
Outside Bar |
…is outside the “zone” set up in the Bar Range column, |
Range |
in each bar within the current selection. |
Before Cursor |
…is before the song Project position. |
Beyond Cursor |
…is after the song Project position. |
Inside Track |
…is inside the set track loop (see “The independent track |
Loop |
loop function” on page 293). |
Inside Cycle |
…is inside the set cycle. |
Exactly match- |
…exactly matches the set cycle. |
ing Cycle |
|
|
|
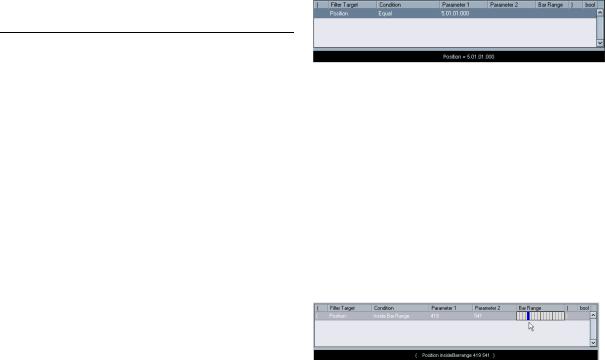
• If you select any condition other than the Range, Bar Range, Cursor, Loop or Cycle options, you set up a specific position (in bars, beats, sixteenth notes and ticks) in the Parameter 1 column. Note that the position for Bar Range is measured in ticks related to the start of the bar.
Here, the Logical Editor will find all elements at the position 5.1.1. in the project.
•If you select Inside Range or Outside Range in the Condition column, you set the start position of the range in the Parameter 1 column and the end position in the Parameter 2 column.
The Project Logical Editor will then find all elements inside or outside this position range.
•If you select one of the Bar Range options in the Condition column, the Bar Range column will show a graphic bar display. You specify the range within the bar by clicking and dragging in the bar display (the specified Bar Range is indicated in blue).
The Project Logical Editor will then find all elements starting inside or outside this Bar Range, in all bars (within the current selection).
Here, the Project Logical Editor will find elements starting around the second beat in each bar.
404
The Project Logical Editor
Searching for elements of certain lengths
1. Select Length in the Filter Target pop-up menu.
This allows you to find elements of a certain length only. The Length parameter is interpreted via the time base setting of the tracks, i.e. in ticks (musical) or ms (time), except for audio parts or events: these are always measured in samples.
2. Open the pop-up menu in the Condition column and select the desired condition.
For lengths, the following options are available:
Condition |
Description |
Equal |
…has the exact same value as set up in the Parameter 1 |
|
column. |
Unequal |
…has any value other than the one set up in the Parame- |
|
ter 1 column. |
Bigger |
…has a value higher than the one set up in the |
|
Parameter 1 column. |
Bigger or Equal |
…has a value that is the same as or higher than the one |
|
set up in the Parameter 1 column. |
Less |
…has a value lower than the one set up in the |
|
Parameter 1 column. |
Less or Equal |
…has a value that is the same as or lower than the one |
|
set up in the Parameter 1 column. |
Inside Range |
…has a value that is between the values set up in the Pa- |
|
rameter 1 and Parameter 2 columns. Note that Parameter |
|
1 should be the lower value and Parameter 2 the higher. |
Outside Range |
…has a value that is not between the values set up in the |
|
Parameter 1 and Parameter 2 columns. |
|
|
If you select any condition other than the Range options, you set up a specific position in the Parameter 1 column.
Here, the Project Logical Editor will find all audio parts and events in the project with a length smaller than 200 samples.
Searching for properties
1.Select Property on the Filter Target pop-up menu.
2.Open the pop-up menu in the Condition column and select the desired condition.
When the Property option is selected, the Condition column has two options: “Property is set” and “Property is not set”.
3.Open the pop-up menu in the Parameter 1 column and select the desired option.
This sets which property will be searched. The options are “muted” and “selected”.
Two examples:
Here, the Project Logical Editor will find all muted MIDI and Instrument parts.
Here, the Project Logical Editor will find all elements that are selected but not muted.
405
The Project Logical Editor
Combining multiple condition lines
As described above, you can add condition lines by clicking the Add Line button to the right of the list. The result of combining condition lines depends on the boolean And/ Or operators and the brackets.
The bool column
By clicking in the “bool” column to the right in the list, you can select a boolean operator: “And” or “Or”. A boolean operator separates two condition lines and determines the result in the following way:
Ö If two condition lines are separated by a boolean And, both conditions must be fulfilled for an element to be found.
The Project Logical Editor will only find MIDI Tracks.
Ö If two condition lines are separated by a boolean Or, one of the conditions (or both) must be fulfilled for an element to be found.
The Project Logical Editor will find all parts or events that match exactly the cycle.
When you add a new condition line, the boolean setting defaults to And. Therefore, if all you want to do is set up two or more conditions that all must be met for an element to be found, you don’t have to think about the boolean column – just add the required lines and make the usual filter settings.
Using brackets
The bracket (parenthesis) columns let you enclose two or more condition lines, dividing the conditional expression into smaller units. This is only relevant when you have three or more condition lines and want to use the boolean Or operator. This is how it works:
Ö Without brackets, the conditional expressions are evaluated according to their order in the list.
Here, the Project Logical Editor will find all audio parts and events whose name contains perc and all Audio parts and events whose name contains drums, as well as other parts and events (e.g. MIDI parts) whose name contains drums.
Maybe you wanted to find all Audio parts and events that either had the name perc or the name drums (but no other parts or events named drums)? Then you need to add some brackets:
Here, all audio parts or events will be found whose name contains perc or drums. The rule behind this is:
Ö Expressions within brackets are evaluated first.
If there are several layers of brackets, these are evaluated “from the inside out”, starting with the innermost brackets.
You add brackets by clicking in the bracket columns and selecting an option. Up to triple brackets can be selected.
Editing filter conditions as text
You can also edit filter conditions as text. This works just like in the Logical Editor for MIDI, see “Editing filter conditions as text” on page 394.
406
The Project Logical Editor