

- •Table of Contents
- •About this manual
- •Welcome!
- •VST Connections: Setting up input and output busses
- •About this chapter
- •Setting up busses
- •Using the busses
- •Setting up Groups and FX channels
- •About monitoring
- •External instruments/effects
- •The Project window
- •Background
- •Window Overview
- •Operations
- •Options
- •Playback and the Transport panel
- •Background
- •Operations
- •Options and Settings
- •Recording
- •Background
- •Basic recording methods
- •Audio recording specifics
- •MIDI recording specifics
- •Options and Settings
- •Recovery of audio recordings after system failure
- •Fades, crossfades and envelopes
- •Creating fades
- •The Fade dialogs
- •Creating crossfades
- •The Crossfade dialog
- •Auto Fades and Crossfades
- •Event Envelopes
- •The Arranger track
- •Introduction
- •Setting up the Arranger track
- •Working with arranger events
- •Flattening the Arranger chain
- •Live Mode
- •Arranging your music to video
- •Folder tracks
- •About folder tracks
- •Handling folder tracks
- •Working with folder parts
- •Using markers
- •About markers
- •The Marker window
- •Using the Marker track
- •Marker key commands
- •Editing markers in the Project Browser
- •The Transpose functions
- •Introduction
- •Transposing your music
- •Other functions
- •The mixer
- •About this chapter
- •Overview
- •Configuring the mixer
- •The audio-related channel strips
- •The MIDI channel strips
- •The common panel
- •The input and output channels
- •Basic mixing procedures
- •Audio specific procedures
- •MIDI specific procedures
- •Utilities
- •VST Mixer Diagrams
- •Control Room
- •Background
- •Configuring the Control Room
- •The Control Room Overview
- •The Control Room Mixer
- •Control Room operations
- •Studios and Studio Sends
- •Direct Monitoring and latency
- •WK-Audio’s ID Controller
- •Audio effects
- •About this chapter
- •Overview
- •Insert effects
- •Send effects
- •Setting up send effects
- •Using the Side-Chain input
- •Using external effects
- •Making settings for the effects
- •Effect presets
- •VST Instruments and Instrument tracks
- •Introduction
- •VST Instrument channels vs. instrument tracks
- •VST Instrument channels
- •Instrument tracks
- •Comparison
- •Automation considerations
- •What do I need? Instrument channel or Instrument track?
- •Instrument Freeze
- •VST instruments and processor load
- •Using presets for VSTi configuration
- •About latency
- •External instruments
- •Surround sound
- •Background
- •Operations
- •Automation
- •Introduction
- •Enabling and disabling the writing of automation data
- •What can be automated?
- •The Automation panel
- •Virgin territory vs. the initial value
- •Automation modes
- •Automation performance utilities
- •The Settings section
- •Hints and further options
- •Automation track operations
- •Working with automation curves
- •Audio processing and functions
- •Background
- •Audio processing
- •Applying plug-ins
- •The Offline Process History dialog
- •Batch Processing
- •Freeze Edits
- •Detect Silence
- •The Spectrum Analyzer
- •Statistics
- •The Sample Editor
- •Background
- •Window overview
- •General Operations
- •Options and settings
- •Audio Warp realtime processing / Tempo matching audio to the project tempo
- •Working with hitpoints and slices
- •Free Warp
- •Realtime pitch-shifting of audio events
- •Flattening the realtime processing
- •The Audio Part Editor
- •Background
- •Opening the Audio Part Editor
- •Window overview
- •Operations
- •Common methods
- •Options and Settings
- •The Pool
- •Background
- •Window overview
- •Operations
- •VST Sound
- •Introduction
- •The MediaBay
- •Introduction
- •Window overview
- •Browsing for media files
- •Finding files in the Viewer section
- •Previewing files in the Scope section
- •The Tag Editor
- •Media management
- •Track Presets
- •Introduction
- •Types of track presets
- •VST presets
- •Browsing for presets
- •Creating a track preset
- •Creating tracks from track presets or VST presets
- •Applying track presets
- •Previewing track and VST presets
- •Inserts and EQ settings from track presets
- •Track Quick Controls
- •Introduction
- •Setting up the Quick Controls tab
- •Options and settings
- •Setting up quick controls on an external remote controller
- •MIDI realtime parameters and effects
- •Introduction
- •Basic track settings
- •MIDI Modifiers
- •MIDI effects
- •Managing plug-ins
- •MIDI processing and quantizing
- •Introduction
- •The Quantizing functions
- •Making your settings permanent
- •Dissolve Part
- •Repeat Loop
- •Other MIDI functions
- •The MIDI editors
- •About editing MIDI
- •Opening a MIDI editor
- •Key Editor operations
- •Edit In-Place
- •List Editor operations
- •Introduction
- •Opening the Logical Editor
- •Window overview
- •Selecting a preset
- •Setting up filter conditions
- •Selecting a function
- •Specifying actions
- •Applying the defined actions
- •Working with presets
- •The Input Transformer
- •The Project Logical Editor
- •Introduction
- •Opening the Project Logical Editor
- •Window overview
- •Selecting a preset
- •Setting up filter conditions
- •Selecting a function
- •Specifying actions
- •Applying the defined actions
- •Working with presets
- •Working with System Exclusive messages
- •Introduction
- •Bulk dumps
- •Recording System Exclusive parameter changes
- •Editing System Exclusive messages
- •Working with the Tempo track
- •Background
- •Operations
- •Process Tempo
- •The Process Bars dialog
- •Options and settings
- •The Beat Calculator
- •Merge Tempo From Tapping
- •The Time Warp tool
- •The Project Browser
- •Window Overview
- •Editing tracks
- •The Track Sheet
- •Overview
- •Printing the Track Sheet
- •Export Audio Mixdown
- •Introduction
- •Mixing down to an audio file
- •The available file formats
- •Synchronization
- •Background
- •Synchronization signals
- •Synchronizing the transport vs. synchronizing audio
- •Making basic settings and connections
- •Synchronization settings
- •Timecode Preferences
- •Machine Control
- •Setting up Machine Control
- •Working with VST System Link
- •Preparations
- •Activating VST System Link
- •Application examples
- •Video
- •Background
- •Before you start
- •Operations
- •The Edit Mode
- •Working with film transfers
- •Compensating for film transfers to video
- •ReWire
- •Introduction
- •Launching and quitting
- •Activating ReWire channels
- •Using the transport and tempo controls
- •How the ReWire channels are handled in Nuendo
- •Routing MIDI via ReWire2
- •Considerations and limitations
- •File handling
- •Working with Projects
- •Startup Options
- •Working with libraries
- •Revert
- •Importing audio
- •Exporting and importing OMF files
- •Exporting and importing AAF files
- •Exporting and importing AES31 files
- •Exporting and importing OpenTL files
- •Importing XSend projects from Liquid
- •Exporting and importing standard MIDI files
- •Exporting and importing MIDI loops
- •Exporting and importing tracks
- •Other Import/Export functions
- •Cleanup
- •Customizing
- •Background
- •Workspaces
- •The Setup dialogs
- •Customizing track controls
- •Configuring the main menu items
- •About preference presets
- •Appearance
- •Applying track and event colors
- •Where are the settings stored?
- •Key commands
- •Introduction
- •Setting up key commands
- •Setting up tool modifier keys
- •The default key commands
- •Index

Customizing the view
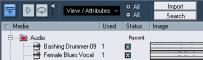
•You can specify which of the columns should be shown or hidden by selecting the View/Attributes pop-up on the toolbar and selecting/deselecting items.
•You can rearrange the order of the columns by clicking on a column heading and dragging the column to the left or right.
The mouse pointer changes to a hand when you place it on the column heading.
•The width of a column can also be adjusted by placing the pointer between two column headers and dragging left or right.
The pointer changes to a divider when you place it between two column headers.
Operations
Ö Most of the Pool-related main menu functions are also available on the Pool context menu (opened by right-click- ing in the Pool window).
Renaming clips or regions in the Pool
To rename a clip or a region in the Pool, select it and click on the existing name, type in a new name and press [Return].
Ö In case of a clip, this will also rename the referred files on disk!
Renaming a clip in the Pool is much preferred to renaming it outside Nuendo (for example on the computer desktop). This way, Nuendo already “knows” about the change, and won’t lose track of the clip the next time you open the project. See “About missing files” on page 305 for details about lost files.
Renaming multiple clips or regions
You can also rename multiple clips or regions in the Pool using the “Rename…” command from the Edit menu.
1.Select one or more audio clips, video clips or regions in the Pool.
You can only select one type of object at a time.
2.From the Edit menu, select “Rename…”.
A dialog with several options for renaming objects automatically will open.
3. Set the parameters for renaming objects and press [Return].
300
The Pool
Setting parameters of the Rename Object dialog
The Rename Object dialog provides a great deal of flexibility and options when renaming multiple objects in Nuendo. In addition to simple prefix, suffix, and incremental numeric additions to names, you can remove certain characters, include timestamp information and more.
The Rename Objects dialog
Each of the eight fields found in the left section of the Rename Objects dialog can be used to add an element to the name generated for each object.
The first line will create text or numbers at the left of the new name. The eighth and last line will create text or numbers at the very right of the new name.
Each of the eight lines can add one of the following elements including a prefix and suffix for each item (You can use a prefix to create a space separating items in the generated name.):
Option Description
Option |
Description |
Samplerate |
The samplerate of the audio file. |
Audio Tempo |
The audio tempo for that clip if it has been assigned. |
User Attribute |
Any one of the custom attributes created in the Setup User |
|
Attributes dialog (see “User Attributes” on page 299). |
|
|
An example of the result is displayed in the bottom of the window for reference. All of these parameters can be saved as a preset as well.
Copying clips in the Pool
To make a duplicate clip, proceed as follows:
1.Select the clip you wish to copy.
2.Select “New Version” on the Media menu.
A new version of the clip appears in the same Pool folder, with the same name but with a “version number” after it, to indicate that the new clip is a duplicate. The first copy made of a clip will logically get the version number “2” and so on. Regions within a clip are copied too, but keep their name.
Copying a clip does not create a new file on disk, but just a new edit version of the clip (referring to the same original file).
Inserting clips into a project
By using menus
1.Select the clip(s) you want to insert into the project.
2.Pull down the Media menu and select an “Insert into Project” option.
“At Cursor” will insert the clip(s) at the current project cursor position. “At Origin” will insert the clip(s) at their Origin Time position(s).
• Note that the clip will be positioned so that its snap
Free Text |
Any text you would like to include in the name. |
Original Name |
The original name given to the object. There are options |
|
to remove all numbers or non-alphanumerics or just the |
|
ones on the left or right sides. |
Number |
An increasing or decreasing number starting with a mini- |
|
mum amount of digits and a starting number (i.e. 001, |
|
002 etc.). |
Project Time |
The current location of the clip in the project window us- |
|
ing any of the seven ruler formats (Bars+Beats, Time- |
|
code etc.). |
point is aligned with the selected insert position.
You can also open the Sample Editor for a clip by double-clicking it, and perform the insert operation from there. This way you can set the snap point before inserting a clip.
3. The clip is inserted on the selected track or on a new audio track.
If several tracks are selected, the clip will be inserted on the first selected track.
Date |
The date that the file was created in several formats. |
File Extension |
The file type. |
Audio Bitsize |
The bit depth of the audio file. |
|
|
301
The Pool
By using drag and drop
You can use drag and drop to insert clips into the Project window. You can also use drag and drop from the Sample Editor for a clip by making a selection range and pressing [Ctrl]/[Command] while dragging. Note:
•Snap is taken into account if activated.
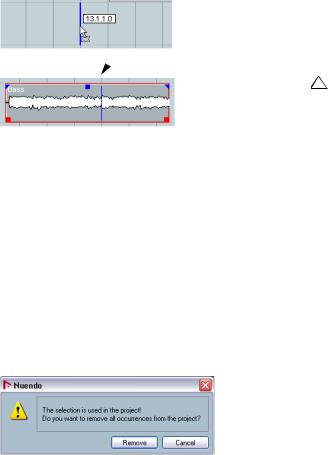
•While you drag the clip in the Project window, its position will be indicated by a marker line and a numerical position box.
Note that these indicate the position of the snap point in the clip. For example, if you drop the clip at the position 10.00, this will be where the snap point ends up. See “Adjusting the snap point” on page 266 for information on how to set the snap point.
 Snap point
2. Click Remove.
A new prompt asks whether you want to move the clip to the Trash or remove it from the Pool.
3. Select “Remove from Pool”.
The clip is no longer associated with the project, but still exists on the hard disk and can be used in other projects etc. This operation can be undone.
Deleting from the hard disk
To delete a file permanently from the hard disk, it must first be moved to the Trash folder:
1.Follow the instructions for deleting clips above and click the Trash button.
Alternatively, you can drag and drop clips into the Trash folder.
2.Select “Empty Trash” on the Media menu. Select one of the two options in the alert:
• Click “Erase” to delete the file on the hard disk permanently.
This operation cannot be undone!
• If you position the clip in an empty area in the event display (i.e. below existing tracks), a new track is created for the inserted event.
Before you permanently delete audio files from the hard disk, make sure that they are not used by another project!
• Click “Remove from Pool” to remove the clip from the Pool but to keep the file.
Ö To retrieve a clip or region from the Trash Folder, drag and drop it back into an Audio or Video folder.
Deleting clips
Removing unused clips from the Pool
Removing clips from the Pool
To remove a clip from the Pool without deleting it from the hard disk, proceed as follows:
1. Select the clip(s) and select “Delete” from the Edit menu (or press [Backspace] or [Delete]).
Ö If you try to delete a clip that is used by one or more events, the program will ask you if you want to remove these events from the project.
If you cancel, neither the clip nor the associated events are deleted.
This function finds all clips in the Pool that are not used in the project. You can then decide whether to move them to the Pool Trash folder (where they can be permanently deleted) or to remove them from the Pool:
1.Select “Remove Unused Media” on the Media or context menu.
A message appears asking you whether you want to move the file to the trash or to remove it from the Pool.
2.Make your selection.
Removing regions
To remove a region from the Pool, select it and select “Delete” from the Edit menu (or press [Backspace] or [Delete]).
Ö Note that for regions, there is no alert if the region is used in the project!
302
The Pool
Locating events and clips
Locating events via clips in the Pool
If you want to find out which events in the project refer to a particular clip in the Pool, proceed as follows:
1.Select one or more clips in the Pool.
2.Select “Select in Project” on the Media menu.
All events that refer to the selected clip are now selected in the Project window.
Locating clips via events in the Project window
If you want to find the clip for an event in the Project window, proceed as follows:
1.Select one or more events in the Project window.
2.Pull down the Audio menu and select “Find Selected in Pool”.
The corresponding clip(s) will be located and highlighted in the Pool. If the Pool window isn’t already open, it will be opened.
Searching for audio files
The Pool can help you locate audio files in your Pool, on your hard disk or other media. This works much like the regular file search, but with a couple of extra features:
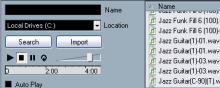
1. Click the Search button in the toolbar.
A search pane appears at the bottom of the window, displaying the search functions.
The search pane in the Pool.
• If you want to limit the search to certain folders, choose “Select Search Path” and select the desired folder in the dialog that appears.
The search will include the selected folder and all subfolders. Note also that folders you have recently selected using the “Select Search Path” function will appear on the pop-up menu, allowing you to quickly select any of them.
4. Click the Search button.
The search is started and the Search button is labeled Stop – click this to cancel the search if needed.
When the search is finished, the found files are listed to the right.
•To audition a file, select it in the list and use the playback controls to the left (Play, Stop, Pause and Loop).
If Auto Play is activated, selected files will automatically be played back.
•To import a file into the Pool, double-click on it in the list or select it and click the Import button.
5. To close the search pane, click the Search button in the toolbar again.
The Find Media window
Alternatively to the search pane in the Pool, you can open a stand-alone Find Media window by selecting the “Search Media…” option from the Media or context menu (also available from the Project window). This offers the same functionality as the search pane.
• To insert a found clip or region directly into the project from the Find Media window, select it in the list in the dialog and select one of the “Insert into Project” options from the Media menu.
The options are described in the section “Inserting clips into a project” on page 301.
By default, the search parameters available in the search pane are “Name” and “Location”. For using other filter criteria, see “Extended search functionality” on page 304.
2.Specify the name of the file(s) to search for in the Name field.
You can use partial names or wildcards (*). Note that only audio files of the supported formats will be found.
3.Use the Location pop-up menu to specify where to search.
The pop-up menu will list all your local drives and removable media.
303
The Pool
Extended search functionality
Apart from the search criterion Name, additional search filters and user attributes are available. To use them, proceed as follows:
1.Set up a couple of user attributes using the “View/ Attributes” pop-up menu.
2.Click the Search button on the toolbar.
The Search pane is displayed in the lower part of the Pool window.
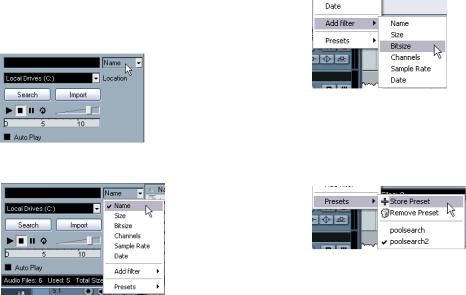
3. Move the mouse pointer over the “Name” text to the right of the name field, until an arrow is displayed, and click it.
Move the mouse pointer over the “Name” text to the right of the name field and click…
…to show the Extended Search pop-up menu.
4.The Extended Search pop-up menu opens.
This contains six options determining which search criteria will be displayed above the Location field (Name, Size, Bitsize, Channels, Sample Rate or Date). It also contains all the user attributes you specified and the Add Filter and Presets submenus.
The search criteria have the following parameters:
•Name: partial names or wildcards (*)
•Size: Less than, more than, equal, between (two values), in seconds, minutes, hours and bytes
•Bitsize (resolution): 8, 16, 32, 64
•Channels: mono, stereo and from 3 to 16
•Sample Rate: various values, choose “Other” for free setting
•Date: various search ranges
5.Select one of the topmost 6 options in the pop-up menu to change the search option above the Location pop-up menu.
This way, you can choose e.g. to display the Size or Sample Rate parameter instead of the Name field.
6.If you want to display more search options, select the desired element from the Add filter submenu.
This allows you e.g. to add the Size or the Sample Rate parameters to the already displayed Name and Location parameters.
This allows for a very detailed search, helping you to master even the largest sound database.
• You can store presets of your search filter settings. For this, click Store Presets in the Presets submenu and enter a name for the preset.
Existing presets will be found at the bottom of the list. To remove a preset, click on the preset to activate it, then select Remove Preset.
• It is also possible to further refine the search options by including your user attributes in the search criteria.
When user attributes have been defined, these will appear on the popup menu (see above).
304
The Pool
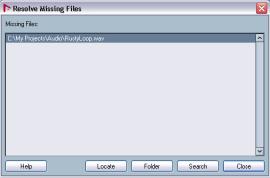
About missing files
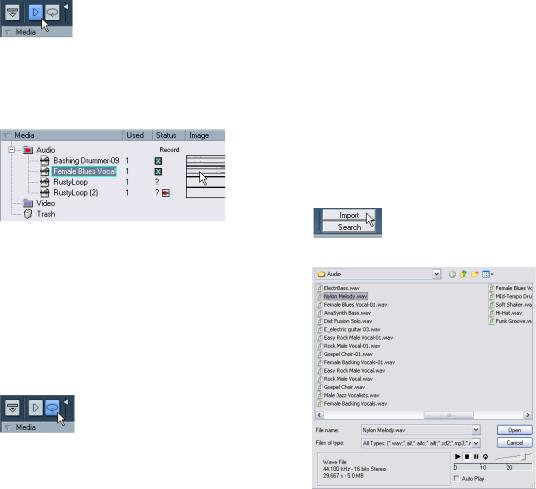
When you open a project, the Resolve Missing Files dialog (see below) may open, warning you that one or more files are “missing”. If you click Close, the project will open anyway, without the missing files. In the Pool, you can check which files are considered missing. This is indicated by a question mark in the Status column.
A file is considered missing under one of the following conditions:
•The file has been moved or renamed outside the program since the last time you worked with the project, and you ignored the Resolve Missing Files dialog when you opened the project for the current session.
•You have moved or renamed the file outside the program during the current session.
•You have moved or renamed the folder in which the missing files are located.
Locate missing files
1. Select “Find Missing Files” from the Media or context menu.
The Resolve Missing Files dialog opens.
2. Decide if you want the program to try to find the file for you (Search), if you want to do it yourself (Locate) or if you want to specify in which directory the program should search for the file (Folder).
• If you select Locate, a file dialog opens, allowing you to locate the file manually.
Select the file and click “Open”.
•If you select Folder, a dialog opens to let you specify the directory in which the missing file can be found.
This might be the preferred method if you have renamed or moved the folder containing the missing file, but the file still has the same name. Once you select the correct folder, the program finds the file and you can close the dialog.
•If you select Search, a dialog opens to let you specify which folder or disk should be scanned by the program.
Click the Search Folder button, select a directory or a disk and click the Start button. If found, select the file from the list and click “Accept”. Afterwards Nuendo tries to map all other missing files automatically.
Reconstructing missing edit files
If a missing file cannot be found (e.g. if you have accidentally deleted it from the hard disk), it will normally be indicated with a question mark in the Status column in the Pool. However, if the missing file is an edit file (a file created when you process audio, stored in the Edits folder within the project folder), it may be possible for the program to reconstruct it by recreating the editing to the original audio file:
1.Open the Pool and locate the clip(s) for which files are missing.
2.Check the Status column – if it says “Reconstructible”, the file can be reconstructed by Nuendo.
3.Select the reconstructible clips and select “Reconstruct” from the Media menu.
The editing is performed and the edit files are recreated.
Removing missing files from the Pool
If the Pool contains audio files that cannot be found or reconstructed, you may want to remove these. For this, select “Remove Missing Files” from the Media or context menu.
This will remove all missing files from the Pool as well as their corresponding events from the Project window.
305
The Pool
Auditioning clips in the Pool
There are three methods you can use to audition clips in the Pool:
• By using key commands.
If you activate the “Playback Toggle triggers Local Preview” option in the Preferences (Transport page), you can use the [Space] bar to audition. This is the same as clicking the Audition icon on the toolbar.
• By selecting a clip and activating the Play button.
The whole clip will play back, unless you stop playback by clicking the Play button again.
The Play button.
• By clicking somewhere in the waveform image for a clip.
The clip will play from the position in the waveform you click until the end of the clip, unless you stop playback by clicking the Play button, or by clicking anywhere else in the pool window.
• If you click in the waveform image to audition, the section from the point you clicked to the end of the clip will repeat indefinitely until you stop playback.
Opening clips in the Sample Editor
The Sample Editor allows you to perform detailed editing on the clip (see “The Sample Editor” on page 258). You can open clips in the Sample Editor directly from the Pool in the following ways:
•If you double-click on a clip waveform icon or a clip name in the Media column, the clip will open in the Sample Editor.
•If you double-click on a region in the Pool, its clip will open in the Sample Editor with the region selected.
One practical use for this is to set a snap point for a clip (see “Adjusting the snap point” on page 266). When you later insert the clip from the Pool into the project, you can have it properly aligned according to the set snap point.
Click in the waveform image to audition a clip.
• The audio will be routed directly to the Control Room, if the Control Room is activated. When the Control Room is deactivated, the audio will be routed to the Main Mix (the default output) bus, bypassing the audio channel’s settings, effects and EQs.
You can adjust the auditioning level with the miniature level fader on the toolbar. This does not affect the regular playback level.
If you have activated the Loop button before you audition, the following will happen:
The Loop button.
• If you click the Play button to audition a clip, it will repeat indefinitely until you stop playback by clicking the Play or Loop button again.
Import Medium…
The Import Medium dialog lets you import files directly into the Pool. It is opened from the Media or context menu or with the Import button in the Pool window.
Clicking the Import button opens the Import dialog:
306
The Pool
This is a standard file dialog, where you can navigate to other folders, audition files etc. The following audio file formats can be imported:
•Wave (Normal or Broadcast, see “Broadcast Wave files” on page 441)
•AIFF and AIFC (Compressed AIFF)
•REX or REX 2 (see “Importing ReCycle files” on page 493)
•Dolby Digital AC3 file (ac3 – if you have the Steinberg Dolby Digital Encoder installed in your system)
•DTS file (dts – if you have the Steinberg DTS Encoder installed in your system)
•SD2 (Sound Designer II)
•MPEG Layer 2 and Layer 3 (mp2 and mp3 files – see “Importing compressed audio files” on page 493)
•Ogg Vorbis (ogg files – see “Importing compressed audio files” on page 493)
•Windows Media Audio (Windows – see “Importing compressed audio files” on page 493)
•Wave64 (w64 files)
They may have the following characteristics:
•Stereo or mono
•Any sample rate (although files with another sample rate than the one used in the project will play back at the wrong speed and pitch – see below).
•8, 16, 24 bit or 32 bit float resolution
The following videos formats can also be imported:
•AVI (Audio Video Interleave)
•MOV and QT (QuickTime)
•WMV (Windows only)
•DV (Mac OS X only)
•MPEG 1 and 2 video files.
For video files to be played back correctly, the right codecs have to be installed.
Ö It is also possible to use the commands on the Import submenu on the File menu to import audio or video files into the Pool.
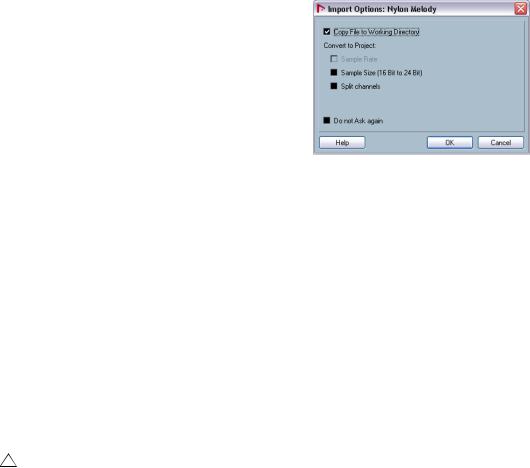
When you select a file in the Import Medium dialog and click Open, the Import Options dialog opens:
It contains the following options:
• Copy File to Working Directory.
Activate this if you want a copy of the file to be made in the Audio folder of the project, and have the clip refer to this copy. If the option is off, the clip will refer to the original file in the original location (and will thus be marked as “external” in the Pool – see “About the Status column symbols” on page 299).
• Convert to Project section:
Here you can choose to convert the sample rate (if the sample rate is different than the one set for the project) or the sample size, i.e. resolution (if the sample size is lower than the record format used in the project).
The options are only available if necessary. Note that if you are importing several audio files at once, the Import Options dialog will instead contain a “Convert if needed” checkbox. When this is activated, the imported files will be converted only if the sample rate is different or the sample size is lower than the project’s.
• Split Channels
If this is activated, stereo and multi-channel files will be split into a corresponding number of mono files – one for each channel – and these will be imported into the Pool. Note that if you use this option, the imported files will always be copied to the Audio folder of the project, as described above.
• Do not Ask again.
If this is activated, files will always be imported according to the settings you have made, without this dialog appearing. This can be reset in the Preferences (Editing–Audio page).
Ö You can always convert files later by using the Convert Files (see “Convert Files” on page 310) or Conform Files (see “Conform Files” on page 310) options.
307
The Pool
Importing audio CD tracks
You can import tracks (or sections of tracks) from an audio CD directly into the Pool by using the “Import Audio CD” function on the Media menu. This opens a dialog in which you can specify which tracks should be copied from the CD, converted to audio files and added to the Pool.
For details about the Import Audio CD dialog, see “Importing audio CD tracks” on page 491.
Exporting regions as audio files
If you have created regions within an audio clip (see “Working with regions” on page 269), these can be exported as separate audio files. To create a new audio file from a region, proceed as follows:
1.In the Pool, select the region you wish to export.
2.On the Audio menu, select “Bounce Selection”.
A browser dialog opens.
3.Select the folder in which you want the new file to be created.
A new audio file is created in the specified folder. The file will have the name of the region and will automatically be added to the Pool.
Ö If you have two clips that refer to the same audio file (different “versions” of clips, e.g. created with the “Convert to Real Copy” function), you can use the Bounce Selection function to create a new, separate file for the copied clip.
Select the clip, select Bounce Selection and enter a location and name for the new file.
Changing the Pool Record folder
The Pool Record folder.
In the Pool Record folder, all audio clips that you record in the project will end up. The Pool Record folder is indicated by the text “Record” in the Status column and by a red dot on the folder itself, as shown in the picture above. By default, this is the main Audio folder. You can, however, at any time create a new Audio subfolder and designate this as your Pool Record folder. Proceed as follows:
1. Select the Audio folder or any audio clip.
You cannot designate the Video folder (or a subfolder in it) as the Pool Record folder.
2.Select “Create Folder” on the Media or context menu.
A new empty audio subfolder appears in the Pool.
3.Select the new folder.
4.Select “Set Pool Record Folder” on the Media or context menu, or click in the Status column of the new folder.
The new folder now becomes the Pool Record folder, and any audio recorded in the project will be saved in this folder.
Organizing clips and folders
If you accumulate a large number of clips in the Pool, it may sometimes be difficult to quickly find specific items. In such cases, organizing clips in new subfolders with suitable names that reflect the content can be a solution. For example, you could put all sound effects in one folder, all lead vocals in another etc. Proceed as follows:
1.Select the type of folder, audio or video, for which you want to create a subfolder.
You cannot put audio clips in a video folder and vice versa.
2.Select “Create Folder” on the Media on context menu.
A new empty subfolder named “New Folder” appears in the Pool.
3.Click on the name and enter an appropriate name for the folder.
4.Drag and drop the clips you wish to move to the new folder.
5.Repeat steps 1-4 as necessary.
Applying processing to clips in the Pool
You can apply audio processing to clips from within the Pool in the same way as to events in the Project window. Simply select the clip(s) and choose a processing method from the Audio menu. To find out more about audio processing, see the chapter “Audio processing and functions” on page 238.
308
The Pool

Undoing processing
If you have applied processing to a clip, in the Project window, the Sample Editor, or in the Pool, this is indicated by the red and gray waveform symbol in the Status column.
This processing can always be undone using the Offline Process History, see “The Offline Process History dialog” on page 251.
Freeze Edits
You can use the Freeze Edits function to create a new file with processing applied or to replace the original with a processed version, see “Freeze Edits” on page 253.
Minimize File
The option “Minimize File” on the Media or context menu allows you to change the size of audio files according to the audio clips referenced in a project. The files produced using this option will only contain the audio file portions actually used in the project. This can significantly reduce the size of the project, if large portions of the audio files are unused. Therefore, the option is useful for archiving purposes after you have completed a project.
Ö This operation will permanently alter the selected audio files in the Pool. This cannot be undone!
If this is not what you want, you can use the option “Save Project to New Folder” on the File menu instead, see “Save Project to New Folder” on page 489. This function also has the option of minimizing files, but copies all files into a new folder, leaving the original project untouched.
Proceed as follows:
1.Select the file(s) you wish to minimize in the Pool.
2.Select “Minimize File” on the Media menu.
An alert appears, informing you that the entire Edit History will be cleared. Click Minimize to proceed or Cancel to stop the process.
3. After the minimizing is finished, another alert appears, because the file references in the stored project have become invalid.
Click Save Now to save the updated project or click Later to proceed with the unsaved project.
Only the audio portions actually used in the project remain in the corresponding audio file(s) in the Pool Record folder.
Prepare Archive
The option “Prepare Archive” on the Media menu is useful if you want to archive a project. It verifies that every clip referenced in the project is located in the same folder, and takes actions if that is not the case:
•Any files that are located outside the current project folder will be copied into it.
Please note that audio files that reside within the project folder will not be copied to the audio folder. You will therefore have to copy them there manually before backing up the audio folder or save them separately during backup, see below.
•If any processing has been applied, you will be asked whether you want to Freeze Edits.
If you do this, you don’t have to archive the Edits folder. Everything belonging to the project will be contained in the project file and the Audio folder.
Once you have performed a Prepare Archive, you can copy the project file, the Audio folder and any other audio material you saved in the project folder to backup disks, etc.
It is not necessary to archive the Images folder, since these Images can be recreated by Nuendo. You may also find a file with the extension “.csh” in the project folder. This contains image information for edited clips and other data that can be recreated, so it can safely be deleted.
Video clips are always referenced and not stored in the project folder.
Importing and exporting Pool files
You can import or export a Pool as a separate file (file extension “.npl”), by using the “Import Pool” and “Export Pool” options on the Media or context menu.
When you import a Pool file, the file references in it are “added” to the current Pool.
ÖSince the audio and video files are only referenced but not saved in the Pool file, the Pool import is only useful if you have access to all referenced files (which preferably should have the same file paths as when the Pool was saved).
ÖYou can also save and open libraries. These are standalone Pool files that are not associated with a project.
See “Working with libraries” on page 490.
309
The Pool
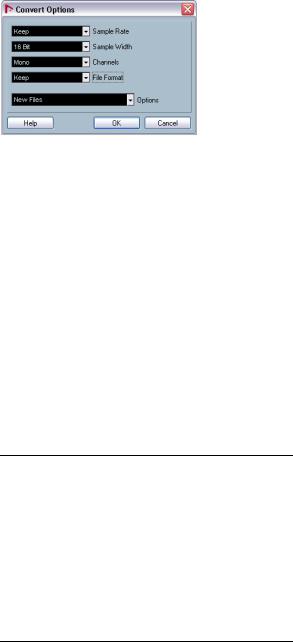
Convert Files
Selecting the option “Convert Files” on the Media or context menu opens the Convert Options dialog which operates on selected files. Use the pop-up menus to specify which audio file attributes you want to keep and which you want to convert. The available settings are:
• Sample Rate
Keep as is, or convert to a sample rate between 8.000 and 96.000 kHz.
• Sample Width
Keep the sample width (resolution) as is, or convert to 16 bit, 24 bit or 32 Bit float.
• Channels
Keep as is, or convert the file to Mono or Stereo Interleaved.
• File Format
Keep as is, or convert to Wave, AIFF, Wave 64 or Broadcast Wave format.
Options
When you convert a file, you can use the Options pop-up to set one of the following options regarding what to do with the new file:
Option |
Description |
New Files |
Creates a copy of the file in the audio folder and converts |
|
this new file according to the chosen attributes. The new |
|
file is added to the Pool, but all clip references will still |
|
point to the original, unconverted file. |
Replace Files |
Converts the original file without changing clip refer- |
|
ences. The references are however saved with the next |
|
save action. |
New + Replace Creates a new copy with the chosen attributes, replaces in Pool the original file with the new one in the Pool and redirects
the current clip references from the original file to the new file. This is the option to select if you want your audio clips to refer to the converted file, but still want to keep the original file on disk (e.g. if the file is used in other projects).
Conform Files
By using this command, you will change all selected files that have different file attributes than what is specified for the project, to conform to this standard.
Proceed as follows:
1.Select the clips in the Pool.
2.Select “Conform Files” on the Media menu.
A dialog opens allowing you to choose between keeping or replacing the original unconverted files in the Pool. The following applies:
•Clip/event references in the pool are always redirected to the conformed files.
•If any “keep” option is selected, original files remain in the Project’s Audio folder and new files are created.
•If you select the “Replace” option, files in the Pool and in the Project’s Audio folder are replaced.
Extract Audio from Video
This Media menu item allows you to extract the audio from a video file on disk. It automatically generates a new audio clip that will appear in the Pool Record folder. The resulting clip will have the following properties:
•It will get the same file format and sample rate/width as in the current project.
•It will get the same name as the video file.
Ö This function is not available for mpeg video files.
310
The Pool