

- •Table of Contents
- •About this manual
- •Welcome!
- •VST Connections: Setting up input and output busses
- •About this chapter
- •Setting up busses
- •Using the busses
- •Setting up Groups and FX channels
- •About monitoring
- •External instruments/effects
- •The Project window
- •Background
- •Window Overview
- •Operations
- •Options
- •Playback and the Transport panel
- •Background
- •Operations
- •Options and Settings
- •Recording
- •Background
- •Basic recording methods
- •Audio recording specifics
- •MIDI recording specifics
- •Options and Settings
- •Recovery of audio recordings after system failure
- •Fades, crossfades and envelopes
- •Creating fades
- •The Fade dialogs
- •Creating crossfades
- •The Crossfade dialog
- •Auto Fades and Crossfades
- •Event Envelopes
- •The Arranger track
- •Introduction
- •Setting up the Arranger track
- •Working with arranger events
- •Flattening the Arranger chain
- •Live Mode
- •Arranging your music to video
- •Folder tracks
- •About folder tracks
- •Handling folder tracks
- •Working with folder parts
- •Using markers
- •About markers
- •The Marker window
- •Using the Marker track
- •Marker key commands
- •Editing markers in the Project Browser
- •The Transpose functions
- •Introduction
- •Transposing your music
- •Other functions
- •The mixer
- •About this chapter
- •Overview
- •Configuring the mixer
- •The audio-related channel strips
- •The MIDI channel strips
- •The common panel
- •The input and output channels
- •Basic mixing procedures
- •Audio specific procedures
- •MIDI specific procedures
- •Utilities
- •VST Mixer Diagrams
- •Control Room
- •Background
- •Configuring the Control Room
- •The Control Room Overview
- •The Control Room Mixer
- •Control Room operations
- •Studios and Studio Sends
- •Direct Monitoring and latency
- •WK-Audio’s ID Controller
- •Audio effects
- •About this chapter
- •Overview
- •Insert effects
- •Send effects
- •Setting up send effects
- •Using the Side-Chain input
- •Using external effects
- •Making settings for the effects
- •Effect presets
- •VST Instruments and Instrument tracks
- •Introduction
- •VST Instrument channels vs. instrument tracks
- •VST Instrument channels
- •Instrument tracks
- •Comparison
- •Automation considerations
- •What do I need? Instrument channel or Instrument track?
- •Instrument Freeze
- •VST instruments and processor load
- •Using presets for VSTi configuration
- •About latency
- •External instruments
- •Surround sound
- •Background
- •Operations
- •Automation
- •Introduction
- •Enabling and disabling the writing of automation data
- •What can be automated?
- •The Automation panel
- •Virgin territory vs. the initial value
- •Automation modes
- •Automation performance utilities
- •The Settings section
- •Hints and further options
- •Automation track operations
- •Working with automation curves
- •Audio processing and functions
- •Background
- •Audio processing
- •Applying plug-ins
- •The Offline Process History dialog
- •Batch Processing
- •Freeze Edits
- •Detect Silence
- •The Spectrum Analyzer
- •Statistics
- •The Sample Editor
- •Background
- •Window overview
- •General Operations
- •Options and settings
- •Audio Warp realtime processing / Tempo matching audio to the project tempo
- •Working with hitpoints and slices
- •Free Warp
- •Realtime pitch-shifting of audio events
- •Flattening the realtime processing
- •The Audio Part Editor
- •Background
- •Opening the Audio Part Editor
- •Window overview
- •Operations
- •Common methods
- •Options and Settings
- •The Pool
- •Background
- •Window overview
- •Operations
- •VST Sound
- •Introduction
- •The MediaBay
- •Introduction
- •Window overview
- •Browsing for media files
- •Finding files in the Viewer section
- •Previewing files in the Scope section
- •The Tag Editor
- •Media management
- •Track Presets
- •Introduction
- •Types of track presets
- •VST presets
- •Browsing for presets
- •Creating a track preset
- •Creating tracks from track presets or VST presets
- •Applying track presets
- •Previewing track and VST presets
- •Inserts and EQ settings from track presets
- •Track Quick Controls
- •Introduction
- •Setting up the Quick Controls tab
- •Options and settings
- •Setting up quick controls on an external remote controller
- •MIDI realtime parameters and effects
- •Introduction
- •Basic track settings
- •MIDI Modifiers
- •MIDI effects
- •Managing plug-ins
- •MIDI processing and quantizing
- •Introduction
- •The Quantizing functions
- •Making your settings permanent
- •Dissolve Part
- •Repeat Loop
- •Other MIDI functions
- •The MIDI editors
- •About editing MIDI
- •Opening a MIDI editor
- •Key Editor operations
- •Edit In-Place
- •List Editor operations
- •Introduction
- •Opening the Logical Editor
- •Window overview
- •Selecting a preset
- •Setting up filter conditions
- •Selecting a function
- •Specifying actions
- •Applying the defined actions
- •Working with presets
- •The Input Transformer
- •The Project Logical Editor
- •Introduction
- •Opening the Project Logical Editor
- •Window overview
- •Selecting a preset
- •Setting up filter conditions
- •Selecting a function
- •Specifying actions
- •Applying the defined actions
- •Working with presets
- •Working with System Exclusive messages
- •Introduction
- •Bulk dumps
- •Recording System Exclusive parameter changes
- •Editing System Exclusive messages
- •Working with the Tempo track
- •Background
- •Operations
- •Process Tempo
- •The Process Bars dialog
- •Options and settings
- •The Beat Calculator
- •Merge Tempo From Tapping
- •The Time Warp tool
- •The Project Browser
- •Window Overview
- •Editing tracks
- •The Track Sheet
- •Overview
- •Printing the Track Sheet
- •Export Audio Mixdown
- •Introduction
- •Mixing down to an audio file
- •The available file formats
- •Synchronization
- •Background
- •Synchronization signals
- •Synchronizing the transport vs. synchronizing audio
- •Making basic settings and connections
- •Synchronization settings
- •Timecode Preferences
- •Machine Control
- •Setting up Machine Control
- •Working with VST System Link
- •Preparations
- •Activating VST System Link
- •Application examples
- •Video
- •Background
- •Before you start
- •Operations
- •The Edit Mode
- •Working with film transfers
- •Compensating for film transfers to video
- •ReWire
- •Introduction
- •Launching and quitting
- •Activating ReWire channels
- •Using the transport and tempo controls
- •How the ReWire channels are handled in Nuendo
- •Routing MIDI via ReWire2
- •Considerations and limitations
- •File handling
- •Working with Projects
- •Startup Options
- •Working with libraries
- •Revert
- •Importing audio
- •Exporting and importing OMF files
- •Exporting and importing AAF files
- •Exporting and importing AES31 files
- •Exporting and importing OpenTL files
- •Importing XSend projects from Liquid
- •Exporting and importing standard MIDI files
- •Exporting and importing MIDI loops
- •Exporting and importing tracks
- •Other Import/Export functions
- •Cleanup
- •Customizing
- •Background
- •Workspaces
- •The Setup dialogs
- •Customizing track controls
- •Configuring the main menu items
- •About preference presets
- •Appearance
- •Applying track and event colors
- •Where are the settings stored?
- •Key commands
- •Introduction
- •Setting up key commands
- •Setting up tool modifier keys
- •The default key commands
- •Index
20
The Pool
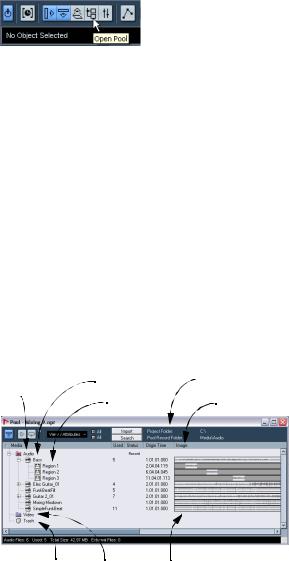
Background
What is the Pool?
Every time you record on an audio track, a file is created on your hard disk. A reference to this file – a clip – is also added to the Pool. Two general rules apply to the Pool:
•All audio and video clips that belong to a project are listed in the Pool.
•There is a separate Pool for every project.
The way the Pool displays folders and their contents is similar to the way the Mac OS X Finder and the Windows Explorer display folders and lists of files.
What can you do in the Pool?
In the Pool you can, among other things, perform the following operations:
Operations that affect files on disk
•Import clips (audio files can automatically be copied and/or converted).
•Convert file formats.
•Rename clips (this will also rename the referred files on disk), and regions.
•Delete clips (if you select the “Move to Trash” option and empty the Trash folder – see “Deleting clips” on page 302).
•Prepare File Archives for backup.
•Minimize files.
Operations that only affect clips
•Copy clips.
•Audition clips.
•Organize clips.
•Apply audio processing to clips.
•Save or import complete Pool files.
Opening the Pool
You open the Pool in any of the following ways:
•By clicking the Pool icon in the Project window.
•By selecting “Pool” on the Project menu or “Open Pool Window” on the Media menu.
•By using a key command (by default [Ctrl]/[Command]+[P] – note that using this key command a second time will close the Pool again).
The content of the Pool is divided into three main folders:
• The Audio folder
This contains all audio clips and regions currently in the project.
• The Video folder
This contains all video clips currently in the project.
• The Trash folder
Unused clips can be moved to the Trash folder for later permanent removal from the hard disk.
These folders cannot be renamed or deleted from the Pool, but any number of subfolders can be added (see “Organizing clips and folders” on page 308).
Window overview
Audio clip name |
Toolbar |
|
Audio |
Column Headings |
|
Region name |
||
|
Trash folder |
Video folder |
Waveform image |
297
The Pool
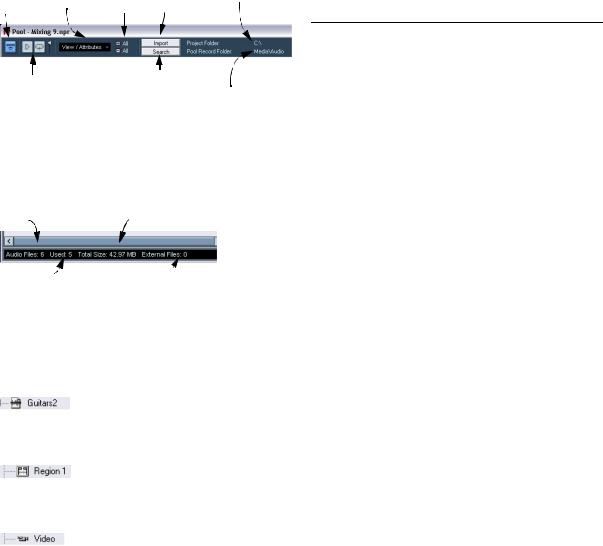
Toolbar overview
Hide/show |
Open/Close all |
Project Folder Path |
|||
info line View / Attributes |
Folders |
|
|
||
|
Pop-up |
|
Import Button |
|
|
|
|
|
|||
|
|
|
|
|
|
Play and Loop buttons, |
Search Button |
|
Pool Record Folder Path |
||
audition volume control |
The info line
Click the “Show Info” button on the toolbar to show or hide the info line at the bottom of the Pool window. It shows the following information:
Number of audio |
Total size of all audio |
files in the Pool |
files in the Pool |
Number of audio |
Number of files in the Pool that are not |
files in use |
in the project folder (e. g. video files) |
How clips and regions are displayed in the Pool
•Audio clips are represented by a waveform icon followed by the clip name.
•Audio regions are represented by a region icon followed by the region name.
•Video clips are represented by a camera icon followed by the clip name.
The Pool window columns
Various information about the clips and regions can be viewed in the Pool window columns. The columns contain the following information:
Column |
Description |
Media |
This column contains the Audio, Video and Trash folders. |
|
If the folders are opened, the clip or region names are |
|
shown and can be edited. This column is always shown. |
Used |
This column displays the number of times a clip is used in |
|
the project. If a column row is empty, the corresponding |
|
clip is not used. |
Status |
This column displays various icons that relate to the cur- |
|
rent Pool and clip status. See “About the Status column |
|
symbols” on page 299 for a description of the icons. |
Straighten up |
The checkbox in this column allows you to activate or de- |
|
activate Straighten up. If the Tempo column (see below) |
|
displays “???”, you have to enter the correct tempo be- |
|
fore you can activate Straighten up. |
Tempo |
This shows the tempo of audio files for which a tempo |
|
has been set. If no tempo has been specified, the column |
|
displays “???”. |
Sign. |
This is the time signature, e.g. “4/4”. |
Key |
This ist the root key, if one was specified for the file. |
Info |
This column shows the following information for audio |
|
clips: The sample rate, bit resolution, number of channels |
|
and the length in seconds. For regions, it displays start |
|
and end times in frames, and for video clips the frame |
|
rate, number of frames, and length in seconds. |
Type |
This column shows the file format of the clip. |
Date |
This column shows the date when the clip was created. |
Origin Time |
This column shows the original start position where a clip |
|
was recorded in the project. As this value can be used as |
|
a basis for the option “Insert into Project” in the Media or |
|
context menu (and other functions), you can change it if |
|
the Origin Time value is independent (i.e. not for regions). |
|
This can either be done by editing the value in the col- |
|
umn, or by selecting the corresponding clip in the Pool, |
|
moving the project cursor to the new desired position |
|
and selecting “Update Origin” from the Audio menu. |
Image |
This column displays waveform images of audio clips or |
|
regions. |
Path |
This column shows the path to the location of a clip on |
|
the hard disk. |
Reel Name |
If you have imported an OMF file (see “Exporting and im- |
|
porting OMF files” on page 494), they may include this |
|
attribute, in which case it is shown in this column. The |
|
Reel Name describes the 'physical' reel or tape from |
|
which the media was originally captured. |
|
|
298
The Pool
About the Status column symbols
The Status column can display various symbols that relate to the clips status. The following symbols can be shown:
Symbol Description
This indicates the current Pool Record folder (see “Changing the Pool Record folder” on page 308).
This symbol is shown if a clip has been processed.
The question mark indicates that a clip is referenced to the project but is missing from the Pool (see “About missing files” on page 305).
This indicates that the clip file is external, i.e. located outside the current Audio folder for the project.
This indicates that the clip has been recorded in the currently open version of the project. This is useful for finding recently recorded clips quickly.
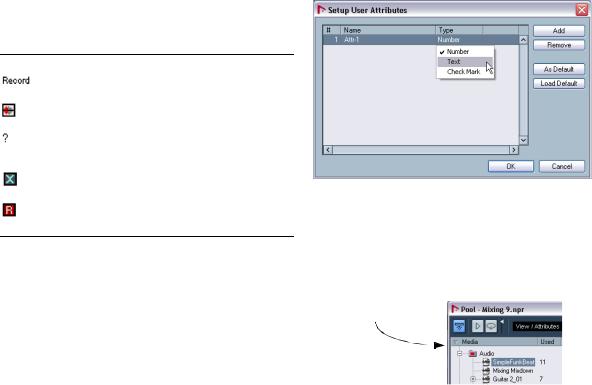
User Attributes
You can define your own attributes for elements in the pool. This is handy when you have a large number of audio files in the Pool. You can use the attributes to sort items in the pool or merely keep track of some aspect of your project.
Simply select the “Define User Attributes” option from the View/Attributes pop-up and create as many new attributes as you need. These attributes will then get their own columns in the Pool. Each attribute can be defined as checkbox, text field or number. You can then specify the user attributes for each file, thus categorizing them further. All user attributes you created are automatically available as search criteria in the Pool and can be added as separate elements to the search pane (or replace the search criteria above the Location parameter, see above). This allows for a very detailed search, helping you to master even the largest sound database.
Setting up a talent name attribute to keep track of ADR takes.
Sorting the Pool contents
You can sort the clips in the Pool by name, date etc. This is done by clicking on the corresponding column heading. Clicking again on the same heading switches between ascending and descending sort order.
The arrow indicates the sort column and sort order.
299
The Pool