

- •Table of Contents
- •About this manual
- •Welcome!
- •VST Connections: Setting up input and output busses
- •About this chapter
- •Setting up busses
- •Using the busses
- •Setting up Groups and FX channels
- •About monitoring
- •External instruments/effects
- •The Project window
- •Background
- •Window Overview
- •Operations
- •Options
- •Playback and the Transport panel
- •Background
- •Operations
- •Options and Settings
- •Recording
- •Background
- •Basic recording methods
- •Audio recording specifics
- •MIDI recording specifics
- •Options and Settings
- •Recovery of audio recordings after system failure
- •Fades, crossfades and envelopes
- •Creating fades
- •The Fade dialogs
- •Creating crossfades
- •The Crossfade dialog
- •Auto Fades and Crossfades
- •Event Envelopes
- •The Arranger track
- •Introduction
- •Setting up the Arranger track
- •Working with arranger events
- •Flattening the Arranger chain
- •Live Mode
- •Arranging your music to video
- •Folder tracks
- •About folder tracks
- •Handling folder tracks
- •Working with folder parts
- •Using markers
- •About markers
- •The Marker window
- •Using the Marker track
- •Marker key commands
- •Editing markers in the Project Browser
- •The Transpose functions
- •Introduction
- •Transposing your music
- •Other functions
- •The mixer
- •About this chapter
- •Overview
- •Configuring the mixer
- •The audio-related channel strips
- •The MIDI channel strips
- •The common panel
- •The input and output channels
- •Basic mixing procedures
- •Audio specific procedures
- •MIDI specific procedures
- •Utilities
- •VST Mixer Diagrams
- •Control Room
- •Background
- •Configuring the Control Room
- •The Control Room Overview
- •The Control Room Mixer
- •Control Room operations
- •Studios and Studio Sends
- •Direct Monitoring and latency
- •WK-Audio’s ID Controller
- •Audio effects
- •About this chapter
- •Overview
- •Insert effects
- •Send effects
- •Setting up send effects
- •Using the Side-Chain input
- •Using external effects
- •Making settings for the effects
- •Effect presets
- •VST Instruments and Instrument tracks
- •Introduction
- •VST Instrument channels vs. instrument tracks
- •VST Instrument channels
- •Instrument tracks
- •Comparison
- •Automation considerations
- •What do I need? Instrument channel or Instrument track?
- •Instrument Freeze
- •VST instruments and processor load
- •Using presets for VSTi configuration
- •About latency
- •External instruments
- •Surround sound
- •Background
- •Operations
- •Automation
- •Introduction
- •Enabling and disabling the writing of automation data
- •What can be automated?
- •The Automation panel
- •Virgin territory vs. the initial value
- •Automation modes
- •Automation performance utilities
- •The Settings section
- •Hints and further options
- •Automation track operations
- •Working with automation curves
- •Audio processing and functions
- •Background
- •Audio processing
- •Applying plug-ins
- •The Offline Process History dialog
- •Batch Processing
- •Freeze Edits
- •Detect Silence
- •The Spectrum Analyzer
- •Statistics
- •The Sample Editor
- •Background
- •Window overview
- •General Operations
- •Options and settings
- •Audio Warp realtime processing / Tempo matching audio to the project tempo
- •Working with hitpoints and slices
- •Free Warp
- •Realtime pitch-shifting of audio events
- •Flattening the realtime processing
- •The Audio Part Editor
- •Background
- •Opening the Audio Part Editor
- •Window overview
- •Operations
- •Common methods
- •Options and Settings
- •The Pool
- •Background
- •Window overview
- •Operations
- •VST Sound
- •Introduction
- •The MediaBay
- •Introduction
- •Window overview
- •Browsing for media files
- •Finding files in the Viewer section
- •Previewing files in the Scope section
- •The Tag Editor
- •Media management
- •Track Presets
- •Introduction
- •Types of track presets
- •VST presets
- •Browsing for presets
- •Creating a track preset
- •Creating tracks from track presets or VST presets
- •Applying track presets
- •Previewing track and VST presets
- •Inserts and EQ settings from track presets
- •Track Quick Controls
- •Introduction
- •Setting up the Quick Controls tab
- •Options and settings
- •Setting up quick controls on an external remote controller
- •MIDI realtime parameters and effects
- •Introduction
- •Basic track settings
- •MIDI Modifiers
- •MIDI effects
- •Managing plug-ins
- •MIDI processing and quantizing
- •Introduction
- •The Quantizing functions
- •Making your settings permanent
- •Dissolve Part
- •Repeat Loop
- •Other MIDI functions
- •The MIDI editors
- •About editing MIDI
- •Opening a MIDI editor
- •Key Editor operations
- •Edit In-Place
- •List Editor operations
- •Introduction
- •Opening the Logical Editor
- •Window overview
- •Selecting a preset
- •Setting up filter conditions
- •Selecting a function
- •Specifying actions
- •Applying the defined actions
- •Working with presets
- •The Input Transformer
- •The Project Logical Editor
- •Introduction
- •Opening the Project Logical Editor
- •Window overview
- •Selecting a preset
- •Setting up filter conditions
- •Selecting a function
- •Specifying actions
- •Applying the defined actions
- •Working with presets
- •Working with System Exclusive messages
- •Introduction
- •Bulk dumps
- •Recording System Exclusive parameter changes
- •Editing System Exclusive messages
- •Working with the Tempo track
- •Background
- •Operations
- •Process Tempo
- •The Process Bars dialog
- •Options and settings
- •The Beat Calculator
- •Merge Tempo From Tapping
- •The Time Warp tool
- •The Project Browser
- •Window Overview
- •Editing tracks
- •The Track Sheet
- •Overview
- •Printing the Track Sheet
- •Export Audio Mixdown
- •Introduction
- •Mixing down to an audio file
- •The available file formats
- •Synchronization
- •Background
- •Synchronization signals
- •Synchronizing the transport vs. synchronizing audio
- •Making basic settings and connections
- •Synchronization settings
- •Timecode Preferences
- •Machine Control
- •Setting up Machine Control
- •Working with VST System Link
- •Preparations
- •Activating VST System Link
- •Application examples
- •Video
- •Background
- •Before you start
- •Operations
- •The Edit Mode
- •Working with film transfers
- •Compensating for film transfers to video
- •ReWire
- •Introduction
- •Launching and quitting
- •Activating ReWire channels
- •Using the transport and tempo controls
- •How the ReWire channels are handled in Nuendo
- •Routing MIDI via ReWire2
- •Considerations and limitations
- •File handling
- •Working with Projects
- •Startup Options
- •Working with libraries
- •Revert
- •Importing audio
- •Exporting and importing OMF files
- •Exporting and importing AAF files
- •Exporting and importing AES31 files
- •Exporting and importing OpenTL files
- •Importing XSend projects from Liquid
- •Exporting and importing standard MIDI files
- •Exporting and importing MIDI loops
- •Exporting and importing tracks
- •Other Import/Export functions
- •Cleanup
- •Customizing
- •Background
- •Workspaces
- •The Setup dialogs
- •Customizing track controls
- •Configuring the main menu items
- •About preference presets
- •Appearance
- •Applying track and event colors
- •Where are the settings stored?
- •Key commands
- •Introduction
- •Setting up key commands
- •Setting up tool modifier keys
- •The default key commands
- •Index
Handling several parts
When you open the Audio Part Editor with several parts selected – all on the same track or on different tracks – they might not all “fit” in the editor window, which can make it hard to get an overview of the different parts when editing.
Therefore, the toolbar features a few functions to make working with multiple parts easier and more comprehensive:
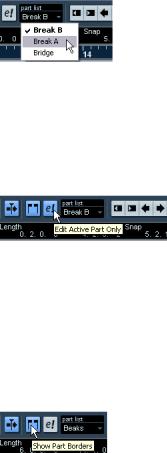
• The Part List menu lists all parts that were selected when you opened the editor, and lets you select which part should be active for editing.
When you select a part from the list, it is automatically made active and centered in the display.
Ö Note that it is also possible to activate a part by clicking on it with the Arrow tool.
• The button “Edit Active Part Only” lets you restrict editing operations to the active part only.
If you for example select “All” from the Select submenu on the Edit menu with this option activated, all events in the active part will be selected but not the events in other parts.
“Edit Active Part Only” activated on the toolbar.
•You can zoom in on an active part so that it fills the screen by selecting “Zoom to Event” from the Zoom submenu on the Edit menu.
•The button “Show Part Borders” can be used if you want to see clearly defined borders for the active part.
When this is activated, all parts except the active one are grayed out, making the borders easily discernible. There are also two “markers” in the ruler with the name of the active part, marking its beginning and end. These can be moved freely to change the part borders.
• It is possible to cycle between parts, making them active, with key commands.
In the Key Commands dialog – Edit category, there are two functions: “Activate Next Part” and “Activate Previous Part”. If you assign key commands to these, you can use them to cycle between parts. Please refer to “Setting up key commands” on page 518 for instructions on how to set up key commands.
Common methods
Assembling a “perfect take”
When you record audio in Cycle mode, either an event or a region (or both) is created for each recorded lap (see “Recording audio in cycle mode” on page 73). These events and regions are named “Take X”, where “X” is the number of the take. You can create a perfect take by putting together sections of the different takes in the Audio Part Editor.
Ö The procedure below will not work if you recorded with “Keep Last” mode selected on the Transport panel.
In that case, only the last take will be kept on the track (although the previous takes will be available as regions in the Pool).
First, you have to create an audio part from the takes. This procedure is slightly different depending on whether you choose to create events or regions.
Creating an audio part from events
1.In the Project window, use the Object Selection tool to draw a rectangle around the recorded events.
This is necessary, since clicking on the event may just select the event on top (the last take). If in doubt, check the info line – the info text should be yellow.
2.Pull down the Audio menu and select “Events to Part”.
The events are converted to an audio part.
• Note that the events cycle record mode also makes it easy to combine different takes in the Project window – see “Create Events mode (Preferences)” on page 74.
“Show Part Borders” activated on the toolbar.
The Audio Part Editor — 294
Creating an audio part from regions
1.In the Project window, select the event you recorded in Cycle mode.
After recording, this will play the last take.
2.Pull down the Audio menu and select “Events to Part”.
You are asked whether you want to “Create part using regions”.
3.Click “Regions”.
The regions are converted to an audio part.
Assembling a take
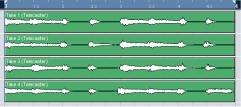
1. Double-click the part to open the Audio Part Editor.
Now, the different takes will be placed on different lanes, with the last take at the bottom.
2. Use the tools to cut out pieces of the takes and assemble the final result.
This can include splitting with the Scissors tool, resizing events with the Arrow tool or deleting with the Eraser tool.
• Remember that the events on the lowest lane have playback priority.
Use the Audition icon to audition the result.
3. Close the Audio Part Editor.
You have now assembled a “perfect take”!
Options and Settings
The following options and settings are available in the Audio Part Editor:
• Snap
You can specify an independent Snap mode (and snap value for the Grid mode) in the editor. The functionality is exactly the same as in the Project window.
• Autoscroll
When Autoscroll is activated on the toolbar, the window will scroll during playback, keeping the project cursor visible in the editor. This setting can be activated or deactivated individually for each window.
• Snap to Zero Crossing
When this option is activated, all audio edits are done at zero crossings (positions in the audio where the amplitude is zero). This helps you avoid pops and clicks which might otherwise be caused by sudden amplitude changes.
295 — The Audio Part Editor