17
Audio processing and functions
Background
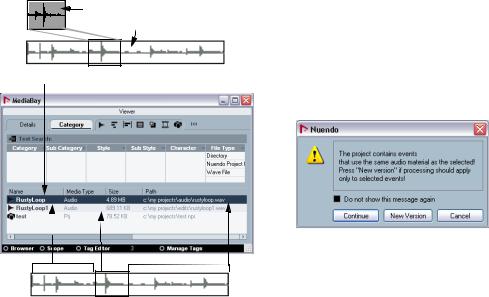
Audio processing in Nuendo can be called “non-destruc- tive”, in the sense that you can always undo changes or revert to the original versions. This is possible because processing affects audio clips rather than the actual audio files, and because audio clips can refer to more than one audio file. This is how it works:
1.If you process an event or a selection range, a new audio file is created in the Edits folder, within your project folder.
This new file contains the processed audio, while the original file is unaffected.
2.The processed section of the audio clip (the section corresponding to the event or selection range) then refers to the new, processed audio file.
The other sections of the clip will still refer to the original file.
This event plays a section of this clip…
…which refers to this audio file.
After processing the event the clip will refer both to the original file and a new file, containing the processed section only.
• Since all edits are available as separate files, it is possible to undo any processing, at any point and in any order!
This is done in the Offline Process History dialog, see “The Offline Process History dialog” on page 251.
• Furthermore, the original, unprocessed audio file can still be used by other clips in the project, by other projects or by other applications.
Audio processing
Basically, you apply processing by making a selection and selecting a function from the Process submenu on the Audio menu. Processing is applied according to the following rules:
•Selecting events in the Project window or the Audio Part Editor will apply processing to the selected events only.
Processing will only affect the clip sections that are referenced by the events.
•Selecting an audio clip in the Pool will apply processing to the whole clip.
•Making a selection range will apply processing to the selected range only.
Other sections of the clip are not affected.
If you attempt to process an event that is a shared copy (i.e. the event refers to a clip that is used by other events in the project), you are asked whether you want to create a new version of the clip or not.
Select “New Version” if you want the processing to affect the selected event only. Select “Continue” if you want the processing to affect all shared copies.
Ö If you activate “Do not show this message again”, any further processing you do will conform to the selected method (“Continue” or ”New Version”).
You can change this setting at any time by using the “On Processing Shared Clips” pop-up in the Preferences (Editing–Audio page).
239 — Audio processing and functions
Common settings and features
If there are any settings for the selected Audio processing function, these will appear when you select the function from the Process submenu. While most settings are specific for the function, some features and settings work in the same way for several functions:
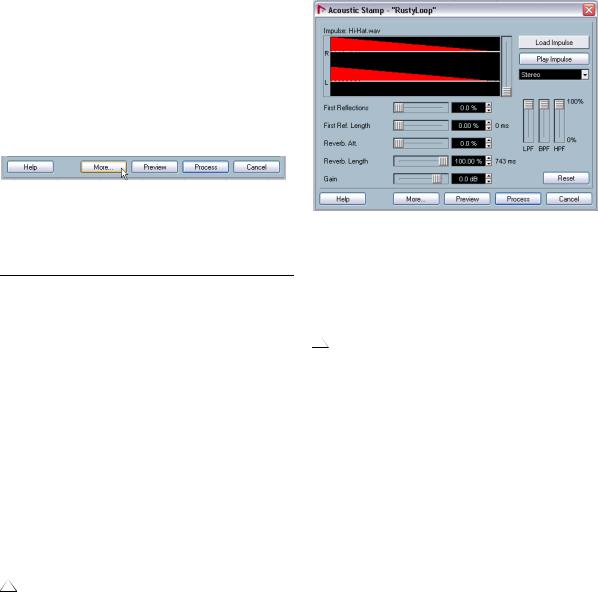
The “More…” button
If the dialog has a lot of settings, some options may be hidden when the dialog appears. To reveal these, click the “More…” button.
To hide the settings, click the button again (now labeled “Less…”).
The Preview, Process and Cancel buttons
These buttons have the following functionality:
Button |
Description |
Preview |
Allows you to listen to the result of the processing with |
|
the current settings. Playback will continue repeatedly |
|
until you click the button again (the button is labeled |
|
“Stop” during Preview playback). You can make adjust- |
|
ments during Preview playback, but the changes are not |
|
applied until the start of the next “lap”. Some changes |
|
may automatically restart the Preview playback from the |
|
beginning. |
Process |
Performs the processing and closes the dialog. |
Cancel |
Closes the dialog without processing. |
|
|
Pre/Post-CrossFade
Some processing functions allow you to gradually mix the effect in or out. This is done with the Pre/Post-CrossFade parameters. If you activate Pre-CrossFade and specify a value of e.g. 1000 ms, the processing will be applied gradually from the start of selection, reaching full effect 1000 ms after the start. Similarly, if you activate Post-CrossFade, the processing will gradually be removed, starting at the specified interval before the end of the selection.
The sum of the Preand Post-CrossFade times cannot be larger than the length of the selection.
Acoustic Stamp
The Acoustic Stamp function is a convolution tool, which allows you to apply room characteristics (reverb) to the audio. This is done by processing the audio signal according to an impulse response – generally a stereo or mono recording of a very short signal (the impulse) in a room or other location. As a result, the processed audio will sound as if it were played in the same location.
This function requires a lot of processing power, especially when using the Preview function. If you are working with long impulse response files or stereo files, you may find that Preview playback stutters or stops. In that case, it’s better to process the material, listen to the result and modify it in the Offline Process History (see “The Offline Process History dialog” on page 251) if necessary.
The dialog contains the following settings:
Impulse and Envelope display
This display shows the loaded impulse response (in white) and the Envelope (in red). You can zoom in vertically on the impulse response using the slider to the right of the display (this can be useful since impulse responses typically are very weak). Zooming does not affect the processing in any way.
Audio processing and functions — 240
Load Impulse button
Clicking the “Load Impulse” button allows you to load an impulse response file from disk. These are ordinary wave or aiff audio files, with a maximum duration of 12 seconds. The name of the currently loaded impulse response file is shown above the display.
• A number of demonstration impulse response files are included in the Nuendo program folder.
For proper use of the Acoustic Stamp function, we recommend that you acquire files from a professional impulse response library.
Filter controls
The three sliders to the right allow you to tailor the tonal character of the processed sound. In essence, this is a graphic equalizer with three broad bands: the LPF slider governs the low frequency content, the BPF governs the midrange and the HPF governs the high frequency content.
• Setting a slider to 100% means that the corresponding filter is “fully open”.
When all three sliders are set to 100%, the processed audio is not filtered at all.
Play Impulse button
Plays back the currently loaded impulse response.
Channel selector
If the currently loaded impulse response is a stereo file, this pop-up menu allows you to select whether the left channel, right channel or both (stereo) should be used for the convolution process.
Envelope controls
The five sliders below the display are used for setting up the “reverb envelope”, that is, a gain curve modifying how the impulse response is applied over time, and thereby the reverb character. These settings are reflected in the red Envelope display above. The sliders have the following functionality:
Parameter Description
First Reflections A level control for the first section of the reverb (the length of which is set with the next parameter, see below). Usually, this governs the volume of the first reflection(s) of the reverb.
First Ref. Length This determines the length of the First Reflections section (the level of which is controlled by the previous parameter). Usually you would want to set this so that it includes the first reflection in the impulse response (normally about 5% of the total length).
Reverb Att. |
A level control for the end section of the reverb (the sec- |
|
tion after the First Reflections, see above). |
Reverb Length |
Governs the reverb time, in milliseconds. |
Gain |
Allows you to adjust the gain of the impulse response. |
|
This may be necessary for optimal results, since different |
|
impulse response files may be recorded at different lev- |
|
els. |
|
|
Reset button
Sets all parameters in the upper section of the dialog to their default values.
Wet/Dry Mix
These two sliders allow you to specify the balance between wet (processed) and dry (original) signal in the resulting clip.
Normally the two sliders are “reverse-ganged”, so that raising the Wet mix slider lowers the Dry mix slider by the same amount. However, if you press [Alt]/[Option] and drag a slider, you can move it independently. This allows you to set e.g. 80% dry and 80% wet signal. Be careful to avoid distortion.
Tail
This parameter allows you to “add space” after the original audio section, to avoid that the reverb tail is cut off. When the checkbox is activated, you can specify a tail length using the slider. The tail time is included when playing back with the Preview function, allowing you to find the appropriate tail length. A good value would be the Reverb Length value, displayed in ms to the right of the Reverb Length parameter.
Pre and Post-CrossFade
See “Pre/Post-CrossFade” on page 240.
241 — Audio processing and functions
Envelope |
Gain |
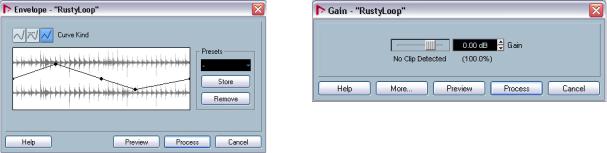
The Envelope function allows you to apply a volume envelope to the selected audio. The dialog contains the following settings:
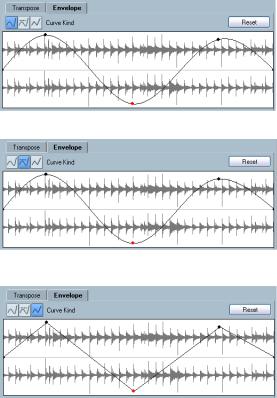
Curve Kind buttons
These determine whether the envelope curve should consist of spline curve segments (left button), damped spline segments (middle button) or linear segments (right button).
Fade display
Shows the shape of the envelope curve. The resulting waveform shape is shown in dark gray, with the current waveform shape in light gray. You can click on the curve to add points, and click and drag existing points to change the shape. To remove a point from the curve, drag it outside the display.
Presets
If you have set up an envelope curve that you may want to apply to other events or clips, you can store it as a preset by clicking the Store button.
•To apply a stored preset, select it from the pop-up menu.
•To rename the selected preset, double-click on the name and enter a new one in the dialog that appears.
•To remove a stored preset, select it from the pop-up menu and click Remove.
Fade In and Fade Out
For a description of these functions, see the chapter “Fades, crossfades and envelopes” on page 86.
Allows you to change the gain (level) of the selected audio. The dialog contains the following settings:
Gain
This is where you set the desired gain, between -50 and +20dB. The setting is also indicated below the Gain display as a percentage.
Clipping detection text
If you use the Preview function before applying the processing, the text below the slider indicates whether the current settings result in clipping (audio levels above 0dB). If that is the case, lower the Gain value and use the Preview function again.
• If you want to increase the level of the audio as much as possible without causing clipping, you should use the Normalize function instead (see “Normalize” on page 244).
Preand Post-CrossFade
See “Pre/Post-CrossFade” on page 240.
Audio processing and functions — 242
Merge Clipboard |
Noise Gate |
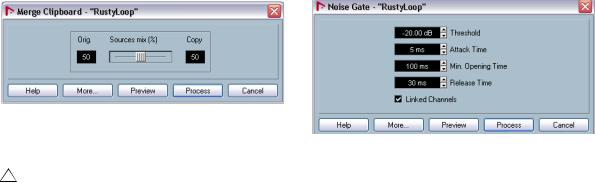
This functions mixes the audio from the clipboard into the audio selected for processing, starting at the beginning of the selection.
For this function to be available, you need to have cut or copied a range of audio in the Sample Editor first.
The dialog contains the following settings:
Sources mix
Allows you to specify a mix ratio between the original (the audio selected for processing) and the copy (the audio on the clipboard).
Preand Post-CrossFade
See “Pre/Post-CrossFade” on page 240.
Scans the audio for sections weaker than a specified threshold level and replaces them with silence. The dialog contains the following settings:
Threshold
The level below which you want audio to be silenced. Levels below this value will close the gate.
Attack Time
The time it takes for the gate to open fully after the audio level has exceeded the threshold level.
Min. Opening Time
This is the shortest time the gate will remain open. If you find that the gate opens and closes too often when processing material that varies rapidly in level, you should try raising this value.
Release Time
The time it takes for the gate to close fully after the audio level has dropped below the threshold level.
Linked Channels
This is available for stereo audio only. When it is activated, the Noise Gate is opened for both channels as soon as one or both channels exceed the Threshold level. When Linked Channels is deactivated, the Noise Gate works independently for the left and right channel.
Dry/Wet mix
Allows you to specify a mix ratio between “dry” and processed sound.
Preand Post-CrossFade
See “Pre/Post-CrossFade” on page 240.
243 — Audio processing and functions
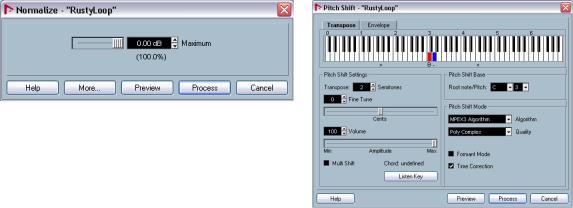
Normalize |
Pitch Shift |
The Normalize function allows you to specify the desired maximum level of the audio. It then analyzes the selected audio and finds the current maximum level. Finally it subtracts the current maximum level from the specified level and raises the gain of the audio by the resulting amount (if the specified maximum level is lower than the current maximum, the gain will be lowered instead). A common use for Normalizing is to raise the level of audio that was recorded at too low an input level. The dialog contains the following settings:
Maximum
The desired maximum level for the audio, between -50 and 0dB. The setting is also indicated below the Gain display as a percentage.
Preand Post-CrossFade
See “Pre/Post-CrossFade” on page 240.
Phase Reverse
Reverses the phase of the selected audio, turning the waveform “upside down”. The dialog contains the following settings:
Phase Reverse on
When processing stereo audio, this pop-up menu allows you to specify which channel(s) should be phase-reversed.
Preand Post-CrossFade
See “Pre/Post-CrossFade” on page 240.
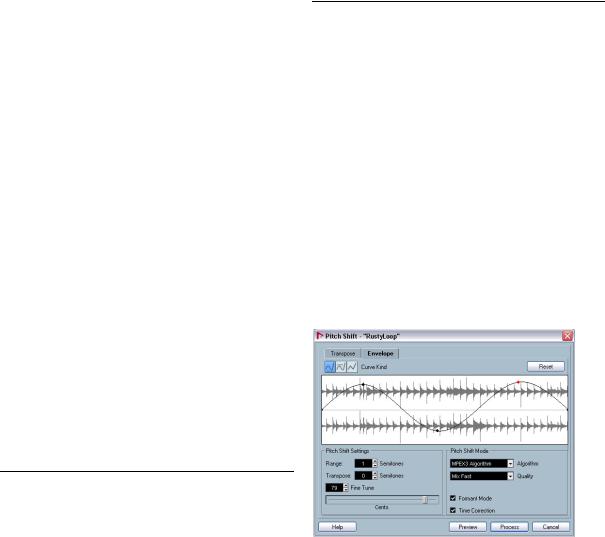
This function allows you to change the pitch of the audio with or without affecting its length. You can also create “harmonies” by specifying several pitches or apply pitch shift based on a user specified envelope curve.
When the “Transpose” tab is selected, the dialog contains the following parameters:
Keyboard display
This offers a way to specify the transpose interval in semitones and gives a graphic overview of the transposition setting.
• The “root note” is indicated in red.
This has nothing to do with the actual key or pitch of the original audio, it just provides a way to display transpose intervals. If you like, you can change the root note by using the settings in the Pitch Shift Base section, or by pressing [Alt]/[Option] and clicking in the keyboard display.
•To specify a transpose interval, click on one of the keys.
The key is indicated in blue, and the program plays test tones in the base pitch and transpose pitch to give you an audible confirmation.
•If “Multi Shift” is activated (see below), you can click on several keys to create “chords”.
Clicking on a blue (activated) key removes it.
Pitch Shift settings
The “Semitones” and “Fine tune” settings allow you to specify the amount of pitch shift. You can transpose the audio ±16 semitones, and fine tune it by ±200 cents (hundredths of semitones).
Audio processing and functions — 244