

Automation performance utilities
The automation modes described above become far more effective when used in combination with the Nuendo automation performance utilities. These are a number of options and functions tailored to specific situations, allowing you to write automation data quickly and efficiently. You will find these utilities in the various sections on the Automation panel.
The Fill options
The Fill options define conditions for what is to happen in a specific section of your project when you punch-out of a running automation pass. They can be used in real-time while rolling through your project, in situations that are not too complex. Look at these two examples:
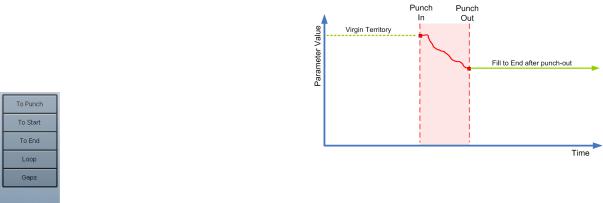
Fill To End
Imagine you are automating volume for the background tracks of a two-minute scene. Rather than to hold on to the fader for two minutes, you can proceed as follows:
1.Open the Automation panel and select Touch as your automation mode.
2.Click the “To End” button once to activate it as Fill option.
The “To End” button is highlighted.
3.Start rolling and touch the parameter control to punchin the automation pass.
4. Move the fader until you have found the setting you want, and release the fader.
This will punch-out the writing of automation data. As you let go of the fader, the automation curve will take the found value setting, from where you punched out through to the end of the project.
Fill To End
Fill To Punch
Let’s say you are rolling, in real-time, over a scene cut and volume must be softer in the next scene – you don’t yet know how much softer, but the change in volume from the first to the second scene must be abrupt.
1.Select Touch as automation mode and “Fill To Punch” as Fill option.
2.Start rolling somewhere during the first scene and touch the fader on the moment of scene change.
The automation pass is punched in.
3.Move the fader until you have found the volume setting you need in the second scene, and release the fader to punch-out.
The volume curve is set from the point of punch-out back to where you punched in. The values written while moving the fader to find the right value are deleted, and volume jumps, at exactly the right moment, from the value set in the first scene to the value found for the second scene.
You will find this works the same for the other Fill options:
• When “To Start” is selected, punching out of automation will fill the automation track from where you punched out to the start of the project.
222
Automation
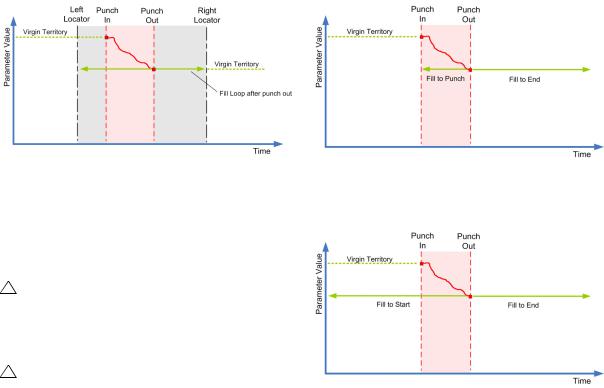
• To use the Loop option, you must first set up a loop range with the left and right locators. When you then select Loop, punching out of automation will set the found value within the range defined by the left and right locator.
Note that, even when the project cursor is outside the defined loop, the found automation value will be applied only between the locators.
Fill combinations
You can also combine the various Fill options.
• Select “To Punch” and “To End” if you want the found value to be used from where you punched in through to the end of your project.
Fill Loop
• The Gaps option is used only in combination with Virgin Territory. This is explained in detail in the section “Virgin territory vs. the initial value” on page 217. When Gaps is selected, punching out of automation will fill any gaps between previously written automation with the last value found during the last automation pass.
The Fill options write one particular value across a defined section of your automation track – any previously created data within this section is overwritten. Therefore, use the Fill options with caution, to avoid accidental loss of data.
Note that when Trim is active, the Fill–Gaps option will have no effect. This is because Trim will only modify already existing data.
Combining Fill To Punch and Fill To End
• Combining “To Start” and “To End” will fill the automation track from the beginning through to the end of the project.
Combining Fill To Start and Fill To End
• You can also combine the Fill options with the Preview options (see “The Preview options” on page 225), and when working offline with the Pencil tool.
Offline editing is explained in more detail in the section “Editing automation events” on page 235). This is a very fast and efficient way to move through your project.
Feel free to experiment!
223
Automation
One shot vs. continuous fill
The Fill options can be used in two different ways:
•When you click one of the Fill options once, it is highlighted, and will be enabled during the next automation pass.
Afterwards, the option is disabled again, i.e. the operation can be performed only once.
•If you click a Fill option a second time, a lock symbol is displayed on the highlighted button, indicating that you are permanently in “Fill to X” mode and that the operation can be repeated as many times as you wish.
Clicking the option for a third time will disable this Fill option.
Trim
Trim is available from the Automation panel only. Trim is a way of manipulating an already written automation curve, other, rather than an automation mode.
Ö Trim works for channel volume and aux send level adjustments.
When enabling Trim, a channel volume fader is positioned in the exact middle position, and will not move with any existing volume automation curve.
You can use Trim either in Stop mode or in Play mode.
Trim in Stop mode
In Stop mode, selecting one of the Fill options and moving the fader in Trim mode will move the entire existing volume automation curve up or down, so you can still adjust the overall volume of a channel without destroying any automation data that you might have created earlier.
• In Stop mode, Trim is used in combination with some of the Fill options (see “The Fill options” on page 222), to determine within which range the automation curve is adjusted.
The Fill options available are To Start, To End, Loop and any combination of these.
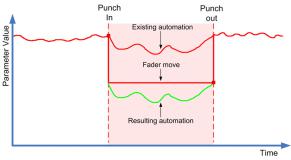
Trim in Play mode
In Play mode, moving the fader in Trim mode will move the existing break-points by a relative amount as the project cursor passes over them.
• In Play mode, as the project cursor moves along the timeline, your Trim moves will adjust the existing breakpoints on the automation curve.
Ö Note that the exact result of your trim moves in Play mode will only be visible after punch-out.
Trim in Play mode, in combination with Fill to Punch. Note that you would arrive at a similar curve when enabling Trim, setting the left and right locators, selecting Fill Loop and moving the fader downwards in Stop mode.
Ö Note that Trim is not merely a matter of rewriting the automation curve using the fader movements you perform. Instead, the settings from the existing curve and the settings calculated from your fader movements are used to re-calculate the automation curve as soon as you punchout.
224
Automation
The Preview options |
• Note that each automation track has its own Preview |
|
button. |
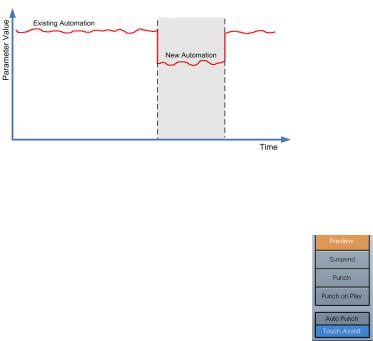
Preview provides an easy way to find new settings without recording the steps needed to locate them:
•Preview allows you to deal with abrupt changes in your audio material, e.g. in music when changing from verse to chorus, or in film when moving into the next scene.
•With Preview, you can do a test run of your automation pass.
•Preview is the mode to use in complex situations where many things happen in a very short period of time, and where it is not possible to set all required parameters in real-time.
•Preview allows you to set up automation for several parameters simultaneously.
Imagine two film scenes where the actors move from a hotel entrance hall into the open air: while some of your parameter settings might still be OK for the second scene, others will have to change abruptly as soon as the second scene starts.
So for the second scene, you must find new settings, but without deleting any existing automation data.
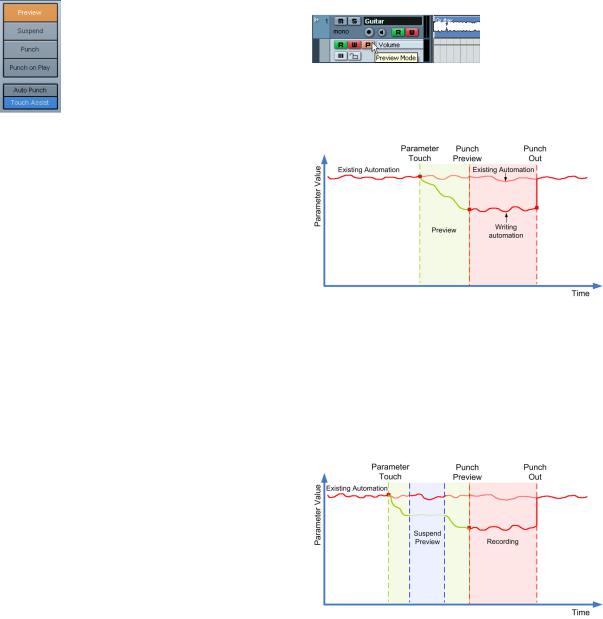
The Preview workflow
The Preview workflow has three different phases: touchcollecting the required parameters, finding the required values, and the actual automation pass. Proceed as follows:
1.On the Automation panel, click the Preview button in the Preview section.
The Preview button is highlighted.
2.Touch a parameter control.
Below the Preview button three other buttons are displayed. You now have full manual control of the touch-collected parameter, suspending (but not deleting!) any previously recorded automation data. You may now touch-collect another parameter, if you want to write data for several parameters during the same automation pass.
Clicking this button will enable Preview mode for this particular automation track. This is touch-collecting via automation tracks.
3. Play back the scene (you may want to loop it) and find the parameter setting(s) you want.
Touch the required parameter, start rolling, find the desired value and select Punch to start the new automation pass.
• Use the Suspend option in the Preview section on the Automation panel to compare any previously automated value with the value found during preview.
Suspend will play back your audio material using the parameter values set before activating Preview – in our example above, to hear the settings for the indoor scene, you need to click Suspend, and at the moment of scene change, you need to click Suspend again to return you to Preview mode and the values found for the open-air scene.
Suspend allows you to listen to the existing automation settings.
225
Automation
Ö Remember: you can use the delta indicator in the automation track as an additional visual aid for comparing the previously found and the currently set parameter values.
4. When you are happy with the values found, start rolling and click Punch to punch-in the automation pass.
The new value setting is recorded, from the point where you punched in to your punch-out position (as defined by the automation mode setting).
The result of the Preview automation pass.
Punch vs. Punch on Play
When using the Punch option as described above, starting playback and punching in are two separate actions. If you want to punch-in when starting playback, activate Punch on Play.
•Punch would be the option to use if you need to listen to the section before your desired punch-in point and if this section has automation data already that you don’t want to overwrite – you would roll through this section and then punch-in the automation pass.
•You can also use Punch in Stop mode. To create automation data in this way, Punch must be combined with one of the Fill modes (see “The Fill options” on page 222).
•Use Punch on Play when you cannot punch-in on the fly
– i.e. in situations where you need to find the punch-in position in stop mode. Once you have found the exact position, enable Punch on Play and start playback from there.
Auto Punch
As described in the section “General punch-out conditions” on page 219, when setting up a loop with the left and right locators, an automation pass will always punchout when reaching the right locator.
When in Preview mode, you can also use the left and right locators to automatically punch-in and out at defined positions, using the Auto Punch command.
• Use Auto Punch when you want the automation pass to begin and end at defined positions.
You can also use Auto Punch without enabling Preview mode, to set up a “safe zone” for previously written automation data:
• Place the right locator at the beginning of an area you wish to protect and enable cycle mode.
This will ensure that a running automation pass will always punch-out before reaching this section of your project.
Touch Assist
When you use Preview mode, you may get into a situation where you change some parameters, but not others, although they belong to the same group of parameters (e.g. EQ settings). To prevent you from forgetting some parameters while touch-collecting parameters for Preview (see also “The Preview workflow” on page 225), you can enable the Touch Assist option. You will find this option at the bottom of the Preview section on the Automation Panel.
The Touch Collect Assistant is enabled.
When the Touch Collect Assistant is enabled, the parameters of the following features will be treated as groups:
•Channel EQ module (21 parameters total)
•Aux send on/off and send level
•Stereo panner
•Surround panner (Left-Right, Front-Rear, LFE)
•Insert plug-ins (only available for plug-ins with 32 or less parameters)
•When this option is enabled, it will ensure that touching one parameter in a group will “touch” all other parameters in that group as well.
226
Automation

• If, however, you want to automate one and only one particular parameter, the Touch Collect Assistant should be disabled to prevent you from inadvertently overwriting any previously created automation data.
Enabling the Touch Collect Assistant may lead to the creation of a large amount of automation data, causing a higher CPU load. If performance is an issue in your workflow, you should consider not using the Touch Collect Assistant.
Changing plug-in presets in Preview mode
When changing a preset of a VST plug-in while in Preview mode, the change in the parameter settings caused by the preset change is recorded automatically as automation.
Note that the plug-in must have 32 or less parameters for this to work.
The Punch Log section
This section of the Automation panel displays a list of recent punch-in operations performed in Preview mode.
By loading one of these log entries for the current track, you recall the corresponding touch-collected parameters and their values at the moment of punch-in.
•To recall the settings of a particular entry in the punch log, select it in the list and click Load.
The Preview button on the Automation panel and the “Preview mode” button on the corresponding automation track light up to indicate that this parameter is now in Preview mode.
•You can rename any log entry by double-clicking it and entering a new name.
•To delete an entry, select it and click Delete.
•To specify how many log entries are displayed, click the Max. Log Entries button in the Settings section.
If this value is set to 10 entries, the eleventh punch event will overwrite the entry created for the first event, the twelfth will replace the second entry, etc. The maximum possible number of punch log entries is 100.
•You can prevent a particular entry from being overwritten by clicking in the right column for this entry, so that a check mark is displayed.
•Punch log entries are saved with the current project.
Punch log data is always project-specific. There is no way to export log entries to another project.
Loading behavior
When loading a log entry, you add the corresponding parameter(s) to any other parameters that you have touchcollected during the current Preview session.
However, if you manually touch-collect a parameter, e.g. volume, and then add volume again by loading a punch log entry, the settings for volume from the punch log will be used, replacing any values set manually.
The Suspend options
The parameters or parameter groups selected here are excluded from the reading or writing of automation data – giving you full manual control of these parameters.
Ö Note that the Others options refer to all parameters not covered by any of the options Volume, Pan, Mute, EQ, Sends or Inserts.
227
Automation
Suspending Write
Imagine the following situation: To help you concentrate while working on a particular track, you mute several other tracks. However, because automation Write is active on these tracks, this mute state is also automated during the next automation pass – a classic situation in mixing.
To avoid inadvertently excluding whole tracks from your mix in this way, you can exclude Mute from all automation writing. Simply click Mute below the Suspend Write button in the Suspend section on the Automation panel.
•Click the Suspend Write button to enable all Suspend Write options, thus suspending the writing of automation data for all parameters/parameter groups.
When any of the options below the Suspend Write button are enabled, clicking Suspend Write will disable these buttons.
•When an automation pass is in progress for a particular parameter and you write-suspend this parameter, it will punch-out of the automation pass.
Suspending Read
Imagine you have already automated several tracks. While working on the current track, you want one of the other tracks to be louder, to better identify a particular position in your audio material. By suspending Read for the volume parameter, you regain full manual control and can set the volume to the required level.
• Click the Suspend Read button to enable all Suspend Read options, thus suspending the reading of automation data for all parameters/parameter groups.
When any of the options below the Suspend Read button are enabled, clicking Suspend Read will disable these buttons.
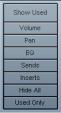
The Show options
The Show options in the Automation panel
The Show options in the Automation panel always affect all tracks. Clicking on these buttons opens the automation tracks for the corresponding parameters, e.g. volume or pan. This makes it easy to look at, e.g., your EQ settings on several tracks.
•When you click either Volume, Pan, EQ, Sends or Inserts, this will open the corresponding automation track(s) for all tracks.
The automation tracks will be opened even if no automation data was recorded on these tracks.
•For parameter groups (i.e. Pan, EQ, Sends and Inserts) you can step through the individual parameter sets by repeatedly clicking the respective button.
•When the Used Only button is enabled, clicking one of the parameter options will show you only the automation tracks for which automation data has already been written.
“Empty” automation tracks will not be displayed.
•When you click Show Used, only those automation tracks that contain automation data will be displayed.
These will be all automation tracks, for any parameter, on all automated tracks.
•Hide All will hide all open automation tracks.
228
Automation