


Setting the Main Mix bus (the default output bus)
The Main Mix is the output bus that each new channel in the mixer will be assigned to when it is created.
Any one of the output busses in the VST Connections window can be the default output bus. By right-clicking on the name of an output bus, you can set this bus as the Main Mix bus.
Setting the default output bus in the VST Connections window.
When creating new audio, group or FX channels in the mixer, they will automatically be routed to the default bus.
The default bus is indicated by an orange colored speaker icon next to its name in the VST Connections window.
Other bus operations
•To change the port assignment for a bus, you proceed as when you added it – make sure the channels are visible (by clicking the “+” button next to the bus, or by clicking the “+ All” button at the top of the window) and click in the Device Port column to select ports.
•To remove a bus you don’t need, select it in the list, right-click and select “Remove Bus” from the pop-up menu, or press [Backspace].
•You can store and recall bus presets with the pop-up menu at the top of the window.
To store the current configuration as a preset, click the Store “+” button and enter a name for the preset. You can then select the stored configuration directly from the Presets pop-up menu at any time. To remove a stored preset, select it and click the “-” button.
Using the busses
This section describes briefly how to use the input and output busses you have created. For details refer to the chapters “Recording” on page 64 and “The mixer” on page 122.
Routing
When you play back an audio track (or any other audio channel in the mixer – VST Instrument channels, ReWire channels, etc.), you route it to an output bus. In the same way, when you record on an audio track you select from which input bus the audio should be sent.
• You can select input and output busses in the Inspector, using the Input and Output Routing pop-up menus.
For audio-related channel types other than audio track channels (i.e. VST Instrument channels, ReWire channels, Group channels and FX channels), only the Output Routing pop-up menu is available. Select one of its subtracks in the Track list to open it.
• You can also select busses in the Routing panel at the top of each channel strip in the mixer.
Again, for VST Instrument channels, ReWire channels, Group channels and FX channels you will only be able to select output busses.
14
VST Connections: Setting up input and output busses
• If you press [Alt]/[Option] and select an input or output bus in the Mixer Routing View, it will be chosen for all selected channels.
This makes it easy to quickly set several channels to use the same input or output. Similarly, if you press [Shift] and select a bus, the following selected channels will be set to use incrementing busses – the second selected channel will use the second bus, the third will use the third bus and so on.
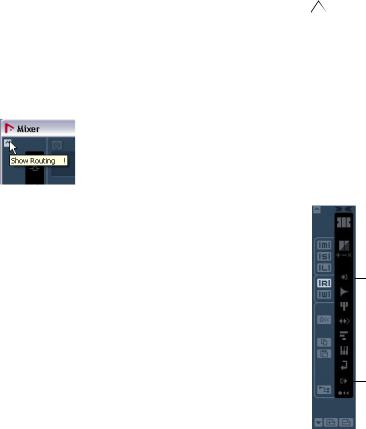
Ö If the Routing panel isn’t shown, click the Show Routing button in the extended common panel or open the Mixer context menu and select “Show Routing View” from the Window submenu.
The “Show Routing” button in the extended common panel of the Mixer.
When selecting an input bus for a track you can only select busses that correspond to the track’s channel configuration. Here are the details for input busses:
•Mono tracks can be routed to mono input busses or individual channels within a stereo or surround input bus.
•Mono tracks can be routed to External Inputs that are configured in the Studio tab of the VST Connections window. These can be mono or individual channels within a stereo or surround input bus. They can also be routed to the Talkback input.
•Mono tracks can also be routed to mono output busses, mono group output busses or mono fx channel output busses, provided that these will not lead to feedback.
•Stereo tracks can be routed to mono input busses, stereo input busses or stereo child busses within a surround bus.
•Stereo tracks can be routed to External Inputs that are configured in the Studio tab of the VST Connections window. These can be mono input busses or stereo input busses. They can also be routed to the Talkback input.
•Stereo tracks can also be routed to mono or stereo output busses, mono or stereo group output busses and mono or stereo fx channel output busses, provided that these will not lead to feedback.
•Surround tracks can be routed to surround input busses.
•Surround tracks can be routed to External Inputs that are configured in the Studio tab of the VST Connections window, provided that these have the same input configuration.
•Surround tracks can also be routed to output busses, provided that these have the same input configuration or will not lead to feedback.
For output busses any assignment is possible.
Assignments that will lead to feedback are not available in the pop-up menu. This is also indicated by a one-way symbol.
To disconnect input or output busses, select “No Bus” from the corresponding pop-up menu.
Viewing the busses in the mixer
In the mixer, busses are represented by input and output channels (shown in separate panes to the left and right in the window). You can show or hide these independently by clicking the Hide Input Channels and Hide Output Channels buttons in the common panel:
Hide Input Channels
Hide Output Channels
15
VST Connections: Setting up input and output busses

Input channels |
Output channels |
The input channels are shown to the left in the mixer. As you can see, each input channel resembles a regular mixer channel strip. Here you can do the following:
•Check and adjust the recording level using the Input Gain knobs and/or the level fader.
See “Setting input levels” on page 69.
•Change the phase of the input signal.
This is done by clicking the Input Phase button next to the Input Gain control.
• Add effects or EQ to the input bus.
See “Recording with effects” on page 76 for an example of how to add effects to your recording at the input bus stage.
The settings you make in the input channel strip will be a permanent part of the recorded audio file!
The output channels are shown to the right in the mixer. Here you can do the following:
•Adjust the output level for the busses with the faders.
•Add effects or EQ.
These will affect the whole bus. Examples of effects you may want to add here include compressors, limiters and dithering. See the chapter “Audio effects” on page 168.
• Using Sends, send varying amounts of one output bus to any other output bus that is to the right of the selected output bus in the mixer.
16
VST Connections: Setting up input and output busses

Setting up Groups and FX channels
The Group/FX tab in the VST Connections window shows all Group channels and FX channels in your project. You can create new Group or FX channels by clicking the corresponding Add button. This is the same as creating Group channel tracks or FX channel tracks in the Project window (see “Using group channels” on page 142 and the chapter “Audio effects” on page 168).
However, the VST Connections window also allows you to create child busses for Groups and FX Channels. This is useful e.g. if you have Groups or FX Channels in surround format and want to route stereo channels to specific channel pairs in these.
To create a child bus for a Group channel or FX channel in surround format, proceed as follows:
1.Open the VST Connection window and select the Groups/FX tab.
2.Select the Group or FX channel in the list and rightclick it.
3.Select a channel configuration from the “Add Child Bus” submenu.
The child bus you created will be available for direct routing in the mixer. It’s a part of the parent Group or FX channel, which means there will be no separate channel strip for it.
About monitoring
By default, monitoring is done via the Control Room (see the chapter “Control Room” on page 151). When the Control Room is disabled on the Studio tab of the VST Connections window, the Main Mix bus (see “Setting the Main Mix bus (the default output bus)” on page 14) will be used for monitoring.
Setting the monitoring level
When you are using the Control Room for monitoring, this is set in the Control Room Mixer, see the chapter “Control Room” on page 151. When you are monitoring via the Main Mix bus, you can adjust the monitoring level in the regular Project Mixer.
When auditioning or scrubbing in the Sample Editor, you can also set the monitoring level using the small fader on the Sample editor toolbar.
External instruments/effects
Nuendo supports the integration of external effect devices and external instruments, e.g. hardware synthesizers, into the sequencer signal flow.
You can use the External Instruments tab and the External FX tab in the VST Connections window to define the necessary send and return ports and access the instruments/effects through the VST Instruments window.
External Instruments and effects are indicated by an “x” icon in the list next to their names in the respective pop-up menus.
Requirements
•To use external effects, you need audio hardware with multiple inputs and outputs. To use external instruments, a MIDI interface must be connected to your computer.
An external effect will require at least one input and one output (or input/ output pairs for stereo effects) – in addition to the input/output ports you use for recording and monitoring.
•As always, audio hardware with low-latency drivers is a good thing to have.
Nuendo will compensate for the input/output latency and ensure that the audio processed through external effects isn’t shifted in time.
17
VST Connections: Setting up input and output busses
Connecting the external effect/instrument
To set up an external effect or instrument, proceed as follows:
1.Connect an unused output pair on your audio hardware to the input pair on your external hardware device.
In this example, we assume that the hardware device has stereo inputs and outputs.
2.Connect an unused input pair on your audio hardware to the output pair on your hardware device.
Please note that it is possible to select input/output ports for external effects/instruments that are already used (i.e. that have been selected as inputs/outputs in the VST Connections window). If you select a used port for an external effect/instrument, the existing port assignment will be broken. Note that you will not get a warning message!
Once the external device is connected to the audio hardware of your computer, you have to set up the input/output busses in Nuendo
Setting up external effects
1.Open the VST Connections window from the Devices menu.
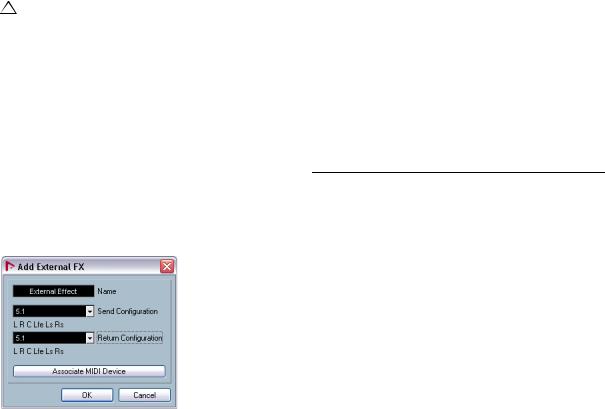
2.Open the External FX tab and click “Add External FX”.
3.In the dialog that appears, enter a name for the external effect and specify the Send and Return configurations. If you want to set up a MIDI device corresponding to the external effect, click the “Associate MIDI Device” button.
Depending on the type of effect, you can specify mono, stereo or surround configurations. When clicking “Associate MIDI Device”, you can use the MIDI Device Manager functions to create a new MIDI device for the effect. Note that delay compensation will only be applied for the effect when you use MIDI devices. For information about the MIDI Device Manager and user device panels see the separate PDF document “MIDI Devices”.
4.Click OK. This adds a new External FX bus.
5.Click in the Device Port column for the Send Bus “Left” and “Right” ports and select the outputs on your audio hardware that you connected in step 1 above.
6.Click in the Device Port column for the Return Bus “Left” and “Right” ports and select the inputs on your audio hardware that you connected in step 2 above.
7.If you like, make additional settings for the bus.
These are found in the columns to the right. Note however that you can adjust these while actually using the external effect – which may be easier as you can hear the result. You have the following options:
Setting |
Description |
Delay |
If your hardware effect device has an inherent delay (la- |
|
tency), you should enter this value here, as it allows Nu- |
|
endo to compensate for that delay during playback. You |
|
can also let the delay value be determined by the pro- |
|
gram by right-clicking in the Delay column for the effect |
|
and selecting “Check User Delay”. Note that you don’t |
|
have to take the latency of the audio hardware into ac- |
|
count – this is handled automatically by the program. |
Send Gain |
Allows you to adjust the level of the signal being sent to |
|
the external effect. |
Return Gain |
Allows you to adjust the level of the signal coming in from |
|
the external effect. |
|
Note however that excessive output levels from an external |
|
effect device may cause clipping in the audio hardware. |
|
The Return gain setting cannot be used to compensate for |
|
this – you have to lower the output level on the effect de- |
|
vice instead. |
MIDI Device |
When you click in this column, a pop-up menu opens |
|
where you can either disconnect the effect from the as- |
|
sociated MIDI device, select a MIDI device, create a new |
|
device or open the MIDI Device Manager in Nuendo to |
|
edit the MIDI device. |
|
When Studio Manager 2 is installed, you may also select |
|
an OPT editor to access your external effect. |
Used |
Whenever you insert an external effect into an audio |
|
track, this column shows a check mark (“x”) to indicate |
|
that the effect is being used. |
|
|
18
VST Connections: Setting up input and output busses
8. When you are done, close the VST Connections window.
Ö Note that external device ports are exclusive, see “Connecting the external effect/instrument” on page 18.
How to use the external effect
If you now click an insert effect slot for any channel and look at the effect pop-up menu, you will find the new external FX bus listed on the “External Plug-ins” submenu.
When you select it, the following happens:
•The external FX bus is loaded into the effect slot just like a regular effect plug-in.
•The audio signal from the channel will be sent to the outputs on the audio hardware, through your external effect device and back to the program via the inputs on the audio hardware.
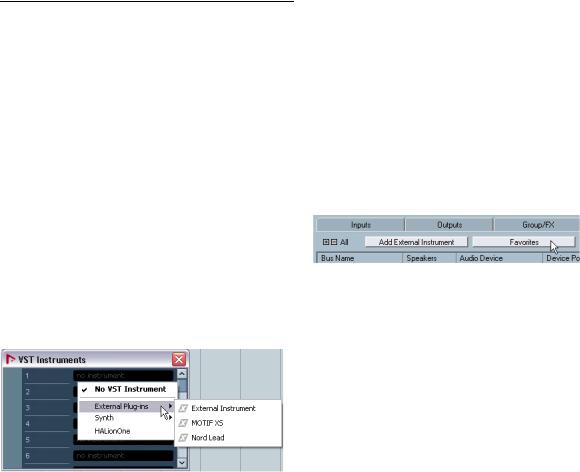
•A parameter window appears, showing the Delay, Send Gain and Return Gain settings for the external FX bus. You can adjust these as necessary while playing back. The parameter window also provides the “Measure Effect’s Loop Delay for Delay Compensation” button. This is the same function as the “Check User Delay” option in the VST Connections window. It provides Nuendo with a Delay value to be used for delay compensation. When you have defined a MIDI device for the effect, the corresponding Device window will be opened. When Studio Manager 2 is installed, and you have set up a corresponding OPT editor, this OPT editor will be displayed.
The default parameter window for an external effect
Like any effect, you can use the external FX bus as an insert effect or as a send effect (an insert effect on an FX channel track). You can deactivate or bypass the external effect with the usual controls.
Setting up external instruments
1.Open the VST Connections window from the Devices menu.
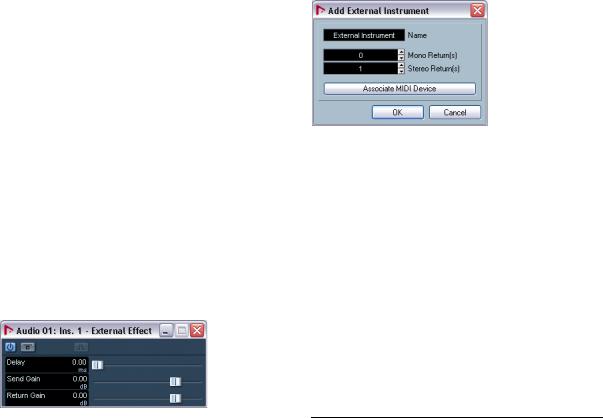
2.Open the External Instrument tab and click “Add External Instrument”.
3.In the dialog that appears, enter a name for the external instrument and specify the number of required mono and/or stereo returns. If you want to set up a MIDI device corresponding to the external instrument, click the Associate MIDI Device button.
Depending on the type of instrument, a specific number of mono and/or stereo return channels is required. When clicking “Associate MIDI Device”, you can use the MIDI Device Manager functions to create a new MIDI device. For information about the MIDI Device Manager and user device panels see the separate PDF document “MIDI Devices”.
4.Click OK. This adds a new external instrument bus.
5.Click in the Device Port column for the Return Bus “Left” and “Right” ports and select the inputs on your audio hardware to which you connected the external instrument.
6.If you like, make additional settings for the bus.
These are found in the columns to the right. Note however that you can adjust these while actually using the external instrument – which may be easier as you can hear the result. You have the following options:
Setting |
Description |
Delay |
If your hardware device has an inherent delay (latency), |
|
you should enter this value here. This allows Nuendo to |
|
compensate for that delay during playback. Note that you |
|
don’t have to take the latency of the audio hardware into |
|
account – this is handled automatically by the program. |
Return Gain |
Allows you to adjust the level of the signal coming in from |
|
the external instrument. |
|
Note however that excessive output levels from an exter- |
|
nal device may cause clipping in the audio hardware. The |
|
Return gain setting cannot be used to compensate for |
|
this – you have to lower the output level on the device in- |
|
stead. |
|
|
19
VST Connections: Setting up input and output busses
Setting |
Description |
MIDI Device |
When you click in this column, a pop-up menu opens |
|
where you can either disconnect the instrument from the |
|
associated MIDI device, select a MIDI device, create a |
|
new device or open the MIDI Device Manager in Nuendo |
|
to edit the MIDI device. |
|
When Studio Manager 2 is installed, you may also select |
|
an OPT editor to access your external instrument. |
Used |
Whenever you insert the external instrument into a VST |
|
Instrument slot, this column shows a chicanery (“x”) to in- |
|
dicate that the instrument is being used. |
|
|
7. When you are done, close the VST Connections window.
Ö Note that external device ports are exclusive, see “Connecting the external effect/instrument” on page 18.
How to use the external instrument
Once you have set up the external instrument in the VST Connections window, you can use it as a VST Instrument. Open the VST Instruments window and click on an empty instrument slot. In the instrument pop-up menu, your external instrument is listed on the External Instruments submenu:
When you select the external instrument in the VST Instruments window, the following happens:
•A parameter window for the external device is opened automatically. This may either be the Device window, allowing you to create a generic device panel, an OPT editor window or a default editor. For information about the Device window, the MIDI Device Manager and User device panels, see the separate PDF document “MIDI Devices”.
•To send MIDI notes to the external instrument, open the output pop-up menu in the Inspector for the corresponding MIDI track and select the MIDI device to which the external instrument is connected. This ensures use of delay compensation. The instrument will now play any MIDI notes it receives from this track and return them to Nuendo through the return channel(s) you have set up.
The external instrument will behave like any other VST Instrument in Nuendo.
About the Favorites buttons
In the VST Connections window, both the External FX tab and the External Instruments tab feature a Favorites button.
The Favorites button on the External FX tab
Favorites are device configurations that you can recall at any time, like a library of external devices that are not constantly connected to your computer. They also allow you to save different configurations for the same device, e.g. a multi-effect board or an effect that provides both a mono and a stereo mode.
To save a device configuration as a favorite, proceed as follows:
•When you have added a new device in the VST Connections window, select it in the Bus Name column and click the Favorites button.
A context menu is displayed showing an option to add the selected effect or instrument to the Favorites.
•You can recall the stored configuration at any time by clicking the Favorites button and selecting the device name from the context menu.
20
VST Connections: Setting up input and output busses
About the “plug-in could not be found” message
When you open a project that uses an external effect/instrument, you may get a “plug-in could not be found” message. This will happen when you remove an external device from the VST Connections window although it is used in a saved project, or when transferring a project to another computer on which the external device is not defined. You may also see this message when opening a project last saved with version 3.0 of Nuendo.
In the VST Connections window, the broken connection to the external device is indicated by an icon in the Bus Name column.
To reestablish the broken connection to the external device, simply right-click the entry for the device in the Bus Name column and select “Connect External Effect”. The icon is removed, and you can use the external device within your project as before.
Note that busses set up for external effects or external instruments are saved “globally”, i.e. for your particular computer setup.
Freezing external effects/instruments
Just as when working with regular VST instruments and effects, you can also choose to freeze external effects and instruments. The general procedure is described in detail in the chapters “Audio effects” on page 168 and “VST Instruments and Instrument tracks” on page 189.
Note that you have to perform Freeze in realtime. Otherwise external effects will not be taken into account.
When freezing external instruments or effects, you can adjust the corresponding tail value in the Freeze Channel Options dialog:
•Use the arrow buttons next to the Tail Size value field to set the desired Tail length, i.e. the range after the part boundary that should also be included for the freeze. You can also click directly in the value field and enter the desired value manually (the maximum value being 60 s).
•When the Tail Size is set to 0s (default), the freezing will only take into account the data within the Part boundaries.
21
VST Connections: Setting up input and output busses