

15
Surround sound
Background
What is Surround sound?
Surround is a common name for various techniques for positioning audio in reference to the listener. Whereas regular stereo is limited to left/right positioning, within a relatively narrow field, surround sound opens possibilities of positioning an audio source anywhere around the listener.
Surround sound comes in many flavors, from the ill-fated Quadraphonic format for vinyl discs launched in the 70s, to today’s more successful incarnations.
The differences between the formats are in two areas:
•The number and configuration of speakers.
This varies from two speakers up to 12.
•The intended final coding format.
This depends on the media the audio will be “stored” on: film, broadcast video or DVD, for example.
Surround sound is a large topic, there are entire books and regular publications devoted to the subject. This chapter will not provide an in-depth introduction to surround sound as such. Instead it will concentrate on the specific implementation in Nuendo.
Surround sound in Nuendo
Nuendo has integrated surround sound features with support for several formats. This support goes all the way through the audio path – all audio channels and busses can handle multiple speaker channel configurations (up to 12 channels). A channel in the mixer can either carry complete surround mixes, or an individual speaker channel which is part of a surround setup.
•Audio channels can be routed freely to surround channels.
•The Surround Panner function in the mixer allows you to graphically position channels in the surround field.
•The Mixconvert plug-in allows conversion of one surround channel into another with a different speaker configuration. Nuendo places Mixconvert automatically where needed.
•Nuendo is ready for surround specific plug-ins, that is plug-ins with multi-channel support specifically designed for surround sound mixing tasks (the included “Mix8to2” plug-in is an example of this). There are also surround aware plug-ins, which are not designed specifically for Surround but which due to their multi-channel support work well in a Surround configuration. An example is the Surrounddither plug-in.
•You configure Nuendo for surround by defining input and output busses in the desired surround format, and specifying which audio inputs and outputs should be used for the different channels in the busses. This is done in the VST Connections window.
Requirements for using Surround
The following additional equipment is required for taking advantage of the surround sound implementation in Nuendo:
• An audio card with more than two outputs.
The card must have as many outputs as the surround format you plan to select.
• A matching amplifier/speaker configuration.
Encoding
The result of a surround mix in Nuendo is either the multichannel audio sent from the surround output bus to your surround speaker setup, or (if you use the Export audio feature) audio file(s) on your hard disk. Exported surround mixes can either be split (one mono file per speaker channel) or interleaved (a single file containing all the surround channels).
Getting from this step to the final product (surround sound on DVD disc, DTS, etc.) requires special software and possibly hardware. This equipment will encode the signal into the desired format, possibly compress the audio and store it on the final media.
Exactly what type of software and/or hardware you need depends on what kind of format you are mixing for and is not dependent on Nuendo in any way.
• Steinberg provides Dolby Digital and DTS encoders for purchase, tailored for use with Nuendo.
For details, please go to www.steinberg.net.
203
Surround sound
About surround plug-ins
Included with the program are some specific surround- plug-ins. These are:
• MatrixEncoder and MatrixDecoder.
These are used for working with LRCS Surround encoded material. In LRCS Surround, four audio channels are converted to two channels, for distribution via regular video and broadcast formats. These plug-ins perform such conversions (in both ways) and are compatible with the LRCS Surround format.
• Mixconvert
Mixconvert gives you an easy way to take surround mixes and convert them to other formats with less channels. For example, Mixconvert can be used to downmix a 5.1 surround mix to a normal stereo mix. This plugin is unique in that Nuendo will automatically insert it in place of the channel panner or aux send panner in certain situations. Please refer to the manual “Nuendo Expansion Kit – Cubase Music Tools for Nuendo 4” for complete information about Mixconvert.
• Mix6to2
The Mix6to2 effect allows you to control the levels of up to six surround channels, and to mix these down to a stereo output.
• Mix8to2
The Mix6to2 effect allows you to control the levels of up to eight surround channels, and to mix these down to a stereo output.
• Mixer Delay
The Mixer Delay effect is useful for time aligning surround speakers if your room configuration does not allow for proper ITU-R speaker placement. It is also handy for re-routing surround channels to their proper speaker channels in your setup (refer to the separate manual “Nuendo Expansion Kit – Cubase Music Tools for Nuendo 4” for more information about Mixer Delay.
• SurroundDither
This is a dithering plug-in capable of handling six channels at the same time – use this for applying dithering to a surround output bus.
• SurroundPanner
This is described in the section “Using the Surround Panner” on page 208.
Ö Surround plug-ins (apart from the SurroundPanner) are described in the separate manual “Nuendo Expansion Kit – Cubase Music Tools for Nuendo 4”.
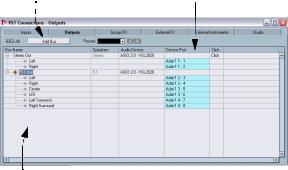
The VST Connections window
In this window you can add input and output busses. There is a complete selection of common surround configurations available, as well as standard mono or stereo busses.
The Bus Name column contains the currently configured busses as they will appear in the input and output routing pop-ups in the mixer.
Click here to add a bus. |
The outputs selected for the |
channels in the busses. |
The currently configured busses.
VST Connections showing the Outputs page. The “5.1 Out” bus is unfolded, displaying the individual speaker channels, with their physical output ports displayed in the Device Port column to the right.
204
Surround sound
Surround in the mixer
Surround sound is supported throughout every stage of the signal path in the Nuendo mixer, from input to output bus. Each bus or audio channel can carry up to 12 surround speaker channels.
Here, the SurroundPanner is used for positioning the sound “dynamically” in the surround field.
Operations
Setting up the surround configuration
Output bus configuration
Before you can start working with surround sound, you have to configure a surround output bus, through which all the speaker channels of the chosen surround format are routed. How to add and set up busses is described in detail in the section “Setting up busses” on page 11. Here is a brief run through:
1.Open the VST Connections window from the Devices menu.
2.Click the “Outputs” tab.
3.Click the “Add Bus” button and select one of the preset formats from the Configuration pop-up (see below).
The new bus appears with the ports visible.
4.By clicking in the Device Port column you can now route the speaker channels to the desired outputs of your audio hardware.
5.If you like, rename the output bus by clicking its name and typing in a new one.

 Using the Output Routing pop-up, audio channels can be routed directly to surround channels.
This name will appear in the mixer and on routing pop-ups.
The following surround configurations are included:
|
|
Format |
|
|
Description |
|
|
|
LRCS |
|
|
|
LRCS refers to Left Right Center Surround, where the |
|
|
|
|
|
|
|
|
|
L |
C |
R |
||
|
|
surround speaker is center-rear positioned. This is the |
||||
|
|
|
|
|
|
|
|
|
|
|
|
|
original surround format that first appeared as Dolby Ste- |
|
|
|
|
|
|
reo in cinema and later as the home cinema format Dolby |
|
|
|
S |
|
|
ProLogic. |
|
|
|
|
|
|
|
|
5.0 |
|
|
|
This is the same as 5.1 (see below) but without the LFE |
|
|
|
|
|
|
|
|
|
|
L |
C |
R |
|
|
|
|
|
channel. The LFE channel is optional in 5.1 and if you |
|||
|
|
|
|
|
|
|
|
|
|
|
|
|
don’t plan to use it, you might find this option more con- |
|
|
|
|
|
|
venient. |
|
|
SL |
|
SR |
|
|
In the output channel section of the mixer you can control |
5.1 |
|
|
|
This format is one of the most popular in cinema and |
|
|
|
|
|
|
||
|
L |
C |
R |
|||
the master levels for configured busses. The level meter |
|
|
|
|
|
DVD. In its various cinema and DVD encoding implemen- |
for a bus (or channel in the mixer) that carries multiple sur- |
|
|
+ |
|
|
tations (established by different manufacturers) it is re- |
|
|
|
|
ferred to as Dolby Digital, AC-3, DTS and MPEG 2 |
||
|
|
|
|
|
||
round channels will show multiple level bars, one for each |
|
SL |
|
SR |
|
Multichannel. 5.1 has one center speaker (mainly used |
speaker channel in the surround configuration. |
|
|
|
|
|
for speech), main left and right speakers, and two sur- |
|
|
|
|
|
||
|
|
|
|
|
round speakers (mostly for sound effects). Additionally a |
|
|
|
|
|
|
|
|
|
|
|
|
|
|
subchannel (LFE – Low Frequency Effects) with lower |
|
|
|
|
|
|
bandwidth is used for special low frequency effects. |
|
205 |
|
|
|
|
|
|
|
|
|
|
|
|
Surround sound |
|
|
|
|
||
Format |
|
|
Description |
|
LRC |
|
|
Same as LRCS, but without the surround speaker chan- |
|
|
|
|
||
L C |
R |
|||
nel. |
||||
|
|
|
||
|
|
|
|
|
LRS |
|
|
Left-Right-Surround, with the surround speaker posi- |
|
|
|
|
||
L |
R |
|
||
|
tioned at center-rear. |
|||
|
|
|
||
S |
|
|
|
|
LRC+Lfe
L C R
+
LRS+Lfe
L R
+
S
Quadro
L R
SL SR
Same as LRC but with an Lfe sub-channel added.
Same as LRS but with an Lfe sub-channel added.
The original Quadraphonic format for music, with one speaker in each corner. This format was intended for vinyl record players.
LRCS+Lfe |
|
Same as LRCS but with an Lfe sub-channel added. |
||
L |
C |
R |
||
|
||||
|
+ |
|
|
|
|
S |
|
|
|
Quadro+Lfe |
Same as Quadro but with an Lfe sub-channel added. |
|||
|
|
|
||
L |
|
R |
||
|
|
|||
|
+ |
|
|
|
SL SR
6.0 Cine
L C R A Left-Right-Center front speaker arrangement with 3 (Left-Right-Center) surround channels.
SL S SR
Format |
|
|
|
6.0 |
Music |
|
|
|
|
|
|
L |
R |
||
LS |
|
RS |
|
SL |
SR |
||
|
|
|
|
6.1 |
Cine |
|
|
|
|
|
|
L |
C |
R |
|
|
+ |
|
|
SL S |
SR |
|
|
6.1 Music
L R
LS + RS
SL SR
7.0 Cine
L LC C RC R
SL SR
7.0 Music
L C R
LS RS
SL SR
7.1 Cine
L LC CRC R
+
SL SR
7.1 Music
L C R
LS + RS
SL SR
8.0 Cine
L LC CRC R
SL S SR
Description
This uses 2 (Left/Right) front channels with Left and Right surround channels and Left and Right Side channels.
Same as 6.0 Cine but with an Lfe sub-channel added.
Same as 6.1 Cine but with an Lfe sub-channel added.
A Left, Mid-left, Center, Mid-right, Right front speaker arrangement with Left and Right surround channels.
Same as 6.0 Music but with a Center front channel added.
Same as 7.0 Cine but with an Lfe sub-channel added.
Same as 7.0 Music but with an Lfe sub-channel added.
Same as 7.0 Cine but with the addition of a Center Surround channel.
206
Surround sound
Format
8.0 Music
L C R
LS RS
SL S SR
8.1 Cine
Description
Same as 7.0 Music but with the addition of a Center Surround channel.
L LC CRC R |
Same as 8.0 Cine but with an Lfe sub-channel added. |
|||
|
||||
|
+ |
|
|
|
SL |
S |
SR |
|
|
8.1 Music |
|
Same as 8.0 Music but with an Lfe sub-channel added |
||
|
|
|
||
L |
C |
R |
||
|
||||
|
|
|||
SL |
+ |
SR |
|
|
LS S |
RS |
|
||
10.2 |
|
|
This is an experimental format with ten surrounding |
|
|
|
|
||
L |
C |
R |
||
TFL TFCTFR speakers and two Lfe channels (a combination of two |
||||
++5.1, one at the top and one at the bottom of the room).
TRL TRR
SL SR
Child busses
Essentially a child bus is a bus within a (bigger) bus. Typically you may want stereo child busses within your surround bus – this allows you to route stereo tracks directly to a stereo speaker pair within the surround bus. You may also want to add child busses in other surround formats (with fewer channels than the “parent bus”).
Once you have created a surround bus, you can add one or several child busses to it by right-clicking the bus and selecting “Add Child Bus”. This is described in detail in the section “Adding a child bus” on page 13.
Input bus configuration
To work with surround sound in Nuendo, it is often not necessary to configure a surround format input bus. You can record audio files via standard inputs, and easily route the resulting audio channels to surround outputs at any stage. You can also directly import multi-channel files of specific surround format onto audio tracks of the same format.
You should add a surround input bus in the following circumstances:
•You have existing audio material in a specific surround format, and you wish to transfer this material into Nuendo as a single, multi-channel file.
•You wish to record a surround setup “live”.
In both cases, you can add and configure an input bus of the format you wish to use in the VST Connections dialog so that each input on your audio hardware is routed to the corresponding speaker channel.
To add an input bus, use the same general method as described for output busses (see “Output bus configuration” on page 205), but select the “Inputs” tab instead.
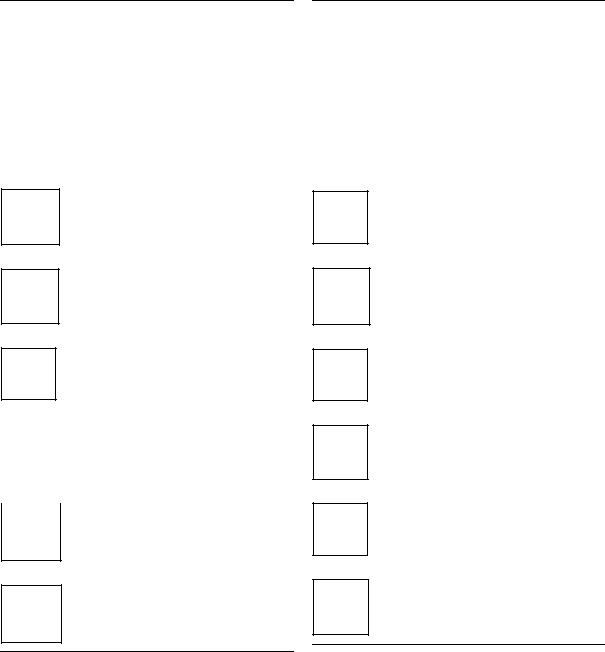
Routing channels directly to surround channels
If you want to place an audio source in one separate speaker channel only, you can route it directly to that speaker channel. This is useful for pre-mixed material or multi-channel recordings that don’t require panning.
1.Open the mixer and locate the channel you wish to route.
2.From the output routing pop-up menu, select the corresponding surround speaker channel.
• If a stereo audio channel is routed directly to a speaker channel, the left/right channels will be mixed to mono.
The pan control for the audio channel governs the balance between the left and right channel in the resulting mono mix. Center pan will produce a mix of equal proportion.
Routing channels using child busses
Child busses provide a way to route stereo (or multi-chan- nel) audio channels to specific speaker channels in a surround configuration.
The most obvious application of a child bus is when you wish to add a stereo channel to two specific left/right surround speaker channels.
207
Surround sound

If you have added a child bus within a surround bus (see above), it appears as a submenu item within the surround bus on the output routing pop-up menu. Select this to route a stereo audio channel directly to that stereo speaker pair in the surround bus.
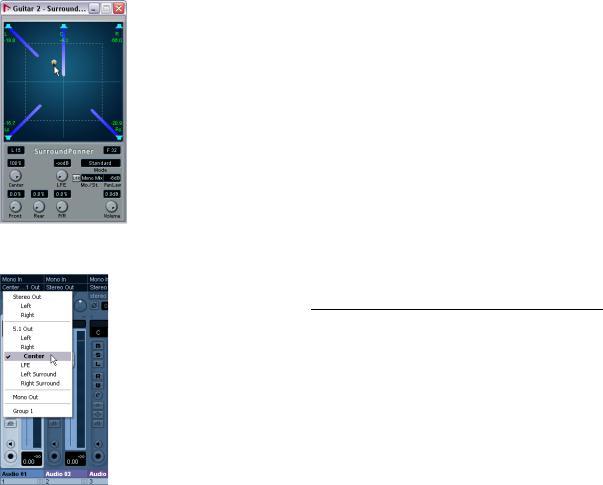
Using the Surround Panner
Nuendo has a special feature for graphically positioning a sound source in a surround field. This is actually a special plug-in which distributes the audio from the channel in various proportions to the surround channels.
1.Open the mixer and locate the channel you wish to position.
This could be a mono or stereo channel.
2.From the output routing pop-up menu, select the “whole surround bus” option (not a specific speaker channel).
A miniature graph of the surround plug-in interface appears above the fader in the channel strip.
3. You can click and drag directly in the miniature image to move the sound in the surround field.
The horizontal red strip to the right controls the subbass (LFE) level (if available in the selected surround format).
•You can also view a slightly larger version of this control by selecting “Panner” on the View options pop-up menu for the extended mixer panel.
This mode offers click and drag-panning as well as numerical values for left/right balance, front/rear balance and LFE amount – enter the desired number or use the mouse wheel to adjust them.
•The SurroundPan can also be displayed in the Inspector for all audio channel track types. To display the Surround Pan tab in the Inspector, make sure the corresponding option is enabled in the Inspector context menu.
•For total control over surround panning, double-click on the miniature image to open the full Surround Panner interface in a separate window.
When the “whole surround bus” is selected, the channel strip shows a miniature surround control.
208
Surround sound
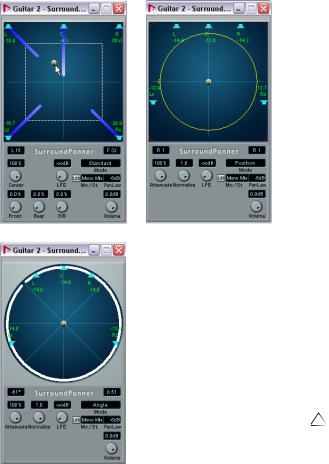
The SurroundPan controls |
Mode – Standard/Position/Angle |
The SurroundPan plug-in interface in Standard, Position and Angle mode, respectively.
The SurroundPan plug-in allows you to position your audio in the surround field. It consists of an image of the speaker arrangement, as defined by the output bus selected on the output routing pop-up menu, with the sound source indicated as a gray ball.
The Standard Mode/Position Mode/Angle Mode switch allows you to work in three modes:
•In both Standard and Position mode, the speakers in the front are aligned, as they would normally be in a cinema-type situation. This means that the front speakers are at a varying distance from the center. Standard mode (default) is the best mode for moving sources between speakers without level attenuation.
•Angle Mode is the traditional surround sound mixing definition. Note that here the speakers are defined as being at equal distance from the center. This is not really a true representation of for example a cinema, but has still proven to work well in many situations.
Speakers
The speakers in the panel represent the chosen surround configuration.
•The speakers in the front are aligned, as they would normally be in a cinema-type situation.
This means that the front speakers are at a varying distance from the center, allowing you to move sources between speakers without level attenuation.
•You can turn speakers on and off by clicking them with [Alt]/[Option] pressed. When a speaker is turned off, no audio will be routed to that surround channel.
Positioning and levels
The text below assumes that the Mono/Stereo popup is set to “Mono Mix”. For more information on the other modes, see below.
A sound source is positioned either by clicking or by dragging the gray “ball” around in the panel (or by using key commands, see below). By dragging during playback you can record automation, see “Enabling and disabling the writing of automation data” on page 214.
•In Standard Mode, the signal levels from the individual speakers are indicated by colored lines from the speakers to the center of the display.
•In Position Mode, the concentric circles will help you determine the level of the signal at a certain position.
The yellow circle represents -3dB below nominal level, the red circle is at -6dB and the blue is located at -12dB. These are affected by attenuation, see below.
209
Surround sound

• In Angle Mode, a red arc helps you determine the perceived “range” of a source. The sound will be at its loudest in the middle of the arc and will have dropped in level towards the ends.
Exactly how levels are handled may require some explanation:
•When you move a source around, a number will indicate the loudness in each speaker.
This is a value in dB (decibel) and is relative to the nominal level of the source. In other words, 0.0 (dB) represents full level.
•If you position the source far enough away from a speaker, its level will drop to zero (indicated by an infinity symbol).
•The signal levels from the individual speakers are indicated by colored lines from the speakers to the center of the display.
•You can use modifier keys to restrict movement in various ways:
In Standard and Position Mode:
Key |
Movement restriction |
[Shift] |
Horizontally only |
[Ctrl]/[Command] |
Vertically only |
[Alt]/[Option] |
Diagonally (up left, down right) |
[Ctrl]/[Command]+ |
Diagonally (up right, down left) |
[Alt]/[Option] |
|
|
|
The LFE dial (all modes)
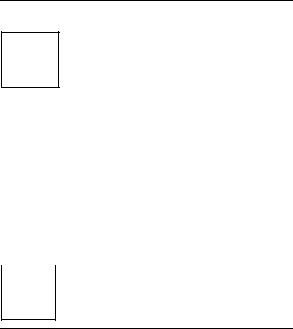
If the selected surround setup includes an LFE (Low Frequency Effects) channel, a separate LFE level dial will be available in the SurroundPan window. Use this to set the signal amount sent to the LFE channel. You can also set this using the small red strip to the right of the Surround Panner in the mixer channel strip, or by typing in a number in the LFE value field in the larger Surround Panner that can be shown in the extended channel strip.

 Click here and type in a LFE level value…
 …or drag this control to set LFE level.
The Surround Panner in the channel strip (bottom) and in the extended panel of the mixer channel strip (“Panner” selected on the View options pop-up menu).
In Angle Mode:
Key |
Movement restriction |
[Shift] |
From center to perimeter only |
[Ctrl]/[Command] |
Along the perimeter only (at current distance from |
|
center) |
|
|
There is also a special set of key commands for working in the SurroundPan window.
For a complete list of the available key commands, click on the “SurroundPanner” logo and then click again!
Mono/Stereo pop-up (All Modes)
If you have a mono channel the Mono/Stereo pop-up is by default set to Mono Mix. The panner will then behave as described above.
If you have a stereo channel, you have the option of using one of the three Mirror modes. Two gray balls will then appear, one for each channel (L/R). This will allow you to move the two channels symmetrically, by dragging one of them. The three modes allow you to select which axis should be used for mirroring.
•The default mode for stereo channels is the Y-Mirror mode.
•If you run a stereo signal through the panner in Mono Mix mode, the two channels will be mixed together before entering the plug-in.
•If you run a mono signal through the plug-in in one of the stereo modes, the signal will be split before entering the plug-in.
210
Surround sound
Additional parameters (Standard mode) |
Mixconvert |
• Center Level.
This determines how center source signals should be reproduced by the front speakers. With a value of 100%, the center speaker will provide the center source. With a value of 0%, the center source will be provided by the ghost image created by the left and right speakers. Other values will produce a mix between these two methods.
• Divergence Controls.
The three divergence controls determine the attenuation curves used when positioning sound sources, for X-axis front, X-axis back and Y-axis (front/rear), respectively. If all three Divergence values are 0% (default), positioning a sound source on a speaker will set all other speakers to zero level (-×) (except for the center speaker which depends on the center level). With higher values, the other speakers will receive a percentage of the sound source.
Additional parameters (Position and Angle mode)
• Attenuate.
Attenuate can be used to amplify or weaken the source. Exactly what effect this has on the level in each speaker can be determined by the level readouts, the concentric circle (Position mode) and the arc (Angle mode).
• Normalize.
Normalize is a function for controlling the overall loudness from all speakers. When this is set to 1.0 (full normalization), the level from all speakers together is always exactly 0dB. The individual levels will then be boosted or attenuated accordingly.
Please note that this is not a dynamic feature, like compression or limiting. It is instead just a tool for scaling the nominal output levels from the surround channels.
Automation
All parameters in the SurroundPan plug-in can be automated, just as with any other plug-in. See “Enabling and disabling the writing of automation data” on page 214.
Mixconvert is a special plug-in that converts one multichannel audio source into another multi-channel destination. It is most frequently used to “downmix” a multi-chan- nel surround mix into another format with less channels (a 5.1 surround mix into a stereo mix for example).
This plug-in can be used as an insert effect in the mixer like other plug-ins but it also has special functions. Nuendo will automatically insert Mixconvert in place of the surround panner in cases where the channel (audio track, group channel etc…) is being routed to a destination that has fewer audio paths. Mixconvert will also be inserted in place of any aux send panner when the destination has a different audio path than the source. The surround panner’s displays and controls will be replaced by Mixconvert’s.
Please refer to the separate manual “Nuendo Expansion Kit – Cubase Music Tools for Nuendo 4” for detailed information on the operation of Mixconvert.
Ö There is one exception to this behavior. When a stereo channel is routed to a mono destination through the channel routing or an aux send routing, a normal panner will appear. However, this panner will control the balance of the left and right channels as they are blended into the mono destination. The center position blends both channels together equally. With the pan set all the way to the left, only the left channel will be heard. With the pan set all the way to the right, only the right channel will be heard.
Exporting a Surround mix
When you have set up a surround mix you can choose to export it with the Export Audio Mixdown function. This function exports a single selected output bus – this means that all channels that you want to be part of the mix must be routed to the surround output bus.
You have the following export options when doing surround work:
•Export to “split” format, resulting in one mono audio file for each surround channel.
•Export to interleaved format, resulting in a single multichannel audio file (e.g. a 5.1 file, containing all six surround channels).
211
Surround sound
•Under Windows you can also export a 5.1 surround mix to a file in Windows Media Audio Pro format.
This is an encoding format tailored for 5.1 surround – see “Windows Media Audio Pro files (Windows only)” on page 442.
•You can also export a surround mix to a Dolby Digital AC3 file or a DTS file, if you have the Steinberg Dolby Digital Encoder or the Steinberg DTS Encoder (both optional, separate plug-ins) installed in your system.
Please go to www.steinberg.net for details.
For more about exporting to files, see the chapter “Export Audio Mixdown” on page 437.
Using effects in surround configurations
Nuendo introduces a special surround format for VST plug-ins, that is plug-ins that can process more than two channels. Mix8to2 is an example of such a plug-in.
Applying a Surround-aware plug-in
This is not different from applying a regular plug-in. The only difference is that the plug-in panel may have controls for more than two channels.
Using a stereo plug-in in a surround configuration
Normally, when you apply a stereo insert effect to a surround configuration, the first two speaker channels (often L and R) are routed through the plug-in and other channels are left unprocessed.
However, you may want to use the plug-in on other speaker channels. This is described in the chapter “Audio effects” on page 168.
212
Surround sound