

Configuring the mixer
As mentioned earlier, the mixer windows can be configured in various ways to suit your needs and to save screen space. Here follows a run through of the various view options (the following descriptions assume that you have an active project containing some tracks):
Normal vs. Extended channel strips
You have the option of selecting normal or extended channel strips and whether to show the input and output settings at the top of the channel strips. Proceed as follows:
1. Open any of the mixer windows.
The leftmost strip is called the common panel and is always shown in the mixer. It contains various global settings and options relating to the mixer. For further information, see “The common panel” on page 131.
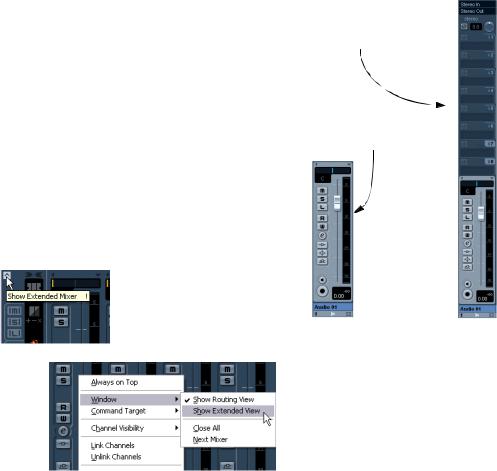
2. Click on the arrow button on the common panel (“Show Extended Mixer”) or right-click in the Mixer to open the Mixer context menu and select “Show Extended View” from the Window submenu.
You can also use a key command for this. See the chapter “Key commands” on page 517.
Opening the Extended Mixer via the Mixer Common panel…
The fader panel shows the basic controls – faders, pan controls and an associated vertical row of buttons. The extended panel can be set to show EQ, effect sends, insert effects, etc. The input/output settings panel contains input and output routing pop-up menus (where applicable), along with input phase switches and input gain controls.
A fully extended channel strip with the input/output routing section at the top.
A basic channel strip with no extended options.
…and via the Mixer context menu.
3. You can show or hide the Routing panel of the channel strips by clicking on the respective arrow button (“Show Routing”) or by selecting “Show Routing View” from the Window submenu on the Mixer context menu.
The fader panel is always shown.
Selecting what to display in the extended channel strips
You can select what to display in the extended channel strip either globally from the common panel or individually from each channel strip.
The available options vary depending on the type of channel.
•For a description of the options for audio channels, see “Options for the extended audio channel strip” on page 136.
•For a description of the options for MIDI channel, see “Selecting what to show in the extended MIDI channel strip” on page 144 .
126
The mixer
Selecting globally from the common panel
1. Open any of the mixer windows.
The leftmost strip is called the common panel and is always shown in the mixer. It contains various global settings and options relating to the mixer. For more information, see “The common panel” on page 131.
2. Make sure that the extended panel of the mixer is visible.
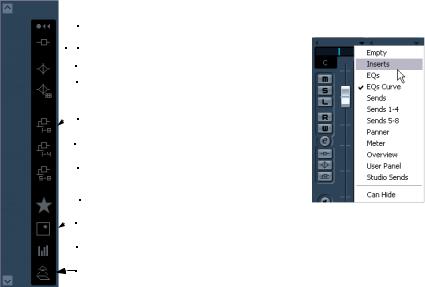
In the extended area of the common panel, you can see a vertical row of icons. These act as buttons and determine globally what is displayed in the extended panel for all channel strips in the mixer.

 Clear all views (blank panels)

 Show all Inserts

 Show all Equalizers

 Show all Equalizers with curve

 Show all Sends

 Show Sends 1-4

 Show Sends 5-8

 Show Studio Sends

 Show Surround Panners (where applicable)

 Show all Meters
Show Channel Overview
If you place the pointer on an icon, a tooltip appears.
3. Click on the “Show all Inserts” button (second icon from the top).
Now all channel strips in the mixer will show Insert effect slots in the extended panel.
•As mentioned above, what can be set globally depends on the type of channel.
Channel types that do not support a selected global option will be unaffected.
•If you press [Alt]/[Option] and click one of the global view buttons, input and output channels will be affected as well.
Selecting for individual channels
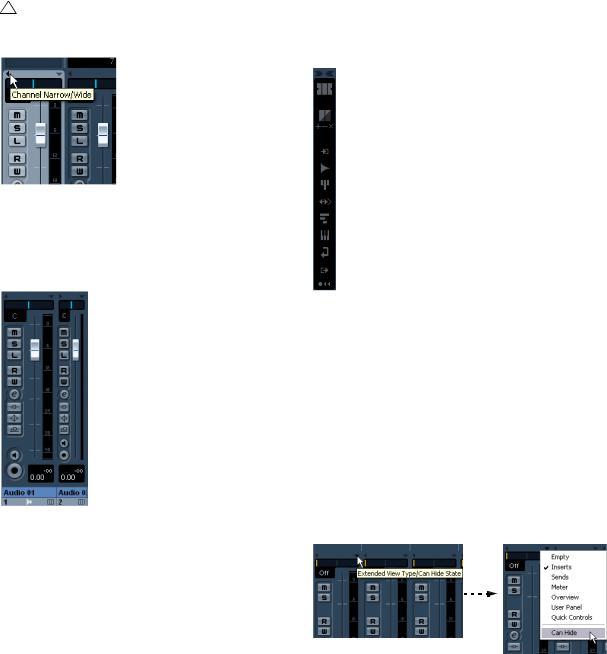
Each channel strip in the mixer features a View options pop-up menu, which is used for two things:
•To determine what is shown in the extended panel for individual channels in the mixer.
•To set the “Can Hide” status for individual channels in the mixer.
This is described in the section “Showing/hiding individual channels (the “Can Hide” setting)” on page 128.
The View options pop-up is opened by clicking the down arrow located just above the fader panel of the channel strip.
• To select what to display in the extended panel from the View options pop-up menu, you must first open the extended mixer.
You can then use the pop-up to select which parameters to show in the extended panel for each individual channel in the mixer.
127
The mixer
Setting the width of channel strips
Each channel strip can be set to either “Wide” or “Narrow” mode by using the Channel Narrow/Wide button on the left above the fader strip.
The Channel Narrow/Wide button
• Narrow channel strips contain a narrow fader, miniature buttons, and the View options pop-up.
If you have selected to show parameters in the extended section, only the channel overview or the Meter can be shown in narrow mode. (The parameters will be shown again when you return to wide mode.)
Selecting what channel types to show/hide
You can specify what channel types to show or hide in the mixer. In the lower part of the common panel you find a vertical strip with different indicator buttons. Each indicator represents a channel type to show or hide in the mixer:
“Command Target” options – see “About the Command Target” on page 129.
“Can Hide” options – see below.
Input Channels
Audio Channels
Group Channels
ReWire Channels
MIDI Channels
VST Instrument Channels
Effect Return Channels
Output Channels
Reveals all channel strips
Wide and narrow channel strips
• When selecting “All targets narrow” or “All targets wide” on the common panel, all channel strips selected as command targets (see “About the Command Target” on page 129) are affected.
• To hide or show a channel type, click the corresponding indicator.
If an indicator is dark, the corresponding channel type will be shown in the mixer. If it is orange, the corresponding channel type will be hidden.
Showing/hiding individual channels (the “Can Hide” setting)
You can also show/hide individual channels of any type in the mixer. For this, you can assign channels a “Can Hide” status, which allows you to hide these channels collectively. Proceed as follows:
1. Pull down the View options pop-up menu for the channel you want to hide and activate the “Can Hide” option.
If “Can Hide” is activated for a channel strip, the corresponding icon (/) will be visible in the top middle section of the channel strip.
128
The mixer
2.Repeat this for all channels you want to hide.
3.Click the top “hide button” (Hide Channels set to “Can Hide”) on the common panel.
This hides all channels set to “Can Hide”. To show them again, click the Hide button again or click the button at the bottom on the common panel (“Reveal All Channels”).
Below the top hide button, there are three additional “Can Hide” buttons.
Option Description
Set Target Channels This activates “Can Hide” for all Channels you specto ’Can Hide’ ified as “Command Targets”. For more information,
see below.
Remove ’Can Hide’ |
This deactivates “Can Hide” for all Channels you |
from Target |
specified as “Command Targets”. For more informa- |
Channels |
tion, see below. |
Remove ’Can Hide’ |
This deactivates “Can Hide” for all Channels in the |
from All Channels |
Mixer. |
|
|
3.A dialog appears, allowing you to enter a name for the view set.
4.Click OK to store the current mixer view set.
•You can now return to this stored configuration at any time, by clicking the “Select Channel View Set” button (the down arrow to the left of the “Store View Set” button) and selecting it from the pop-up menu.
•To remove a stored channel view set, select it and click the “Remove View Set” button (the minus sign).
Some remote control devices (such as Steinberg’s Houston) feature this function, which means that you can use the remote device to switch between the channel view sets.
About the Command Target
Command targets let you specify which channels should be affected by the “commands” (basically all the functions that can be assigned key commands) when working with the Mixer, e.g. what to display in the extended mixer, the width setting of the channel strips, etc. You can set command targets using the Mixer common panel or the context menu.
Channel view sets
Channel view sets are saved configurations of the mixer windows, allowing you to quickly switch between different layouts for the mixer. Proceed as follows:
1. Set up the mixer the way you wish to store it as a view set.
The following settings will be stored:
•Settings for individual channel strips (e.g. narrow or wide mode and whether the channel strip is (or can be) hidden or not).
•The hide/show status for channel types.
•The mixer’s display status (fader panel, extended panel, input/ output panel).
•Settings for what is shown in the extended view of the mixer.
2. Click the “Store View Set” button (the plus sign) at the bottom of the (non-extended) common panel.
The Command Target Controls on the common panel
The Command Target submenu in the Mixer context menu
The following options are available:
• All Channels
Select this if you want your commands to affect all channels.
• Selected Only
Select this if you want your commands to affect the selected channels only.
• Exclude Inputs
Select this if you don’t want your commands to affect the input channels.
• Exclude Outputs
Select this if you don’t want your commands to affect the output channels.
129
The mixer