
- •Table of Contents
- •About this manual
- •Welcome!
- •VST Connections: Setting up input and output busses
- •About this chapter
- •Setting up busses
- •Using the busses
- •Setting up Groups and FX channels
- •About monitoring
- •External instruments/effects
- •The Project window
- •Background
- •Window Overview
- •Operations
- •Options
- •Playback and the Transport panel
- •Background
- •Operations
- •Options and Settings
- •Recording
- •Background
- •Basic recording methods
- •Audio recording specifics
- •MIDI recording specifics
- •Options and Settings
- •Recovery of audio recordings after system failure
- •Fades, crossfades and envelopes
- •Creating fades
- •The Fade dialogs
- •Creating crossfades
- •The Crossfade dialog
- •Auto Fades and Crossfades
- •Event Envelopes
- •The Arranger track
- •Introduction
- •Setting up the Arranger track
- •Working with arranger events
- •Flattening the Arranger chain
- •Live Mode
- •Arranging your music to video
- •Folder tracks
- •About folder tracks
- •Handling folder tracks
- •Working with folder parts
- •Using markers
- •About markers
- •The Marker window
- •Using the Marker track
- •Marker key commands
- •Editing markers in the Project Browser
- •The Transpose functions
- •Introduction
- •Transposing your music
- •Other functions
- •The mixer
- •About this chapter
- •Overview
- •Configuring the mixer
- •The audio-related channel strips
- •The MIDI channel strips
- •The common panel
- •The input and output channels
- •Basic mixing procedures
- •Audio specific procedures
- •MIDI specific procedures
- •Utilities
- •VST Mixer Diagrams
- •Control Room
- •Background
- •Configuring the Control Room
- •The Control Room Overview
- •The Control Room Mixer
- •Control Room operations
- •Studios and Studio Sends
- •Direct Monitoring and latency
- •WK-Audio’s ID Controller
- •Audio effects
- •About this chapter
- •Overview
- •Insert effects
- •Send effects
- •Setting up send effects
- •Using the Side-Chain input
- •Using external effects
- •Making settings for the effects
- •Effect presets
- •VST Instruments and Instrument tracks
- •Introduction
- •VST Instrument channels vs. instrument tracks
- •VST Instrument channels
- •Instrument tracks
- •Comparison
- •Automation considerations
- •What do I need? Instrument channel or Instrument track?
- •Instrument Freeze
- •VST instruments and processor load
- •Using presets for VSTi configuration
- •About latency
- •External instruments
- •Surround sound
- •Background
- •Operations
- •Automation
- •Introduction
- •Enabling and disabling the writing of automation data
- •What can be automated?
- •The Automation panel
- •Virgin territory vs. the initial value
- •Automation modes
- •Automation performance utilities
- •The Settings section
- •Hints and further options
- •Automation track operations
- •Working with automation curves
- •Audio processing and functions
- •Background
- •Audio processing
- •Applying plug-ins
- •The Offline Process History dialog
- •Batch Processing
- •Freeze Edits
- •Detect Silence
- •The Spectrum Analyzer
- •Statistics
- •The Sample Editor
- •Background
- •Window overview
- •General Operations
- •Options and settings
- •Audio Warp realtime processing / Tempo matching audio to the project tempo
- •Working with hitpoints and slices
- •Free Warp
- •Realtime pitch-shifting of audio events
- •Flattening the realtime processing
- •The Audio Part Editor
- •Background
- •Opening the Audio Part Editor
- •Window overview
- •Operations
- •Common methods
- •Options and Settings
- •The Pool
- •Background
- •Window overview
- •Operations
- •VST Sound
- •Introduction
- •The MediaBay
- •Introduction
- •Window overview
- •Browsing for media files
- •Finding files in the Viewer section
- •Previewing files in the Scope section
- •The Tag Editor
- •Media management
- •Track Presets
- •Introduction
- •Types of track presets
- •VST presets
- •Browsing for presets
- •Creating a track preset
- •Creating tracks from track presets or VST presets
- •Applying track presets
- •Previewing track and VST presets
- •Inserts and EQ settings from track presets
- •Track Quick Controls
- •Introduction
- •Setting up the Quick Controls tab
- •Options and settings
- •Setting up quick controls on an external remote controller
- •MIDI realtime parameters and effects
- •Introduction
- •Basic track settings
- •MIDI Modifiers
- •MIDI effects
- •Managing plug-ins
- •MIDI processing and quantizing
- •Introduction
- •The Quantizing functions
- •Making your settings permanent
- •Dissolve Part
- •Repeat Loop
- •Other MIDI functions
- •The MIDI editors
- •About editing MIDI
- •Opening a MIDI editor
- •Key Editor operations
- •Edit In-Place
- •List Editor operations
- •Introduction
- •Opening the Logical Editor
- •Window overview
- •Selecting a preset
- •Setting up filter conditions
- •Selecting a function
- •Specifying actions
- •Applying the defined actions
- •Working with presets
- •The Input Transformer
- •The Project Logical Editor
- •Introduction
- •Opening the Project Logical Editor
- •Window overview
- •Selecting a preset
- •Setting up filter conditions
- •Selecting a function
- •Specifying actions
- •Applying the defined actions
- •Working with presets
- •Working with System Exclusive messages
- •Introduction
- •Bulk dumps
- •Recording System Exclusive parameter changes
- •Editing System Exclusive messages
- •Working with the Tempo track
- •Background
- •Operations
- •Process Tempo
- •The Process Bars dialog
- •Options and settings
- •The Beat Calculator
- •Merge Tempo From Tapping
- •The Time Warp tool
- •The Project Browser
- •Window Overview
- •Editing tracks
- •The Track Sheet
- •Overview
- •Printing the Track Sheet
- •Export Audio Mixdown
- •Introduction
- •Mixing down to an audio file
- •The available file formats
- •Synchronization
- •Background
- •Synchronization signals
- •Synchronizing the transport vs. synchronizing audio
- •Making basic settings and connections
- •Synchronization settings
- •Timecode Preferences
- •Machine Control
- •Setting up Machine Control
- •Working with VST System Link
- •Preparations
- •Activating VST System Link
- •Application examples
- •Video
- •Background
- •Before you start
- •Operations
- •The Edit Mode
- •Working with film transfers
- •Compensating for film transfers to video
- •ReWire
- •Introduction
- •Launching and quitting
- •Activating ReWire channels
- •Using the transport and tempo controls
- •How the ReWire channels are handled in Nuendo
- •Routing MIDI via ReWire2
- •Considerations and limitations
- •File handling
- •Working with Projects
- •Startup Options
- •Working with libraries
- •Revert
- •Importing audio
- •Exporting and importing OMF files
- •Exporting and importing AAF files
- •Exporting and importing AES31 files
- •Exporting and importing OpenTL files
- •Importing XSend projects from Liquid
- •Exporting and importing standard MIDI files
- •Exporting and importing MIDI loops
- •Exporting and importing tracks
- •Other Import/Export functions
- •Cleanup
- •Customizing
- •Background
- •Workspaces
- •The Setup dialogs
- •Customizing track controls
- •Configuring the main menu items
- •About preference presets
- •Appearance
- •Applying track and event colors
- •Where are the settings stored?
- •Key commands
- •Introduction
- •Setting up key commands
- •Setting up tool modifier keys
- •The default key commands
- •Index

Using the Overlap controls
The Overlap controls let you move the fade area without moving the Offset Point – the “center” of the fade area (see below). This means that the “center” of the fade will be offset in relation to the fade area.
•You can either use the Overlap sliders or you can click in the Overlap fields, change the values numerically and press [Return].
•If “Symmetric Fades” is activated, both the upper and the lower Overlap controls will move both the fade-out and the fade-in area.
Changing the Offset Point
You can also move a fade area by changing its Offset Point. The Offset Point is the “center” of the fade area, i.e. the point where the volume of the event is precisely halfway between full level and zero level.
•Click in the value field, enter the desired value, in accordance with the selected display format (see “The Crossfade display” on page 92) and press [Return].
This will move the Offset Point along with the fade area by the specified amount. Note however that this only applies to the fade-in area!
•The Offset Point is indicated by a dotted vertical line in the crossfade display.
Auto Fades and Crossfades
Nuendo features an Auto Fade function that can be set both globally, i.e. for the entire project, and separately for each audio track. The idea behind the Auto Fade function is to create smoother transitions between events by applying short (1 - 500 ms) fade-ins and fade-outs.
As mentioned earlier, fades are calculated in real time during playback. This means that the larger the number of audio tracks with Auto Fades activated in a project, the higher the demands on the processor.
Note that auto fades are not indicated by the fade lines!
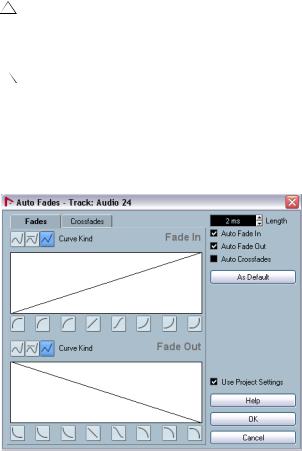
Making global Auto Fade settings
1. To make Auto Fades settings globally for the project, select “Auto Fades Settings...” from the Project menu.
This opens the Auto Fades dialog for the project.
2.Use the checkboxes in the upper right corner to activate or deactivate Auto Fade In, Auto Fade Out and Auto Crossfades, respectively.
3.Use the Length value field to specify the length of the Auto Fade or Crossfade (1-500 ms).
96
Fades, crossfades and envelopes

4.To adjust the shapes of Auto Fade In and Auto Fade Out, select the “Fades” tab and make settings as in the regular Fade dialogs.
5.To adjust the shape of the Auto Crossfade, select the “Crossfades” tab and make settings as in the regular Crossfade dialog.
6.If you want to use the settings you have made in future projects, click the “As Default” button.
The next time you create a new project, it will use these settings by default.
7.Click OK to close the dialog.
Making Auto Fade settings for a separate track
By default, all audio tracks will use the settings you have made in the project’s Auto Fades dialog. However, since Auto Fades use computing power, a better approach may be to turn Auto Fades off globally and activate them for individual tracks, as needed:
1.Right-click the track in the Track list and select “Auto Fades Settings...” from the context menu (or select the track and click the “Auto Fades Settings” button in the Inspector).
The Auto Fades dialog for the track opens. This is identical to the project’s Auto Fades dialog, with the addition of a “Use Project Settings” option.
2.Deactivate the “Use Project Settings” option.
Now, any settings you make will be applied to the track only.
3. Set up the Auto Fades as desired and close the dialog.
Reverting to project settings
If you want a track to use the global Auto Fade settings, open the Auto Fades dialog for the track and activate the “Use Project Settings” checkbox.
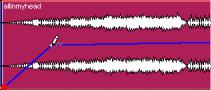
Event Envelopes
An envelope is a volume curve for an audio event. It is similar to the real-time fades, but allows you to create volume changes within the event, not only at the start or end. To create an envelope for an audio event, proceed as follows:
1.Zoom in on the event so that you can view its waveform properly.
2.Select the Pencil tool.
When you move the Pencil tool over an audio event, a small volume curve symbol is shown next to the tool.
3. To add an envelope point, click in the event with the Pencil tool.
A blue envelope curve and a curve point appear.
4. Drag the curve point to adjust the envelope shape.
The waveform image reflects the volume curve.
•You can add as many curve points as you like.
•To remove a curve point from the envelope, click on it and drag it outside the event.
•The envelope curve is a part of the audio event - it will follow when you move or copy the event.
After copying an event with an envelope, you can make independent adjustments to the envelopes in the original event and the copy.
Ö It is also possible to apply an envelope to the audio clip using the Envelope function on the Process submenu on the Audio menu.
See “Envelope” on page 242.
• To remove an event envelope curve from a selected event, open the Audio menu and select the Remove Volume Curve option.
97
Fades, crossfades and envelopes