

Molecular Biology Problem Solver
.pdfROTOR PATHLENGTH (Rmax–Rmin)
Rmin |
a |
R |
min |
b |
|
|
Rmin |
c |
Rmax
Figure 4.2 Effect of rotor angle on centrifugation experiments. Reproduced with permission of Kendro Laboratory Products. Artwork by Murray Levine.
The radius of a swinging bucket rotor is the distance between the center of the rotor and the bottom of the bucket when it is fully horizontal (Figure 4.2a). The greater the rotor radius, the greater is the g force.
The distance between the center of a fixed angle rotor and the bottom of the tube cavity determines the radius of a fixed-angle rotor (Figure 4.2b). Again the g force increases directly as the radius increases.
The greater the rotor angle, the greater is the distance the sample must travel before it pellets (Figure 4.2b). This travel distance also affects the shape of a density gradient (Figure 4.3).
The k-factor of a fixed-angle rotor provides a method to predict the required time of centrifugation for different fixed-angle rotors.
How to Properly Use and Maintain Laboratory Equipment |
59 |
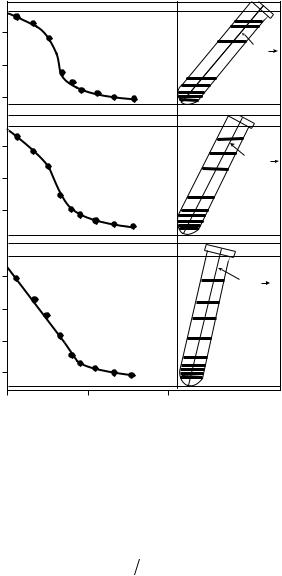
Figure 4.3 Effect of rotor angle on gradient formation. Reproduced with permission of Amersham Pharmacia Biotech.
Distance from the meniscus (cm)
2 |
|
40° |
|
|
|
4 |
|
|
6 |
|
Rotor 40.2 |
2 |
|
23.5° |
|
|
|
4 |
|
|
6 |
|
Rotor 60.5 |
|
|
|
2 |
|
14° |
|
|
|
4 |
|
|
6 |
|
|
8 |
|
Rotor 30.2 |
|
|
|
1.00 |
1.10 |
1.20 |
|
|
Density g/ml |
The k-factor is a measure of pelleting efficiency; rotors with smaller k-factors (smaller fixed angles or vertical angles) pellet more efficiently, requiring shorter run times. The k-factor can also calculate the time required to generate a gradient when switching between different rotors. The k-factor can be determined by
Ê 2.53 ¥ 1011 ˆ |
|
|||
k = Á |
|
|
˜ ln(rmax rmin ) |
(1) |
(rpm) |
2 |
|||
Ë |
|
¯ |
|
|
Equation (2) uses the k-factor to predict the time required for centrifugation for different fixed-angle rotors:
T1 |
= |
T2 |
(2) |
|
k1 |
k2 |
|||
|
|
T1 is the run time in minutes for the established protocol. First, calculate the k1 factor at the appropriate speed for the rotor that is referenced. Next, calculate the k2 factor at the chosen speed for your rotor. Finally, solve for T2. This strategy is not appropriate to
60 |
Troutman et al. |
convert protocols between rotor types (fixed-angle, horizontal, and vertical).
Should Flamables, Explosive, or Biohazardous Materials Be Centrifuged in Standard Centrifugation Equipment?
Centrifuge manufacturers strongly recommend that standard laboratory centrifuges should not be exposed to any materials capable of producing flammable or explosive vapors, or extreme exothermic reactions. Specialized equipment exists for centrifuging dangerous substances.
Which Centrifuge Tube Is Appropriate for Your Application?
A broken or leaking sample container can seriously damage a centrifuge by knocking the rotor out of balance or exposing mechanical and electrical components to harsh chemicals. Damage can occur at any speed. Use only the tubes that are recommended for centrifugation use. If unsure, contact the tube manufacturer to assess compatability.
With the trend toward smaller sample size and greater throughput, microplates have become very popular. Other protocols call for vials and slides. Never attempt to create your own adapter for these containers; ask the rotor manufacturer about the availability of specialized equipment.
Fit
Correct tube fit is critical, especially at higher g forces. Tubes or containers that are too large can get trapped in rotors, while tubes that fit loosely can leak or break. Never use homemade adapters. While a broken tube doesn’t sound costly, poorly fitted containers can lead to costly repairs.
g Force
Many tubes are not suitable for high stress centrifugation.When in doubt about g force limitations, contact the tube’s manufacturer. If this isn’t feasible, you can test the tube by filling it with water, centrifuging at low rpm’s, and inspecting the tube for damage or indications of stress while slowly increasing the speed.
Chemical Compatibility
Confirm the tube’s resistance with the manufacturer. Containers that are not resistant to the sample might survive one or more centrifugations but will surely be weakened. Chemically resistant containers should always be inspected for signs of stress before using them. Repeated centrifugation can damage any container.
How to Properly Use and Maintain Laboratory Equipment |
61 |
A Checklist for Centrifuge Use
Inspect the centrifuge for frost on the inside chamber. Accumulated frost must be removed because it can prevent proper temperature control. Previous spills should also be cleaned before starting the centrifuge.
If your instrument uses rotor identification codes, does your instrument have the appropriate software to recognize and operate your rotor? Don’t apply the identification code of one rotor for a second rotor that does not possess it’s own code. Manually confirm the speed limitations of your rotor if identification codes aren’t relevant.
Inspect the rotor for signs of corrosion and wear-and-tear. If you see any pitting or stress marks in the rotor cavities, do not use the rotor. If it is difficult to lock the rotor lid down or lock the rotor to the centrifuge, don’t use the rotor. Check that all O-rings on the rotor and sample holders are present, clean, in good physical condition, and well lubricated. Many fixed-angle rotors have a cover O-ring, while many rotors that get locked to the drive have a drive spindle O-ring. If you have concerns about the rotor’s condition, don’t use it. Request an inspection from the manufacturer.
All the buckets and/or carriers within a swinging bucket rotor must be in place, even when these positions are empty. Utilize the proper adaptors and tubes, as described above. Balance your tubes or bottles. Refer to the manufacturer’s instructions for balance tolerance, which vary with different rotors. Place the rotor onto the drive shaft and check that it is seated properly. Many rotors must be secured to the drive. Gently try to lift the rotor off the drive as a final check that the rotor is properly installed.
Begin centrifugation. Even though most imbalances occur at lower speed, monitor the centrifuge until it approaches final speed. If an imbalance occurs, reinspect the balancing of the tubes and the placement of the rotor.
Should the Brake Be Applied, and If So, to What Degree?
If a brake is turned completely off, it could take hours for the rotor to stop, depending on the top speed and instrument conditions (i.e., vacuum run). The stiffer the brake setting, the greater the jolt to the sample, so take note that the default setting of most instruments is the hardest, quickest brake rate. A reduced brake rate is recommended when separating samples of similar densities, when high resolution gradients and layers are required, and when fluffy, noncompacted pellets are produced. The degree of jolting, the braking technique, and the terminology varies among
62 |
Troutman et al. |
manufacturers, so consult your operating manual or contact the manufacturer to discuss the most appropriate brake setting for your application. [The reverse is true when looking at the deceleration.) If you have an option as to where to control to (or from), 1000 to 1500rpm is recommended.
Centrifugation of DNA and RNA
How Does a Deration Curve Affect Your Purification Strategy?
Deration describes the situation where a rotor should not attain its maximum speed because a high-density solution is used in the separation. For example, centrifuged at high g force, dense solutions of CsCl will precipitate at a density of about 1.9 g/ml, a situation that can blow out the bottom of the rotor. The deration curve supplied by the rotor’s manufacturer will indicate those speeds that could cause centrifugation media to precipitate and potentially damage the rotor and or centrifuge (Figure 4.4).
Is a Vertical Rotor the Right Angle for You?
Vertical rotors can purify DNA via cesium chloride centrifugation in three hours, as compared to the overnight runs using fixedangle rotors. Vertical rotors re-orient your sample (Figure 4.5), so there is the small possibility that the RNA that pelleted against the outer wall of the tube will contaminate the DNA as the gradient re-orientes.
A near-vertical rotor from Beckman-Coulter eliminates this problem (Figure 4.6). The 9° angle of this rotor allows the RNA to pellet to the bottom of the tube without contaminating the DNA. The closeness to vertical keeps centrifugation times short. Triton X-100 was applied in this near-vertical system to improve the separation of RNA from plasmid DNA, although the impact of the detergent on the later applications of the DNA was not tested (Application Note A-1790A, Beckman-Coulter Corporation).
Vertical rotors also allow for the tube to be pulled out straight without the worry of disrupting the gradient. Fixed-angle rotors produce bands at an angle, requiring greater care when removing samples from the rotor.
What Can You Do to Improve the Separation of Supercoiled DNA from Relaxed Plasmid?
Centrifugation at lower g force will increase the resolution of supercoiled and relaxed DNA. Apply a step-run gradient, where high speed establishes the gradient, followed by lower speeds and g forces to better separate supercoiled and relaxed DNA. Rotor
How to Properly Use and Maintain Laboratory Equipment |
63 |

Figure 4.4 Deration Curve. Reproduced with permission of Kendro Laboratory Products.
manufacturers can provide the appropriate conditions for stepruns on your rotor-centrifuge combination.
Troubleshooting
How Can You Best Avoid Service Calls?
Too often operating manuals are buried in unmarked drawers, never to be seen again. This is a costly error because manuals contain information that can often solve problems without the expense and delay of a service call.
Older instruments may have brush motors.The more frequently
64 |
Troutman et al. |

Figure 4.5 Operation of vertical rotors. (a) The gradient is prepared, the sample is layered on top, and the centrifuge tubes are placed in the pockets of the vertical rotor. (b) Both sample and gradient begin to reorient as rotor accelerates. (c) Reorientation of the sample and gradient is now complete. (d) Bands form as the particles sediment. (e) Bands and gradient reorient as the rotor decelerates. (f ) Bands and gradient both fully reoriented; rotor at rest. From Centifugation: A Practical Approach (2nd Ed.). 1984. Rickwood, D., ed. Reprinted by permission of Oxford University Press.
|
|
Figure 4.6 Effect of Triton |
||||
A |
B |
X-100 on RNA pellet in the |
||||
TLN-100 |
rotor. |
The |
final |
|||
|
|
concentration of Triton X- |
||||
|
|
100 in these tubes is (a) 0%, |
||||
|
|
(b) 0.0001%, (c) 0.001%, and |
||||
|
|
(d) 1%. As the Triton X-100 |
||||
|
|
concentration increases, the |
||||
|
|
pellet |
adhesion |
decreases. |
||
|
|
High Triton X-100 levels |
||||
|
|
(0.1–1%) |
produce |
a |
visible |
|
|
|
reddish band at the top of the |
||||
|
|
tube. |
Courtesy, |
Beckman |
||
C |
D |
Coulter, Inc., Fullerton, CA, |
||||
application note A-1790A. |
||||||
How to Properly Use and Maintain Laboratory Equipment |
65 |
the instrument is used, the more frequently these brushes need to be changed. This is a procedure that you can do yourself, since brushes ordered form the manufacturer usually provide detailed instructions. Most instruments are equipped with an indicator light that signals a worn brush. As with any attempt to repair an instrument, disconnect any power source and consult the manufacturer for warnings on any hazards.
Cleanliness matters. Dirt and spilled materials can enter the motor compartment and cause failures. Clean any spills that occur inside the instrument as soon as possible.
When not in use, turn off the power to a refrigerated centrifuge, and open the chamber door to allow moisture to evaporate. If the instrument must be maintained with the power on, keep the chamber door shut as much as possible and check for frost before use.
Check the level of an instrument after it has been moved. An unleveled instrument can cause damage to the drive mechanism. A post-move preventative maintenance call can prevent problems and ensure that the machine is performing accurately.
What Is the Best Way to Clean a Spill within a Centrifuge?
Spills should be immediately cleaned using a manufacturerapproved detergent. Mild detergents are usually recommended and described in operating manuals. Avoid harsh solvents such as bleach and phenolics.
How Should You Deal with a Walking Centrifuge?
Older units are more prone to walking when imbalanced. If the instrument vibrates mildly, hit the stop button on the instrument. If there is major shaking, cut the power to the instrument by a means other than the instrument’s power switch. You can’t predict when or how the instrument is going to jump. An ultracentrifuge might require hours to come to a complete stop. Clear an area around the instrument and allow it to move if necessary. Vibration is going to be the greatest at a rotor-dependent critical speed, usually below 2000rpm. Never attempt to open the chamber door while the rotor is spinning, and don’t attempt to enter the rotor area even if the door is open. Don’t attempt to use physical force to restrict the movement of the machine. Keep your hands off the instrument until it comes to a complete stop.
How Can You Improve Pellet Formation?
Fluffy pellets that form on the side of a wall are easily dislodged during attempts to remove the supernate. To form tighter pellets,
66 |
Troutman et al. |
switch to a rotor with a steeper angle, or spin harder and longer at the existing angle.
PIPETTORS (Michele A. Kennedy)
The accurate delivery of a solution is critical to almost all aspects of laboratory work. If the volume delivered is incorrect, the results can be compounded throughout the entire experiment. This section will discuss issues ranging from selecting the correct pipette from the start to ensuring that the pipette is working properly.
Which Pipette Is Most Appropriate for Your Application?
Different applications will require the use of different types of pipettes or different methods of pipetting. Prior to purchasing a pipette, one should decide which type of pipette will be required to address the needs of the lab. There are two main types of pipettes: air displacement and positive displacement. The air displacement pipette is the most commonly used pipette in the lab. In this type of pipette, a disposable pipette tip is used in conjunction with a pipette that has an internal piston. An air space, which is moved by the internal pipette piston, allows for the aspiration and dispensing of sample. This type of pipette is ideal for use with aqueous solutions.
The second type of pipette is the positive displacement pipette. In this pipette, the piston is contained within the disposable tip and comes in direct contact with the sample solution. Positive displacement pipettes are recommended for use with solutions that have a high vapor pressure or are very viscous. When pipetting solutions with a high vapor pressure, it is recommended to prewet the tip. This allows the small air space within a positive displacement system to become saturated with the vapors of the solution. Pre-wetting increases the accuracy of the pipetting because the sample will not evaporate into the saturated environment, which would normally cause a pipette to leak.
Once you have decided if an air or positive displacement pipette is the right choice for your lab, then the next thing to choose is the proper volume range. Determine what will be the most frequently used volume. This will then help you to decide on the style of pipette that will achieve the best accuracy. Fixed-volume pipettes provide the highest accuracy of manual pipettes, but they are limited to one volume.Adjustable-volume pipettes are slightly less accurate, but they allow for the pipetting of multiple volumes with one pipette. For example, an Eppendorf® Series 2100 10 to 100 ml
How to Properly Use and Maintain Laboratory Equipment |
67 |
adjustable pipette, set at 100 ml has an inaccuracy specification of
±0.8%, whereas a Series 2100 100 ml fixed-volume pipettes has an inaccuracy specification of ±0.6%. When choosing an adjustablevolume pipette, remember that all adjustable pipettes provide greater accuracy at the high end of their volume range.An Eppendorf Series 2100 10 to 100 ml adjustable pipette, set at 100 ml has an inaccuracy specification of ±0.8%, whereas a 100 to 1000 ml pipette set at 100 ml has an inaccuracy specification of ±3.0%.
What Are the Elements of Proper Pipetting Technique?
Once you have selected the correct pipette for your application, then you must ensure that the pipette is used correctly. Improper use of a pipette can lead to variations in the volume being dispensed. When working with a pipette, check that all movements of the piston are smooth and not abrupt. Aspirating a sample too quickly can cause the sample to vortex, possibly overaspirating the sample.
When aspirating a sample, it is important to make sure that the following guidelines are adhered to. First, the pipette tip should only be immersed a few mm into the sample to be aspirated (Figure 4.7).
This ensures that the hydrostatic pressure is similar during aspiration and dispensing. Next, the pipette should always be in a completely vertical position during aspiration. The result of holding a pipette at an angle of 30° could create a maximum of +0.5% inaccuracy (Products and Applications for the Laboratory 2000, Eppendorf® catalog, p. 161).
When dispensing the sample, the pipette tip should touch the side of the receiving vessel. This will ensure the even flow of the sample from the tip, without forming droplets. If a droplet remains inside the tip, the volume dispensed will not be correct.
Preventing and Solving Problems
A good maintenance and calibration schedule is the key to ensuring that your pipette is working properly. More often than not, the factory-set calibration on a pipette is changed before a proper inspection and cleaning has been performed. A good maintenance program can prevent unnecessary changes in the calibration, which saves money over the life of the pipette. A few maintenance suggestions are listed below:
• Always store pipettes in an upright position, preferably in a stand. This prevents the nose cones or pistons from being bent when placed in a drawer.
68 |
Troutman et al. |