

20CHAPTER 2
Exploring JUnit
Table 2.1 The seven core JUnit classes and interfaces (interfaces are indicated by italics) (continued)
Class / interface |
Responsibilities |
Introduced in… |
|
|
|
TestCase |
A TestCase defines an environment (or fixture) that can be |
Section 2.1 |
|
used to run multiple tests. |
|
|
|
|
TestSuite |
A TestSuite runs a collection of test cases, which may |
Section 2.3 |
|
include other test suites. It is a composite of Tests. |
|
|
|
|
BaseTestRunner |
A test runner is a user interface for launching tests. |
Section 2.2.2 |
|
BaseTestRunner is the superclass for all test runners. |
|
|
|
|
Figure 2.2 shows the relationships among the seven core JUnit classes. You’ll see how these core classes and interfaces work together in this chapter and throughout the book.
2.2 Launching tests with test runners
Writing tests can be fun, but what about the grunt work of running them? When you are first writing tests, you want them to run as quickly and easily as possible. You should be able to make testing part of the development cycle— code : run : test : code (or test : code : run : test if you are test-first inclined). There are IDEs and compilers for quickly building and running applications, but what can you use to run the tests?
2.2.1Selecting a test runner
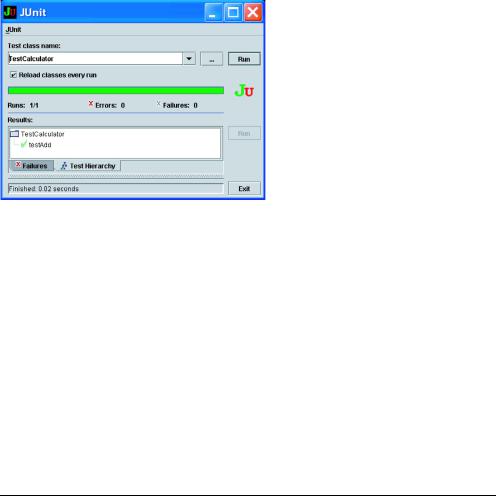
To make running tests as quick and easy as possible, JUnit provides a selection of test runners. The test runners are designed to execute your tests and provide you with statistics regarding the outcome. Because they are specifically designed for this purpose, the test runners can be very easy to use. Figure 2.3 shows the Swing test runner in action.
The progress indicator running across the screen is the famous JUnit green bar. Keep the bar green to keep the code clean is the JUnit motto.
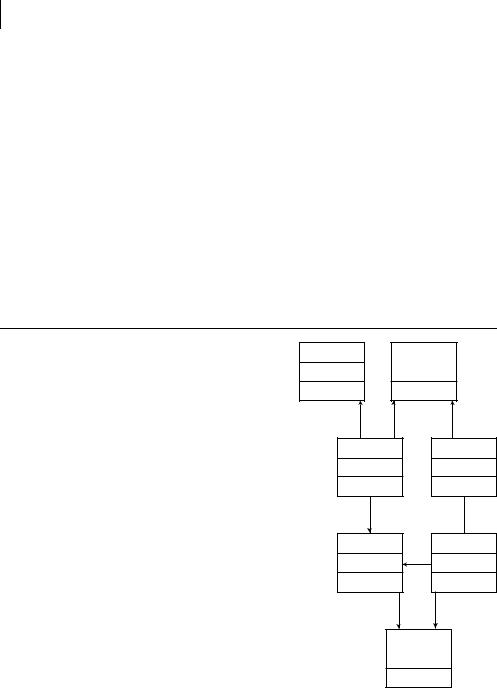
Assert <<Interface>>
Test
TestCase |
|
TestSuite |
|
0..*
0..1
TestResult BaseTestRunner
0..*
<<Interface>>
TestListener
Figure 2.2 The core JUnit classes used to run any JUnit test program
Composing tests with TestSuite |
21 |
|
|
Figure 2.3
The graphical test runner in action
When tests fail, the bar shows up red instead. JUnit testers tend to refer to passing tests as green-bar and failing tests as red-bar.
The JUnit distribution includes three TestRunner classes: one for the text console, one for Swing, and even one for AWT (the latter being a legacy that few people still use).
2.2.2Defining your own test runner
Unlike other elements of the JUnit framework, there is no TestRunner interface. Instead, the various test runners bundled with JUnit all extend BaseTestRunner. If you needed to write your own test runner for any reason, you could also extend this class yourself. For example, the Cactus framework that we’ll discuss in later chapters extends BaseTestRunner to create a ServletTestRunner that can run JUnit tests from a browser.
2.3Composing tests with TestSuite
Simple things should be simple … and complex things should be possible. Suppose you compile the simple calculator test program from listing 2.1 and hand it to a graphical test runner, like this:
>java junit.swingui.TestRunner TestCalculator
It should run just fine, assuming you have the correct classpath. (See figure 2.3 for the Swing test runner in action.) Altogether, this seems simple—at least as far as running a single test case is concerned.
But what happens when you want to run multiple test cases? Or just some of your test cases? How can you group test cases?

22CHAPTER 2
Exploring JUnit
Between the TestCase and the TestRunner, it would seem that you need some type of container that can collect several tests together and run them as a set. But, by making it easier to run multiple cases, you don’t want to make it harder to run a single test case.
JUnit’s answer to this puzzle is the TestSuite. The TestSuite is designed to run one or more test cases. The test runner launches the TestSuite; which test cases to run is up to the TestSuite.
2.3.1Running the automatic suite
You might wonder how you managed to run the example at the end of chapter 1, when you didn’t define a TestSuite. To keep simple things simple, the test runner automatically creates a TestSuite if you don’t provide one of your own. (Sweet!)
The default TestSuite scans your test class for any methods that start with the characters test. Internally, the default TestSuite creates an instance of your TestCase for each testXXX method. The name of the method being invoked is passed as the TestCase constructor, so that each instance has a unique identity.
For the TestCalculator in listing 2.1, the default TestSuite could be represented in code like this:
public static Test suite()
{
return new TestSuite(TestCalculator.class);
}
And this is again equivalent to the following:
public static Test suite()
{
TestSuite suite = new TestSuite(); suite.addTest(new TestCalculator("testAdd")); return suite;
}
NOTE To use this form, the hypothetical TestCalculator class would need to define the appropriate constructor, like this:
public TestCalculator(String name) { super(name); }
JUnit 3.8 made this constructor optional, so it is not part of the source code for the original TestCalculator class. Most developers now rely on the automatic TestSuite and rarely create manual suites, so they can omit this constructor.

Composing tests with TestSuite |
23 |
|
|
If you added another test, like testSubtract, the default TestSuite would automatically include it too, saving you the trouble of maintaining yet another block of fluff:
public static Test suite()
{
TestSuite suite = new TestSuite(); suite.addTest(new TestCalculator("testAdd")); suite.addTest(new TestCalculator("testSubstract")); return suite;
}
This is trivial code and would be easy to copy, paste, and edit—but why bother with such drudgery when JUnit can do it for you? Most important, the automatic test suite ensures that you don’t forget to add some test to the test suite.
2.3.2Rolling your own test suite
The default TestSuite goes a long way toward keeping the simple things simple. But what happens when the default suite doesn’t meet your needs? You may want to combine suites from several different packages as part of a master suite. If you’re working on a new feature, then as you make changes, you may want to run a small set of relevant tests.
There are many circumstances in which you may want to run multiple suites or selected tests within a suite. Even the JUnit framework has a special case: In order to test the automatic suite feature, the framework needs to build its own suite for comparison!
If you check the Javadoc for TestSuite and TestCase, you’ll notice that they both implement the Test interface, shown in listing 2.2.
Listing 2.2 The Test interface
package junit.framework;
public interface Test {
public abstract int countTestCases();
public abstract void run(TestResult result);
}
If you are an over-achiever and also look up the Javadoc for TestSuite, you’ll probably notice that the addTest signature doesn’t specify a TestCase type—any old Test will do.
The ability to add both test suites and test cases to a suite makes it simple to create specialty suites as well as an aggregate TestAll class for your application.

24CHAPTER 2
Exploring JUnit
JUnit design goals
The simple but effective combination of a TestRunner with a TestSuite makes it easy to run all your tests every day. At the same time, you can select a subset of tests that relate to the current development effort. This speaks to JUnit’s second design goal:
The framework must create tests that retain their value over time.
When you continue to run your tests, you minimize your investment in testing and maximize your return on that investment.
Typically, the TestAll class is just a static suite method that registers whatever Test objects (TestCase objects or TestSuite objects) your application should be running on a regular basis. Listing 2.3 shows a typical TestAll class.
Listing 2.3 A typical TestAll class
import junit.framework.Test; import junit.framework.TestSuite;
import junitbook.sampling.TestDefaultController;
public class TestAll |
|
|
|
|
{ |
b |
|
|
|
public static Test suite() |
|
|
|
|
{ |
|
|
|
c |
TestSuite suite = new TestSuite("All tests from part 1"); |
||||
suite.addTestSuite(TestCalculator.class); |
|
D |
|
|
|
|
|||
suite.addTestSuite(TestDefaultController.class); |
|
|
|
|
//if TestDefaultController had a suite method
//(or alternate suite methods) you could also use
//suite.addTestSuite(TestDefaultController.suite()); return suite;
}
}
b Create a suite method to call all your other tests or suites.
C Give the TestSuite a legend to help identify it later.
DYou call addTestSuite to add whatever TestCase objects or TestSuite objects you want to run together. It works for both types because the addTestSuite method
accepts a Test object as a parameter, and TestCase and TestSuite both implement the Test interface.