


System Maintenance Utility3 3
Introduction 3-2
Launching the System Maintenance Utility (Designjet 120/120nr) 3-2 Launching the System Maintenance Utility (Designjet 30, 30n, 90, 90r, 130, 130nr) 3-3
System Maintenance Utility (HP Designjet 120/120nr) 3-4 Color Calibration 3-4
Get Printer Information 3-6 Align Printheads 3-7 Clean Printheads 3-8 Update Firmware 3-9 Print Test Page 3-10 Calibrate Paper Feed 3-11 Reset Jetdirect Card 3-13
System Maintenance Utility (Designjet 30, 30n, 90, 90r, 130, 130nr) 3-14 Main Menu - Printer Front Panel Replication 3-14
Color Calibration 3-15
Align Printheads 3-19
Clean Printheads 3-20 Check Image Quality 3-21 Calibrate Paper Feed 3-22 Get Printer Information 3-24 Update Firmware 3-25
Reset Jetdirect Network Card 3-26
HP Designjet Ultra Low End Printer Service Manual |
3-1 |
System Maintenance Utility
Introduction
The System Maintenance Utility is designed to assist the customer with common maintenance tasks for the printer and also to resolve common problems that they may encounter.
Print jobs must not be sent to the printer while the system maintenance utility is in use.
Since the design of the System Maintenance Tool is different between the Designjet 120/120nr and Designjet 130/130, this chapter will explain how to use the tool for each product separately:
Explanation on how to use the System Maintenance Utility for the Designjet 120,120nr is found on Page 2.
Explanation on how to use the System Maintenance Utility for the Designjet 30, 30n, 130, 130nr is found on Page 3.
Launching the System Maintenance Utility (Designjet 120/120nr)
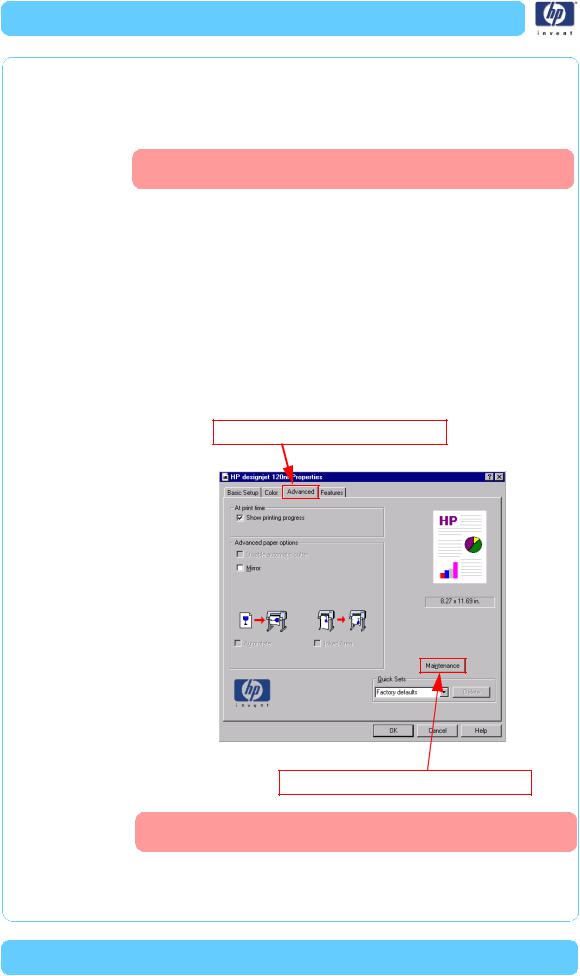
The System Maintenance Utility is launched via the HP printer driver.
Step 1 - Click on the "Advanced" tab
Step 2 - Click on the "Maintenance" box
When you finish using the System Maintenance Utility, you must click on exit on the left hand column before closing the browser.
3-2 |
HP Designjet Ultra Low End Printer Service Manual |
System Maintenance Utility
Launching the System Maintenance Utility (Designjet 30, 30n, 90, 90r, 130, 130nr)
There are two ways of launching the System Maintenance Utility.
From your computer’s desktop (Windows, Mac OS 9 and X)
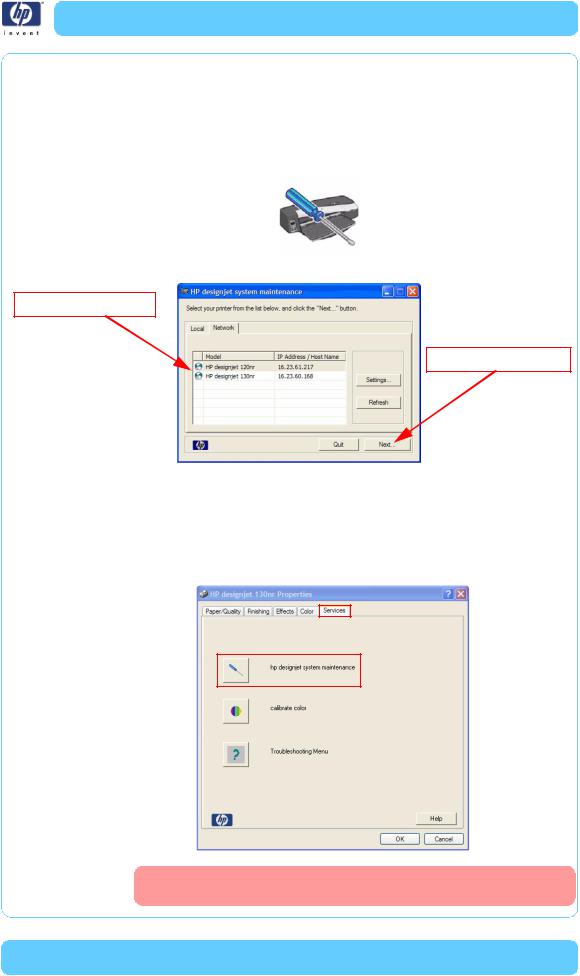
1Double click the hp designjet system maintenance icon on the desktop.
2A printer selector window opens - select your printer from the list.
Step 1 - Select Printer
Step 2 - Click on next
3Click Next (in Windows) or Configure (in Mac OS).
From the Printer Driver (Windows, Mac OS X)
In the Windows driver click the hp designjet system maintenance icon in the Services tab. In Mac OS X, select the Printer in the Print Center or Print Setup Utility and click configure.
When you finish using the System Maintenance Utility, you must click on exit on the left hand column before closing the browser.
HP Designjet Ultra Low End Printer Service Manual |
3-3 |
System Maintenance Utility
System Maintenance Utility (HP Designjet 120/120nr)
Color Calibration
The Color Calibration should ONLY be performed by the user when required.
Why calibrate color?
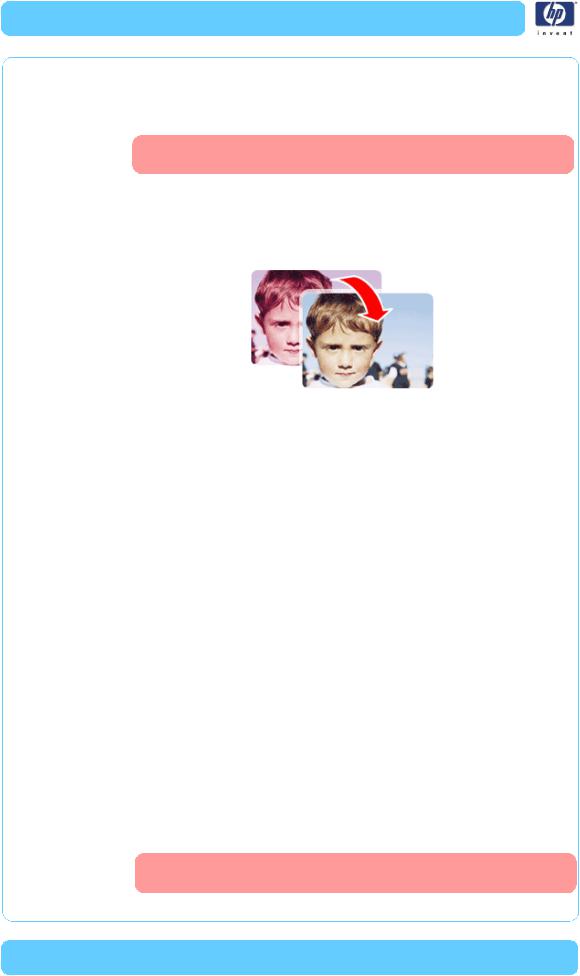
Calibrate color performs a maintenance function to ensure color consistency. If you calibrate correctly, the colors printed on printers with different printheads will look very similar.
This picture shows an exaggerated example of how a printout could look like before and after color calibration.
When do I calibrate color?
It is recommended that you calibrate color every time you replace a printhead or when you perceive color degradation on the printouts. There is no need to perform this operation each time you print. The results of the color calibration will be applied to all print jobs that follow, even if you power off the printer.
Perform color calibration if you print with the regular hp designjet 120 printer driver, which was included with the printer or which you downloaded from the Web. If you use a PostScript driver such as Adobe PS or LaserWriter to print through a PostScript RIP provided by HP or another third-party company, the results of calibrate color will not be applied to your print jobs. In this case, refer to your PostScript RIP documentation for information on how to perform color calibration.
How do I calibrate color?
You have to calibrate color for every Paper Type that requires color consistency. For example, if you require consistent colors on glossy paper and on heavy weight coated paper, you must perform one color calibration for the former and another for the latter Paper Type.
When you want to calibrate color, remember to select the Print Quality option that you are going to use to print. For example, if you want to print with the High Resolution option, select High Resolution before performing the color calibration.
If the Color calibration fails, print the information page and check the list of warnings under the printer status section.
3-4 |
HP Designjet Ultra Low End Printer Service Manual |
System Maintenance Utility
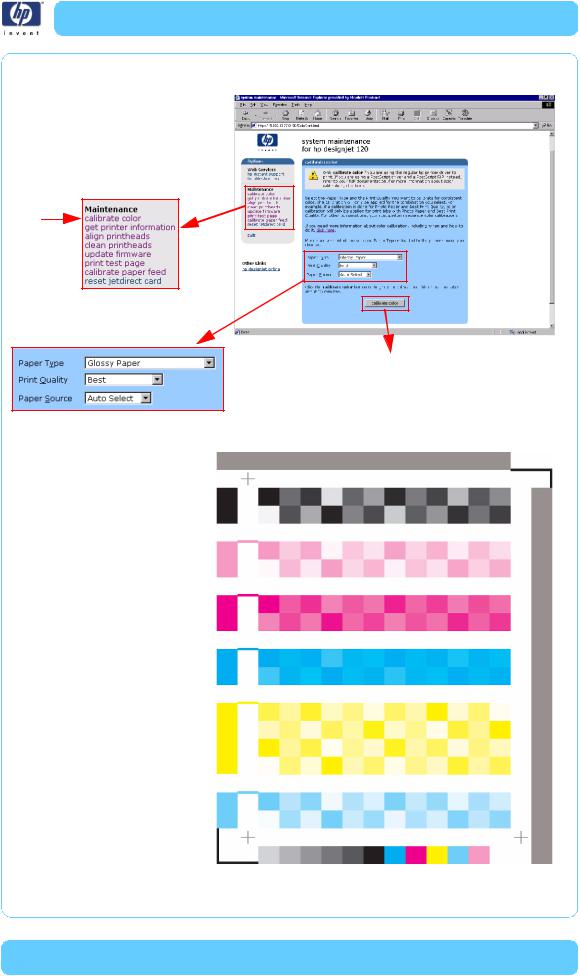
Calibrate Color as shown below:
Step 1 - Select "calibrate color"
Step 3 - Press "Calibrate Color"
Step 2 - Select Paper Type
and Print Quality
Sample of the
Color Calibration Print
HP Designjet Ultra Low End Printer Service Manual |
3-5 |
System Maintenance Utility
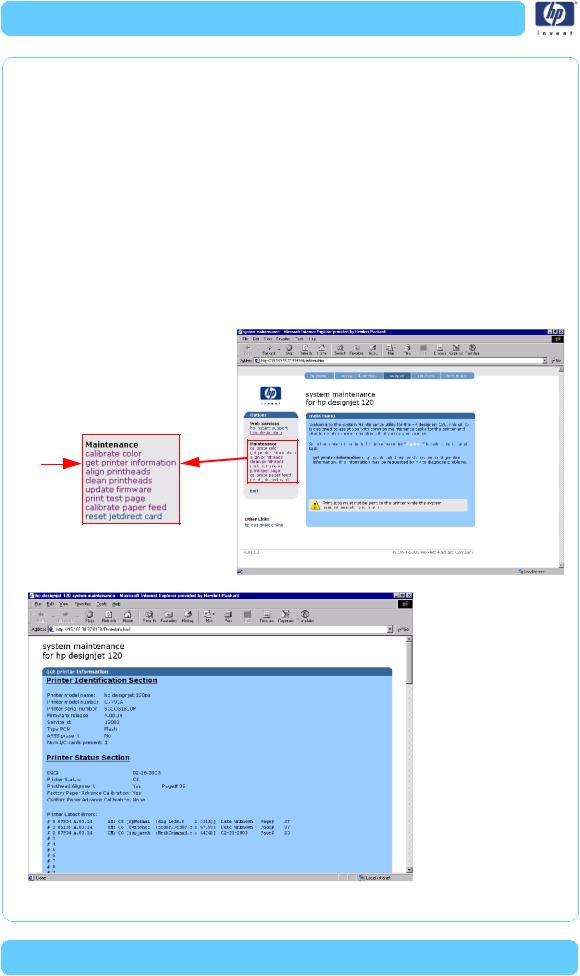
Get Printer Information
This option allows you to view all the information available on the Printer:
Printer Identification.
Printer Status.
Printer Job Queue.
Printer Errors and Warnings.
Printer Usage.
Ink Consumable Identification.
Ink Consumable Status.
Ink Consumable Usage.
Network Card Information.
Refer to the Test Prints chapter for explanations on each section.
Step 1 - Select "Get
Printer Information"
Sample of the information page
3-6 |
HP Designjet Ultra Low End Printer Service Manual |

System Maintenance Utility
Align Printheads
Align printheads performs a maintenance function with the printheads. Proper alignment insures correct registration between ink colors while printing. This is only recommended if you are experiencing problems with print quality.
Before you continue, please verify that three sheets of paper are loaded in the default tray. If the printhead alignment fails on the first attempt, the printer will retry the alignment twice.
Do not power off the printer during this operation. The printer display will indicate busy until the operation is finished.
Step 1 - Select "align printheads"
Step 2 - Press "align printheads"
Pattern for Bidirectional compensation and directionality on Scan-Axis


 To calibrate the sensors
|
|
|
|
Pattern for directionality |
||||||
|
|
|
|
|
|
|
on Paper-Axis |
|||
|
|
|
|
|||||||
|
|
|
|
|
|
|
|
|
|
|
|
|
|
|
|
|
|
|
|
|
|
|
|
|
|
|
Test Result |
|
|
|
||
|
|
|
|
|
|
|
||||
Sample of the Printhead Alignment Page |
|
|
Pass |
|
Fail |
|
||||
|
|
|
|
|||||||
|
|
|
|
|
|
|||||
|
|
|
|
|
|
|||||
HP Designjet Ultra Low End Printer Service Manual |
3-7 |
System Maintenance Utility
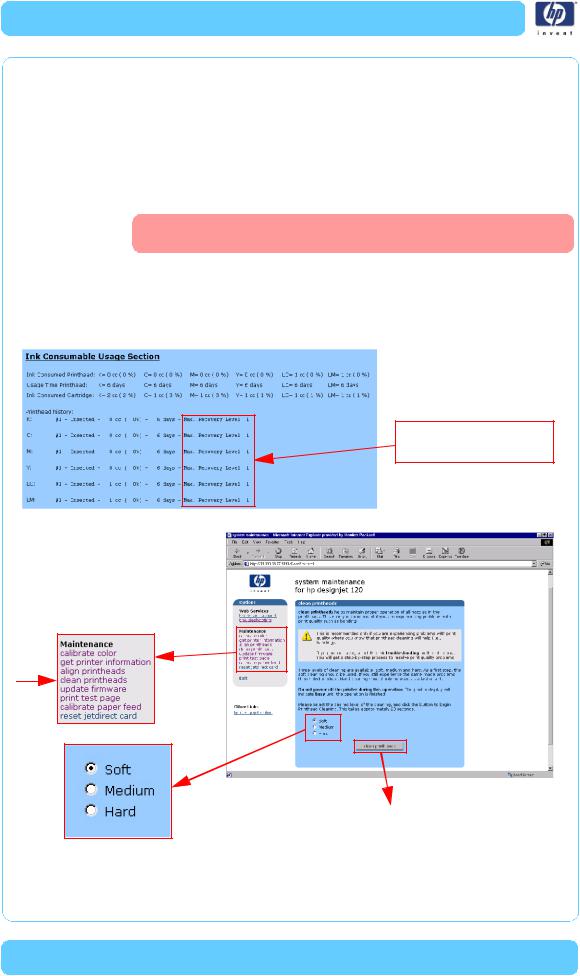
Clean Printheads
Clean printheads helps maintain proper operation of all nozzles in the printheads. This is only recommended if you are experiencing problems with print quality such as banding.
Three levels of cleaning are available: soft, medium and hard. As a first step, the soft cleaning should be used. If you still experience the same image problems, then select medium. Hard cleaning should only be used as a last resort.
Do not power off the printer during this operation. The printer display will indicate busy until the operation is finished.
Before cleaning the printheads, first check the maximum recovery level already performed on the printheads. If hard level (Recovery Level 3) has already been performed, then do not try performing hard level again. The Maximum Recovery Level can be seen on the Printer Information page in the "Printhead History" section.
Maximum Recovery Level
already performed
Step 1 - Select "clean printheads"
Step 3 - Press "clean printheads"
Step 2 - Select the recovery level to be performed
3-8 |
HP Designjet Ultra Low End Printer Service Manual |
System Maintenance Utility
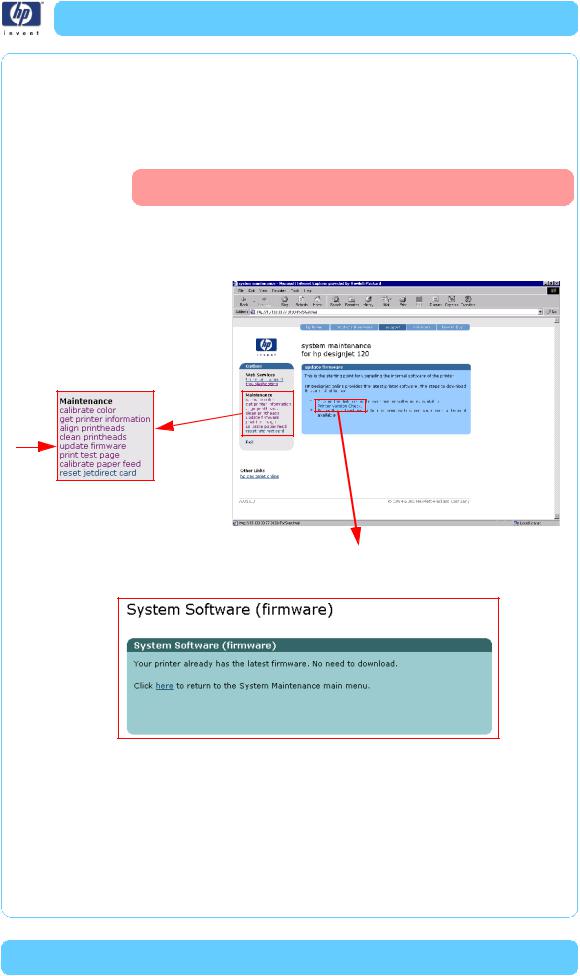
Update Firmware
Update firmware updates the built-in software of the printer. The update process will check the printer's version with the latest version available from HP. Before trying this utility, first make sure that you have an internet connection.
Do not power off the printer during this operation. The printer display will indicate busy until the operation is finished.
The first step will be to check if newer printer software is available. If newer software is available, then follow the instructions in the window in order to upgrade the printer software.
Step 1 - Select "update firmware"
Step 2 - Click on this link
If newer printer software is not available, then this message will be displayed
HP Designjet Ultra Low End Printer Service Manual |
3-9 |
System Maintenance Utility
Print Test Page
Print test page provides two diagnostic pages for printing. The following test pages are available:
Image Quality Diagnostic page.
Skew Diagnostic page.
These commands only print the diagnostic pages and do not provide analysis of the results. A full troubleshooting process is available using the troubleshooting command under the Web Services option.
Select "troubleshooting" for the analysis of the test pages
Step 1 - Select "print test page"
Step 2 - Click on "Image Quality" or "Skew"
|
|
|
|
|
|
|
|
|
|
|
|
3-10 |
HP Designjet Ultra Low End Printer Service Manual |
||||
System Maintenance Utility
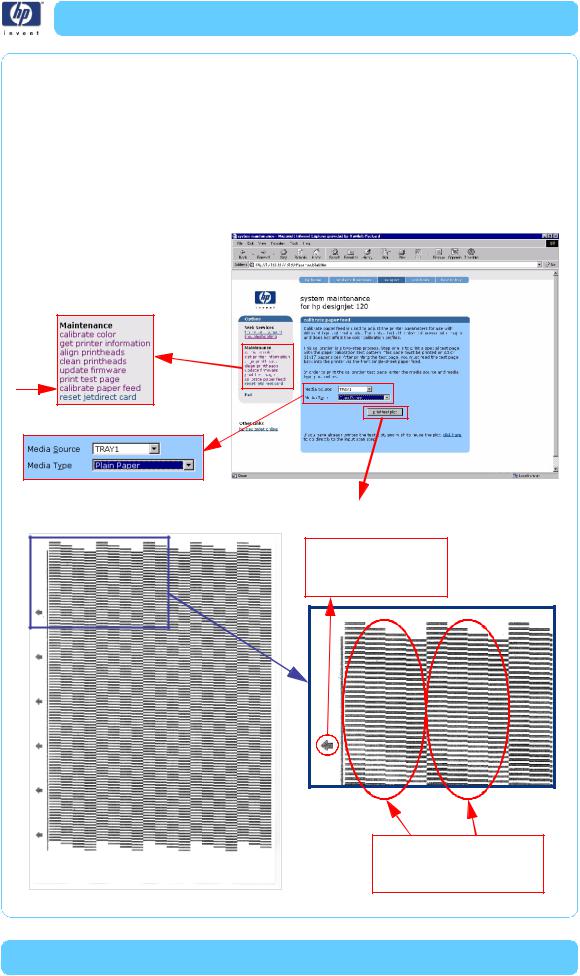
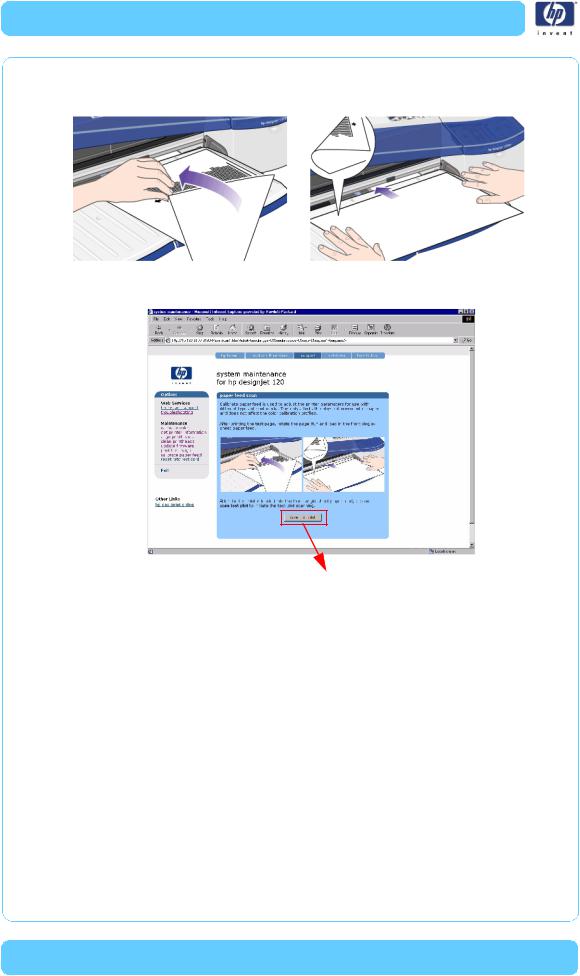
Calibrate Paper Feed
Calibrate paper feed is used to adjust the printer parameters for use with different types of print media. This only affects the physical movement of paper and does not affect the color calibration profiles.
This calibration is a two-step process. Step one is to print a special test page with the paper calibration test pattern. This page must be printed on A3 or 11x17 paper sizes. After printing the test page, you must feed the test page back into the printer via the front single-sheet paper feed.
Step 1 - Select "calibrate paper feed"
Step 2 - Select Media Source |
Step 3 - Press "print test plot" |
and Media Type |
Sample of the |
Accuracy Calibration Print |
Indication that tells you how to load the paper to scan the pattern
Pattern printed several times
Optimize for different areas of the print zone
HP Designjet Ultra Low End Printer Service Manual |
3-11 |
System Maintenance Utility
Once the Accuracy Calibration has been printed, rotate the page and reload it upside down (image facing down).
Step 1 - Rotate the page and reload it upside down (image facing down)
Step 2 - Press "scan test plot"
3-12 |
HP Designjet Ultra Low End Printer Service Manual |
System Maintenance Utility
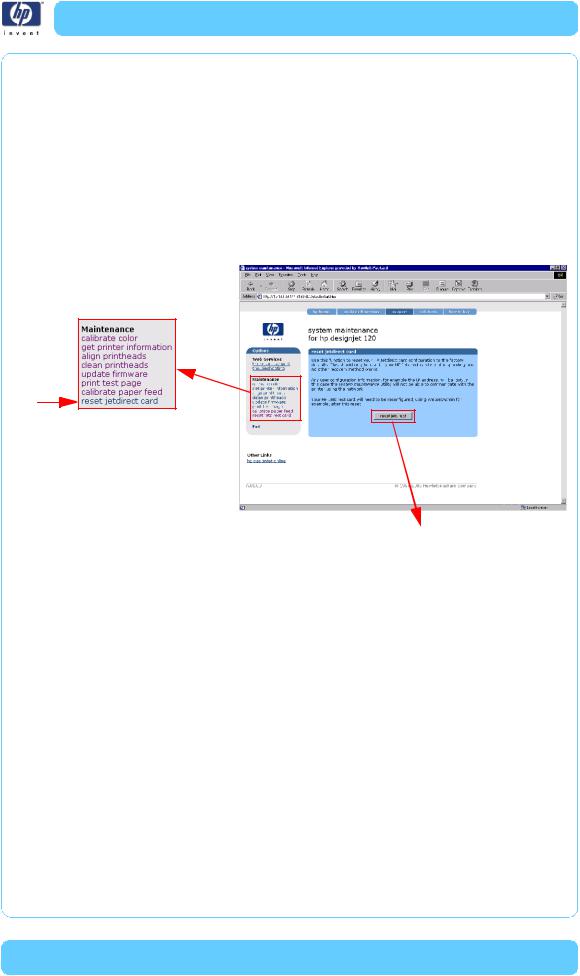
Reset Jetdirect Card
Use this function to reset the HP Jetdirect card configuration to the factory defaults. This should only be used if the HP Jetdirect card is not responding and no other recovery method works.
Any user configuration information, for example the IP address, will be lost. In this case the system maintenance utility will not be able to communicate with the printer using the network.
The HP Jetdirect card will need to be reconfigured, using WebJetAdmin for example, after this reset.
Step 1 - Select "reset jetdirect card"
Step 2 - Press "reset jetdirect"
HP Designjet Ultra Low End Printer Service Manual |
3-13 |
System Maintenance Utility
System Maintenance Utility (Designjet 30, 30n, 90, 90r, 130, 130nr)
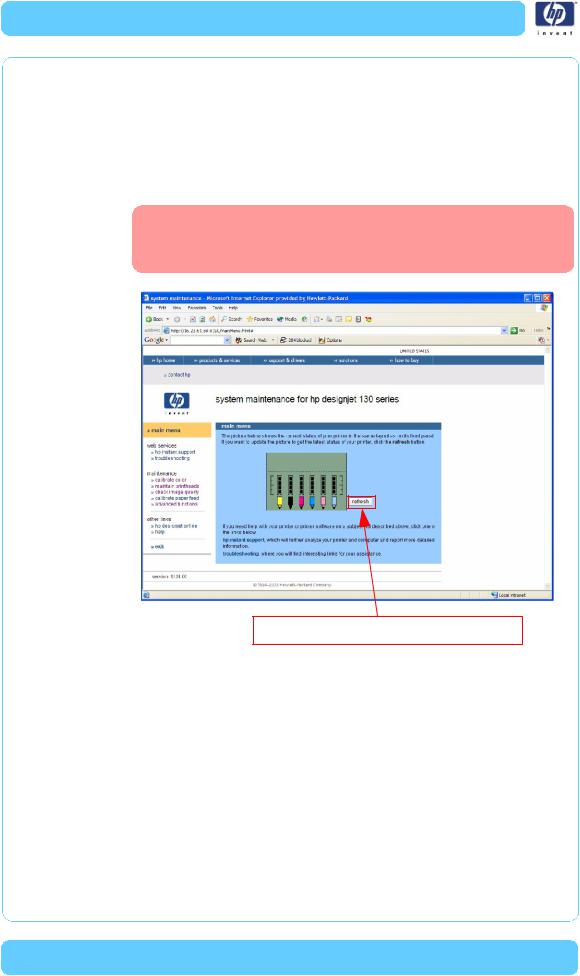
Main Menu - Printer Front Panel Replication
The main page of the System Maintenance Utility includes a replica of the
Printer’s Front Panel showing the status of the Printer.
The replica Front Panel does not show the real-time status. It is a snapshot which can be refreshed by pressing the refresh button either on the web browser toolbar or in the actual replica window.
Click to refresh status of Front Panel
3-14 |
HP Designjet Ultra Low End Printer Service Manual |
System Maintenance Utility
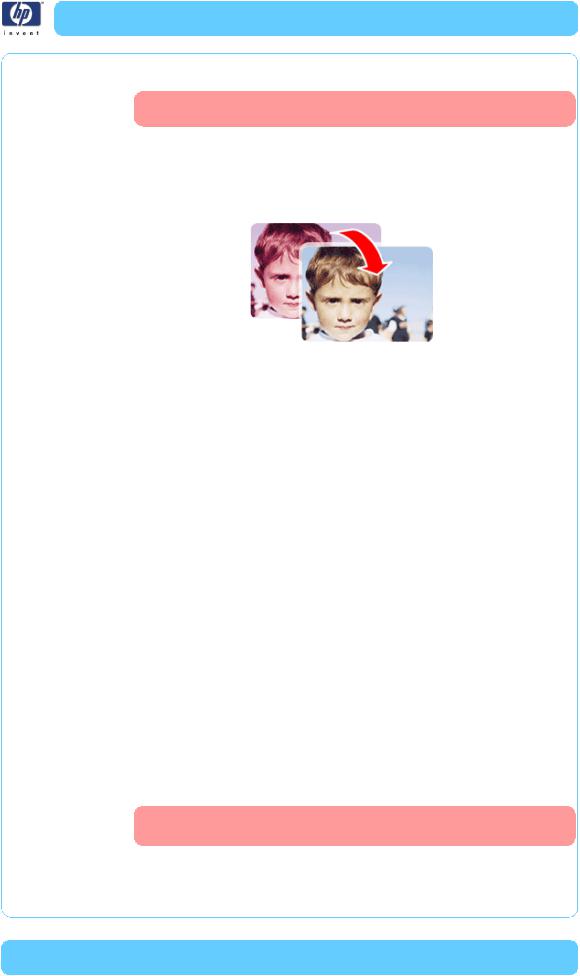
Color Calibration
The Color Calibration should ONLY be performed by the user when required.
Why calibrate color?
Calibrate color performs a maintenance function to ensure color consistency. If you calibrate correctly, the colors printed on printers with different printheads will look very similar.
This picture shows an exaggerated example of how a printout could look like before and after color calibration.
When do I calibrate color?
It is recommended that you calibrate color every time you replace a printhead or when you perceive color degradation on the printouts. There is no need to perform this operation each time you print. The results of the color calibration will be applied to all print jobs that follow, even if you power off the printer.
Perform color calibration if you print with the regular hp designjet 120 printer driver, which was included with the printer or which you downloaded from the Web. If you use a PostScript driver such as Adobe PS or LaserWriter to print through a PostScript RIP provided by HP or another third-party company, the results of calibrate color will not be applied to your print jobs. In this case, refer to your PostScript RIP documentation for information on how to perform color calibration.
How do I calibrate color?
You have to calibrate color for every Paper Type that requires color consistency. For example, if you require consistent colors on glossy paper and on heavy weight coated paper, you must perform one color calibration for the former and another for the latter Paper Type.
When you want to calibrate color, remember to select the Print Quality option that you are going to use to print. For example, if you want to print with the High Resolution option, select High Resolution before performing the color calibration.
If the Color calibration fails, print the information page and check the list of warnings under the printer status section.
HP Designjet Ultra Low End Printer Service Manual |
3-15 |
System Maintenance Utility
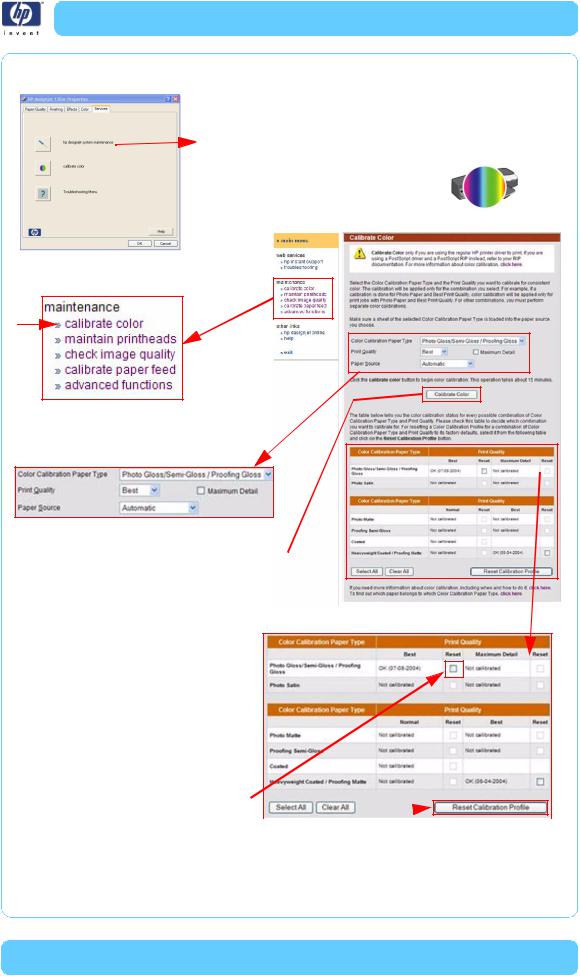
Performing the Color Calibration (HP DesignJet 30, 30n,130, 130nr)
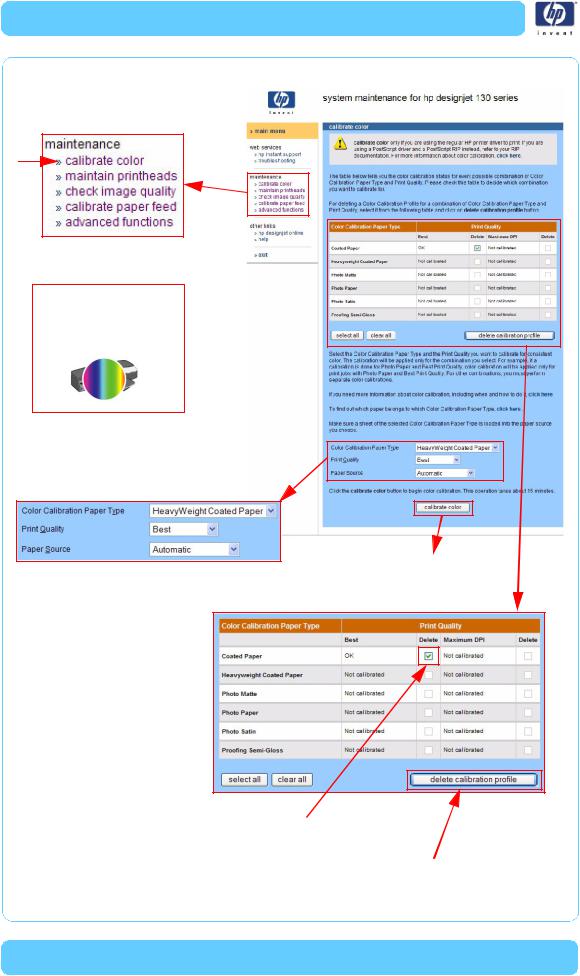
Step 1 - Select "calibrate color"
OR
Double click on the "calibrate color" icon on the computer desktop
Step 2 - Select Paper Type
and Print Quality
Step 3 - Press "Calibrate Color"
This table gives you the color calibration status for each type of paper and print quality. You can also use this table to delete color calibration profiles that you don’t need.
|
Step 1 - Select color calibration profile |
|
Step 2 - Press "delete calibration profile" |
3-16 |
HP Designjet Ultra Low End Printer Service Manual |
System Maintenance Utility
Performing the Color Calibration (HP DesignJet 90, 90r)
|
|
|
|
|
|
|
|
Double click on the |
||
|
|
|
|
|
|
|
|
|||
|
|
|
|
|
|
|
|
|||
|
|
|
|
|
|
|
|
"calibrate color" icon |
||
|
|
|
|
|
|
Launch system maintenance |
|
|||
|
|
|
|
|
|
OR |
on the computer desktop |
|||
|
|
|
|
|
|
|||||
|
|
|
|
|
|
tool via the hp driver |
||||
|
|
|
|
|
|
|
|
|
||
|
|
|
|
|
|
|
|
|
||
|
|
|
|
|
|
|
|
|
|
|
|
|
|
|
|
|
|
|
|
|
|
|
|
|
|
|
|
|
|
|
|
|
|
|
|
|
|
|
|
|
|
|
|
Step 1 - Select "calibrate color"
Step 2 - Select Paper Type
and Print Quality
Step 3 - Press "Calibrate Color"
This table gives you the color calibration status for each type of paper and print quality. You can also use this table to delete color calibration profiles that you don’t need.
Step 1 - Select color calibration profile
Step 2 - Press "delete calibration profile"

HP Designjet Ultra Low End Printer Service Manual |
3-17 |
System Maintenance Utility
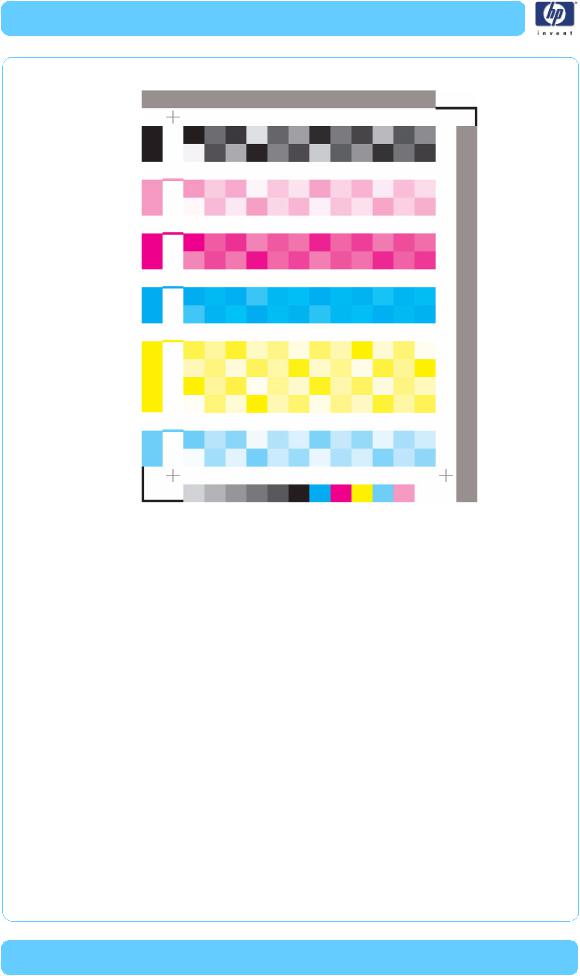
Sample of the Color Calibration Print:
|
|
|
3-18 |
HP Designjet Ultra Low End Printer Service Manual |
|
System Maintenance Utility
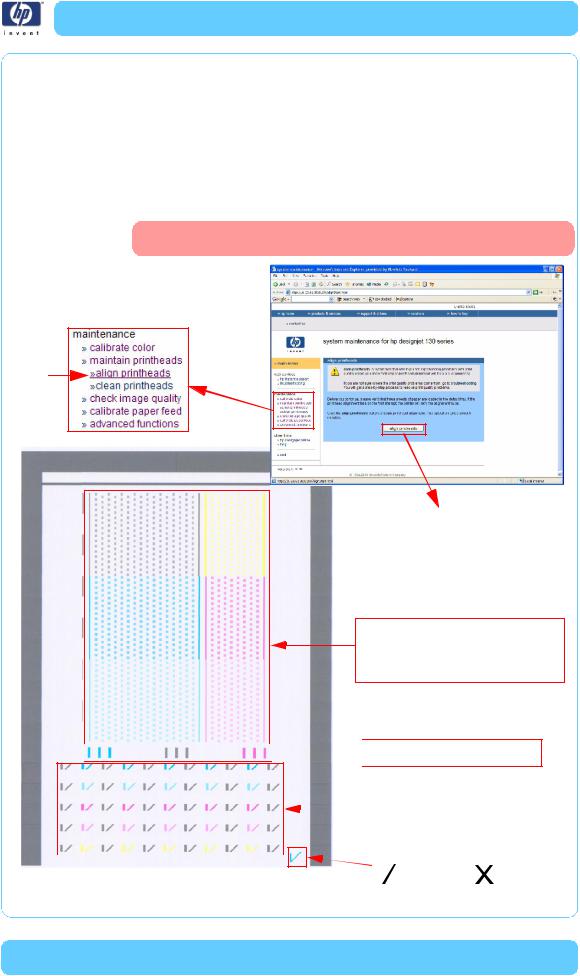
Align Printheads
Align printheads performs a maintenance function with the printheads. Proper alignment insures correct registration between ink colors while printing. This is only recommended if you are experiencing problems with print quality.
Before you continue, please verify that three sheets of paper are loaded in the default tray. If the printhead alignment fails on the first attempt, the printer will retry the alignment twice.
Do not power off the printer during this operation. The printer display will indicate busy until the operation is finished.
Step 1 - Select "maintain printheads" and then "align printheads"
Step 2 - Press "align printheads"
Pattern for Bidirectional compensation and directionality on Scan-Axis


 To calibrate the sensors
|
|
|
|
Pattern for directionality |
||||||
|
|
|
|
|
|
|
on Paper-Axis |
|||
|
|
|
|
|||||||
|
|
|
|
|
|
|
|
|
|
|
|
|
|
|
|
|
|
|
|
|
|
|
|
|
|
|
Test Result |
|
|
|
||
|
|
|
|
|
|
|
||||
Sample of the Printhead Alignment Page |
|
|
Pass |
|
Fail |
|
||||
|
|
|
|
|||||||
|
|
|
|
|
|
|||||
|
|
|
|
|
|
|||||
HP Designjet Ultra Low End Printer Service Manual |
3-19 |
System Maintenance Utility
Clean Printheads
Clean printheads helps maintain proper operation of all nozzles in the printheads. This is only recommended if you are experiencing problems with print quality such as banding.
Three levels of cleaning are available: soft, medium and hard. As a first step, the soft cleaning should be used. If you still experience the same image problems, then select medium. Hard cleaning should only be used as a last resort.
Do not power off the printer during this operation. The printer display will indicate busy until the operation is finished.
Before cleaning the printheads, first check the maximum recovery level already performed on the printheads. If hard level (Recovery Level 3) has already been performed, then do not try performing hard level again. The Maximum Recovery Level can be seen on the Printer Information page in the "Printhead History" section.
Maximum Recovery Level
already performed
Step 1 - Select "maintain printheads" and then "clean printheads"
Step 3 - Press "clean printheads"
Step 2 - Select the recovery level to be performed
3-20 |
HP Designjet Ultra Low End Printer Service Manual |
System Maintenance Utility
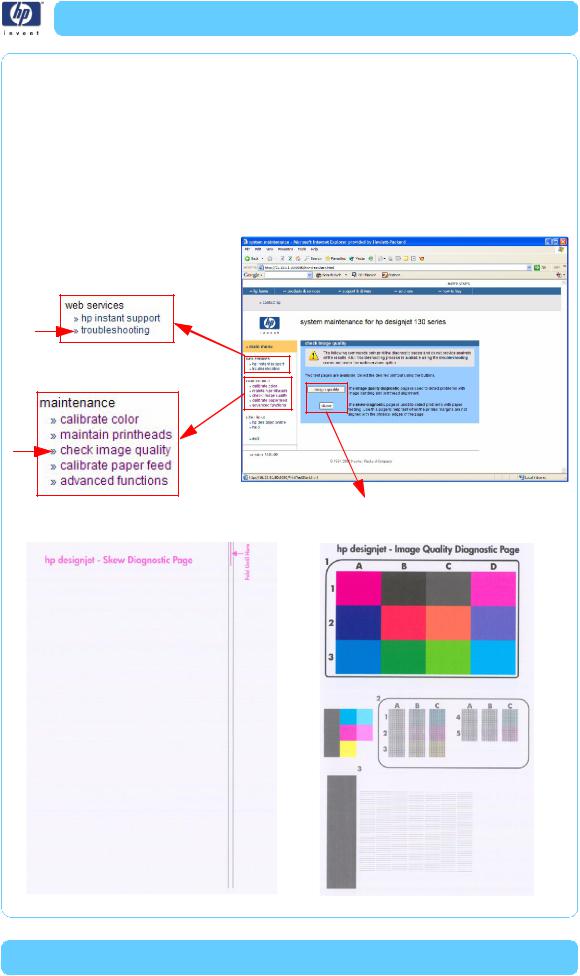
Check Image Quality
Check image quality provides two diagnostic pages for printing. The following test pages are available:
Image Quality Diagnostic page.
Skew Diagnostic page.
These commands only print the diagnostic pages and do not provide analysis of the results. A full troubleshooting process is available using the troubleshooting command under the Web Services option.
Select "troubleshooting" for the analysis of the test pages
Step 1 - Select "check image quality"
Step 2 - Click on "Image Quality" or "Skew"
|
|
|
|
|
|
|
|
|
|
HP Designjet Ultra Low End Printer Service Manual |
3-21 |
|||
System Maintenance Utility
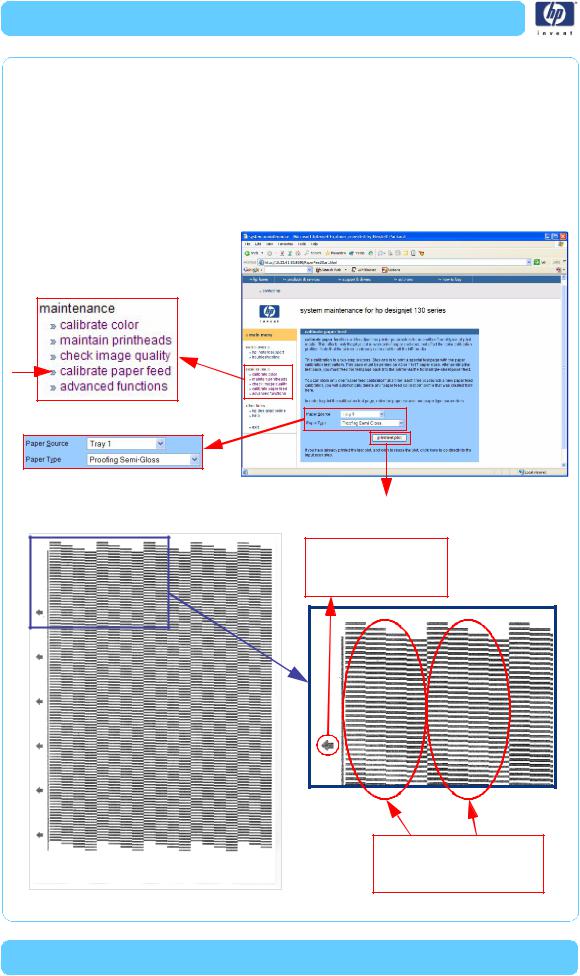
Calibrate Paper Feed
Calibrate paper feed is used to adjust the printer parameters for use with different types of print media. This only affects the physical movement of paper and does not affect the color calibration profiles.
This calibration is a two-step process. Step one is to print a special test page with the paper calibration test pattern. This page must be printed on A3 or 11x17 paper sizes. After printing the test page, you must feed the test page back into the printer via the front single-sheet paper feed.
Step 1 - Select "calibrate paper feed"
Step 2 - Select Media Source
and Media Type |
Step 3 - Press "print test plot" |
Sample of the |
Accuracy Calibration Print |
Indication that tells you how to load the paper to scan the pattern
Pattern printed several times
Optimize for different areas of the print zone
3-22 |
HP Designjet Ultra Low End Printer Service Manual |
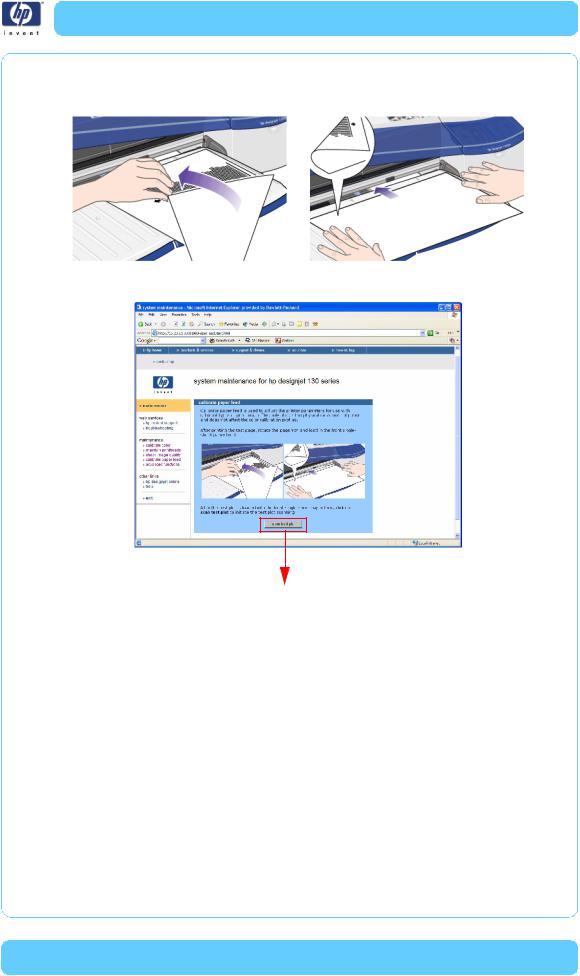
System Maintenance Utility
Once the Accuracy Calibration has been printed, rotate the page and reload it upside down (image facing down).
Step 1 - Rotate the page and reload it upside down (image facing down)
Step 2 - Press "scan test plot"
HP Designjet Ultra Low End Printer Service Manual |
3-23 |
System Maintenance Utility
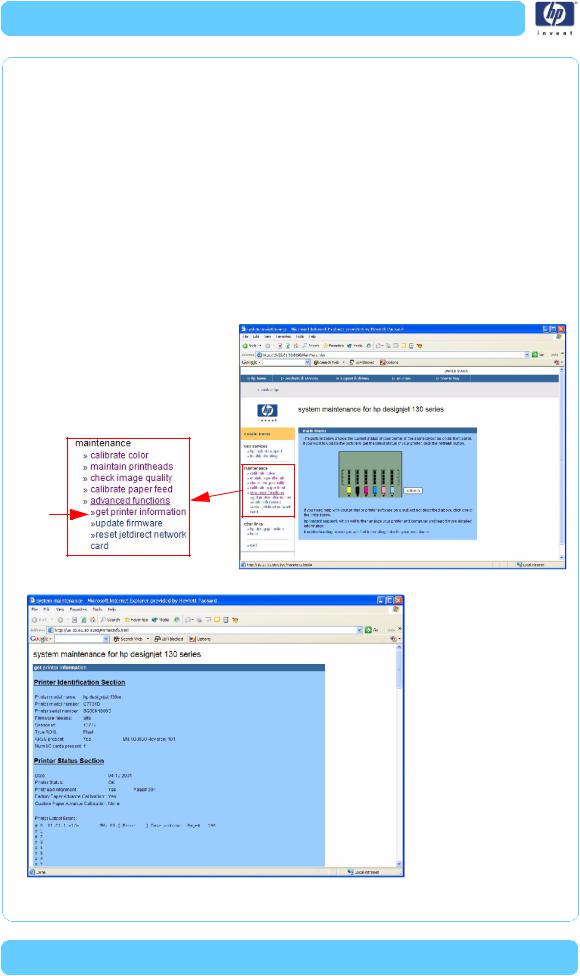
Get Printer Information
This option allows you to view all the information available on the Printer:
Printer Identification.
Printer Status.
Printer Job Queue.
Printer Errors and Warnings.
Printer Usage.
Ink Consumable Identification.
Ink Consumable Status.
Ink Consumable Usage.
Network Card Information.
Refer to the Test Prints chapter for explanations on each section.
Step 1 - Select "advanced functions" and then "get printer information"
Sample of the information page
3-24 |
HP Designjet Ultra Low End Printer Service Manual |
System Maintenance Utility
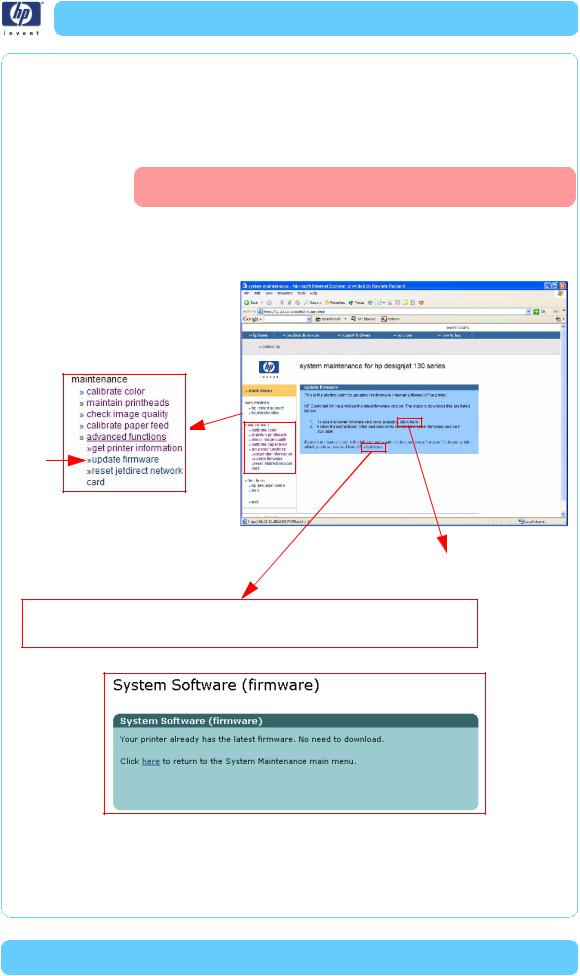
Update Firmware
Update firmware updates the built-in software of the printer. The update process will check the printer's version with the latest version available from HP. Before trying this utility, first make sure that you have an internet connection.
Do not power off the printer during this operation. The printer display will indicate busy until the operation is finished.
The first step will be to check if newer printer software is available. If newer software is available, then follow the instructions in the window in order to upgrade the printer software.
Step 1 - Select "advanced functions" and then "update firmware"
Step 2 - Click on this link
If you do not have Internet access, you can still send a new firmware file (which you have received on CD from HP) from your computer to the Printer.
If newer printer software is not available, then this message will be displayed
HP Designjet Ultra Low End Printer Service Manual |
3-25 |
System Maintenance Utility
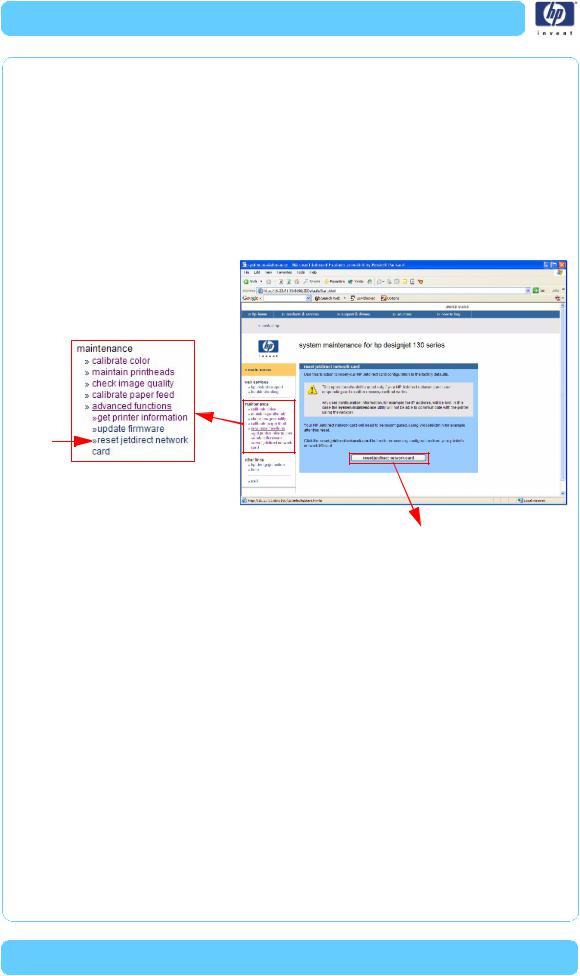
Reset Jetdirect Network Card
Use this function to reset the HP Jetdirect Network card configuration to the factory defaults. This should only be used if the HP Jetdirect Network card is not responding and no other recovery method works.
Any user configuration information, for example the IP address, will be lost. In this case the system maintenance utility will not be able to communicate with the printer using the network.
The HP Jetdirect Network card will need to be reconfigured, using
WebJetAdmin for example, after this reset.
Step 1 - Select "advanced functions" and then "reset jetdirect network card"
Step 2 - Press "reset jetdirect network card"
3-26 |
HP Designjet Ultra Low End Printer Service Manual |