

Задани на лабораторные работы. ПРК / Professional Microsoft Robotics Developer Studio
.pdfwww.it-ebooks.info
|
|
Chapter 14: Remotely Controlling a Mobile Robot |
|
|
|
|
Pin |
Function |
|
|
|
|
0 |
eb500 Do Not Use (Serial In) |
|
1 |
eb500 Do Not Use (Serial Out) |
|
2 |
Right IR Detector |
|
3 |
Right IR LED |
|
4 |
Piezoelectric Speaker |
|
5 |
eb500 Do Not Use (Connected Flag) |
|
6 |
eb500 Do Not Use |
|
7 |
Left Whisker |
|
8 |
Right Whisker |
|
9 |
Left IR LED |
|
10 |
Left IR Detector |
|
11 |
(No connection — available for use) |
|
12 |
Right Servo Motor |
|
13 |
Left Servo Motor |
|
14 |
LED |
|
15 |
LED |
|
|
|
As well as building the robot, you must download the monitor program into it. You can do this using the BASIC Stamp Editor that is supplied with the kit.
A revised version of the Parallax software is supplied with the code for this book in the Parallax folder under Chapter14. This updated version has some additional features that you might like to use. It can be found in the directory ProMRDS\Chapter14\Parallax\Boe-Bot and the file is
BoeBotControlForMRDS.bs2.
When you double-click the .bs2 file in Windows Explorer, it launches the BASIC Stamp Editor. You do not need to make any changes to the code. Just plug your Boe-Bot into a serial port on your PC and download the program by selecting Run from the menu. If you don’t have a serial port, then you can buy a USB-to-Serial device from Parallax.
Once you have downloaded the program, the Boe-Bot will reset itself and start running the program. It will beep once and flash the LED on pin 15. From then on, every time you turn on the Boe-Bot, it will beep and flash. This indicates that the monitor program has started running successfully.
613
www.it-ebooks.info
Part IV: Robotics Hardware
Establishing a Bluetooth Connection
Connecting the Boe-Bot to MRDS via Bluetooth is quite easy and is very similar to the procedure described earlier in the chapter for the LEGO NXT:
1.
2.
3.
4.
5.
6.
7.
Plug in your Bluetooth USB dongle or turn on Bluetooth on your PC or laptop.
Turn on your Boe-Bot, with the eb500 module plugged into it. No setup is required.
Open the Bluetooth applet from the Control Panel or the system tray. It should be called Bluetooth Devices or Bluetooth Configuration.
In the Devices tab, click the Add button (refer to Figure 14-3). The Add Bluetooth Device Wizard will appear (refer to Figure 14-4).
Click the checkbox that says “My device is set up and ready to be found” and then click Next. Your PC will search for Bluetooth devices in range and should find the eb500. The wizard will display a dialog asking for a passkey.
Enter the passkey for the eb500, which is 0000 (see Figure 14-5 for an example, but make sure you enter 0000).
After entering the passkey, there will be a slight delay while the PC determines what services are offered by the eb500 and creates the necessary virtual devices. Eventually the final dialog of the wizard will be displayed, showing the COM ports that have been allocated. (See Figure 14-6 for an example.)
Make a note of the outgoing COM port number. You will need this to configure your Boe-Bot. Then click Finish.
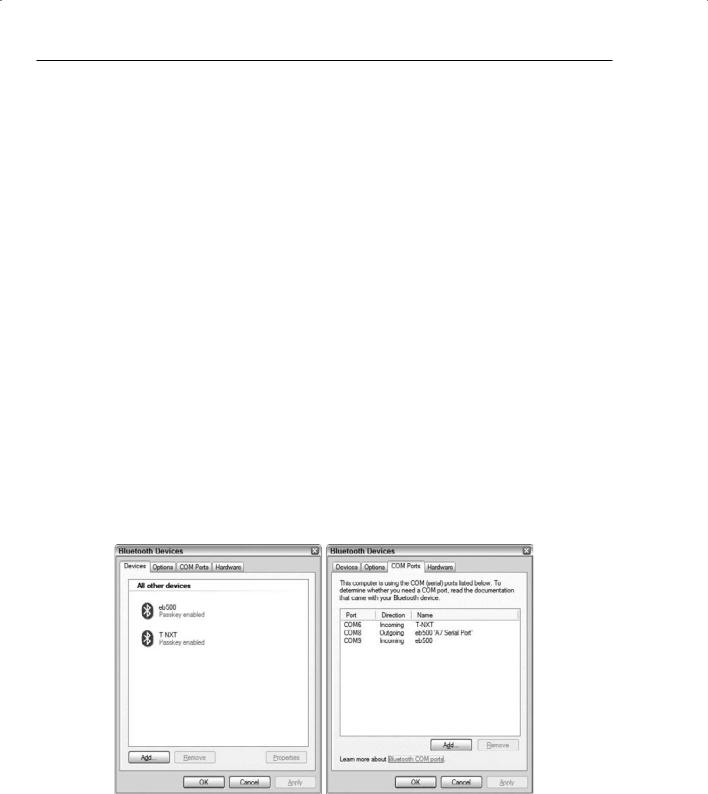
If you have installed both a LEGO NXT and a Boe-Bot, then the Devices tab in the Bluetooth applet should look something like the left-hand diagram in Figure 14-11. The eb500 is the new device and the T-NXT is the existing LEGO NXT.
Figure 14-11
614
www.it-ebooks.info
Chapter 14: Remotely Controlling a Mobile Robot
The right side of Figure 14-11 shows the COM Ports tab. Note that there are two ports for the Boe-Bot: COM8 and COM9. The outgoing port, COM8, is connected to an A7 serial port. So port number 8 is the one that should be used when setting the Boe-Bot configuration. The ports that you see will probably be different from these. It depends on the hardware installed on your PC.
Communicating with the Boe-Bot
In order to use a Boe-Bot, you must set up the COM port number. Open the configuration file, Parallax.BoeBot.Config.xml, which is in the ProMRDS\Config directory. It should look like the following:
<?xml version=”1.0” encoding=”utf-8”?>
<BasicStampState xmlns:s=”http://www.w3.org/2003/05/soap-envelope” xmlns:wsa=”http://schemas.xmlsoap.org/ws/2004/08/addressing” xmlns:d=”http://schemas.microsoft.com/xw/2004/10/dssp.html” xmlns=”http://schemas.microsoft.com/robotics/2007/06/basicstamp2.html”>
<Configuration> <Delay>0</Delay> <SerialPort>8</SerialPort>
</Configuration> <AutonomousMode>false</AutonomousMode> <Connected>false</Connected> <FrameCounter>0</FrameCounter> <ConnectAttempts>0</ConnectAttempts> <MotorSpeed>
<LeftSpeed>0</LeftSpeed> <RightSpeed>0</RightSpeed>
</MotorSpeed> <Sensors>
<IRLeft>false</IRLeft> <IRRight>false</IRRight> <WhiskerLeft>false</WhiskerLeft> <WhiskerRight>false</WhiskerRight>
</Sensors> </BasicStampState>
You can change the SerialPort (which is shown as 8 in the preceding code) to the correct outgoing port that you recorded when you set up Bluetooth.
Using the Dashboard
MRDS comes with a service called the Simple Dashboard. This is useful for getting started with your robot because it enables you to move it around manually and confirm that the communications link is working.
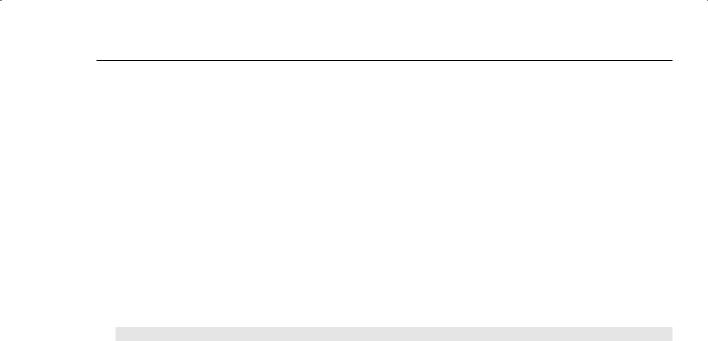
An enhanced version of the Dashboard is provided in the code for Chapter 4 of this book. It has extra features that you might find useful. This Dashboard is shown in Figure 14-12 controlling a LEGO NXT using an Xbox 360 gamepad. Unnecessary parts of the dialog can be collapsed so that only the driving controls are visible. It also remembers its location on the screen. There are controls (the large arrow buttons) that use the DriveDistance and RotateDegrees requests (more on these later), which enable
615
www.it-ebooks.info
Part IV: Robotics Hardware
you to control your robot more precisely, and it won’t run away from you. One of the best features might be that it remembers the name of the remote node. This means that all you have to do when you start up is click Connect and select the services you want to use, without typing a thing.
Figure 14-12
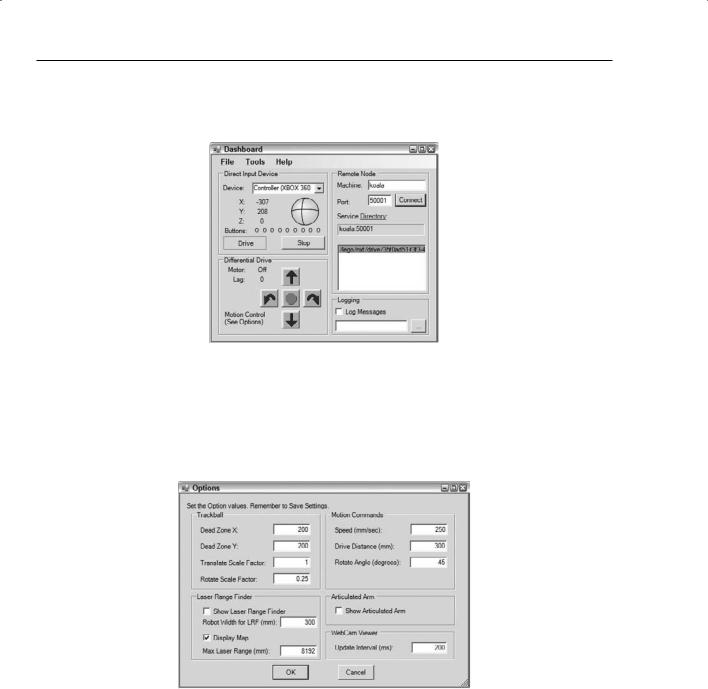
Figure 14-13 shows the options dialog (in the Tools menu) for the Dashboard. The dead zone has been set quite large to allow for some “slop” on the gamepad thumbstick. (This also prevents one of the bugs from the Simple Dashboard whereby the robot spins in the opposite direction if the vertical crosshair is not exactly centered.) Rotation speed is also scaled down. Notice that the Laser Range Finder and Articulated Arm displays are turned off in Figure 14-13. In addition, the DriveDistance and RotateDegrees parameters are set here.
Figure 14-13
Creating a Manifest
Starting the LEGO NXT Tribot service and the Dashboard service at the same time is an example of orchestration. This can be done by creating an appropriate manifest file. Manifests were discussed in earlier chapters, but a brief explanation is given here again because it is good to know how things work “under the hood.”
616

www.it-ebooks.info
Chapter 14: Remotely Controlling a Mobile Robot
A manifest is an XML file that contains a list of services to run and the relationships between the services (partners). All services should have a manifest. If you look in the MRDS directory under samples\ Config you will find dozens of manifests supplied by Microsoft. You will also see a lot of config files, which are discussed later.
Manifests are read by the Manifest Loader service when you start a DSS node. The basic structure of a manifest is as follows:
Service List Service Record
Contract Partner List
Partner
. . .
. . .
For more information, refer to Service Manifests in the MRDS documentation.
Setting Up a Manifest
To set up a new manifest, follow these steps:
1.
2.
3.
Make sure that you have a folder for it. Assuming that you have installed the ProMRDS samples from the book’s website, there should be a folder under Microsoft Robotics Studio (1.5) called ProMRDS\Config.
Take a copy of the manifest file called ProMRDS\Config\LEGO.NXT.TriBot.manifest.xml and name it MyTribot.manifest.xml.
Open the manifest in Notepad. (You can edit a manifest in Visual Studio, but it is a plain-text file so you can just use Notepad). It should look like the following. Note that whitespace in an XML file is ignored, so the layout of the following code has been rearranged slightly to fit on the page:
<?xml version=”1.0”?> <!--
//This file is part of the Microsoft Robotics Studio Code Samples.
//Copyright (C) Microsoft Corporation. All rights reserved.
//
// $File: LEGO.NXT.TriBot.manifest.xml $ $Revision: 11 $ -->
<Manifest xmlns:legonxt=”http://schemas.microsoft.com/robotics/2006/05/legonxt.html” xmlns:bumper=”http://schemas.microsoft.com/2006/06/lego.nxt.bumper.html” xmlns:legonxtdrive=”http://schemas.microsoft.com/robotics/2006/10/legonxtdrive. html”
html”
xmlns:this=”urn:uuid:e7401b21-b3c2-4a80-bb72-29204083cf87” xmlns:dssp=”http://schemas.microsoft.com/xw/2004/10/dssp.html” xmlns=”http://schemas.microsoft.com/xw/2004/10/manifest.html”>
The first part of the manifest specifies the different contracts that will be used and gives them short names, like legonxtdrive, for ease of reference later in the manifest.
617

www.it-ebooks.info
Part IV: Robotics Hardware
Next in the manifest is the service list. The first service in the list is the Brick service, which is the basic LEGO NXT. It partners with a DSSP State service and specifies a configuration file (called lego.nxt
.brick.config.xml) that is loaded when the service starts. This config file is assumed to be in the same folder as the manifest because no path is specified. If it doesn’t exist, the service creates it the first time the manifest is run:
<CreateServiceList> <ServiceRecordType>
<dssp:Contract>http://schemas.microsoft.com/robotics/2006/05/legonxt.html </dssp:Contract>
<dssp:PartnerList> <dssp:Partner>
<dssp:Contract>http://schemas.microsoft.com/robotics/2006/05/legonxt.html </dssp:Contract>
<dssp:Service>lego.nxt.brick.config.xml</dssp:Service> <dssp:PartnerList /> <dssp:Name>dssp:StateService</dssp:Name>
</dssp:Partner> </dssp:PartnerList> <Name>this:Brick</Name>
</ServiceRecordType>
The drive service has to partner with the brick. Note that the LEGO NXT drive implements the generic Differential Drive contract so that it can be controlled by services that know nothing about the specifics of the LEGO NXT, such as the Dashboard:
<ServiceRecordType> <dssp:Contract>http://schemas.microsoft.com/robotics/2006/10/legonxtdrive.html </dssp:Contract>
<dssp:PartnerList> <dssp:Partner>
<dssp:Contract>http://schemas.microsoft.com/robotics/2006/10/legonxtdrive.html </dssp:Contract>
<dssp:Service>lego.nxt.tribot.drive.config.xml</dssp:Service> <dssp:PartnerList /> <dssp:Name>dssp:StateService</dssp:Name>
</dssp:Partner> <dssp:Partner>
<dssp:Contract>http://schemas.microsoft.com/robotics/2006/05/legonxt.html </dssp:Contract>
<dssp:PartnerList /> <dssp:Name>legonxtdrive:Nxt</dssp:Name> <dssp:ServiceName>this:Brick</dssp:ServiceName>
</dssp:Partner> </dssp:PartnerList> <Name>this:legonxtdrive</Name>
</ServiceRecordType>
Lastly, the bumper service is added to the manifest and the service list, and the manifest tags are closed. Notice that the bumper also partners with the brick:
<ServiceRecordType> <dssp:Contract>http://schemas.microsoft.com/2006/06/lego.nxt.bumper.html
618
www.it-ebooks.info
Chapter 14: Remotely Controlling a Mobile Robot
</dssp:Contract> <dssp:PartnerList> <dssp:Partner>
<dssp:Contract>http://schemas.microsoft.com/2006/06/lego.nxt.bumper.html </dssp:Contract> <dssp:Service>lego.nxt.tribot.bumper.config.xml</dssp:Service> <dssp:PartnerList />
<dssp:Name>dssp:StateService</dssp:Name> </dssp:Partner>
<dssp:Partner> <dssp:Contract>http://schemas.microsoft.com/robotics/2006/05/legonxt.html </dssp:Contract>
<dssp:PartnerList /> <dssp:Name>bumper:LegoNxt</dssp:Name> <dssp:ServiceName>this:Brick</dssp:ServiceName>
</dssp:Partner> </dssp:PartnerList> <Name>this:bumper</Name>
</ServiceRecordType>
</CreateServiceList> </Manifest>
Starting the Simple Dashboard
Go to the bottom of the manifest. Just before the closing tag </CreateServiceList> insert the following code to start the Simple Dashboard supplied by Microsoft:
<!-- Dashboard --> <ServiceRecordType>
<dssp:Contract>http://www.promrds.com/contracts/2007/01/ simpledashboard.html</dssp:Contract>
</ServiceRecordType> </CreateServiceList>
As you can see, this code adds a new ServiceRecordType to the manifest. The first line is a comment, and obviously it is not required for the code to work. The format for comments is the same as for HTML. This can be useful for temporarily removing part of a manifest, or if you want to store different options in a manifest, such as running your service with the simulator or a real robot.
If you want to use the Dashboard from the website for this book (www.proMRDS.com or www.wrox.com), then the contract is slightly different:
<dssp:Contract>http://www.promrds.com/contracts/2007/10/dashboard.html </dssp:Contract>
Notice that the name is dashboard.html and that the month and year are different. You must have installed the software from the book’s website in order to use this service. It might be necessary to recompile the service as well.
619
www.it-ebooks.info
Part IV: Robotics Hardware
Alternative Approach for Running the Dashboard
This example shows you how to add the Dashboard to a manifest. However, because the Dashboard establishes its partnerships dynamically at runtime, there is no need to put it in the manifest. In fact, it would be wrong to specify partnerships in the manifest.
You can therefore just use a separate Dashboard manifest on the command line in addition to the manifest for the robot that you want to control. Here is an example:
dsshost /p:50000 /t:50001 /m:”ProMRDS\Config\Tribot.manifest.xml”
 /m:”ProMRDS\Dashboard.manifest.xml”
Note that the preceding command must be typed all on one line.
An example that uses this approach is provided in the MRDS bin folder for the Boe-Bot. It is called BoeBot.cmd. See the discussion below on creating shortcuts to run your robots.
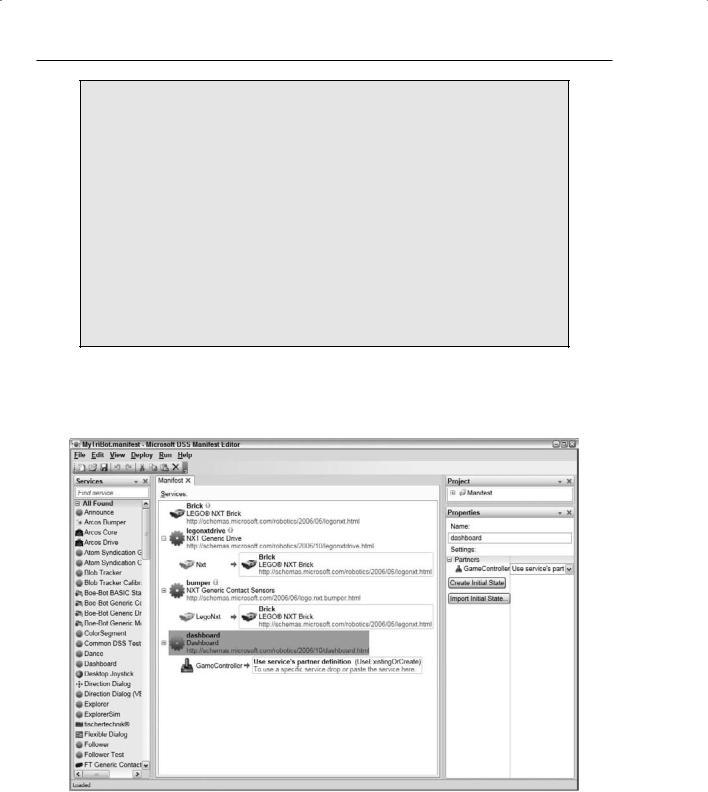
Save the manifest you have been editing and exit from Notepad. You can verify that the manifest is okay by loading it with the Manifest Editor. Select Microsoft DSS Manifest Editor from the Microsoft Robotics Studio (1.5) folder in the Start menu. Open the manifest that you have created. It should look like Figure 14-14.
Figure 14-14
620

www.it-ebooks.info
Chapter 14: Remotely Controlling a Mobile Robot
The Manifest Editor is the preferred way to create and edit manifests because it understands the format and syntax of manifests, and lists all of the available services. If you enter a string, such as LEGO, into the textbox at the top of the Services panel on the left-hand side, you can search for just the related services.
In the future, you might prefer to use the Manifest Editor. For example, you can try creating a manifest for the LEGO NXT V2 by using only V2 services. It should look very similar to Figure 14-12, but you will need to do some configuration. If you are not comfortable building your own manifests yet, there is a manifest already supplied as ProMRDS\Config\MyTribotV2.manifest.xml. This manifest includes all of the sensors for the robot shown in Figure 14-2 and the web browser in Figure 14-9.
If you are using a Boe-Bot, then you can start with the Parallax.BoeBot.manifest.xml and add the Dashboard to it by following the instructions given earlier. Call your new manifest whatever you like. If you are feeling lazy, just use the MyBoeBot.manifest.xml file already provided for you.
Running the Manifest
Now that you have created an appropriate manifest, you can use it in a dsshost command. However, typing long command lines to start up a DSS node is painful and prone to error, so you will probably want to create a batch command file that does it for you.
The following instructions are for the LEGO NXT. If you have a Boe-Bot, then you can read through the instructions and simply use the Boe-Bot version of the code that is supplied on the book’s website, or you can try to figure it out for yourself. There is a BoeBot.cmd batch file in the MRDS bin folder that corresponds to the RunLego.cmd file in the following paragraphs (which is also supplied if you don’t like typing). In the example that follows, the batch file is created in the top-level MRDS folder. However, the sample files in the bin folder are designed to run from there and are a little different.
Using Notepad, create a new file called RunLego.cmd and place it into the top-level MRDS folder. It should contain the following commands:
@ECHO ON
REM Run a Lego NXT Tribot
REM Type Ctrl-C in this window when you want to stop the program.
dsshost -port:50000 -tcpport:50001 -manifest:”ProMRDS/Config/MyTribot.manifest.xml”
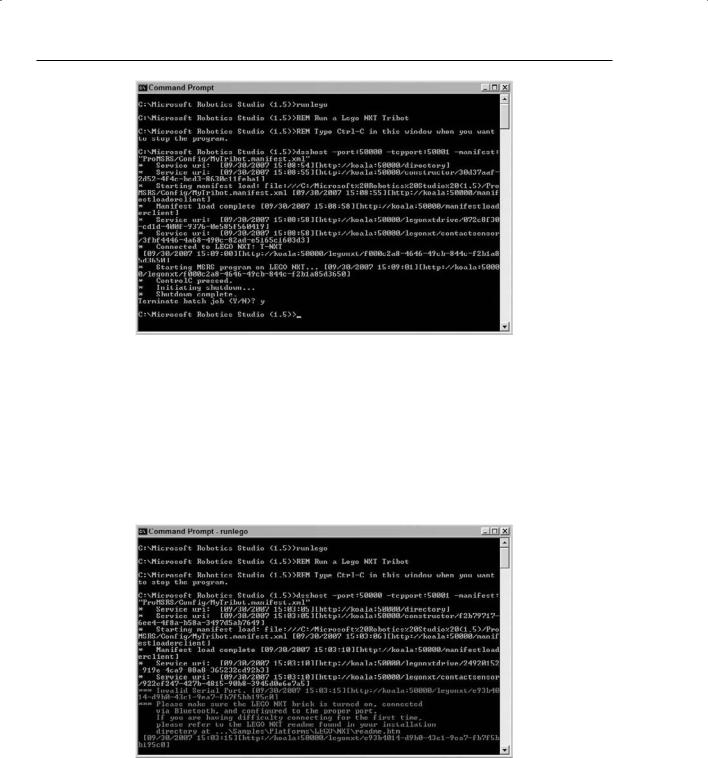
Now open an MRDS Command Prompt window and run the command procedure by typing RunLego. Figure 14-15 shows what the command window should look like. (This figure shows a complete test run. Note that when you press Ctrl+C to cancel the program, a prompt asks whether you want to terminate the batch job. You should enter y, but don’t do this right now!)
621
www.it-ebooks.info
Part IV: Robotics Hardware
Figure 14-15
If you want to use the LEGO NXT V2 services, then you can use TribotV2.manifest.xml, which is provided for you.
If the NXT is turned off, or MRDS cannot establish a connection, you will see a red error message in the Command Prompt window. Figure 14-16 shows an example of this error message (without the color, of course). In this case, the LEGO NXT Brick service web page is also displayed. This is a roundabout way to do it, but it’s one way to change the configuration of your NXT.
Figure 14-16
622