

Задани на лабораторные работы. ПРК / Professional Microsoft Robotics Developer Studio
.pdfwww.it-ebooks.info
Chapter 3: Decentralized Software Services (DSS)
ProMRDS folder, which makes it much easier to pick up and move elsewhere. Furthermore, there is no chance of a conflict if you update your MRDS installation, such as with the MRDS V1.5 Refresh.
If you have not done so already, create a new folder called Projects. In Windows Explorer, browse to the Microsoft Robotics Studio (1.5) folder and make a new folder under it called Projects.
Alternatively, open an MRDS Command Prompt window by running the Command Prompt option from the Microsoft Robotics Studio (1.5) folder in the Start menu. Create a new folder called Projects:
C:\Microsoft Robotics Studio (1.5)>md Projects
This is where you should create your own MRDS projects.
Using Visual Studio
The previous chapter explained how to create a new service using Visual Studio. Now you need to create another service. The New Project dialog is shown in Figure 3-17.
Figure 3-17
To summarize the steps involved:
1.
2.
3.
4.
Open Visual Studio and select File  New
New  Project.
Select the Robotics project type and the Simple Dss Service (1.5) template.
Make sure that the location is your Projects folder.
Give the service the name ServiceA.
113

www.it-ebooks.info
Part I: Robotics Developer Studio Fundamentals
When Visual Studio has finished creating your project, you will find the following source files listed in the Solution Explorer panel:
AssemblyInfo.cs: This is a standard file that contains information about the output assembly (DLL). You do not need to be concerned with it here, so you can ignore it.
ServiceA.cs: This is the main source file for the new service. Most of the work of creating a new service is done in this file.
ServiceA.manifest.xml: This is the manifest that is used by DSS to load the service.
ServiceATypes.cs: This contains a set of classes, also called types, that are used by the service and other services that wish to communicate with it.
(There are several more files that Visual Studio uses to manage the solution: ServiceA.csproj,
ServiceA.csproj.user, ServiceA.sln and ServiceA.suo. You can ignore them; they don’t show up in the Solution Explorer anyway.)
The source files are explained in more detail later in this chapter. In the meantime, it is instructive to look at the Visual Studio Project Properties.
Open the Project Properties and step through each of the tabs to look at the settings. The important points on each of the tabs are highlighted here:
Application tab: The application type is Class Library (DLL). All MRDS services are dynamic link libraries (DLLs). Notice that the Assembly name is ServiceA.Yyyyy.Mmm, where yyyy is the current year and mm is the current month. Using the date is a simple way to create different versions of a service with the same name. Recall from earlier in the chapter that contract identifiers also contain a year and a month. The assembly name and the contract identifier should match. (It is possible to have a different assembly name, but that can become a source of confusion!)
The default namespace is Robotics.ServiceA. There is no need to change this unless you want to create assemblies for a particular organization.
Build tab: The output path should be ..\..\bin. All MRDS services are placed into the bin folder under the MRDS root directory.
Build Events tab: There is a post-build event command that is only executed after successful compilation:
“C:\Microsoft Robotics Studio (1.5)\bin\dssproxy.exe” /dll:”$(TargetPath)” /proxyprojectpath:”$(ProjectDir)Proxy “
 /keyfile:”$(AssemblyOriginatorKeyFile)” $(ProxyDelaySign)
 $(CompactFrameworkProxyGen) /binpath:”. “
 /referencepath:”C:\Microsoft Robotics Studio (1.5)\bin\ “
 /referencepath:”C:\Microsoft Robotics Studio (1.5)\bin\ “
You do not need to know what this command does for now, and you certainly should not change it. Its purpose is to create a proxy for your service. If you are familiar with web services and SOAP requests, then you know what a proxy is. Otherwise, it is explained later in the section “Proxy Assemblies.”
Debug tab: When you run the debugger, it automatically starts an external program: C:\ Microsoft Robotics Studio (1.5)\bin\dsshost.exe.
114

www.it-ebooks.info
Chapter 3: Decentralized Software Services (DSS)
DssHost.exe runs a DSS node, which is effectively the MRDS runtime environment. Your service(s) run within this node. Although it is possible to start a DSS node from within your own application program, it isn’t done that way for the examples in this book.
Notice that the working directory is the MRDS root directory and some command-line options are passed to DssHost:
-port:50000 -tcpport:50001
-manifest:”C:\Microsoft Robotics Studio (1.5)\projects \ServiceA\ServiceA.manifest.xml”
Reference Paths tab: There should be two directories in the list of reference paths. The first directory is where all of the service DLLs reside, as well as the components that make up MRDS. This enables you to easily reference other services. The second directory is the V2.0 .NET Framework, which is required to run MRDS V1.5.
c:\microsoft robotics studio (1.5)\bin c:\windows\microsoft.net\framework\v2.0.50727
You can ignore the Resources, Settings, and Signing tabs because they are not important at this stage. For now, just leave Visual Studio open while you create another service from the command line as an alternative to using Visual Studio. We want two services so that they can interact with each other.
Using the DssNewService Tool
Open an MRDS Command Prompt window from the MRDS menu by clicking Start  All Programs
  Microsoft Robotics Studio (1.5). Note that you cannot use a normal MS-DOS command prompt because the MRDS Command Prompt window defines a lot of environment variables and paths to help you run MRDS commands. In addition, the MRDS command prompt automatically places you into the root directory of MRDS when it starts up.
To use the DSSNewService tool, follow these steps (what you should type appears in bold text):
1. You should already have a folder called Projects. Change to this folder:
C:\Microsoft Robotics Studio (1.5)>cd Projects
2. Execute DssNewService to create a service for you:
C:\Microsoft Robotics Studio (1.5)>DssNewService /service:ServiceB
The only command-line parameter you need to provide is the service name. Note carefully that it is ServiceB. This is going to be the partner to ServiceA, which you created earlier.
3. Once the service has been created, which only takes a couple of seconds, you can open it in Visual Studio. Either locate the .sln file in Windows Explorer and double-click it, or at the command prompt enter the following:
C:\Microsoft Robotics Studio (1.5)>cd ServiceB
C:\Microsoft Robotics Studio (1.5)>ServiceB.sln
115

www.it-ebooks.info
Part I: Robotics Developer Studio Fundamentals
4. Look around in ServiceB. It is basically the same as ServiceA. The only slight difference you might find is that it has an additional reference path:
c:\microsoft robotics studio (1.5)\bin\cf
This is for the .NET Compact Framework, which is not relevant here, but is covered in Chapter 16.
The DssNewService tool has several command-line qualifiers. You can read about them in the online help or enter the following command:
C:\Microsoft Robotics Studio (1.5)>DssNewService /?
We will not cover all of the options here, but a few of them are worth mentioning:
You can explicitly set the URI prefix that is used in the contract identifier with /org. The default is schemas.tempuri.org.
The /month and /year qualifiers affect the contract identifier and the assembly name. They default to the current month and year.
You can specify the service namespace using /namespace. This might be important if you are producing code for a particular organization. You might want to coordinate this with the /org qualifier.
The /clone qualifier enables you to copy an existing service. It does this using reflection, not by copying the source files. Therefore, when DssNewService has finished building your solution, all of the methods exist but there is no code. You can, of course, copy and paste the code yourself.
As you become more familiar with MRDS, you will want to create new services that implement generic contracts. The /alt qualifier specifies an alternate service, i.e., the generic contract, that you wish to implement in addition to your own set of operations. This is covered in the next chapter. Note that if you specify /alt, you also need to supply an /i qualifier.
Examining the Service Source Files
This section examines the various files that are generated when you create a new service. The source code for a new service is split into two files: the main code and the “types.” You are not limited to using only these two files — you can split the code up any way you like. In fact, in the early days of MRDS, it was common to also have a “state” file that contained only the definition of the service state. This is now rolled into the types file, but you can still see many state files in the samples supplied with MRDS.
The Types File
Begin by opening ServiceATypes.cs in Visual Studio. At the very top of the file you can see the contract for ServiceA:
namespace Robotics.ServiceA
{
///<summary>
///ServiceA Contract class
///</summary>
116

www.it-ebooks.info
Chapter 3: Decentralized Software Services (DSS)
public sealed class Contract
{
///<summary>
///The Dss Service contract
///</summary>
public const String Identifier =  “http://schemas.tempuri.org/2008/01/servicea.html”;
}
The namespace is based on the service name. The Contract class is a mandatory part of the contract, and it must contain a string called Identifier. (Your contract identifier will be different unless you explicitly specified /year:2008 and /month:01 when you created the service, which is unlikely.)
Next is the service state. All services have a state class, but at this stage it is empty. Adding fields to the service state is one of the standard steps in creating a new service:
///<summary>
///The ServiceA State
///</summary> [DataContract()]
public class ServiceAState
{
}
Notice that the service state has the [DataContract] attribute applied to it. This is necessary so that the class will be copied across to the Proxy DLL when the code is compiled.
The next piece of code is the main operations port, which is a PortSet:
///<summary>
///ServiceA Main Operations Port
///</summary>
[ServicePort()]
public class ServiceAOperations : PortSet<DsspDefaultLookup, DsspDefaultDrop, Get>
{
}
A service’s main operations port must have the [ServicePort] attribute. Note that even though it is called a port, it is really a PortSet that lists all of the operations supported by the service.
The default PortSet when you create a new service only contains DsspDefaultLookup,
DsspDefaultDrop, and Get operations.
For an orchestration service, such as ServiceA, there is no need to add any operations because no other service will call ServiceA — it is the “master.” However, ServiceB needs some additional operations (as explained later in the section “Update”) because ServiceA needs to call ServiceB to perform certain functions.
117

www.it-ebooks.info
Part I: Robotics Developer Studio Fundamentals
The final section of the types file contains the definitions for the operation request types. In this case, there is only one for Get:
///<summary>
///ServiceA Get Operation
///</summary>
public class Get : Get<GetRequestType, PortSet<ServiceAState, Fault>>
{
///<summary>
///ServiceA Get Operation
///</summary>
public Get()
{
}
///<summary>
///ServiceA Get Operation
///</summary>
public Get(Microsoft.Dss.ServiceModel.Dssp.GetRequestType body) : base(body)
{
}
///<summary>
///ServiceA Get Operation
///</summary>
public Get(Microsoft.Dss.ServiceModel.Dssp.GetRequestType body,  Microsoft.Ccr.Core.PortSet<ServiceAState,W3C.Soap.Fault> responsePort) :
base(body, responsePort)
{
}
}
There are no definitions for DsspDefaultLookup and DsspDefaultDrop because these operations are implicitly handled by the DsspServiceBase class. You can override these operations if you wish; and you will do this for ServiceB, but in general it is not necessary — you can let the base class handle them for you.
Notice that Get uses two generic types (one for the request message type and the other for the response message or messages): GetRequestType and PortSet<ServiceAState, Fault>.
GetRequestType is known as the body of the message. In this case, it is a class that is already defined in the DSS service model. You can also define your own classes to use in messages, so you can determine exactly what the content of messages will be.
Get operations are service-specific because they return the state for the particular service. Therefore, every service needs to subclass Microsoft.Dss.ServiceModel.Dssp.Get and supply an appropriate PortSet for the response. Notice that in this case the PortSet contains ServiceAState.
118

www.it-ebooks.info
Chapter 3: Decentralized Software Services (DSS)
The PortSet indicates that there are two possible responses to this message: ServiceAState or Fault. Obviously, the purpose of Get is to return ServiceAState. Because DSSP is based on SOAP, it uses the standard mechanism already defined by SOAP to return errors. If you look at the top of the file, you will see that the SOAP namespace is referenced because this is where Fault comes from:
using W3C.Soap;
Main Service Implementation File
Now open the main code file for ServiceA, ServiceA.cs. It contains the service initialization and the service operations (or behaviors). Scroll down below the using statements:
namespace Robotics.ServiceA
{
///<summary>
///Implementation class for ServiceA
///</summary> [DisplayName(“ServiceA”)] [Description(“The ServiceA Service”)] [Contract(Contract.Identifier)]
public class ServiceAService : DsspServiceBase
{
The namespace matches ServiceATypes.cs as you would expect. You can change the [DisplayName] and [Description] attributes as you see fit because they are only for documentation. The contract is specified using Contract.Identifier, which is in the ServiceATypes.cs file (as you saw earlier). The new service class is a subclass of DsspServiceBase. This gives you access to a whole host of helper functions.
Every service must have an instance of its service state, even if the state is empty, and a main operations port:
///<summary>
///_state
///</summary>
private ServiceAState _state = new ServiceAState();
///<summary>
///_main Port
///</summary>
[ServicePort(“/servicea”, AllowMultipleInstances=false)] private ServiceAOperations _mainPort = new ServiceAOperations();
By convention, the service state is called _state, but you can call it anything you like. In addition, an operations port called _mainPort is created for sending messages to ServiceA. It might seem strange to send messages to yourself, but in larger services this is quite common. Again, you can use any name you like for the main port, but it is best to stick with convention.
119

www.it-ebooks.info
Part I: Robotics Developer Studio Fundamentals
Finally, there is the constructor for the class, which is always empty:
///<summary>
///Default Service Constructor
///</summary>
public ServiceAService(DsspServiceCreationPort creationPort) : base(creationPort)
{
}
Next is the Start method. All services have a Start method. It is called during service creation so that the service can initialize itself:
///<summary>
///Service Start
///</summary>
protected override void Start()
{
base.Start();
// Add service specific initialization here.
}
A call to base.Start is inserted here automatically. This is explained further in the section “Service Initialization” later in the chapter. You should not remove it.
Lastly, there is a handler for the Get operation:
///<summary>
///Get Handler
///</summary>
///<param name=”get”></param>
///<returns></returns> [ServiceHandler(ServiceHandlerBehavior.Concurrent)] public virtual IEnumerator<ITask> GetHandler(Get get)
{
get.ResponsePort.Post(_state); yield break;
}
This handler is very simple. All it does is return a copy of the service state. It is annotated with the [ServiceHandler]attribute, which specifies that it belongs to the Concurrent group.
Notice that there are no handlers for DsspDefaultLookup and DsspDefaultDrop because these are defined in the base class and there is no need to override them. In fact, you might even wonder why there is code here for Get. The short answer is that it is one of the handlers that is commonly modified.
120
www.it-ebooks.info
Chapter 3: Decentralized Software Services (DSS)
The Service Manifest
The last source file to look at (we will ignore AssemblyInfo.cs for now) is the manifest. Open
ServiceA.manifest.xml in Visual Studio:
<?xml version=”1.0” ?> <Manifest
xmlns=”http://schemas.microsoft.com/xw/2004/10/manifest.html”
xmlns:dssp=”http://schemas.microsoft.com/xw/2004/10/dssp.html”
>
<CreateServiceList>
<ServiceRecordType>
<dssp:Contract>http://schemas.tempuri.org/2008/01/servicea.html</dssp:Contract>
</ServiceRecordType>
</CreateServiceList>
</Manifest>
When you run the debugger, this manifest is passed to DssHost. The manifest describes the services to be started and any partnerships. The preceding one only has a single ServiceRecord with the ServiceA contract identifier. Manifests are discussed in detail later in the chapter in the section “Modifying Manifests.”
Compiling and Running Services
In general, before you compile a service, you need to add references for the other services it uses and write some code to implement the service operations. However, in this case, you have a “chicken or the egg” situation because ServiceA relies on ServiceB, so you will start by compiling both services.
Compiling a Service
You don’t need to do anything special to compile a service — just select Build Solution from the Build menu. If it is not open already, open ServiceA in Visual Studio. Locate the Start method in ServiceA
.cs and add a line of code to announce the startup of the service, as shown here:
protected override void Start()
{
base.Start();
// Add service specific initialization here.
Console.WriteLine(“ServiceA starting”);
Now compile ServiceA. It should compile without errors. You can run it if you want, but it just displays a message indicating that it is starting, which is not very exciting.
Open ServiceB in Visual Studio and add a Console.WriteLine command in ServiceB.cs, except obviously the message should say “ServiceB starting.”
When you compile, you might notice in the Output panel that some other DLLs are created as well. These are the Proxy DLLs discussed later in the section “Proxy Assemblies.”
121
www.it-ebooks.info
Part I: Robotics Developer Studio Fundamentals
Setting Up References
In Visual Studio for ServiceA, expand the References in the Solution Explorer panel. References are inserted automatically for Ccr.Core, DssBase, and DssRuntime when the service is created. In almost all services, you will also require RoboticsCommon.Proxy. You can add this reference to your services if you want, but because they do not involve a real robot, it is not necessary.
You also need to add references to other services that you intend to use. In the example in this chapter, ServiceA partners with ServiceB, so ServiceA must have a reference to the ServiceB proxy. (See “Proxy Assemblies,” later in the chapter). This is why you compiled both of the services in the previous section.
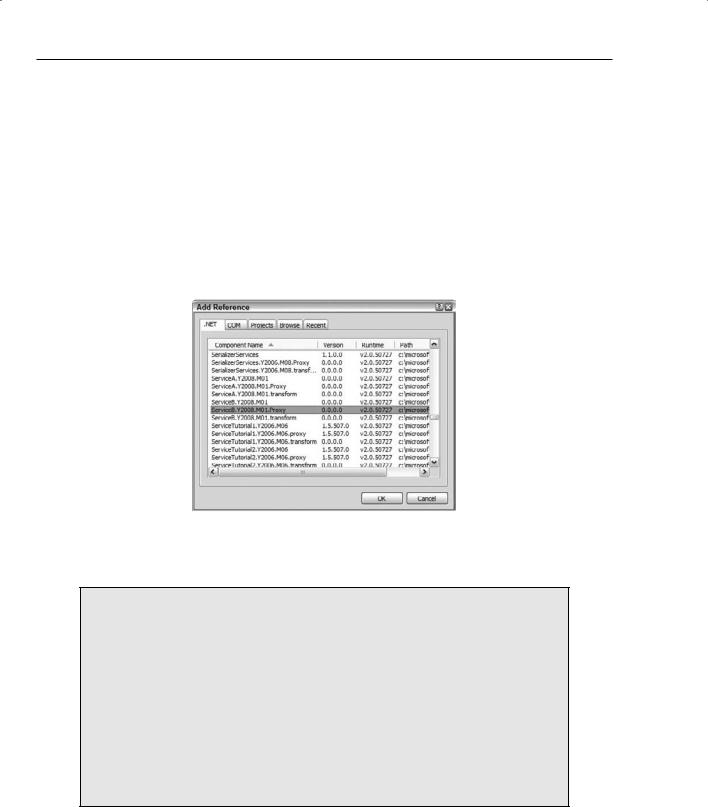
When you add a reference, it might take a little while before the dialog is displayed. Eventually you should see a list of DLLs. Scroll down to ServiceB, as shown in Figure 3-18. Make sure you select the Proxy assembly. (The year and month in the assembly name will be different for you.)
Figure 3-18
Note that ServiceB does not need a reference to ServiceA because it never calls ServiceA — it only responds to requests from ServiceA.
Service Assemblies
If you were writing a service to control a real robot, you would have to find the relevant proxies and add them to your service at this point. For example, to drive
a Boe-Bot you need references to BASICStamp2.Y2007.M06.Proxy and BSServices
.Y2007.M06.Proxy.
The examples in this chapter use two services, each of which is in a separate project. However, there is no requirement to build every service into a separate assembly. In fact, you can combine many services into one assembly as long as each service has its own namespace and follows all the rules for service contracts.
In the case of BSServices, the project contains several different source code files. Each one of these is a separate service, but they are all combined into a single DLL. Perhaps the best example is RoboticsCommon, which combines a large number of services.
122