

Introduction to the Junos Operating System
Part 1: Configuring User Authentication
In this lab part, your team will configure user accounts and related authentication options.
Step 1.1
Ensure that you know to which student device you have been assigned. Check with your instructor if you are not certain. Consult the management network diagram to determine the management address of your student device
Question: What is the management address assigned to your station?
Step 1.2
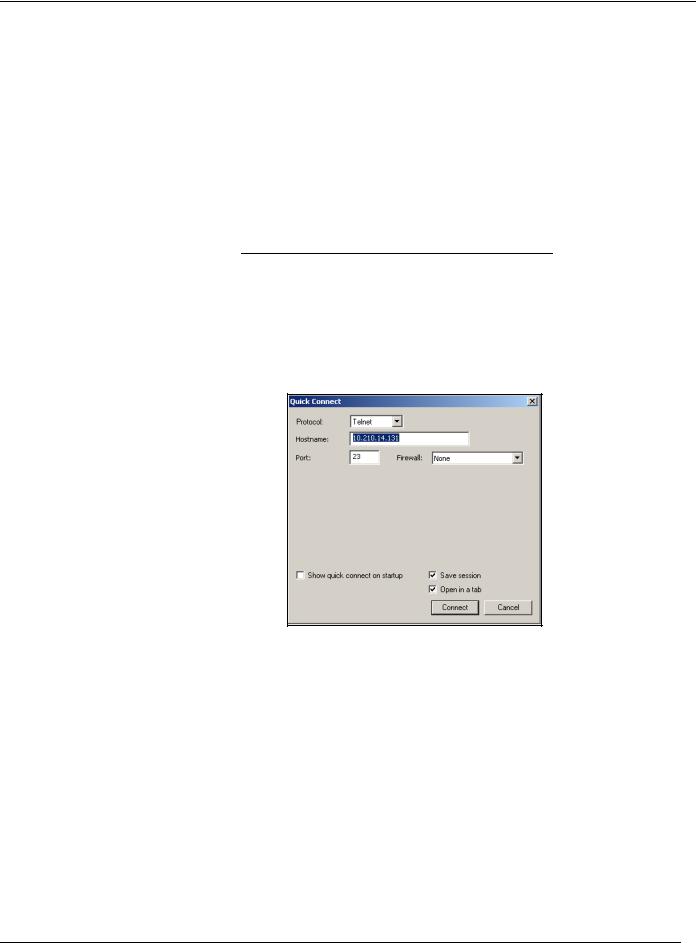
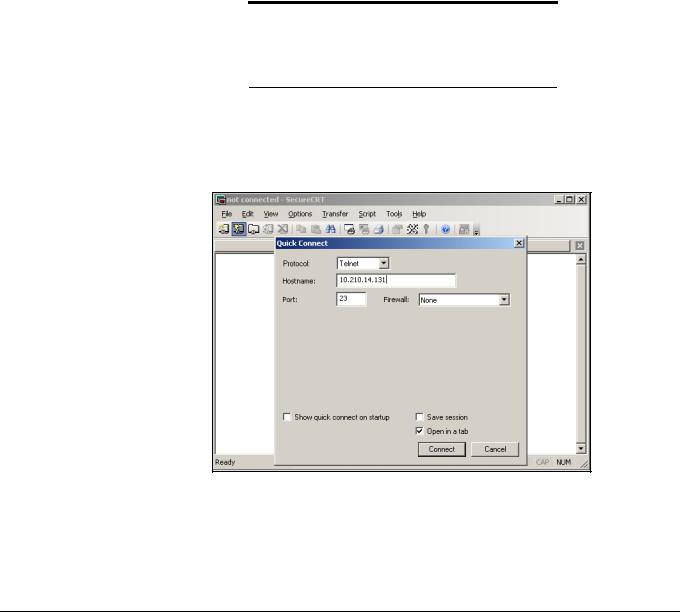
Access the CLI at your station using either the console, Telnet, or SSH as directed by your instructor. Refer to the management network diagram for the IP address associated with your team’s station. The following example uses a simple Telnet access to srxA-1 with the Secure CRT program as a basis:
Step 1.3
Log in to the student device with the username lab using a password of lab123. Note that both the name and password are case-sensitive. Enter configuration mode and load the reset configuration file using the load override /var/home/ lab/ijos/lab3-start.config command. After the configuration has been loaded, commit the changes.
Step 1.4
Navigate to [edit system login] and define a custom login class named juniper with the following permissions:
•view
•view-configuration
•reset
Lab 3–2 • Secondary System Configuration |
www.juniper.net |
Introduction to the Junos Operating System
Step 1.5
Next, define two new user accounts using the information from the following table:
Username |
Class |
Plain-Text Password |
|
|
|
|
|
|
walter |
juniper |
walter123 |
|
|
|
nancy |
read-only |
nancy123 |
|
|
|
Step 1.6
View the configuration under the [edit system login] hierarchy level. If you are satisfied with the results, activate your new configuration by issuing the commit command.
Note
The remainder of this lab part tests user login options. To prevent yourself from being locked out, keep the current console session open!
Step 1.7
Open another terminal window and use Telnet to access your system’s management IP address. If needed, refer to the management network diagram. Log in with the username walter.
Step 1.8
Using the new terminal session, try to enter configuration mode.
www.juniper.net |
Secondary System Configuration • Lab 3–3 |

Introduction to the Junos Operating System
Question: How does the CLI respond when you try to enter configuration mode?
Step 1.9
Enter a question mark (?) at the prompt to view the permitted operational mode command options for the user walter.
Question: Why is the user walter unable to enter configuration mode?
Step 1.10
Verify that the user walter can view the configuration and other operational outputs such as interface information.
Question: Can the user walter view the root password within the configuration? Why?
Step 1.11
Restart the routing process using the restart routing command. This command restarts the routing protocol daemon (rpd), which can be useful when troubleshooting routing problems.
Question: Which permission allows the user walter to perform this command?
Step 1.12
Log out from the user walter and initiate a new Telnet session to the management interface for the user nancy. (Hint: Use the reconnect option on your terminal client.) Attempt to restart the routing protocol process using the restart routing command.
Question: Can nancy successfully issue the restart command?
Lab 3–4 • Secondary System Configuration |
www.juniper.net |

Introduction to the Junos Operating System
Question: What is a quick way to view the top-level operational mode commands available to nancy?
Question: Can the user nancy view the configuration?
Step 1.13
Attempt to clear interface statistics for the ge-0/0/0 interface using the clear interfaces statistics ge-0/0/0 command.
Question: Which permission option would allow the user nancy to clear the interface statistics on the ge-0/0/0 interface?
Step 1.14
Return to the original session opened to the lab user.
From the session opened to the lab user attempt to add the clear permission to the default read-only login class. Issue the show command to view the system login hierarchy.
Question: What happened when you added the clear permission to the read-only login class?
Question: How can you add the clear permission for the user nancy?
Step 1.15
Navigate to the top of the configuration hierarchy and configure a RADIUS server for use with user authentication. Refer to your management network diagram for the server address. The RADIUS secret should be Juniper. Configure the authentication order so that user login attempts use only local password authentication if the RADIUS server is unreachable. Use commit to activate the changes.
www.juniper.net |
Secondary System Configuration • Lab 3–5 |