

Introduction to the Junos Operating System
The Junos CLI: Operational Mode
The slide highlights the topic we discuss next.
Chapter 3–16 • User Interface Options |
www.juniper.net |
Introduction to the Junos Operating System
Operational Mode
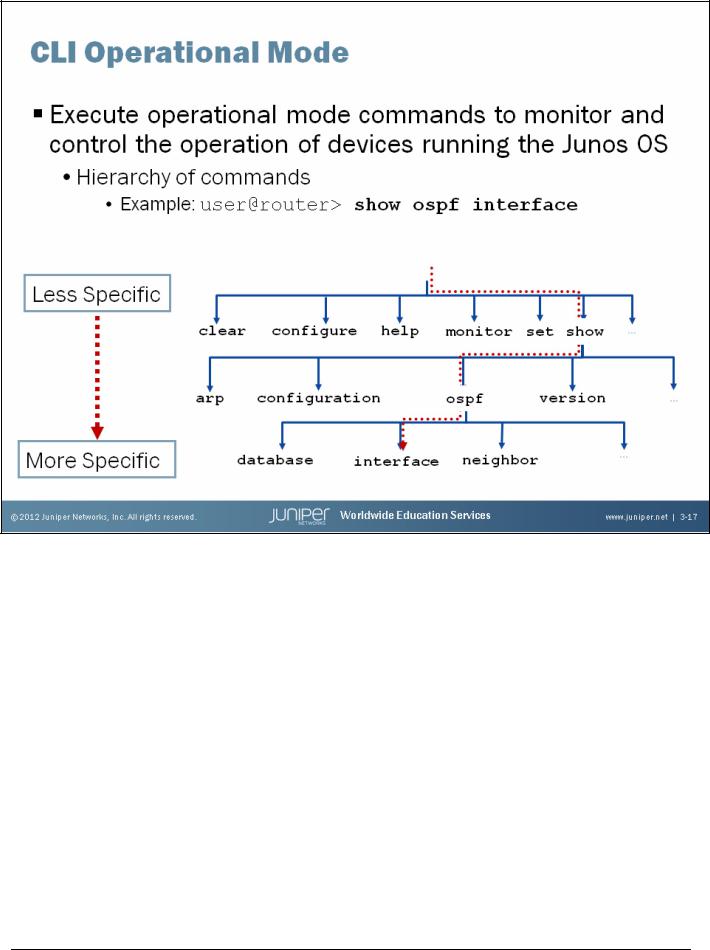
You use operational mode CLI commands to monitor and control the operation of a device running the Junos OS. The operational mode commands exist in a hierarchical structure, as shown on the slide. For example, the show command displays various types of information about the system and its environment. One of the possible options for the show command is ospf, which displays information about the Open Shortest Path First (OSPF) protocol. Specifying the interface option, as in the show ospf interface command, outputs information on OSPF interfaces.
The Junos OS also adds additional flexibility through the run command, which allows you to issue operational mode commands while in configuration mode. We cover the run command in detail later in this chapter.
www.juniper.net |
User Interface Options • Chapter 3–17 |
Introduction to the Junos Operating System
An example for the use of the set command would be setting the time on the device.
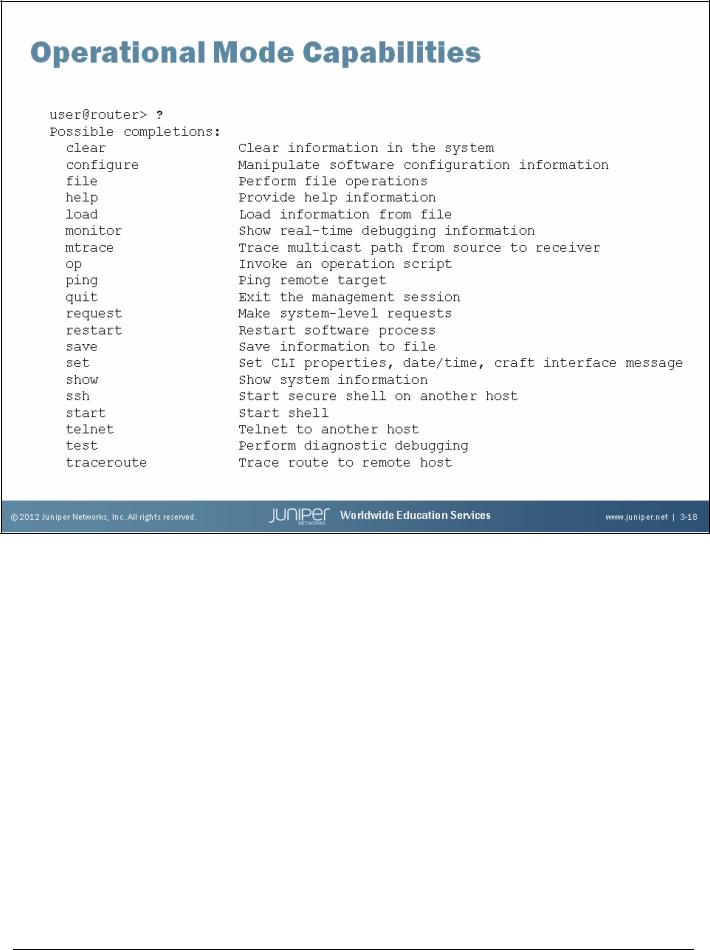
Operational Mode Capabilities
Key operational mode capabilities include the following:
•Entering configuration mode;
•Controlling the CLI environment;
•Exiting the CLI;
•Monitoring and troubleshooting:
–clear
–monitor
–mtrace
–ping
–show
–test
–traceroute;
•Connecting to other network systems;
•Copying files;
•Restarting software processes; and
•Performing system-level operations.
Chapter 3–18 • User Interface Options |
www.juniper.net |

Introduction to the Junos Operating System
The Junos CLI: Configuration Mode
The slide highlights the topic we discuss next.
www.juniper.net |
User Interface Options • Chapter 3–19 |
Introduction to the Junos Operating System
Batch Configuration Changes
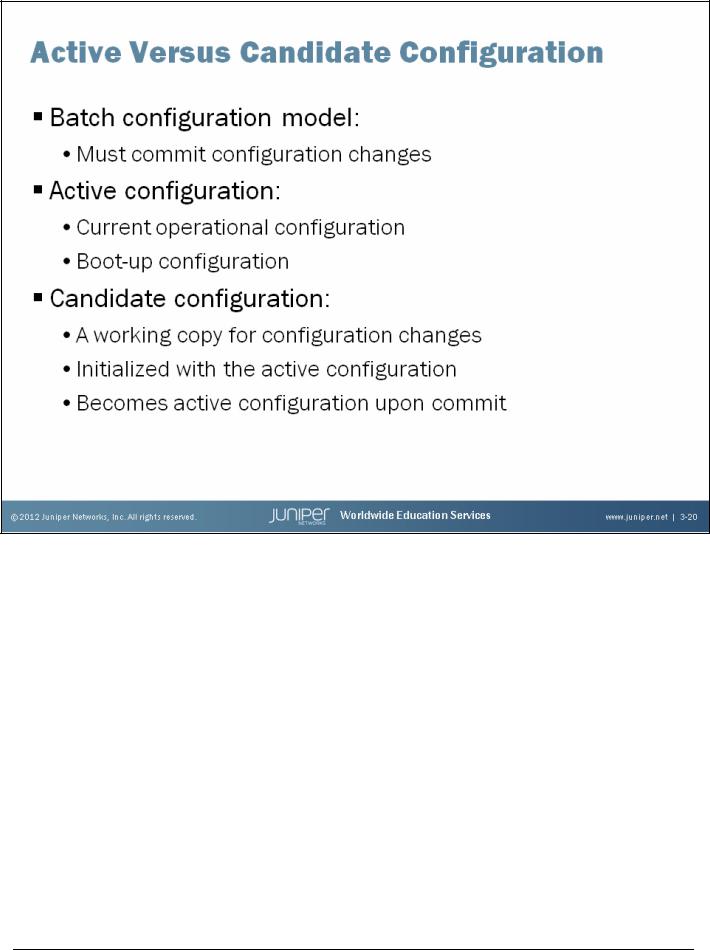
Unlike software from other vendors, configuration changes made in the Junos OS do not take effect immediately. This design feature allows you to group together and apply multiple configuration changes to the running configuration as a single unit.
Active Configuration
The active configuration is the configuration currently operational on the system and is the configuration the system loads during the boot sequence. This concept is analogous to both the running configuration and startup configuration in software from other vendors.
We cover the commit operation in detail later in this section. We strongly suggest that you do not spend much time on the commit operation at this time.
Candidate Configuration
The candidate configuration is a temporary configuration that might possibly become the active configuration. When you configure a device running the Junos OS, the software creates a candidate configuration and initially populates it with the active configuration running on that device. You then modify the candidate configuration. Once satisfied with your modifications, you can commit the changes. This action causes the candidate configuration to become the active configuration.
Chapter 3–20 • User Interface Options |
www.juniper.net |
Introduction to the Junos Operating System
This slide serves as an overview for several concepts that we cover on subsequent slides in this section.
The Life of a Configuration File: An Overview
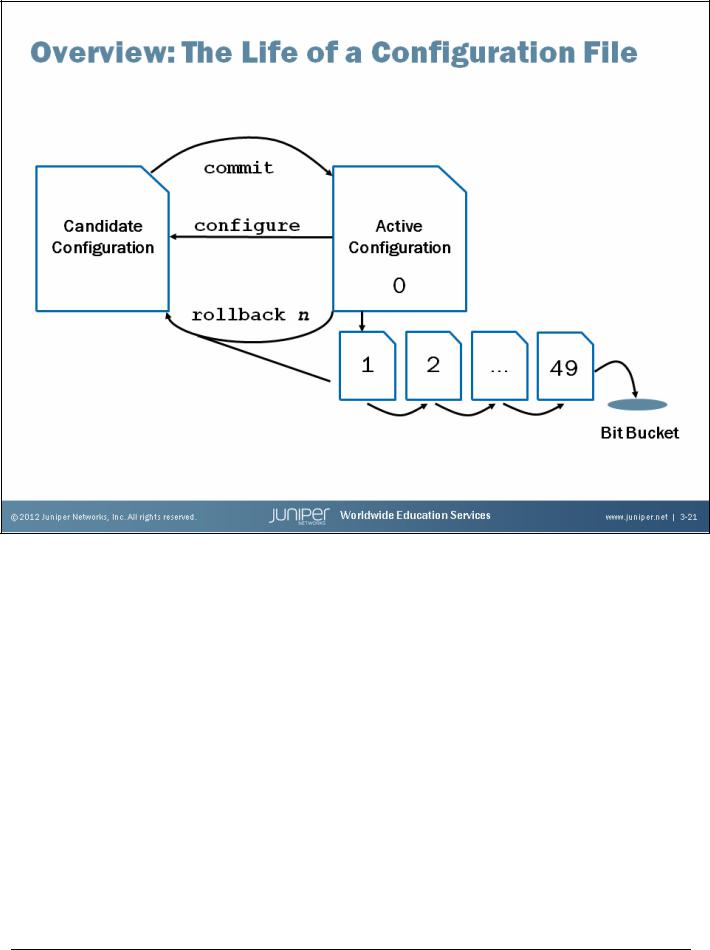
The configure command causes a candidate configuration to be created and populated with the contents of the active configuration. You can then modify the candidate configuration with your changes.
To have a candidate configuration take effect, you must commit the changes. At this time, the Junos OS checks the candidate configuration for proper syntax and it installs it as the active configuration. If the syntax is not correct, an error message indicates the location of the error, and the software does not activate any part of the configuration. You must correct the errors before recommitting the configuration.
You can easily recover previous configurations by using a rollback n command. The Junos OS maintains a configuration history by storing previously active configurations. The software saves a maximum of 50 configurations. This number includes the current active configuration, which is also known as rollback 0, and up to 49 previously active configurations. If you perform a rollback operation, keep in mind that the related configuration does not become active until you issue a commit. When you issue a commit and 50 rollback configurations exist, the software purges the last rollback configuration—rollback 49.
We cover these details more thoroughly on the following pages.
www.juniper.net |
User Interface Options • Chapter 3–21 |
Introduction to the Junos Operating System
You can also enter configuration mode using the hidden edit command. The exclusive and private options also work with the edit command.
Starting Configuration Mode
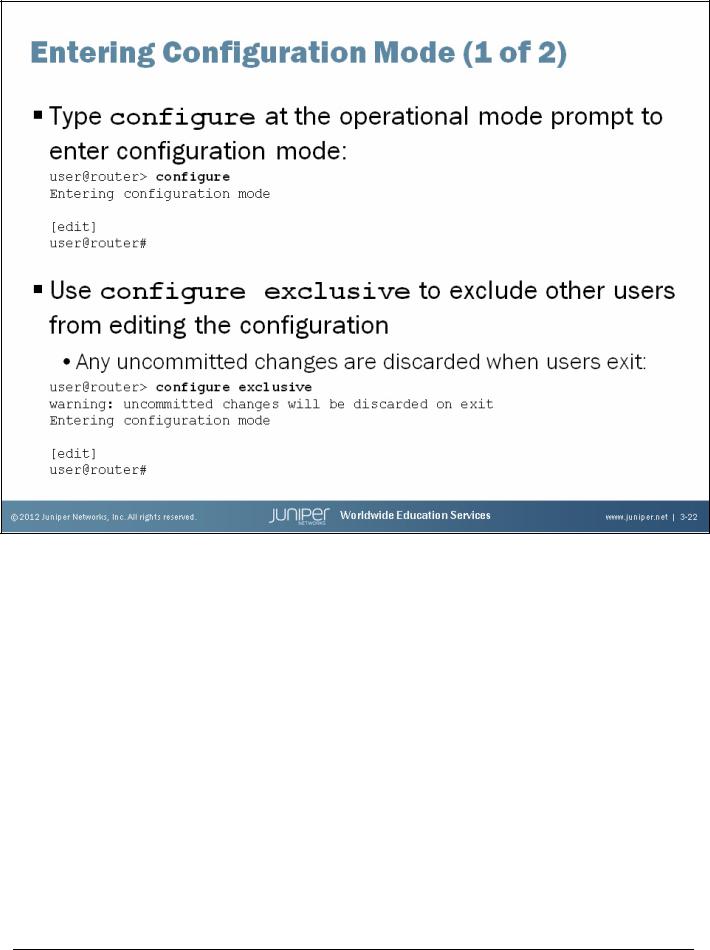
You enter configuration mode by issuing the configure command from the CLI’s operational mode. If, when you enter configuration mode, another user is also in configuration mode, a message indicates who the user is and what portion of the configuration the user is viewing or editing.
In configuration mode, the prompt changes from the angle bracket (>) of operational mode to the pound sign (#), preceded by the name of the user and the name of the device.
The portion of the prompt in brackets, such as [edit], is a banner indicating that you are in configuration mode and specifying your location within the configuration hierarchy.
Exclusive Configuration
By default, multiple users can enter configuration mode and commit changes. Use the configure exclusive command to allow only a single user to edit the configuration. Uncommitted changes are always discarded when you use the configure exclusive command. In contrast, uncommitted changes are retained when you use the standard configure command.
Chapter 3–22 • User Interface Options |
www.juniper.net |

Introduction to the Junos Operating System
Private Configuration
Entering configuration mode using the configure private command allows multiple users to edit the configuration while committing only their private changes. (You must issue a commit command from the [edit] hierarchy.) If private users issue a rollback 0 command, the software discards only their changes.
When a user is in private mode, other users must enter private mode or use configure exclusive to become the master, or they cannot modify the candidate configuration. Exiting private configuration without committing changes results in the loss of any modifications made to the private candidate configuration.
If two users are in private mode and both make the same change (For example, User 1 changes the system hostname to apples while User 2 sets the hostname to oranges), the second commit will fail with an error message to avoid configuration conflicts. The software places the second user’s changes into effect if User 2 issues a second commit command.
When chassis clustering is in effect, the configure private command is automated. In some other environments, you might want to require users to use only configure private. When creating user accounts, it is possible to limit the commands available to users through the assigned properties. We discuss user accounts and their assigned properties later in this course.
If a user is in configuration mode and has altered the candidate configuration, other users cannot enter configuration mode using the exclusive or private options. The changes made by the first user must be committed or cancelled prior to any other users entering configuration mode with the exclusive or private options.
www.juniper.net |
User Interface Options • Chapter 3–23 |
Introduction to the Junos Operating System
Statement Hierarchy
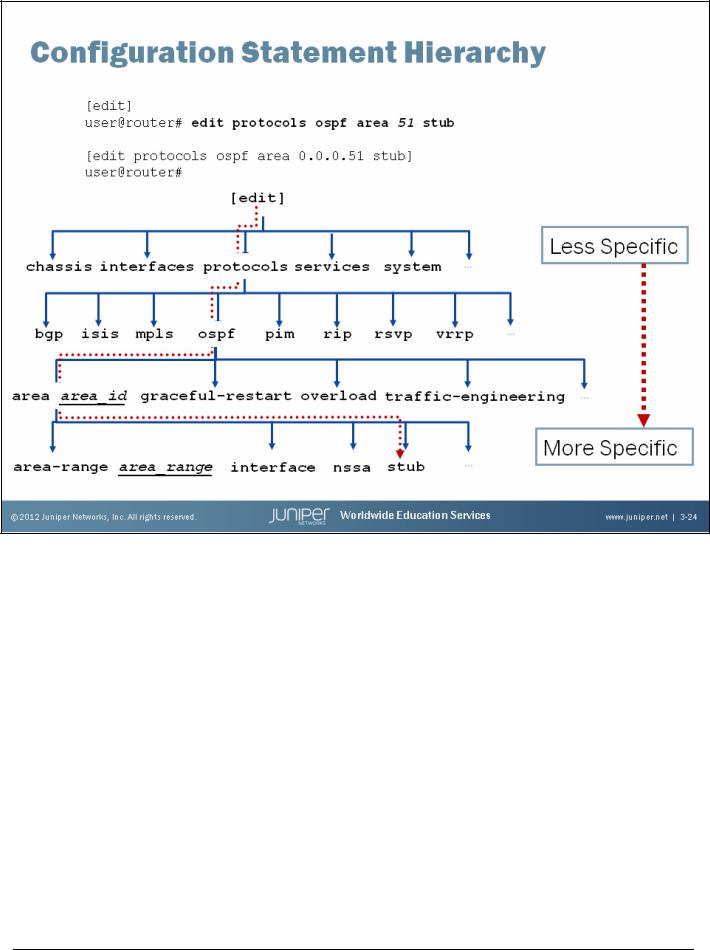
In configuration mode, you enter commands that affect the statement hierarchy. The statement hierarchy stores configuration information and is independent of the CLI operational mode command hierarchy. The commands available in configuration mode are also independent of the commands available in operational mode. For example, CLI operational mode includes a show command to display specific operational information, while the CLI configuration mode provides a show command to display the statement hierarchy. The two commands are independent of each other.
The software organizes the statement hierarchy in a tree structure similar to Windows folders or UNIX directories, grouping related information into a particular branch of the tree.
Chapter 3–24 • User Interface Options |
www.juniper.net |
Introduction to the Junos Operating System
Hierarchical Configuration
Use set commands in the CLI configuration mode to modify the candidate configuration. Use the show command to display the candidate configuration. Both commands are relative to the current configuration hierarchy, shown by the [edit] prompt.
Configuration files use curly brackets ({}) and indentation to visually display the hierarchical structure of the configuration. Terminating—or leaf—statements in the configuration hierarchy are displayed with a trailing semicolon (;). You enter neither the curly brackets nor the semicolons as part of the set command.
www.juniper.net |
User Interface Options • Chapter 3–25 |
Introduction to the Junos Operating System
You might find it helpful to perform a demonstration for the class in which you cover the various navigational options. You can then use this slide and the next several slides as a review of the demonstration.
Moving Between Levels Is Like Changing Directories
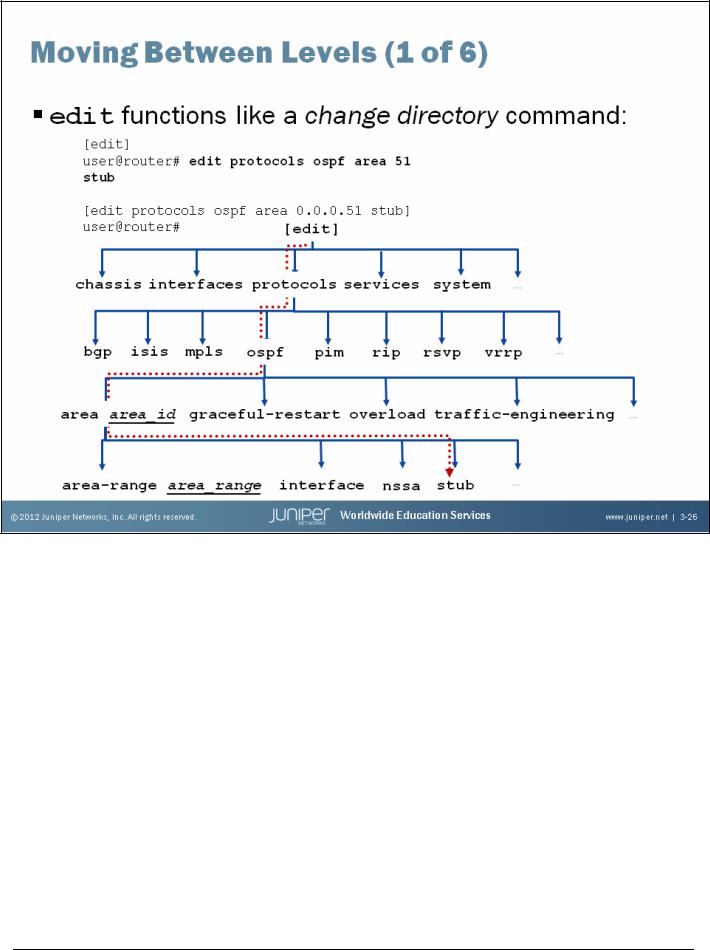
To move down through an existing configuration statement hierarchy or to create a hierarchy and move down to that level, use the edit command, specifying your desired hierarchy level. After you issue an edit command, the configuration mode banner changes to indicate your current level in the hierarchy.
Chapter 3–26 • User Interface Options |
www.juniper.net |

Introduction to the Junos Operating System
Moving Up One Level
To move up one level from the current position in the hierarchy, use the up command.
www.juniper.net |
User Interface Options • Chapter 3–27 |
Introduction to the Junos Operating System
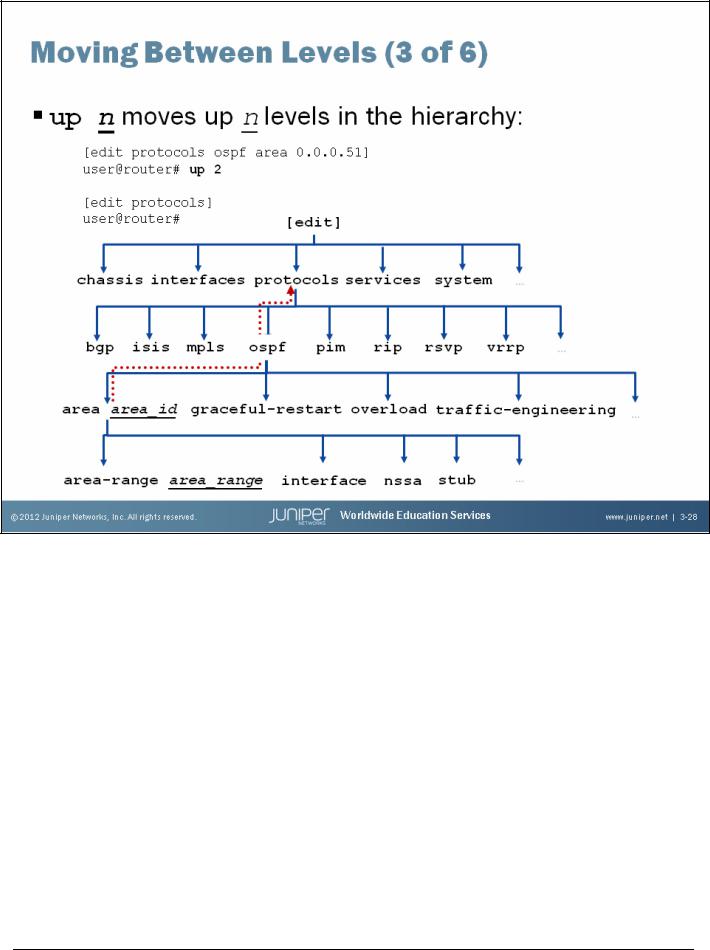
Moving Up More Than One Level
To move up more than one level from the current position in the hierarchy, supply an optional count to the up command. The software moves you up the specified number of levels or to the top of the hierarchy if there are fewer levels than specified.
Chapter 3–28 • User Interface Options |
www.juniper.net |

Introduction to the Junos Operating System
Take Me to the Top
The top command quickly moves you to the top of the configuration hierarchy. You can combine top with edit to move quickly to a different hierarchy or with show to display the configuration details for a different hierarchy, as in the following example:
[edit protocols ospf area 0.0.0.0 interface ge-0/0/0.0] user@router# top edit system login
[edit system login]
user@router# top show system services ftp;
ssh;
www.juniper.net |
User Interface Options • Chapter 3–29 |

Introduction to the Junos Operating System
Back to Where I Was Before
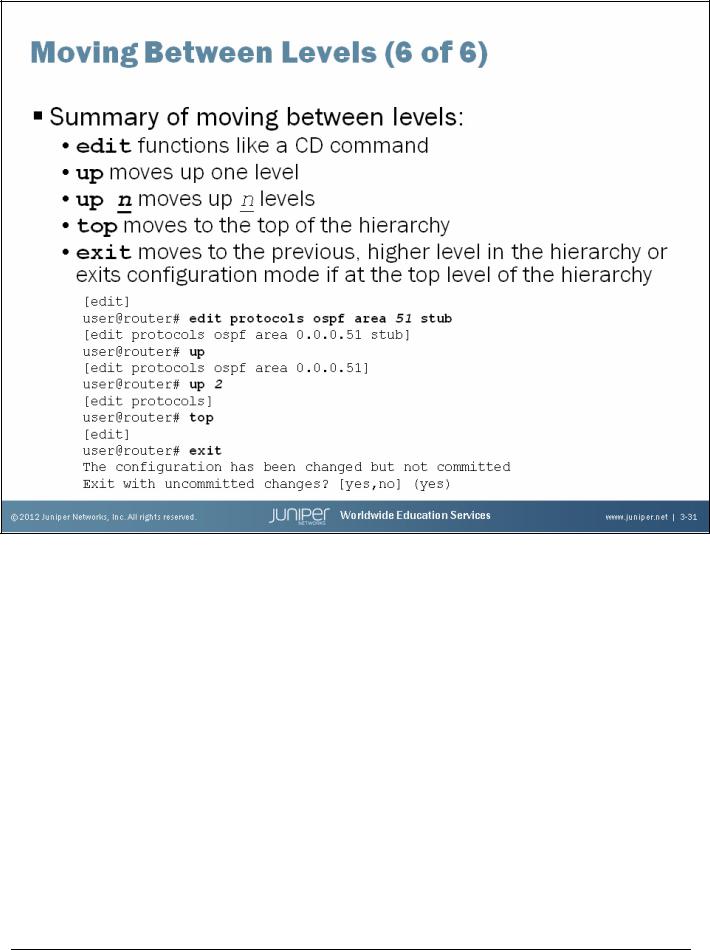
As the example on the slide illustrates, the exit command returns the user to the most recent, higher level of the hierarchy. Entering exit at the top level of the hierarchy exits configuration mode, as follows:
[edit] user@router# exit
Exiting configuration mode
user@router>
Entering exit configuration-mode from any level of the hierarchy also allows you to exit configuration mode, as in the following example:
[edit protocols ospf area 0.0.0.0 interface ge-0/0/0.0] user@router# exit configuration-mode
Exiting configuration mode
user@router>
Chapter 3–30 • User Interface Options |
www.juniper.net |
Introduction to the Junos Operating System
Consider using this slide to test the students knowledge.
In Summary
You can quickly navigate between levels of the configuration hierarchy using the edit, up, top, and exit commands.
www.juniper.net |
User Interface Options • Chapter 3–31 |
Introduction to the Junos Operating System
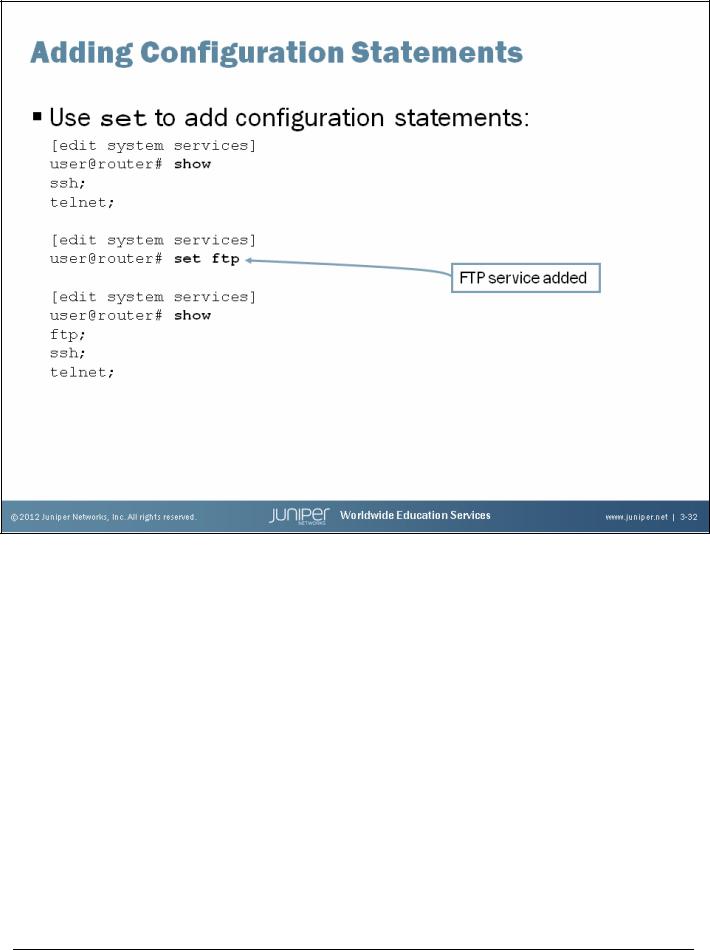
Adding Configuration Statements
Use set commands in the CLI configuration mode to modify the candidate configuration.
Chapter 3–32 • User Interface Options |
www.juniper.net |
Introduction to the Junos Operating System
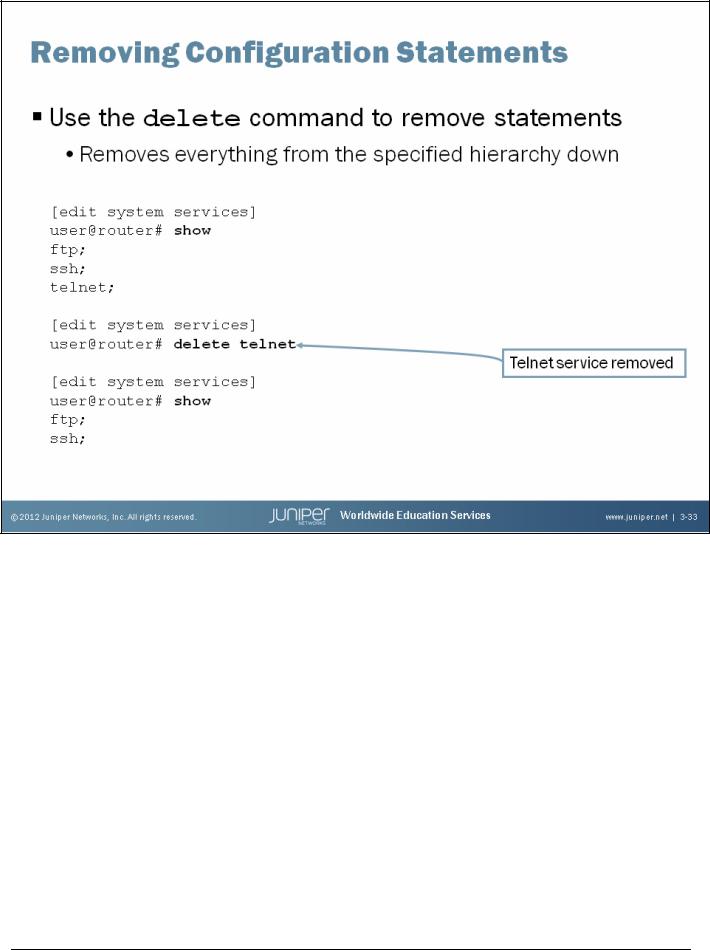
Removing Configuration Statements
Use the configuration mode delete command to remove statements that you previously added to the configuration with a set command. This command deletes the statement and all its subordinate statements and identifiers. Deleting a statement or an identifier effectively unconfigures the functionality associated with that statement or identifier, returning that functionality to its default condition.
Consider using the wildcard delete function when deleting individual statements is too arduous and deleting an entire configuration subhierarchy lacks the granularity that you need. The following example shows sample syntax for a wildcard delete:
[edit]
user@router# wildcard delete interfaces ge-1/* matched: ge-1/0/0
matched: ge-1/0/1
Delete 2 objects? [yes,no] (no) yes
[edit]
user@router#
In addition to deleting configuration statements, you should also consider the use of the deactivate command to cause the specified portion of the configuration hierarchy to be ignored while still retaining the original configuration. Issue an activate command to place the configuration back into effect. We provide an example of the deactivate and activate commands on a subsequent page.
www.juniper.net |
User Interface Options • Chapter 3–33 |
Introduction to the Junos Operating System
Pop Quiz!
Issue a delete interface interface-name statement placed into effect with the referenced set this syntax is correct.
disable command to delete the disable command. Note that the double negative in
The hidden set interface interface-name enable command also re-enables an interface. The supported method for enabling an interface, however, is to use the delete interface interface-name disable command.
Chapter 3–34 • User Interface Options |
www.juniper.net |
Introduction to the Junos Operating System
Using Configuration Mode Efficiently: Part 1
Consider performing an in-class demo to highlight some of these command options.
Using the configuration commands shown on the slide can increase efficiency. The following output illustrates the full list of configuration mode commands:
[edit] |
|
|
user@router# ? |
|
|
Possible completions: |
|
|
<[Enter]> |
Execute this command |
|
activate |
Remove |
the inactive tag from a statement |
annotate |
Annotate the statement with a comment |
|
commit |
Commit |
current set of changes |
copy |
Copy a |
statement |
deactivate |
Add the inactive tag to a statement |
|
delete |
Delete |
a data element |
edit |
Edit a |
sub-element |
exit |
Exit from this level |
|
extension |
Extension operations |
|
help |
Provide help information |
|
insert |
Insert |
a new ordered data element |
load |
Load configuration from ASCII file |
|
prompt |
Prompt |
for an input |
protect |
Protect the statement |
|
quit |
Quit from this level |
|
|
|
|
www.juniper.net |
|
User Interface Options • Chapter 3–35 |

Introduction to the Junos Operating System
rename |
Rename a statement |
replace |
Replace character string in configuration |
rollback |
Roll back to previous committed configuration |
run |
Run an operational-mode command |
save |
Save configuration to ASCII file |
set |
Set a parameter |
show |
Show a parameter |
status |
Show users currently editing configuration |
top |
Exit to top level of configuration |
unprotect |
Unprotect the statement |
up |
Exit one level of configuration |
wildcard |
Wildcard operations |
[edit]
user@router#
Regardless of the method and commands you use to update your configuration file, you must issue the commit command to activate changes.
Chapter 3–36 • User Interface Options |
www.juniper.net |

Introduction to the Junos Operating System
Using Configuration Mode Efficiently: Part 2
The following example shows the deactivate, activate, annotate, and commit commands and their output:
[edit]
user@router# deactivate interfaces ge-0/0/0
[edit]
user@router# commit commit complete
[edit]
user@router# show interfaces ge-0/0/0
##
## inactive: interfaces ge-0/0/0
##
unit 0 {
family inet {
address 10.210.11.177/28;
}
family inet6;
}
Continued on the next page.
www.juniper.net |
User Interface Options • Chapter 3–37 |

Introduction to the Junos Operating System
Using Configuration Mode Efficiently: Part 2 (contd.)
[edit]
user@router# activate interfaces ge-0/0/0
[edit]
user@router# commit commit complete
[edit]
user@router# show interfaces ge-0/0/0 unit 0 {
family inet {
address 10.210.11.177/28;
}
family inet6;
}
[edit system]
user@router# annotate name-server "added new name servers"
[edit system name-server] user@router# show
/* added new name servers */ 205.152.144.23; 205.152.132.23;
Chapter 3–38 • User Interface Options |
www.juniper.net |

Introduction to the Junos Operating System
Viewing the Candidate Configuration
Use the configuration mode show command to display the candidate configuration. This command displays the configuration at the current hierarchy level or at the specified level below the current location.
The show command has the following syntax: show statement-path. When displaying the configuration, the CLI indents each subordinate hierarchy level, inserts curly brackets to indicate the beginning and end of each hierarchy level, and places a semicolon at the end of statements that are at the lowest level of the hierarchy. The display format is the same format you use when creating an ASCII configuration file, and it is also the same format that the CLI uses when saving a configuration to an ASCII file.
In cases where an empty statement leads to an invalid configuration because it is incomplete or meaningless, the show command does not display any of the statement path.
You can display the individual set commands used to create the existing configuration file using the show | display set command. The following is an example of this command and its resulting output:
[edit]
user@router# show system services | display set set system services ssh
set system services web-management http port 8080
www.juniper.net |
User Interface Options • Chapter 3–39 |

Introduction to the Junos Operating System
Remember to Commit
Remember, Junos devices do not automatically apply your configuration changes. You must use the commit command to activate your candidate configuration. You can typically perform the commit operation from any hierarchy level. The exception is when users enter configuration mode using the configure private option, which requires the commit command to be issued at the top hierarchy level.
On devices with redundant Routing Engines, you can perform a commit synchronize, which activates and synchronizes the configuration on both Routing Engines, as shown in the following capture:
{master:0}[edit] |
|
user@router# commit s? |
|
Possible completions: |
|
synchronize |
Synchronize commit on both Routing Engines |
Some platforms, such as the EX4200 switches, automatically perform the commit synchronize operation and do not require the highlighted configuration statement.
Alternatively, you can configure the system to automatically perform the synchronize operation when a standard commit is issued through the set system commit synchronize command.
Checking Configuration Syntax
When you commit a candidate configuration, the software activates the entire configuration in its current form. Use the commit check command to validate the syntax of a candidate configuration without actually placing it into effect.
Continued on the next page.
Chapter 3–40 • User Interface Options |
www.juniper.net |

Introduction to the Junos Operating System
Remote Configuration Is Risky
Of course, commit check cannot catch logical errors in your configuration. What happens when you are configuring a device remotely and make a mistake that leaves that device inaccessible to remote connections? You can solve this scenario by using the commit confirmed command.
When you issue a commit confirmed time-out command, the system starts a timer, during which time it expects to see another commit. If a second commit does not occur within the time-out value specified (the software supports a range of 1 to 65,535 minutes, with 10 minutes being the default), the system performs a rollback 1, commit sequence on your behalf. After the automatic rollback, you can load the rollback 1 file to look for your mistake. We discuss the rollback command and operation in detail later in this chapter.
www.juniper.net |
User Interface Options • Chapter 3–41 |
Introduction to the Junos Operating System
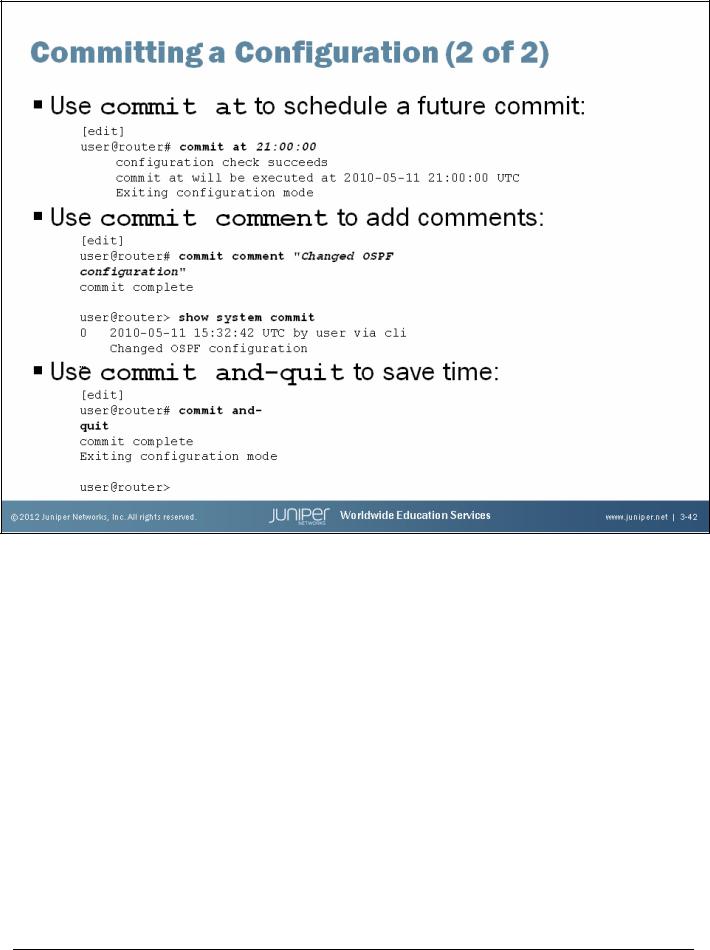
Scheduled Commits
You can also schedule a commit that occurs at a specific time using the commit at time command. This command is useful for synchronizing commits with multiple routers. These routers must have their time synchronized to the same source (likely through NTP) for the commit operations to execute at the same time. To view and clear pending commits, use the show system commit and clear system commit commands:
user@router> show system commit
commit requested by user via cli at 2010-05-11 21:00:00 UTC 0 2010-05-11 15:32:42 UTC by user via cli
...
user@router> clear system commit
Pending commit cleared
Adding a Log Entry to Your Commit
You can also add a log entry to your commit using the commit comment “comment-string” option. As illustrated on the slide, these logs are visible in the output of the show system commit command.
Exiting Configuration Mode
You can add the and-quit option to the commit command to activate your changes and exit configuration mode in a single step.
Chapter 3–42 • User Interface Options |
www.juniper.net |
Introduction to the Junos Operating System
Some factory-default configurations limit the number of rollback configurations, such as the smaller SRX Series platforms, which limit the number to five.
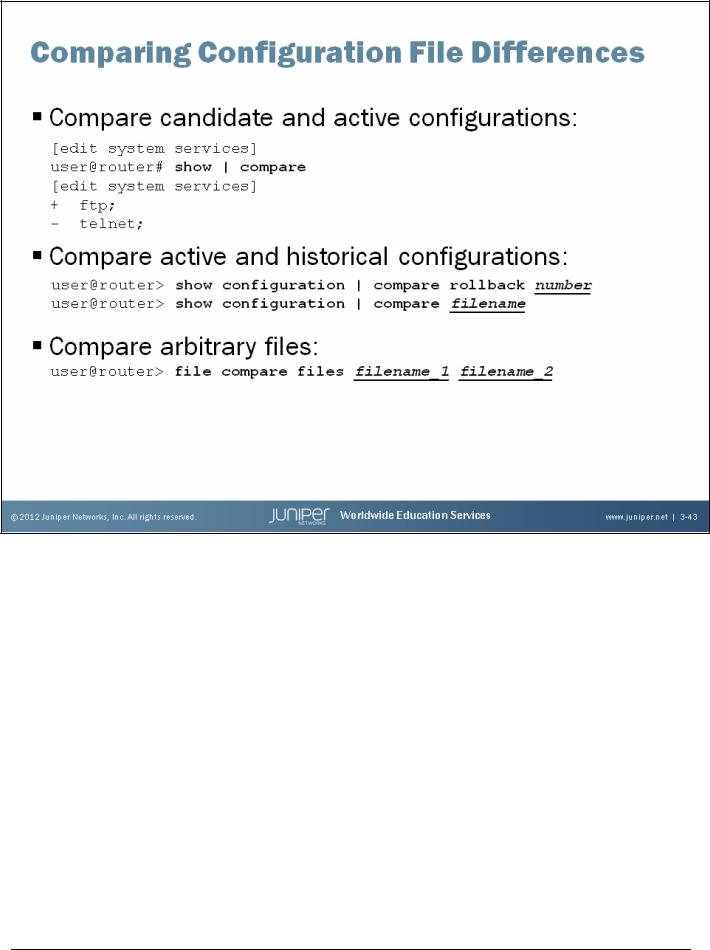
Viewing Differences
Using show | compare displays the differences between the candidate configuration and the active configuration, also known as rollback 0. Configuration comparison is patch-like and context sensitive. Thus, instead of showing the entire configuration, the display shows only the actual changes.
Comparing Active and Rollback Configurations
Using the operational mode show configuration | compare rollback number command, as shown on the slide, allows you to view differences between the active configuration and the rollback configurations. The Junos OS can store up to forty-nine additional rollback configurations in addition to rollback 0, which is the active configuration.
Similarly, the show configuration | compare filename command allows you to compare the active configuration to an arbitrary file. You can also use show | compare rollback number and show | compare filename in configuration mode to compare the candidate configuration with rollback configurations and arbitrary files, respectively.
Viewing Differences in Other Files
The operational mode file compare files command allows you to view differences between any two text files, including log files. The output of this command is in the same patch-like format as the show | compare command.
www.juniper.net |
User Interface Options • Chapter 3–43 |
Introduction to the Junos Operating System
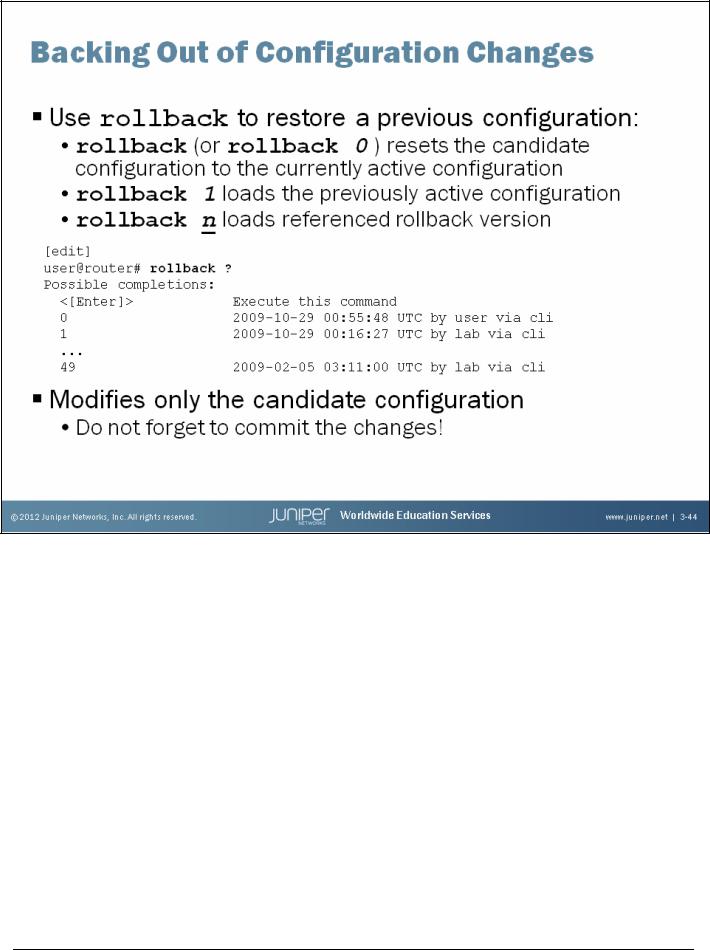
Restoring a Previous Configuration
The software saves the last 50 committed versions of the configuration. To overwrite the candidate configuration with one of these previously committed versions, use the CLI configuration rollback command. By default, the system returns to the most recently committed configuration—the active configuration.
To return to a version prior to the configuration most recently committed, include the version number in the rollback command.
The version argument can be a number in the range 0 through 49. The most recently saved configuration is version 0, which is the active configuration. The oldest committed configuration the software automatically saves is version 49.
The factory-default configuration on some of the smaller Junos devices restricts the number of rollback files stored by the system. This default setting can be changed to increase the number of rollback files as shown in the following capture:
[edit system]
user@router# set max-configurations-on-flash ?
Possible completions:
<max-configurations-on-flash> Number of configuration files stored on flash
You Must Commit
The rollback command modifies only the candidate configuration. To activate the changes loaded through the rollback operation, issue the commit command.
Chapter 3–44 • User Interface Options |
www.juniper.net |
Introduction to the Junos Operating System
Use this slide as a review for many of the concepts previously covered in this section.
The Life of a Configuration File: A Review
As discussed on the previous slides, the configure command causes a candidate configuration to be created and populated with the contents of the active configuration. You can then modify the candidate configuration with your changes.
To have a candidate configuration take effect, you must commit the changes. At this time, the Junos OS checks the candidate configuration for proper syntax and it installs it as the active configuration. If the syntax is not correct, an error message indicates the location of the error, and the software does not activate any part of the configuration. You must correct the errors before recommitting the configuration.
You can easily recover previous configurations with a rollback n command. The Junos OS maintains a configuration history by storing previously active configurations. The software saves a maximum of 50 configurations. This number includes the current active configuration, which is also known as rollback 0, and up to 49 previously active configurations. If you perform a rollback operation, keep in mind that the related configuration does not become active until you issue a commit command. When you issue a commit command and there are 50 rollback configurations, the software purges the last rollback configuration—rollback 49.
www.juniper.net |
User Interface Options • Chapter 3–45 |
Introduction to the Junos Operating System
Saving Configuration Files
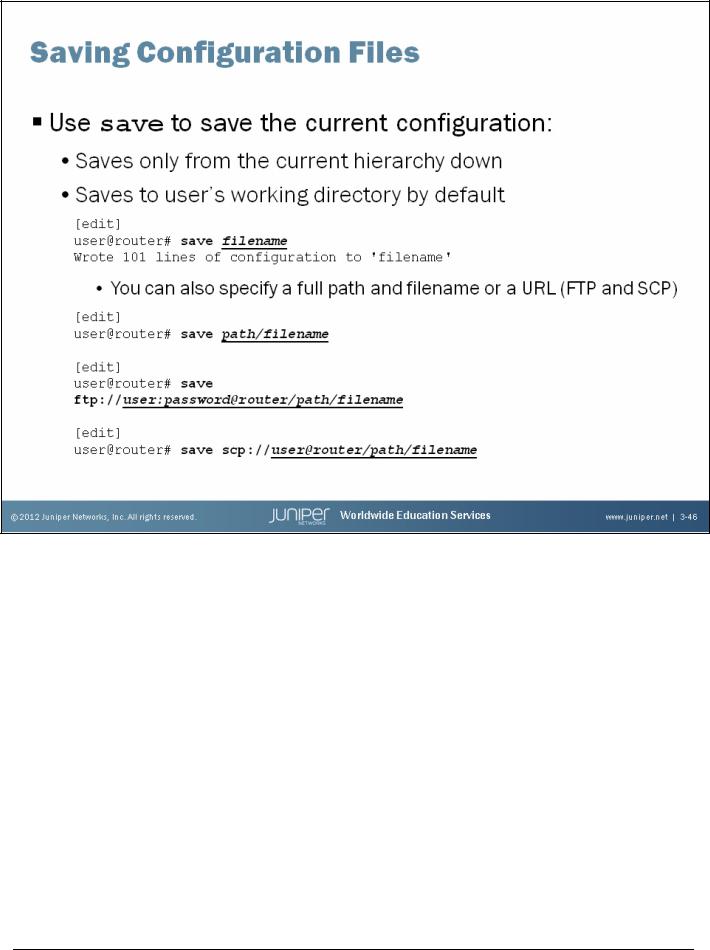
You can save the candidate configuration from your current configuration session to an ASCII file using the save command. Saving a candidate configuration saves the configuration in its current form, including any uncommitted changes.
Note that you are saving only the configuration statements at the current hierarchy level and below. To save the entire candidate configuration, you must be at the top level of the configuration hierarchy. If you do not specify a path, the Junos OS saves the configuration to the user’s working directory. As an example, if user nancy saved a configuration file without specifying a path name, the configuration file would be saved in the /var/home/nancy directory by default.
You can specify a filename in one of the following ways:
•filename or path/filename.
•ftp://user:password@router/path/filename: Puts the file in the location explicitly described by this URL using the FTP protocol. Substituting the word “prompt” for the password causes the FTP server to prompt you for the user’s password.
•scp://user@router/path/filename: Puts the file on a remote system using the SSH protocol. The software prompts you for the user’s password.
Chapter 3–46 • User Interface Options |
www.juniper.net |
Introduction to the Junos Operating System
Consider an in-class demonstration of the load from terminal operation.
Loading Configuration Files
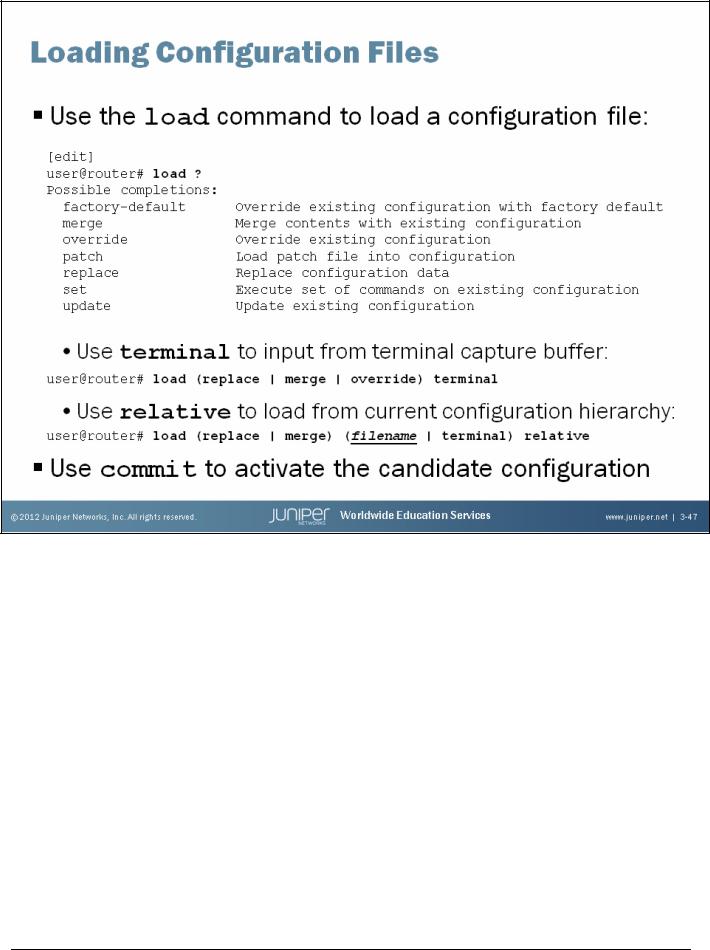
You can use the configuration mode load command to load a complete or partial configuration from a local file, from a file on a remote machine, or from a terminal emulation program’s capture buffer. The load command supports several arguments that determine the specifics of the operation.
The following list provides details for some of the arguments to the load command:
•factory-default: Replaces the full current configuration with the factory-default configuration.
•merge: Combines the current configuration with the configuration you load.
•override: Completely overwrites the current configuration with the configuration you load. You must perform override operations at the root of the configuration hierarchy.
•patch: Adds or deletes variables from the configuration based on the contents of a specified patch file. The patch file used in this operation uses the contextual diff format. The file generated from a show | compare | save operation creates such a file.
Continued on the next page.
www.juniper.net |
User Interface Options • Chapter 3–47 |

Introduction to the Junos Operating System
Loading Configuration Files (contd.)
•replace: Looks for a replace tag in the configuration you load. The software replaces
existing statements of the same name with those in the loaded configuration for stanzas1 marked with the replace tag.
•set: Allows users to load set commands from the terminal or from a saved file that consists of set configuration statements.
•update: Updates the existing configuration with the configuration you load. When the update option is used, the Junos OS attempts to notify only those processes affected by the configuration changes. When the override option is used, the Junos OS makes no such attempt. You can use the update option from any hierarchy, but you can use the override option only from the top level hierarchy.
•terminal: Uses the text you type at the terminal as input to the configuration. Type Ctrl+d to end terminal input. This option is usually used in conjunction with a terminal emulation program’s copy-and-paste functionality to copy and paste configuration data from one system to another.
•relative: Normally, a load merge or load replace operation requires that the data you load contains a full path to the related configuration hierarchy. The relative option negates this need by telling the device to add the data you load relative to the current configuration hierarchy.
commit Activates Candidate Configuration
In all cases, after the load operation is complete, you must issue a commit to activate the changes made to the configuration.
1.Stanzas are sections of a configuration.
Chapter 3–48 • User Interface Options |
www.juniper.net |
Introduction to the Junos Operating System
run Baby run
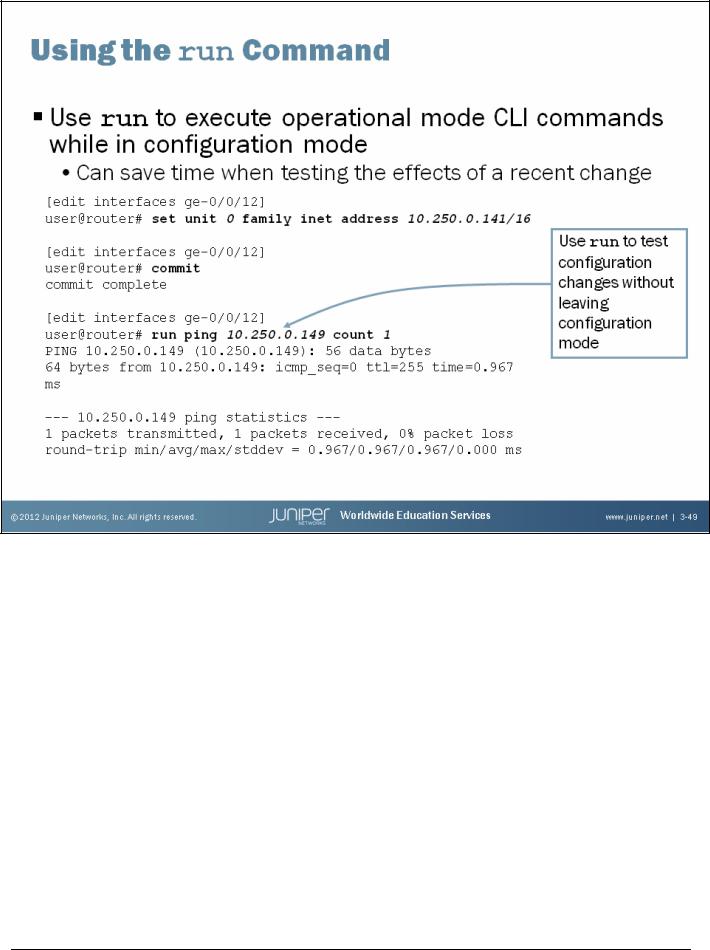
The run command allows you to execute operational mode commands while in configuration mode. It is similar to the do command on equipment from other vendors, but much more flexible. This extremely handy time-saver works for all operational mode commands and the software supports it at all configuration hierarchies. In the example on the slide, we are editing the configuration for the device’s ge-0/0/12 interface. After assigning what we hope to be the correct IP address, we commit the change and invoke the run command to execute a quick ping test.
The primary purpose of this slide is to show how the run command can save key strokes and time.
Unlike Cisco’s do command in IOS, the run command in the Junos OS provides full access to command-line completion and question-mark help for operational mode commands.
www.juniper.net |
User Interface Options • Chapter 3–49 |

Introduction to the Junos Operating System
This Chapter Discussed:
•Common user interface options available for platforms running the Junos OS; and
•The Junos CLI and its related modes and features.
Chapter 3–50 • User Interface Options |
www.juniper.net |
Introduction to the Junos Operating System
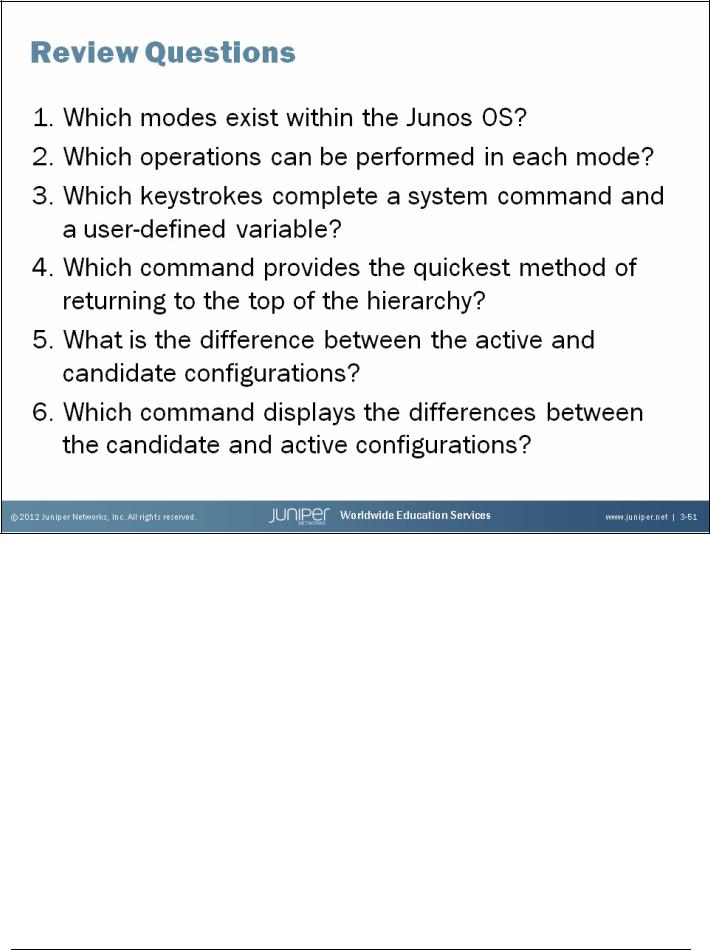
Review Questions
1.
Two primary modes exist within the Junos OS: the operational mode and the configuration mode. A third mode also exists in the form of the FreeBSD shell.
2.
You use the operational mode to monitor and troubleshoot the software, network connectivity, and hardware. You use the configuration mode to configure a device running the Junos OS, including interfaces, protocols, user access, and system hardware.
3.
You use the Spacebar to complete a command and the Tab key to complete a variable.
4.
The top command is the quickest method of returning to the top of the hierarchy.
5.
The active configuration has been committed and is in use, whereas the candidate configuration is not active until you perform a commit operation.
6.
The show | compare command displays the differences between the current active and candidate configurations.
www.juniper.net |
User Interface Options • Chapter 3–51 |