

Introduction to the Junos Operating System
The Junos CLI: CLI Basics
The slide highlights the topic we discuss next.
www.juniper.net |
User Interface Options • Chapter 3–5 |

Introduction to the Junos Operating System
Ensure that the students understand the prompt varies depending on the device’s assigned name and the name of the user currently logged in to the device.
Logging In
The Junos OS requires a username and a password for access. The administrator creates user accounts and assigns permissions. All platforms running the Junos OS have only the root user configured by default, without any password.
When configured, the console login displays the hostname of the device. When you have not configured a hostname, as is the case with a factory-default configuration, the software displays Amnesiac in place of the hostname:
Router (ttyu0)
login: root
--- JUNOS 12.1R1.9 built 2012-03-24 12:12:49 UTC root@router%
The root user has complete access and control of the device. When you log in as the root user, the software places you at the UNIX shell. You must start the CLI by typing the cli command. When you exit the CLI, you return to the UNIX shell. For security reasons, ensure that you also log out of the shell by using the exit command.
Chapter 3–6 • User Interface Options |
www.juniper.net |

Introduction to the Junos Operating System
Operational Mode
In operational mode, you use the CLI to monitor and troubleshoot the device. The monitor, ping, show, test, and traceroute commands let you display information and test network connectivity for the device.
Configuration Mode
In configuration mode, you can configure all properties of the Junos OS, including interfaces, protocols, and user access, as well as several system hardware properties.
www.juniper.net |
User Interface Options • Chapter 3–7 |

Introduction to the Junos Operating System
Need Help?
The CLI provides context-sensitive help at any point in a command line. Help tells you which options are acceptable at the current point in the command and provides a brief description of each command or command option.
To receive help at any time while in the Junos CLI, type a question mark (?). You do not need to press Enter. If you type the question mark at the command-line prompt, the CLI lists the available commands and options including user-defined variables at the appropriate context. If you type the question mark after entering the complete name of a command or an option, the CLI lists the available commands and options and then redisplays the command name and options that you typed. If you type the question mark in the middle of a command name, the CLI lists possible command completions that match the letters you have entered so far and then redisplays the letters that you typed.
Chapter 3–8 • User Interface Options |
www.juniper.net |

Introduction to the Junos Operating System
Help on General Concepts
You can use the help command in various ways. The help topic command displays usage guidelines for the statement. In the example on the slide, we receive information on configuring an interface address.
www.juniper.net |
User Interface Options • Chapter 3–9 |

Introduction to the Junos Operating System
Help with the Junos OS Configuration
The help reference command displays summary information for the referenced configuration statement. In the example on the slide, once again, we are seeking help with interface addressing. Although not shown on the slide, the help reference command displays a complete list of related configuration options along with several other details specific to the referenced command statement.
In addition to the help topic and help reference commands, the Junos OS also offers the help apropos command. The help apropos command displays the contexts (typically set commands) that reference a specified variable. The following is an example of the help apropos command:
[edit system archival configuration] user@router# help apropos archive set archive-sites
List of archive destinations
set archive-sites <url> password <password> Password for login into the archive site
The help apropos command only displays contexts that are relevant to the configuration hierarchy level at which you are currently positioned. In other words, if you entered the sample command shown, at the [edit] hierarchy level you would see all possible references rather than just those that are applicable to the [edit system archival configuration] hierarchy level.
Chapter 3–10 • User Interface Options |
www.juniper.net |

Introduction to the Junos Operating System
Spacebar Completion for Commands
The CLI provides a completion function. Therefore, you are not always required to type the full command or the command option name for the CLI to recognize it.
To complete a command or option that you have partially typed, press the Spacebar. If the partially typed letters begin a string that uniquely identifies a command, the CLI displays the complete command name. Otherwise, the CLI beeps to indicate that you have entered an ambiguous command, and it displays the possible completions.
The command completion option is on by default, but you can turn it off. To disable command completion for an individual user’s session, issue the set cli complete-on-space off command as follows:
user@router> set cli complete-on-space off
Disabling complete-on-space
Tab Completion for Commands and Variables
You can use the Tab key to complete system commands and user-defined variables. Examples of variables include policy names, AS paths, community names, and IP addresses. The Tab key also offers a list of possible completions if multiple, ambiguous options exist. Command completion allows you to save time by reducing your keystrokes, and prevents errors by accurately referencing the desired user-defined variables.
www.juniper.net |
User Interface Options • Chapter 3–11 |
Introduction to the Junos Operating System
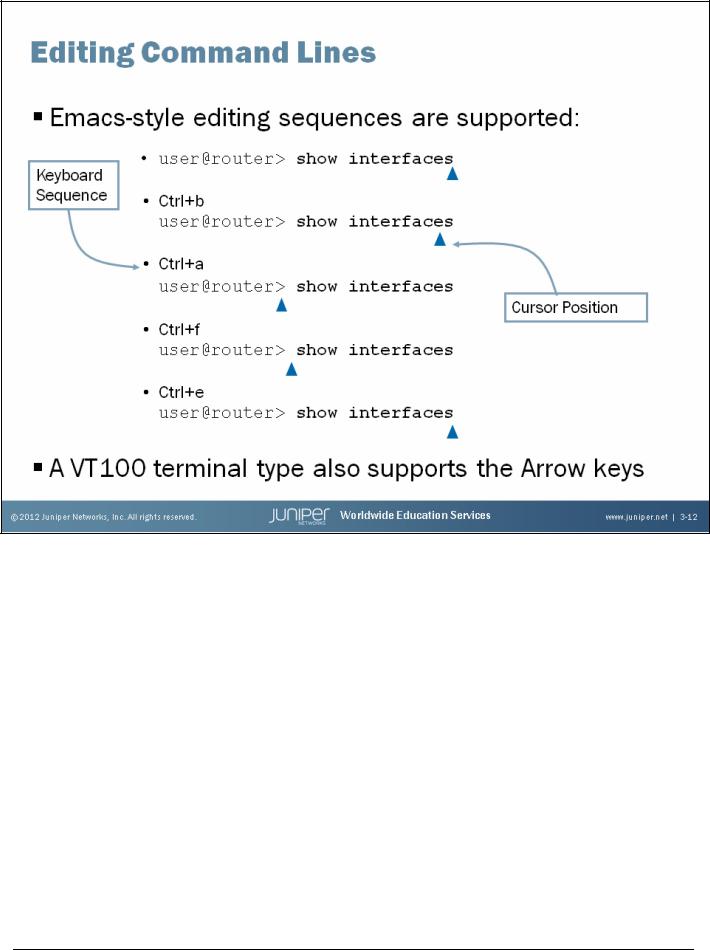
Emacs-Style Control Keys
The CLI supports Emacs-style keyboard sequences that allow you to move the cursor on a command line and delete specific characters or words. The following are supported sequences:
•Ctrl+b: Moves the cursor left one character;
•Ctrl+a: Moves the cursor to the beginning of the command line;
•Ctrl+f: Moves the cursor right one character;
•Ctrl+e: Moves the cursor to the end of the command line;
•Delete and Backspace: Deletes the character before the cursor;
•Ctrl+d: Deletes the character over the cursor;
•Ctrl+k: Deletes from the cursor to the end of the line;
•Ctrl+u: Deletes all characters and negates the current command;
•Ctrl+w: Deletes the entire word to the left of the cursor;
•Ctrl+l: Redraws the current line;
•Ctrl+p, Ctrl+n: Repeats the previous and next command in the command history, respectively;
Continued on the next page.
Chapter 3–12 • User Interface Options |
www.juniper.net |

Introduction to the Junos Operating System
Emacs-Style Control Keys (contd.)
•Esc+d: Deletes the word to the right;
•Esc+b: Moves the cursor back one word with no delete; and
•Esc+f: Moves the cursor forward one word with no delete.
Please note that when using the Esc key, you must release the key and press it again for each occurrence. This action differs from the Ctrl key, which you can hold down for multiple occurrences.
VT100 Terminal Type
The Junos OS defaults to a VT100 terminal type. This terminal type enables the use of keyboard Arrow keys without any additional session or configuration modification.
www.juniper.net |
User Interface Options • Chapter 3–13 |

Introduction to the Junos Operating System
Using Pipe
For operational and configuration commands that display output, such as the show commands, you can filter the output. When help is displayed for these commands, one of the options listed is |, called a pipe, which allows the command output to be filtered. To filter the output of an operational mode or a configuration mode command, add a pipe and an option to the end of the command. The following are available options:
•compare (filename | rollback n): Available in configuration mode using only the show command. Compares configuration changes with another configuration file.
•count: Displays the number of lines in the output.
•display changed: Available in configuration mode only. Tags changes with junos:changed attribute only for XML use.
•display commit-scripts: Shows data after the Junos OS applies commit scripts.
•display detail: Available in configuration mode only. Displays additional information about the contents of the configuration.
Continued on the next page.
Chapter 3–14 • User Interface Options |
www.juniper.net |
Introduction to the Junos Operating System
Using Pipe (contd.)
•display inheritance: Available in configuration mode only. Displays inherited configuration data and source group.
•display omit: Available in configuration mode only. Omits configuration statements with the omit option.
•display set: Available in configuration mode only. Shows set commands that created configuration statements.
•display xml: Displays the output in NETCONF/XML format.
•except regular-expression: Ignores text matching a regular expression when searching the output. If the regular expression contains spaces, operators, or wildcard characters, you must enclose it in quotation marks.
•find regular-expression: Displays the output starting at the first occurrence of text matching a regular expression. If the regular expression contains spaces, operators, or wildcard characters, you must enclose it in quotation marks.
•hold: Holds text without exiting the –-(more)-- prompt.
•last: Displays the last screen of information.
•match regular-expression: Searches for text matching a regular expression. If the regular expression contains spaces, operators, or wildcard characters, you must enclose it in quotation marks.
•no-more: Displays output all at once rather than one screen at a time.
•request message: Displays output to multiple users.
•resolve: Converts IP addresses to Domain Name System (DNS) names. Truncates to fit original size unless you specify full-names.
•save filename: Saves the output to a file or URL.
•trim: Trims specified number of columns from the start line.
You can cascade multiple instances of the CLI’s pipe functionality, which can be very beneficial when you must search extensive outputs displayed through the CLI for specific information. In a subsequent chapter, we highlight the required syntax to evoke logical AND and logical OR searches within extensive outputs and files.
www.juniper.net |
User Interface Options • Chapter 3–15 |