


Chapter 1 Starting to Draw |
19 |
At the right side of the status bar is a small down arrow. Click it to open the status bar menu. This menu determines which buttons appear on the status bar. If you don’t use a certain button, choose it on the menu to remove its checkmark and make it disappear. You can always go back and choose the item again to redisplay the button. Also at the right side of the status bar is the Communication Center icon. (See Chapter 26 for details.) You can use the CLEANSCREENON command to hide the title bar, toolbars, and status bar, leaving more room for the drawing area. To return to the regular display, use the CLEANSCREENOFF command or press Ctrl+0 to toggle between the two displays.
Creating a New Folder
For your work with this book, you should create a new folder so that you can save your exercise drawings where they won’t get mixed up with other drawings. The following directions leave it up to you where to create this new folder. Each computer system is organized differently. If you aren’t sure what to do, choose the drive (not the folder) where AutoCAD or AutoCAD LT is installed and create a new folder there.
Caution |
I do not recommend creating a subfolder in the AutoCAD 2006 or AutoCAD LT 2006 folder. |
|
This folder contains the files that make up the program. If you keep your drawings here, it is |
|
too easy to make a mistake and delete necessary program files. Some people create a sub- |
|
folder in the My Documents folder. |
STEPS: Creating a New Folder
1.Move the mouse cursor down to the taskbar at the bottom of your screen and rightclick the Start button.
2.Choose Explore.
3.On the left pane of Windows Explorer, click the drive where you want to create the new folder. If you don’t know where to create the folder, choose the drive where AutoCAD or AutoCAD LT is installed. If you’re on a network, choose the drive that represents your computer.
4.If you want to make a subfolder (a folder within a folder), choose the folder where you want to create the subfolder.
5.From the Explorer menu, choose File New Folder. A new, highlighted folder, named New Folder, appears in the right pane. You may have to scroll down to see it.
6.Type AutoCAD Bible for the folder name and press Enter. (If you did the exercises from a previous edition of this book, such as AutoCAD 2004 Bible, and you already have a folder named AutoCAD Bible, first rename the original folder to something such as
AutoCAD2005Bible.)
Save all drawings that you create for this book in your AutoCAD Bible folder.
Caution |
Creating a folder for your drawings as described in the previous steps is essential before |
|
you go on to exercises in the rest of this book. |
20 |
Part I AutoCAD and AutoCAD LT Basics |
Using the Interface
If you did the Quick Start exercise, you had the experience of drawing a window, but I chose the simplest method of completing each task because I had not yet described the AutoCAD and AutoCAD LT screen. In the following exercise, you draw some simple objects, but experiment with all the features of the user interface to get a feel for how they work. (Chapter 3 explains in more detail how to use commands.)
For this exercise, simply follow the instructions exactly. When you type the X and Y coordinates (shown in bold), type the first number, a comma, and then the second number, with no spaces between them.
Tip Don’t worry if you don’t understand everything you’re doing. It all becomes clear as you progress through this book. If you haven’t read the Preface, now is a good time to go back and read the part that explains how to follow the exercises.
Follow the prompts shown next. As explained in the Preface, you type what appears in bold. Instructions to you in command sections appear in italics.
STEPS: Drawing a Line in Four Ways
1.Start AutoCAD or AutoCAD LT.
You see a new drawing. (If you are prompted for a template, type or choose acad.dwt. or aclt.dwt.
2.From the menu, choose Draw Line.
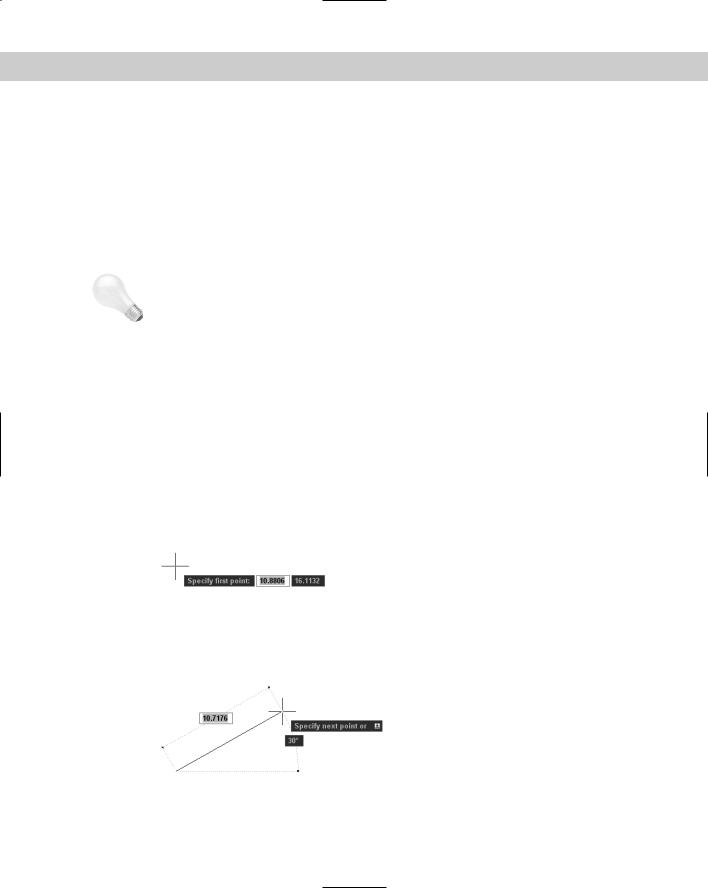
3.Move your mouse to move the crosshairs cursor around the screen. Notice the Dynamic Input bar that follows the cursor around (like a well-trained dog), as shown in Figure 1-4. (If the DYN button on the status bar is not selected, you don’t see this bar.) At the same time, notice the coordinates changing on the left side of the status bar.
Figure 1-4: When you move the mouse around, the Dynamic Input bar follows the cursor, displaying the current coordinates.
4.Anywhere on the screen, stop moving the mouse and click the left mouse button to pick a point. When you move the mouse again, the Dynamic Input bar changes to prompt you to specify the next point, and to show you the angle and length of the cursor from the original point you picked, as shown in Figure 1-5.
Figure 1-5: After specifying the first point of a line, the Dynamic Input bar prompts you for the next point.
5.Pick any point to create a line segment. You see the same Dynamic Input tooltip as before, which means that you can continue to create more line segments. (Chapter 6 is all about drawing lines.)
Chapter 1 Starting to Draw |
21 |
6.Press Enter to end the command and finish your line.
7.For your second line, choose Line from the Draw toolbar. (Figure 1-2 labels this toolbar.) Again, pick any point on the screen.
8.Move your mouse so you can see the length and angle tooltips. Notice the value for the
length. Now type a different value and press Enter. For example, if the Length tooltip says 13.7638, type 5 .
9.Press Enter to end the command. The line’s length is based on what you typed, not where the cursor was, but the line’s angle is the same as it was before you typed in the length.
10.For your third line, type line. Notice that the text appears in the Dynamic Input tooltip as you type, but not in the command line area.
11.Press Enter. You now see the command that you typed in the command line area as well as the Dynamic Input prompt to specify the first point.
12.Click in two places to pick a start point and an endpoint.
13.This time, to end the line, right-click anywhere in the drawing area. By default, this opens a shortcut menu, but it may end the command. If so, you’re done. If you see the shortcut menu, choose Enter from the shortcut menu to end the command.
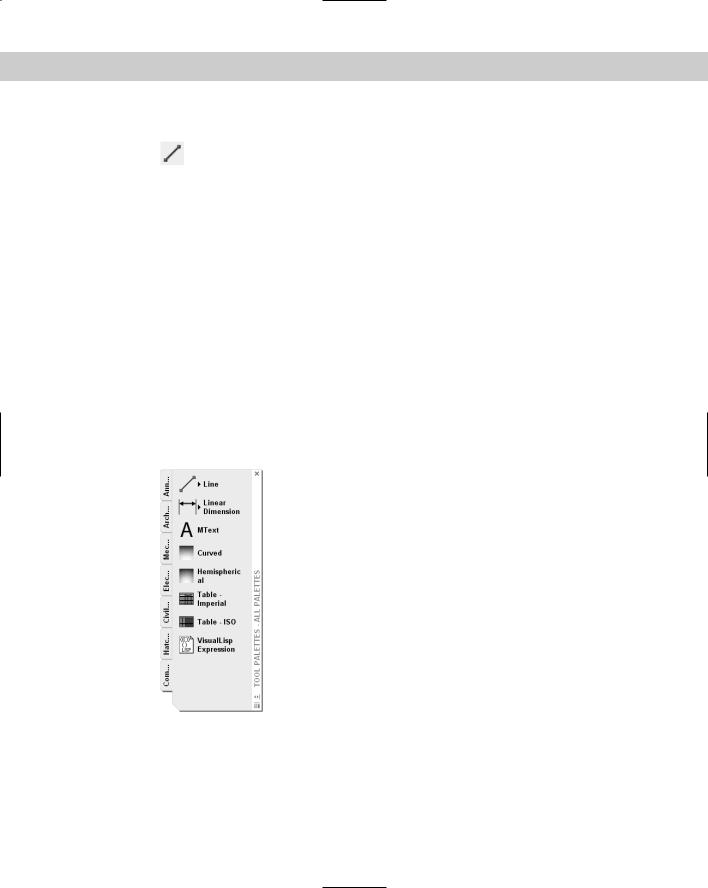
14.For your fourth line, choose Tools Tool Palettes Window from the menu. Click the Command tab, as shown in Figure 1-6. (Because of the many tabs, you may see only part of the tab title.)
Figure 1-6: You can execute commands from the Tool Palettes window.
15.Click the Line command on the tool palette. Move the mouse so that the cursor is in the drawing area. Pick two different points and press Enter.
16.Leave the drawing on your screen and read on to the next exercise to save the drawing.
You should now have four lines on the screen. You can see how AutoCAD’s interface offers several ways to work. You can use the method that suits you best.
22 |
Part I AutoCAD and AutoCAD LT Basics |
Saving a Drawing
Saving a drawing is similar to saving any other file in Windows. You should get in the habit of saving your work every 10 to 15 minutes to avoid losing your work in case your computer system crashes.
Saving a drawing for the first time is different from saving it subsequently because you have to name the drawing the first time you save it.
To save a drawing, click Save on the Standard toolbar. If you’re saving a drawing for the first time, the Save Drawing As dialog box appears, as shown in Figure 1-7.
Figure 1-7: The Save Drawing As dialog box.
Down the left side of the dialog box are several buttons to help you find a location to save drawings more quickly. Together, these buttons are called the Places list. Use the Places list as follows:
History lists shortcuts to recently used drawings.
My Documents lists drawings and folders in the My Documents folder. Some people store files in this folder. (Your system may call this the Personal folder.)
Favorites lists files and folders in the C:\Documents and Settings\[login name]\ Favorites folder. (This is the location in Windows XP; it may be different on your computer.) You may have an Autodesk subfolder; if so, double-click the Autodesk subfolder to save a drawing there. Usually, this folder contains only shortcuts to files saved elsewhere. To put a shortcut to an already saved drawing in Favorites, choose File Save As and click the Tools drop-down list; then click Add to Favorites. You can later open the file from the Favorites folder.
FTP switches you to the FTP locations folder, where you can find an FTP location that you have set up, as explained in the following discussion of the Tools drop-down list.

Chapter 1 Starting to Draw |
23 |
Desktop shows drawings on your desktop. Some of the Windows icons also appear on this list.
Buzzsaw sends you to www.buzzsaw.com, the Autodesk business-to-business portal for the building design and construction industry. You can set up a new account or access existing projects.
Tip |
In a nice touch, you can reorder the buttons in the Places list. Just drag any button to a new |
|
location. |
Of course, you can also choose a location from the Save In drop-down list to which you want to save the file. To save a file, type a file name in the File Name text box and click Save to save the file.
Use the Views drop-down list of the dialog box to specify how you want to display files in this dialog box. List just displays the name; Details adds the file size, type, and date modified; Thumbnails and Preview add a preview image of the drawing.
Use the Tools drop-down list of the dialog box to do the following:
Add or Modify FTP Locations: FTP sites are locations on the Internet for transferring files. To add or modify FTP locations, choose Tools Add/Modify FTP Locations from the menu of the Save Drawing As dialog box. You need to list the name of the FTP site, choose a logon type (Anonymous or User), and specify your username and password if you’re logging on as a User. You can then save drawings (called uploading) to FTP locations by clicking the Save In drop-down list and choosing FTP Locations. This feature makes an intranet or any server with FTP capability as accessible as your own computer system.
Add Current Folder to Places: If you save to a specific folder often, you can navigate to that folder and then choose Tools Add Current Folder to Places. The Places Bar then displays a new button for that folder so that you can easily click the button to go straight to the folder.
Add to Favorites: When you have navigated to a folder, you can add it to the Favorites folder by choosing Tools Add to Favorites. You can also select a file in a folder and add it to the Favorites folder.
Options: The Options dialog box opens, where you can specify certain settings relating to saving drawings.
Security Options: Choose this setting to set a password or attach a digital signature. I discuss these features in Chapter 26.
|
|
The SAVEALL command of the Express Tools saves all open drawings, without closing them. |
|
|
Choose Express File tools Save All Drawings. If a drawing hasn’t been saved, you are |
|
|
prompted for a file name. For information on installing Express Tools, see Appendix A. |
|
|
|
On the |
The CD-ROM includes a small program, savea.lsp, that automatically backs up your drawing |
|
CD-ROM |
to the floppy drive after you’ve saved it on your hard drive. If you like to back up to a diskette |
|
|
|
regularly for safety, this program can be useful. Look in \Software\Chap01\Savea. |
|
|
(AutoCAD only.) |