

Morpheus / Morpheus_Operation_Manual
.pdfBASIC OPERATION
Chapter 2: Basic Operation |
11 |
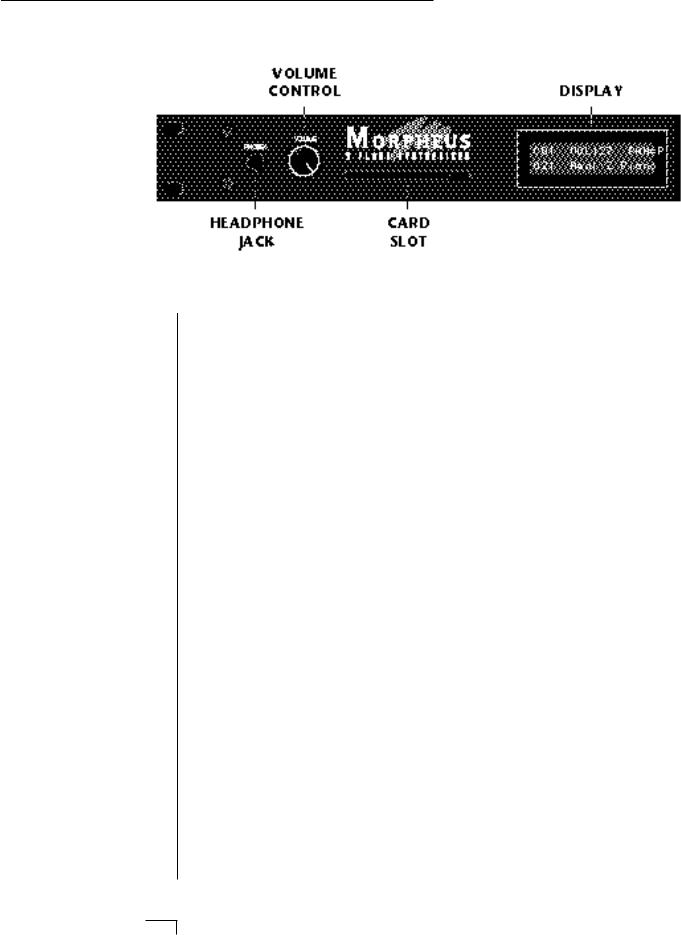
MAIN CONTROLS
Volume Control
This is the master volume control for all audio outputs. Note: For maximum dynamic range, set this control at full level.
Card Slot
The card slot accepts RAM and ROM cards containing additional presets, hyperpresets and midimaps.
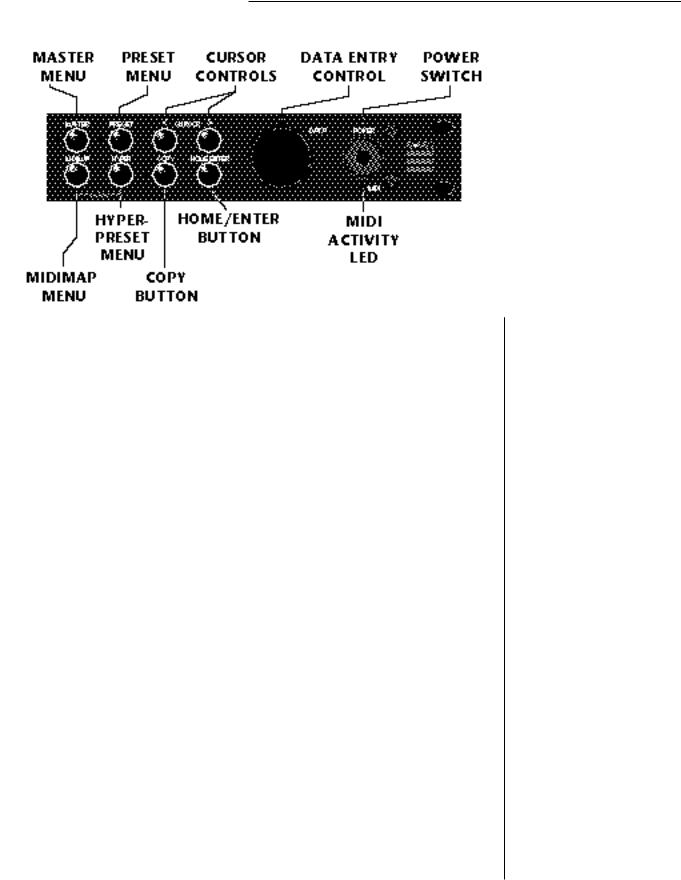
Master Menu Select Button
The Master menu contains global parameters which affect the entire machine. The LED to the left of the button indicates that you are in the Master menu.
Midimap Menu Select Button
A Midimap is a set of parameters used to configure Morpheus to other MIDI gear such as a sequencer or keyboard setup. The 16 Midimaps contain digital effects setting as well as assignments of presets/hyperpresets to MIDI channels. An LED to the left of the button indicates that you are working in the Midimap menu.
Preset Menu Select Button
The Preset menu is used when you want to create or modify a preset. The LED to the left of the button indicates that you are working in the Preset menu. To Compare an edited preset with the unedited version, simply exit Preset Edit mode. The stored preset will be heard whenever the main screen is selected. Changing the preset will erase the edited version.
Hyperpreset Menu Select Button
The Hyperpreset menu is used to place presets at certain locations on the keyboard to create custom keyboard layouts. The LED to the left of the button indicates that you are working in the Hyperpreset menu.
12 Morpheus Operation Manual
MAIN CONTROLS
Demo Sequence Select
Morpheus contains four play-only sequences to demonstrate the range of sounds. Press and hold the Midimap and the Hyperpreset buttons simultaneously to select the Demo Sequence selection screen.
Cursor Control
These buttons move the cursor to the next parameter on the display in a clockwise or counter-clockwise direction. (The cursor is the little flashing line underneath one of the parameters in the display.) Press either cursor control button repeatedly until the cursor is underneath the desired parameter.
Copy Button
The copy menu allows you to copy selected groups of parameters between Presets, Hyperpresets, and Midimaps.
Home/Enter Button
The Home/Enter button is used to confirm a particular operation or to return the cursor the “Home” position in the upper left corner. The LED flashes to indicate that Morpheus is waiting for your response.
Data Entry Control
The data entry control is a stepped, variable control which is used to change parameter values. The control increments or decrements the current value one unit with each click. This control incorporates acceleration (values advance faster if the control is turned quickly).
Power Switch
Switches AC power to Morpheus On and Off.
▼ You must hold the Midimap and Hyperpreset buttons for approximately two seconds to start the demo sequences.
••• The cursor can also be moved bidirectionally using the data entry control while the right cursor button is held down. (i.e. Press and hold the cursor button and turn the data entry knob.)
Chapter 2: Basic Operation |
13 |
BASIC OPERATION
• • If Morpheus is not esponding properly or plays he wrong preset, make sure hat both Morpheus and our MIDI controller are set o the same MIDI channel nd that the MIDI Volume is urned up.
or more information about IDI, see MIDI Realtime ontrols on page 97.
•• Channel Pan should ormally be set to “P” unless ealtime control of panning is esired. If Pan is set to “0”, a tereo preset will play in ono.
MIDI Activity LED
Indicates that MIDI data is being received.
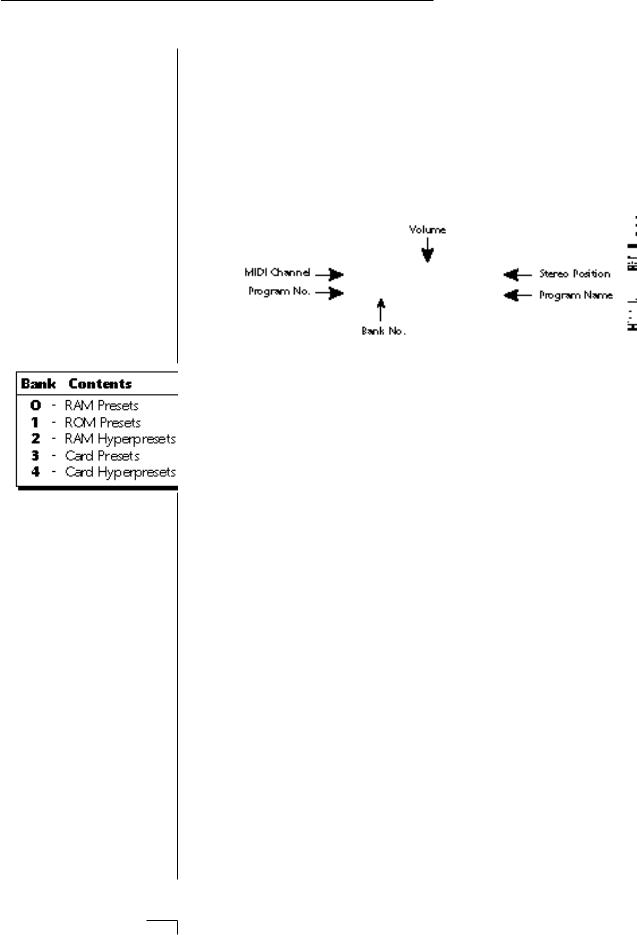
MIDI CHANNEL SELECTION
Press the cursor key repeatedly until the cursor is underneath the channel number. (The cursor is the little flashing line underneath one of the parameters in the display.) Rotate the data entry control to select MIDI channel 01-16. As the channel is changed, the display will change to show the preset/hyperpreset, volume and pan associated with the displayed channel.
C01 VOL127 PAN=P
0000 Preset Name
PRESET/HYPERPRESET (PROGRAM) SELECTION
Press the cursor key repeatedly (or press Home/Enter) until the cursor is underneath the program number. A Program is a Preset or a Hyperpreset. As the data entry control is rotated, the program number and name will change. The displayed program will be assigned to the displayed MIDI channel. Programs are arranged into banks of 128, as shown in the diagram at left. Banks can be selected independently of the program number by pressing the Home/Enter button while turning the data entry knob.
|
|
|
|
|
|
↔ |
MIDI Channel Parameters |
|
|
C01 |
VOL127 PAN=P |
|
|||
|
|
0000 |
|
Program Name |
|
↔ |
Preset/Hyperpreset Name |
|
|
|
|
|
|
|
|
|
|
|
|
|
|
|
|
CHANNEL VOLUME
Press the cursor key repeatedly until the cursor is underneath the volume value. Rotate the data entry control to select volume 000-127. (This is the same parameter as MIDI volume control #7, and changes made over MIDI will be shown in the display.)
CHANNEL PAN
Press the cursor key repeatedly until the cursor is underneath the pan value. Rotate the data entry control to select pan values -7 to +7 or “P”. When “P” is selected, the pan value specified in the preset is selected. Any other value will override the pan parameter in the preset. (This is the same parameter as MIDI pan control #10, and changes made over MIDI will be shown in the display.)
14 Morpheus Operation Manual

BASIC OPERATION
MEMORY CARD
The memory card is a convenient method of saving and transferring presets and hyperpresets. Insert the card firmly into the slot on the front panel with the label facing up. Press the eject button to release the card. A RAM card stores 128 presets, 128 hyperpresets and 16 midimaps. RAM cards may be Write-Protected by moving the little switch on the end of the card. If a memory card is NOT inserted, the display reads “ --noCard-- ” for banks 3 & 4 and the list of selectable midimaps shrinks to 16.
MIDIMAP SELECTION
A Midimap is a set of parameters which can be used as a pre-sequence setup, storing the program and other parameters for each MIDI channel or it could be used as an “Effects Preset”, since each Midimap stores a complete effects setup. There are 16 Midimaps in Morpheus and an additional 16 Midimaps can be stored on a memory card.
To Select a Midimap
Press the Midimap key, lighting the LED. The current screen will be the one most recently selected since powering up Morpheus. The first screen in the menu is Midimap Select. Move the cursor to the lower line and use the data entry control to select one of the 16 Midimaps. The Home/Enter LED will be flashing. Press the Home/Enter key to load the new Midimap.
MIDIMAP SELECT
M00 -defMIDIMap-
RAM Cards can be used to store your own presets, hyperpresets and midimaps.
ROM Cards contain prerecorded presets, hyperpresets and midimaps. You cannot save data to a ROM card.
▼ RAM Cards need to be initialized before they are first used. They display will prompt you to initialize a blank card.
••• The “current Midimap” is remembered on powerdown, even though you may not have saved it. This effectively gives you a total o 17 internal Midimaps.
Simply scrolling through the list DOES NOT change the Midimap. You must move the cursor down to line two and press Enter. Try out the different Midimaps and notice that the effects change with each one.
Chapter 2: Basic Operation |
15 |

BASIC OPERATION
MULTI-TIMBRAL OPERATION
Multi-timbral operation means that the Morpheus can play more than one sound at the same time. To access multiple presets on different MIDI channels simultaneously, follow these instructions:
1.Set the MIDI mode to MULTI-Mode, using the MIDI mode function in the Master menu (page 22).
2.Decide which MIDI channels you wish the Morpheus to receive, and turn “All Messages” Off for the MIDI channels that you DO NOT want Morpheus to receive using the MIDI Enables in the Midimap menu (page 33). Turning “All Messages Off” turns that channel Off.
If you do not turn any channels Off, Morpheus will receive all 16 MIDI channels simultaneously!
3.Select the desired preset or hyperpreset for each of the MIDI channels you wish the Morpheus to receive using the Preset/Hyperpreset -> MIDI Channel selection screen in the Midimap menu (page 31).
4.Save the Midimap using the last screen in the Midimap menu.
5.Morpheus will now respond multi-timbrally on the MIDI channels you have specified.
6.The effects can be programmed and each MIDI channel assigned to an effects bus if so desired. The volume and pan position can be adjusted for each MIDI channel in the Midimap Volume and Pan screen. Remember to SAVE the Midimap or all of your work will be LOST when you select another Midimap.
PLAYING THE DEMO SEQUENCES
Morpheus contains a play-only sequencer with 4 different sequences to give you an idea of what is possible using this amazing instrument. Press and hold both the Midimap and Hyper buttons. The sequence will start momentarily. Press the Enter button to stop the sequence. Press the right cursor button to advance to the next sequence. Sequences will cycle automatically.
DEMO 1 2 3 4
ENTER=Stop >=Nxt
16 Morpheus Operation Manual

MASTER MENU
Chapter 3: Master Menu |
17 |

18 Morpheus Operation Manual

MASTER MENU
The Master menu contains functions that affect the overall operation of Morpheus. For example, changing the Master Tune will change the tuning of all the presets, not just the one currently displayed.
To enable the Master menu
Press the Master button, lighting the LED. The current screen will be the one most recently selected since powering up Morpheus. The Cursor will appear underneath the first character of the screen heading on line one.
To select a new screen
Press the Home/Enter button or press the Cursor buttonrepeatedly until the cursor is underneath the screen title heading. Rotate the data entry control to select another screen.
To modify a parameter
Press the Cursor button repeatedly (or hold the right cursor key while turning the data entry control) until the cursor is underneath the parameter value. Rotate the data entry control to change the value.
To return to the main screen
Press the Master button, turning off the LED.
MASTER MENU FUNCTIONS
• Master Tune
Master tune adjusts the overall tuning of all presets so that Morpheus can be tuned to other instruments. The master tuning range is ± 1 semitone in 1/64th semitone increments. A master tune setting of “+00” would indicate that the Morpheus is perfectly tuned to concert pitch (A=440 Hz).
MASTER TUNE +63
• Transpose
This function transposes the key of Morpheus in half-step intervals. The transpose range is ± 12 semitones or one octave.
TRANSPOSE
+12 semitones
Chapter 3: Master Menu |
19 |
MASTER MENU
•• Application: The user ey tuning can be used to une individual percussion struments.
It is possible to tune the itch up so high that the ange of Morpheus' pitch hifter is exceeded. If the itch will not go any higher, y using the Transpose ontrol instead of Coarse uning.
•• In order for the Pitch heel to control pitch, it ust be routed to this estination in the Realtime odulation Control screen.
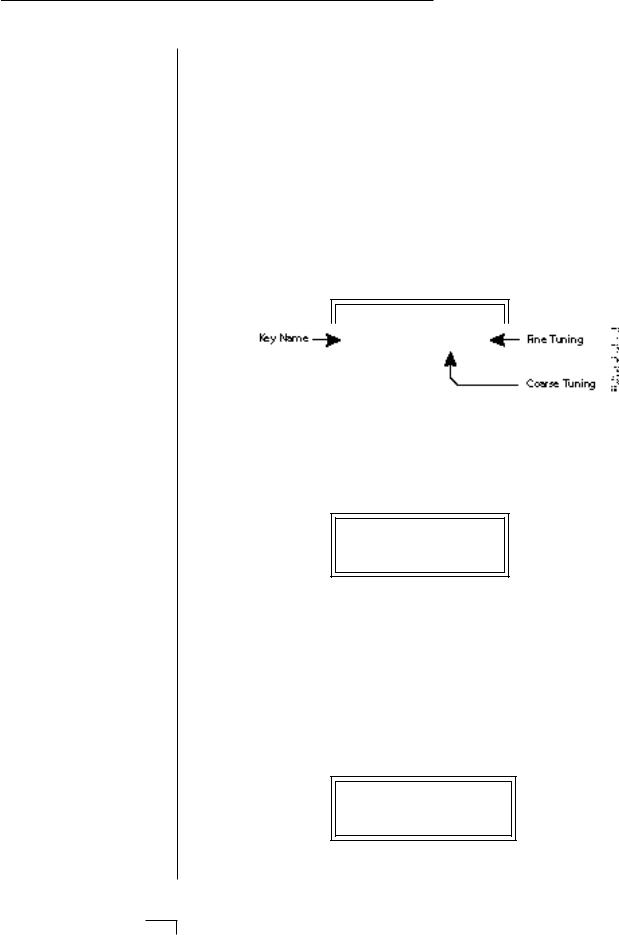
• User Key Tuning
In addition to standard twelve tone equal temperament, Morpheus contains four additional preset tuning tables (Just C, Vallotti, 19 tone, and Gamelan) and one user definable tuning. User Key Tuning allows you to alter the parameters of the user definable tuning stored in memory. The initial frequency of every key can be individually tuned, facilitating the creation of microtonal scales. Using the cursor key and the data entry control, select the key name, the MIDI key number and the fine tuning. The key name is variable from C-2 to G8. Coarse Tuning (which also happens to be the MIDI key number) is variable from 0 to 127. The fine tuning is variable from 00 to 63 in increments of 1/64 of a semitone (approx. 1.56 cents). For each preset, the specific tuning table is selected in the Preset menu.
USER KEY TUNING
Key:C1 036-00
• Global Bend
This function sets the range of the pitch wheel controller (even when pitch wheel is not routed to control pitch). The maximum pitch bend range is ± 12 semitones. This function only affects presets which have their individual pitch bend range set to global.
GLOBAL BEND
+/- 12 semitones
• Global Velocity Curve
Incoming velocity data can be modified by a velocity curve in order to provide different types of dynamics in response to your playing or to better adapt to a MIDI controller. This function allows you to select one of eight global velocity curves or leave the velocity data unaltered (off). Global velocity curve only affects presets which have their individual velocity curve set to global.
GLOBAL VEL CURVE 8
20 Morpheus Operation Manual