

Изделия из кожи
.pdfThis attractive braid can be worked with a single strand of lace. In the drawings I have shown one half of the lace dark so as to make the working as clear as possible.
One great advantage of this braid is that it can be worked without a needle if desired.
! Fig.1. Bring half the lace out through ' the top left hole and half through the
right.
Take the right hand strand across and into the third hole down.
Fig.2. The strand is then taken up, and comes out through the second
hole. It |
is pushed |
under the |
lace |
|
already in |
place and is then |
folded |
||
back out of the way. |
|
|
|
|
Figs 3-5.The left hand |
strand |
goes |
||
across to the right, |
in, |
up, across to |
||
> the left, in, up , under the strand on top and is then folded back out of the way.
Figs 6-8. The upper strand is now folded down and follows the same sequence.
When fig. 8 is reached the upper
strand is ready to fold down and continue on.
Fig. 9. The braiding can be given a raised effect by glueing down a strip ! of skived leather to the belt.
Glue is not essential, as the braiding will hold the extra piece of
4
0
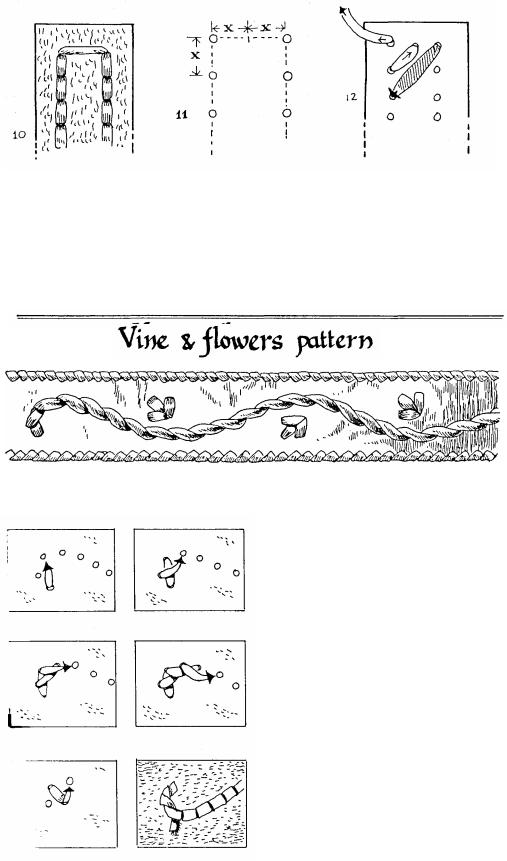
Fig. 10. When doing this braid I am always surprised at the way the front forms a complex braid, but the back of the belt only shows a pair of rows of neat stitches.
Fig. 11. In order to get a neat finish the holes are positioned like this. The
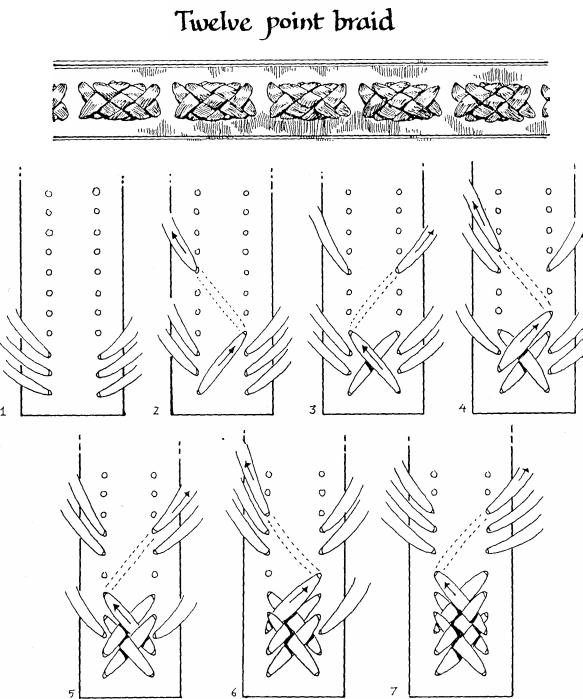
This is a simple pattern to work onto a belt. It looks very striking if
rows are positioned twice(x4x) the distance that the holes are apart.
Fig. 12. For an even neater start to this braid put an extra hole in the
centre and begin as shown. The end is done in the same way
.
the leather is dark and the lacing is a light colour.
Fig. 1. Punch the holes as small as possible and choose a wide rather than a narrow lace.
The sequence is simple, go forward two holes and back one. Figs 2-4. Continue the sequence for the whole length of the belt - forward two holes and back one.
Remember to always bring the lace out above the previous stitch. Fig.5. The flowers can be worked as you go along. Always put in the centre stitch first.
Fig.6. This is the back of the job. When you begin stitching you trap the loose end under a couple of stitches.
When the lacing is completed the end is also threaded through the stitches in the same way.
Like all braiding a needle makes the job much easier . If a proper lacing needle is not available a hairpin or piece of tie - wire can be used as a needle.
41
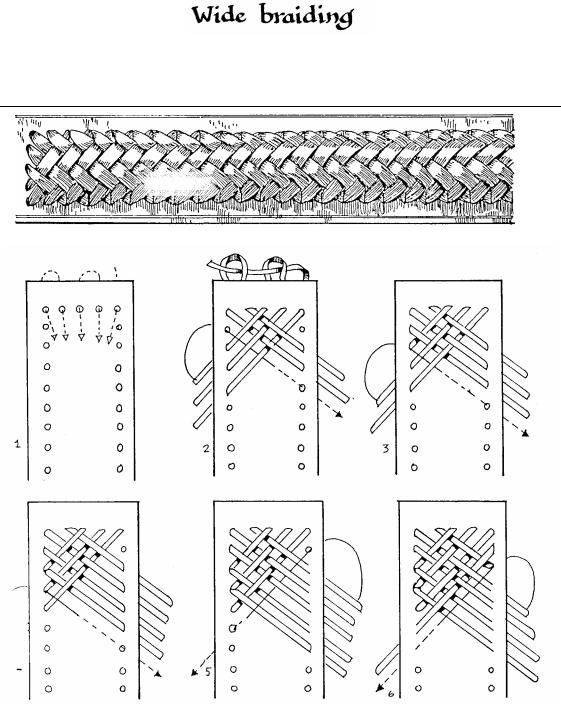
This unusual braid features a series of small braided sections, each of twelve points.
Fig. 1. Take three long lengths of lace and put them in the bottom holes to form six strands. Figs 2-4. For the first three moves each strand is simply laid on top of
42
the previous one.
Figs 5-6. The strands must be placed under the previous strands as shown. Fig. 7. The first braided section is now
complete, and the six strands are ready to begin forming the next section.
This wide braid is very attractive, and also has the advantage that it can be worked without a needle.
Fig.l. Five strands are used, but it is simpler to use three and put them in as shown in the dotted lines. Fig. 2. Arrange the strands as shown. make the upper left strand up and through the hole above it, then over one, under two.
Figs 3-5. The other strands are also taken up and through the hole above, then over and under until all fiv e strands are on the one side.
Fig. 6 The strands are now all worked back to the left side.
43
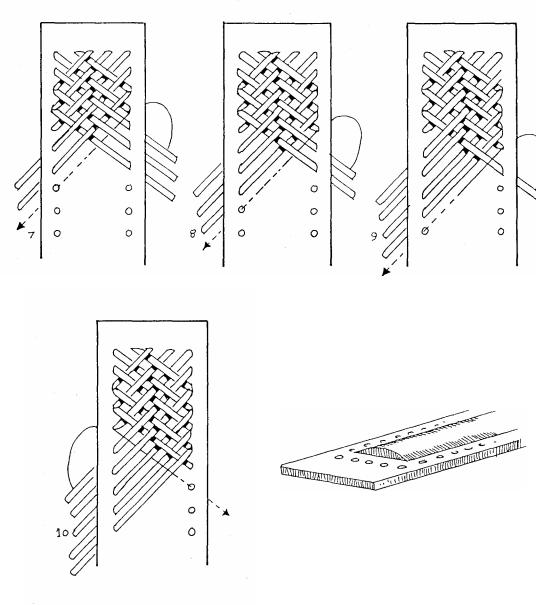
Figs 6-10. The same sequence continues. Each strand is taken up through the hole above and then goes over oneunder two -over two.
When all the strands are on the left side they are worked once again to the right, and so on.
This braid looks very attractive if a shaped piece of leather is placed underneath it, giving a rounded effect to the belt.
To make the sketch easier to understand the lace has been drawn very thin, but when working it use a lace wide enough to touch the strand next to it, so that the finished braid will look like that at the beginning of this section.
44
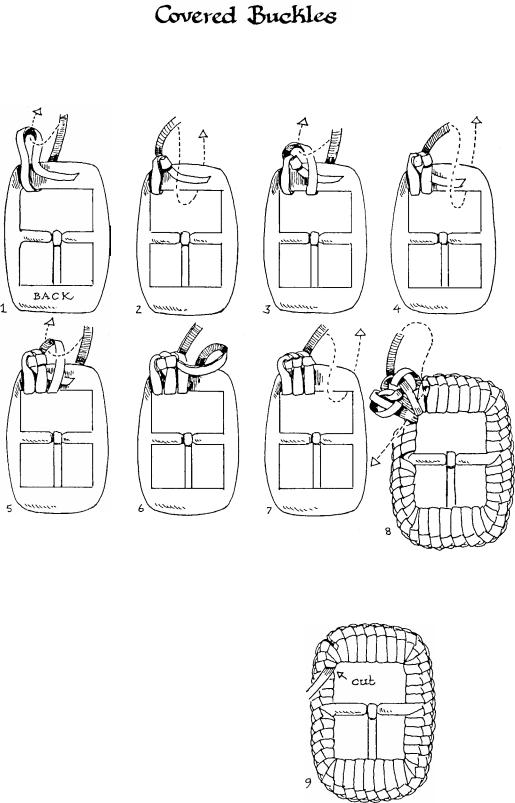
A leather covered buckle sets off a well braided belt. Although the method may look a little complicated it is quite simple once you have begun.
Fig. 1. |
Turn |
the |
buckle |
over, |
the braiding is done |
from the back.
Bend the lace as shown, then bring the end through the loop as shown by the dotted line.
Figs 2-5. As the braiding continues the end is hidden from view and locked in place.
Fig. 6. There is a technique to getting a good firm job with a regular edge.
The loop is held open as in fig.5 and the end passed through it. The loop is then pulled tight as in f ig.6.
Fig. 7. The end is then also pulled tight and the knot is complete.
A needle is not needed when doing this covering.
rigs 8-9. When finishing up leave the last two or three stitches quite loose. Pass the end of the lace through
The amount of lace needed will vary with each buckle, but it will
usually be around ten times the distance round the buckle.
the very first strand that began the
job, and feed it under the loose stitches.
Pull the loose stitches tight then pull the end firm and cut it off flush.
45
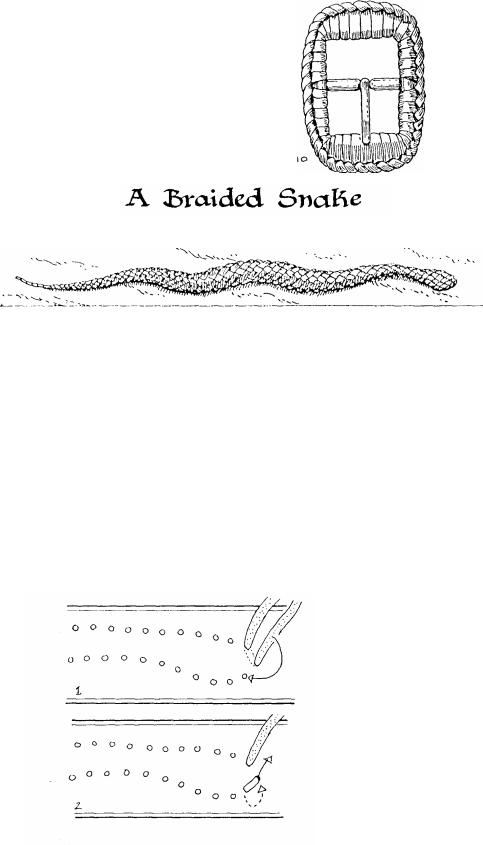
Fig. 10. This shows the finished buckle from the front.
All sorts of designs can be braided onto belts, and this is a typical sample.
The snake can be made to any length and width as desired, the one illustrated here was 350mm long and worked onto a belt 38mm wide.
A single strand of lace 3500mm long was used.
Fig. 1. Begin by putting the ends of the lace through two holes in the head as shown, then continue as
shown in the other drawings.
The dotted lines show where the lace goes when underneath the belt. Fig. 10. Continue braiding in the same sequence. This braid follows the same pattern as shown for a single strand centre braid, also illustrated in this booklet .
Figs 11-13. The very end of the tail is formed with only a single row of holes, and is worked with only a single strand of lace.
46
Foll ow the sequenc es shown here, when the tail is comple te t h e e n d
i s tucked firmly under a few stitche s at the back of the belt. The remaini ng length of lace is also tucked away under a few stitches
.
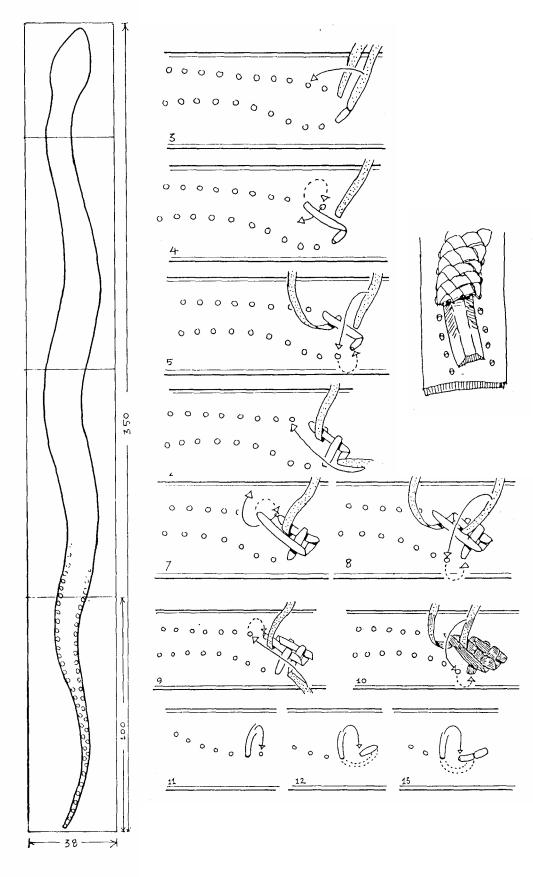
For the best effect make the holes as small as
possible |
|
and |
|
close together. |
|||
|
It |
is |
also |
possible |
to give |
||
t h e s n a k e |
a |
||
raised |
effect |
by |
|
putting |
another |
||
scrap |
of |
shaped |
|
leather under the braiding.
47
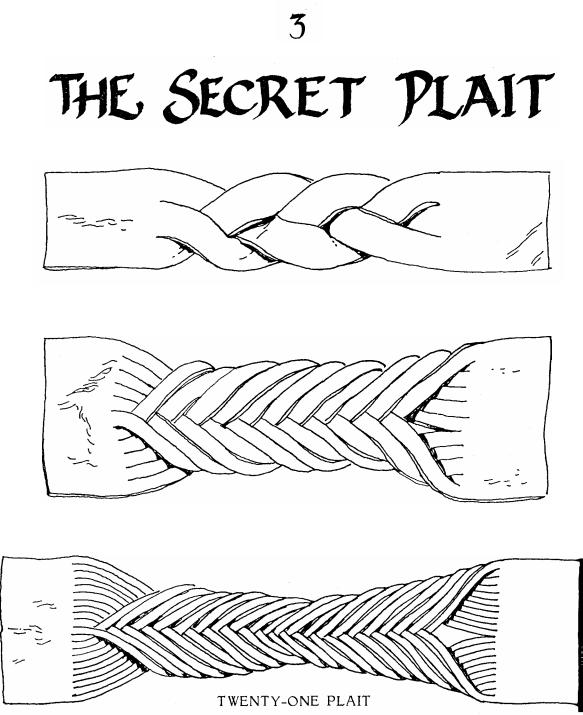
THREE PLAIT
ELEVEN PLAIT
This sketch shows what must be the most useless as well as the most complicated version of the secret plait to have been executed to date. I worked this one out on January 25 1983, and it is a 21 plait. Unfortunately I cannot see any possible use for it.
48