

Изделия из кожи
.pdfFig.21. The belly is plaited around the core. This is the same four plait that was used on the loop. Fig.22. Plaiting continues in this way. When completed the ends can be tied down with thread.
Fig.23. Use a board and give the belly
a good hard rolling to get it as smooth as possible . It may be necessary to wet the leather in order
to get a good finish.
If this is done then also give it a oiling before going any further.
Fig24. The handle and the belly are now covered with a final layer of plaiting. This is cut from a kangaroo hide.
(It is also possible to do this using ready-cut lace if full hides are not
available, but the problem then is that you may have to start with as much as a 16 plait in order to cover the handle properly. By hand cutting the lace you can taper it so as to only have to begin with an 8 plait.)
Begin by cutting |
f o u r |
|||
narrow strips, |
t h e n |
|||
i n c r e a s e |
i t |
t o six |
||
and |
finally |
|
eight, |
|
widening |
the |
strands |
||
as cutting continues. A very sharp knife and a steady hand are needed.
Purists cut the entire lengths by eye, but lazy people use a strand cutter to cut a uniform width for a certain distance, then do some freehand tapering, then use the strand cutter again for another length.
Fig.25. This is how t h e s t r a n d s s h o u ld
look |
when |
straightened |
out. The |
m e a s u r e m e n t s a r e only a guide, but roughly you will lose a third in the plaiting and fixing on the fall.
F i g s 2 6 - 28 . The strands are tied onto t h e h a n d l e a n d plaiting begins. For the 8 plait the top strand is brought around the back, in between the opposite four and back to its own side.
The upper strand on the opposite side is then brought around in the same way, and so on.
183
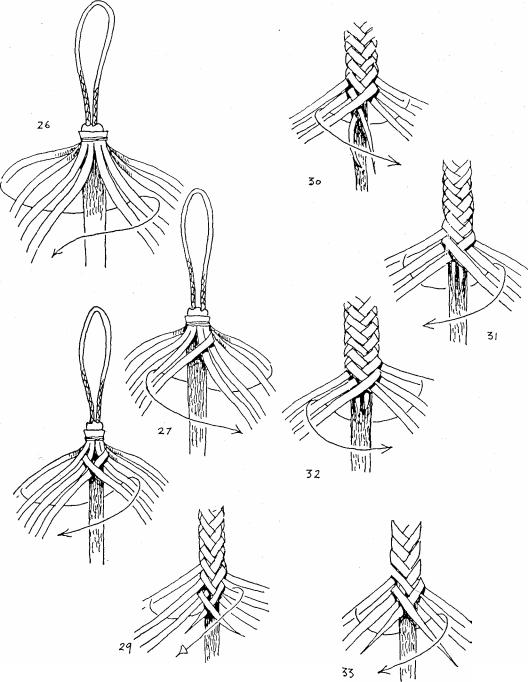
Figs 30-32. Plaiting continues in this way, and the short ends are hidden.
28
Fig.29. The 8 plait continues until the shorter lengths of lace are nearly used up, or until the plaiting becomes too bunched up.
When the short ends are in this position you change to a 6 plait. The top lace on the left comes around the back and goes below the to p lace on the right as shown.
Fig. 33. The 6 plait continues until you again come to two short ends. Now the plaiting changes to a 4 plait. This is easy because it is the same sequence as the 6 plait. The top left strand is brought around the back and under the top right strand.
184
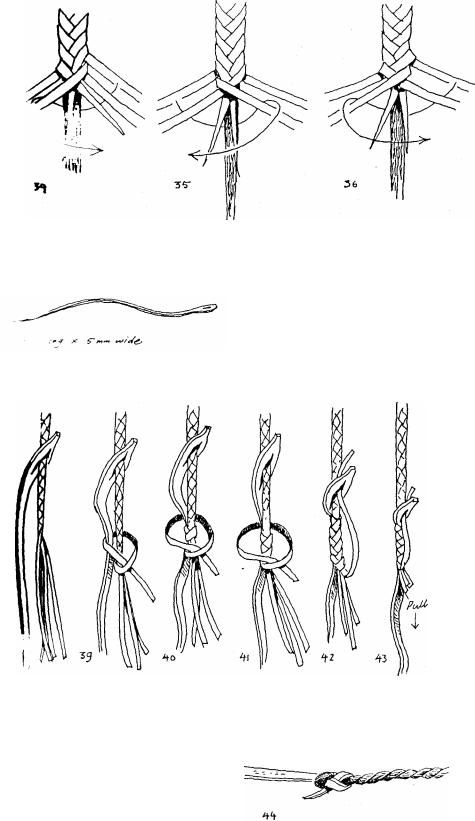
Figs 3436. Plaiting continues in this way, and the 4 strand plaiting goes to the end of the whip.
Fig.37. The fall is fitted to the whip. This can be of the dimensions shown or whatever you fancy. For a good whip the edges should be skived and
the |
fall made |
as round |
as |
possible. |
37 |
It |
should |
be |
of good |
strong leather
such as redhide.
Figs 38-43. The fall is fixed to the end of the whip as shown.
Fig 44 If you wish to add a cracker to the whip it is attac hed to the fall with this knot.
185
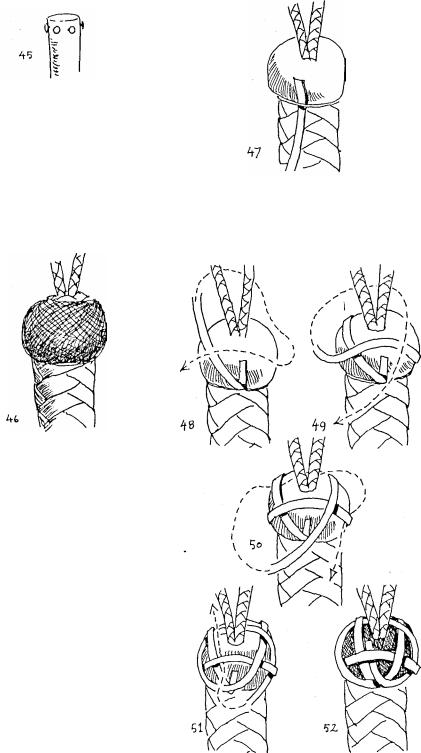
Fig,.45. The whip is now complete
except for the knob on the handle. The shape of the knob is built up with
string or thread.
On a wooden handle the shape can
be built up by tacking on scraps of leather and then paring them down.
When making a whip with a wooden handle it is a good idea to partly drive a few tacks into the timber before winding on the string. This stops the handle slipping off.
Fig.46. Tacks cannot be used in the snake whip, so as a precaution it is not a bad idea to apply some glue to the handle before you begin winding the string or thread on, and plaster the knob with more glue as you build it up.
COVERING THE KNOB METHOD 1
A Turk's-head is used to cover the knob. There are two ways to tie this particular Turk's -head, and I have illustrated both.
The first is tied on the knob itself, while the second is first tied around the fingers and then slipped over the knob.
Some whipmakers use the first method, others prefer the second. I tie it around my fingers because I f i n d i t e a s i e r t o r e m e m b e r t h i s method. Harry, who makes whips for our saddlery business, always ties around the knob.
186
' /
Fig.47. The length of lace needed will vary from knob to knob, but 1 . 5 metres of 4 or 5mm lace should be ample.
The end of the lace can be tied as
shown, or just held with the thumb. Figs 48 -52. This is how the knot is formed. When completed as far as fig. 52 move on to fig.60.
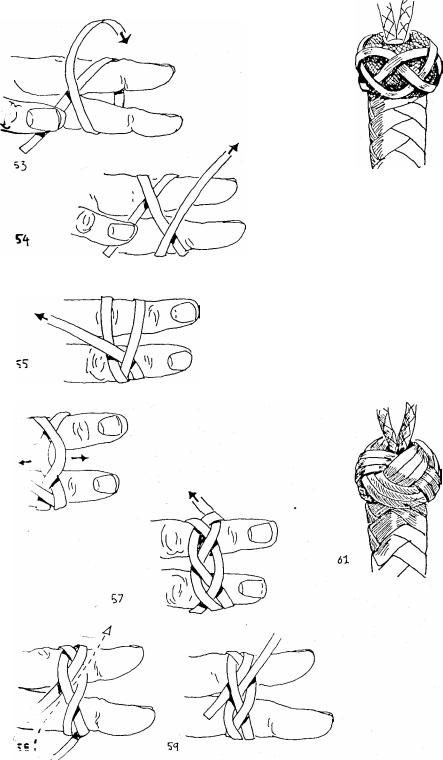
METHOD 2
Figs 53-59. This is how to form the
Turk's-head around the fin gers.
Fig.60. The Turk's-head is spread around the knob like this.
The remaining lace is taken round the knob two, three or four times, following the first run, until the knob is covered.
Fig.61. This is how the finished job should look. In this case the lace was taken around three times.
187

188
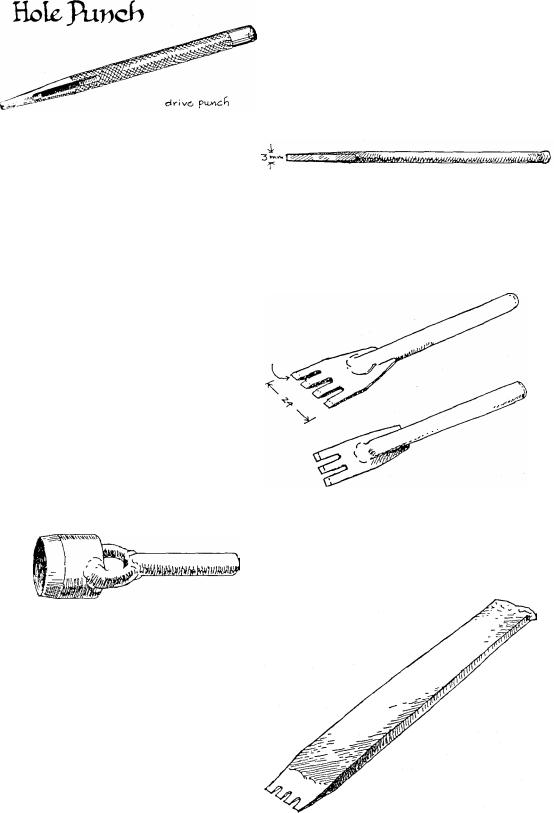
Holes are punched with either a rotary punch or a drive punch. The rotary punch looks like a pair of pliers and is favoured by the amateur worker because the head can be revolved to bring into position different sized punches.
This type of punch is not favoured by saddlers because it is tiring to use on big jobs, and because the punching tubes wear out fairly quickly. Instead they use drive punches.
The drive punch should only ever be struck with a rawhide or wooden mallet, otherwise it too will soon wear out.
It is not practical to make small drive punches, but I have found large ones that have been made by simply sharpening up a piece of metal tube.
However home-made punches do not work very well due to the constant problem of having to remove the circles of leather from inside the tube.
To overcome this the punch must designed differently, and the sketch shows a large one made for us by a local blacksmith.
This punched a 30mm hole.
Punches of this size are not used so much for making holes but rather for producing circles of leather for various jobs. The blacksmith also produced a similar type of punch in the shape of a heart, and people would have their initials stamped on these and hang them around their necks. For us it was a great way to use up all the small scraps of leather.
When making up jobs that are to be sewn together with leather lace most people prefer to punch holes because it is easier to thread the lace through them.
Some craftsmen consider these holes to be ugly and prefer to cut slits for the lace. The slits look neater on the finished job.
A slit punch can be made in minutes by hammering the end of a large nail flat and then sharpening it.
The job of punching slits can be speeded up by using a punch with a multiple head. The sketch shows a
5mm
commercially made pair.
A mutiple punch can be made by grinding down an old file and cutting teeth into it.
The steel in files is very hard and will soon blunt the blade of the hacksaw when cutting the teeth, so
189
first heat it red hot and let it cool down slowly.
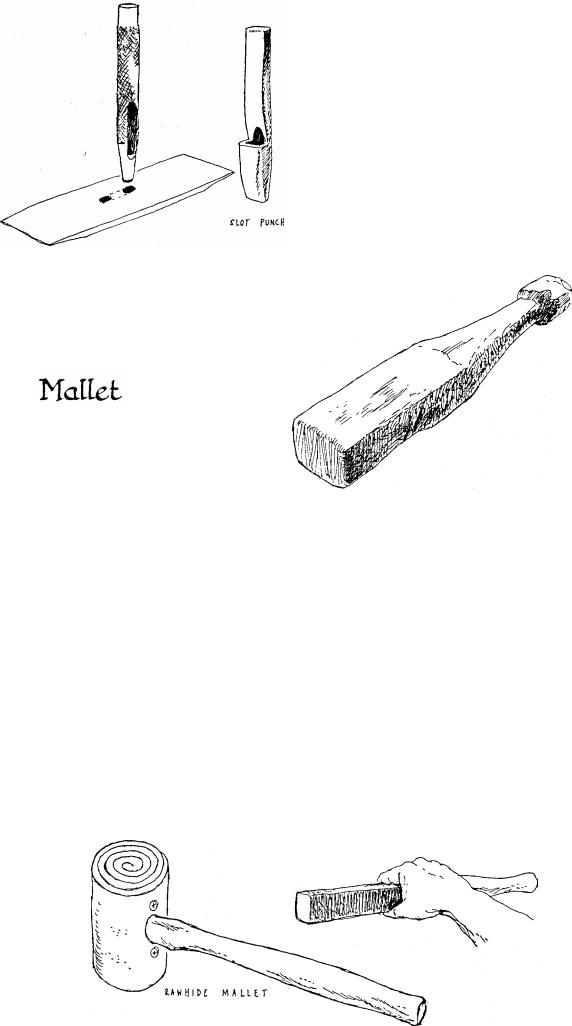
SLOT PUNCH
Slot punches are very expensive, and homemade ones are not usually very good.
The answer to this problem is to simply punch two hole s w i t h a n ordinary round punch and then join them with two cuts of the knife.
Leatherworkers usually have a couple of mallets, a heavy one used when punching large holes and a lighter one for use with decorative stamps.
Punches and stamps should never ever be struck with a metal hammer as this will mushroom out the end of the tool and shorten its life.
I have seen an expensive punch reduced in length from 100mm to 35mm over a couple of years by a slipshod worker with a steel hammer.
The rawhide mallet is the best for leatherwork, a stamp will last a lifetime if only ever struck with one of these.
190
I have yet to meet anyone who has successfully made a rawhide mallet, b u t i t i s a n e a s y j o b t o m a k e a wooden mallet.
This can be chopped out of any scrap of hardwood. Softwood is not suitable as the ends of the metal tools soon break up the surface of the wood.
The shape and size is a matter of personal choice, usually governed by the piece of timber that you choose for the job. The one in the sketch is 70x50x330, and is also used as an ordinary woodworking mallet when using chisels. This size is right for punching large holes, but too large for use with decorative stamps.
360x50x30 is a better size for a stamp mallet.
Many of the top American leather carvers prefer this style of mallet for carved leather work.
They do not hold it in the conventional manner as is done when punching holes, but instead hold it so that they are looking at it side on.
This allows a more controlled strike, as well as giving a better view of the stamp. The smaller mallet is also made from hardwood, the heavier the better.
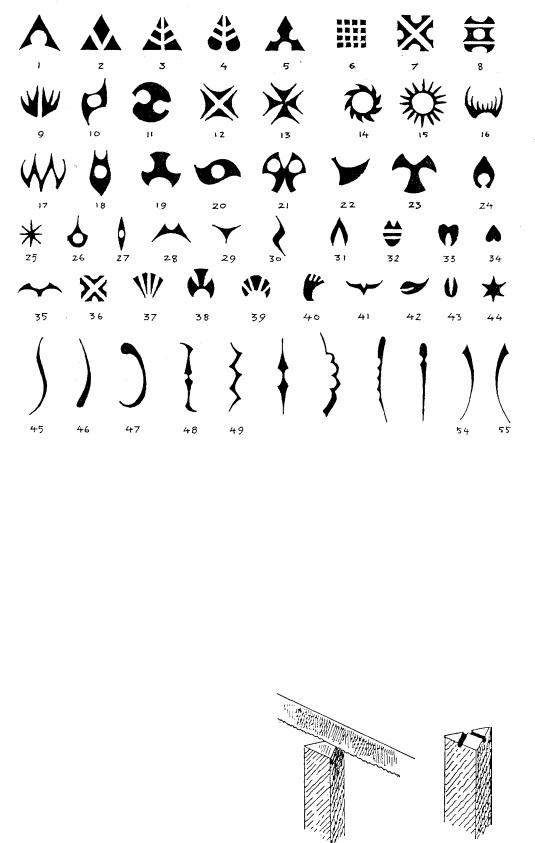
Stamps |
|
|
|
|
|
|
50 |
5) |
52 |
55 |
||||
|
|
|
|
|
|
|
It is possible to make a good |
|||||||
|
|
|
|
|
|
|
|
|
|
|
collection of stamps by hand at no |
|||
|
There are three ways to decorate |
cost at all. The illustration shows the |
||||||||||||
leather , carving, embossing and |
fifty or more that are on my bench at |
|||||||||||||
stamping. |
|
the |
design |
is |
cut into |
the present. |
|
|
||||||
* |
In |
carving |
|
These have been made over the |
||||||||||
the leather |
and various tools are then |
years, often to make up a particular |
||||||||||||
used to press down parts of the design |
design. They are made from scrap |
|||||||||||||
and also add texture and patterns. |
steel, large nails or old files. |
|||||||||||||
American |
saddles |
are |
decorated |
in |
|
Designs .1-5 are made from |
||||||||
this way. |
|
|
|
|
|
|
|
|
three -cornered files. Files are very |
|||||
* |
Embossing is an |
|
old |
technique for |
hard, and in order to soften them |
|||||||||
which |
only |
a |
single |
tool |
is |
needed. |
they should be first heated to red hot |
|||||||
The making of an embossing tool is |
and then be allowed to slowly cool. |
|||||||||||||
described in this booklet. |
be embossed |
A simple and attractive design such |
||||||||||||
Any freehand |
design |
can |
as no.2 can be made with just two |
|||||||||||
onto leather. |
|
|
|
|
|
|
|
cuts with a hacksaw. |
|
|||||
* Stamping is the creation of various |
|
|
|
|
||||||||||
decorative |
patterns |
|
by |
the |
use |
of |
|
|
|
|
||||
stamps |
which |
are |
|
struck |
into |
the |
|
|
|
|
||||
moist |
leather |
using |
a |
|
leather |
or |
|
|
|
|
||||
wooden mallet. |
|
|
|
|
|
|
|
|
|
|
||||
|
A large variety of commercially |
|
|
|
|
|||||||||
made stamps are available, but a good |
|
|
|
|
||||||||||
working collection can easily cost a |
|
|
|
|
||||||||||
hundred dollars or more. |
|
|
|
|
|
|
|
|
||||||
19
1
Offcuts of round mild steel are very useful. A good variety of designs
can be created by drilling holes and then using a file. This is the design shown in no.20.
Other designs, such as no. 16 are
created just with the file.
Flat steel can be used for the long designs 45 -55. Sometimes the steel may be hammered into a curve, but
most of the work is done with a file. The amount of dampening needed by the leather before the stamping is
done varies according to the type and finish of the leather. Some leathe r needs only sponging with water while certain types of harness leather require soaking. Experiment with a scrap before beginning.
192
I
Tools
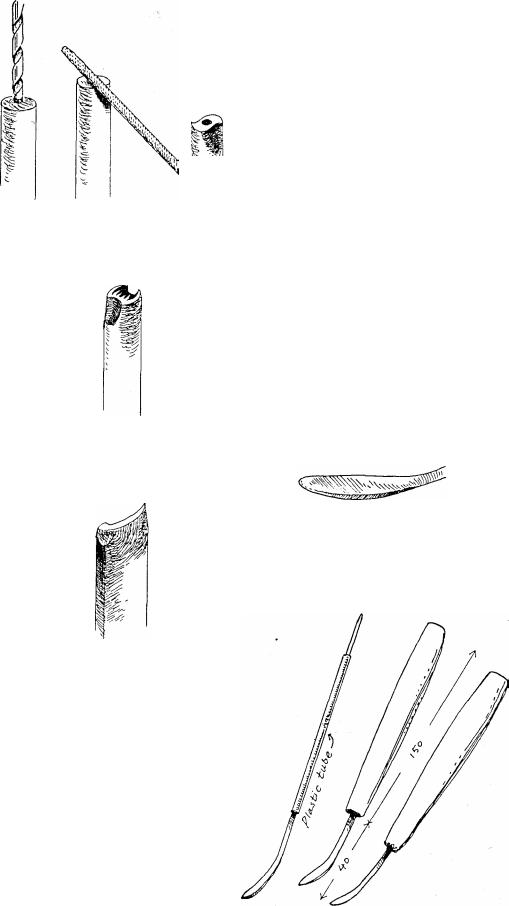
The difference between leather carving and embossing is that in carving the surface of the leather is actually cut and then hammered down with a variety of tools. This makes the design stand well out from the leather.
When leather is embossed the background is only pressed down, usually by hand, and so the design does not stand up so high.
Embossing is a very old art, probably much older than carving, and it is a pity that it has gone into a decline.
Its great virtue is the small number of tools required. Quite a few tools are required to properly carve leather, but embossing can be done with one simple tool that can easily be made by anyone.
They can be made with scraps of fencing wire or brazing rod. Brass is good because it does not rust.
The wire is slightly hammered and then bent. It is ground into the shape shown and made as smooth as possible. The actual dimensions do not matter, it may be an idea to make a small one for fine work and a larger one for broad curves.