

Изделия из кожи
.pdfFig. 1. If using two colours place the six strands as shown and tie them onto the core. Cross the two front strands as shown by the arrows.
Fig. 2. Take the back right hand strand and bring it across as shown.
Fig. 3. Take the upper left strand and bring it through as shown.
Fig. 4. Now the sequence begins, Take the upper left strand and bring it around the back as shown, then over- under-over.
Plaiting continues in this manner.
7
The seven plait is not usually worked for its own sake. However whips are commonly worked with an eight plait, and as the whip tapers strands are worked in and dropped so that it will end up as a four plait.
Many whipmakers drop two strands at a time, so that they work an eight plait, then a six then a four. Others may drop only one strand at a time, and so will need to know all the plaits down to four.
Four strands are arranged on one side and three on the other, and the sequence is shown by the arrows.
115
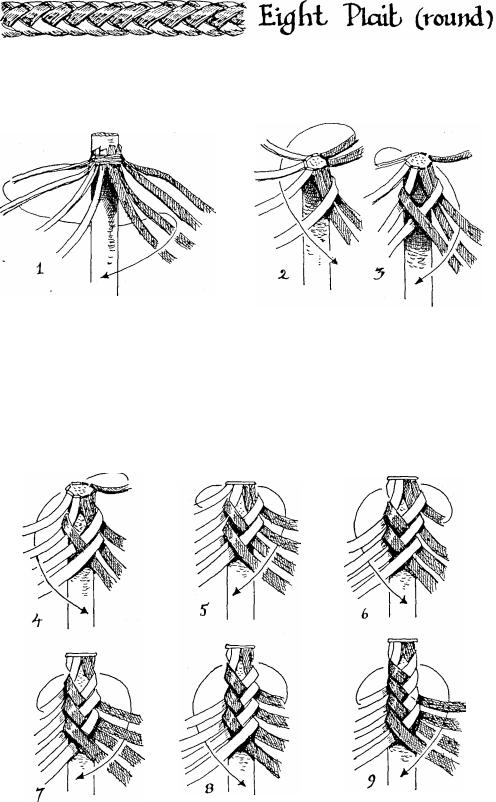
The eight plait is both useful and attractive, and is an easy one to remember. It is always worked around a core, either solid or flexible.
Fig. 1. Tie the strands around the core. For a good job the strands should all touch each other when they are tied around. If they do not do this the finished job may show gaps.
Take the back left hand strand, bring it around the back and through the middle of the opposite four.
Fig.2. Take the back right hand strand and bring it around the back and through the middle of the opposite four.
Continue the sequences as shown in the drawings.
116
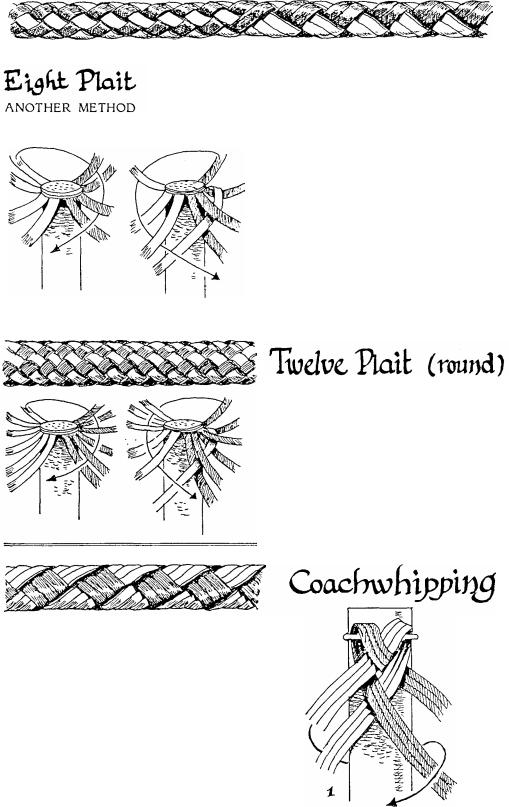
Coachwhipping is a much faster method of plaiting with twelve strands.
The twelve strands can be tied onto the core, or six strands can be doubled and put together as shown in fig. 1.
The strands have to be given a t w i s t s o t h a t t h e g o o d s i d e i s showing on all strands.
The eight plait can also be done in an over one -under one sequence. Although this is much slower than the above method it is often used by whipmakers who will use the fast method for the bulk of the whip but include short sections of this plait as a decorative touch.
The above sketch shows what it looks like when the change is made from one to the other.
The under one - over one sequence can be used for a ten plait, but this plait is not often used. The method is the same as that shown for the 8 and 12 plait.
The under one - over one sequence can be used for a twelve plait, and also for a 14, 16 and so on, but it is a slow method and not often used.
The sketches show the sequence to be followed.
117
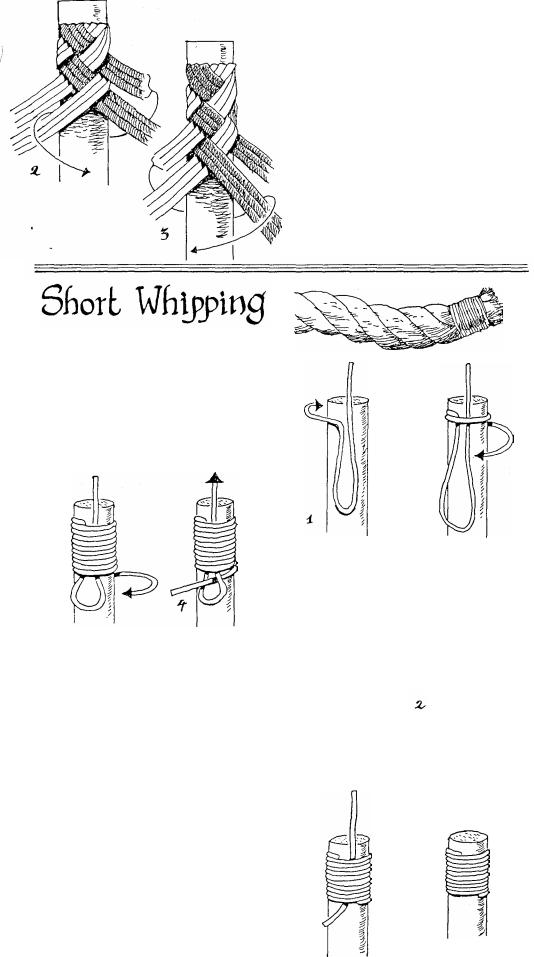
This is the easiest whipping to remember. Its only limitation is that it cannot be made as long as the long whipping described elsewhere. This is because the whipping must be put on as tightly as possible, and if you make it too long it becomes difficult to haul the end through when finishing.
Figs 3 & 4. When sufficient wrapping has been done the end is taken through the loop.
Figs 5 & 6. Pull on the end sticking out the top, this will cause the loop to tighten and pull the bottom end inside the wrapping. Stop when you judge the end to be half way up inside.
Trim
Figs 2 & 3. The plaiting sequence is quite simple, it is the same as a round four plait, except that you work three strands each time.
Coachwhipping can be done in a variety of ways, for instance 16 strands can be put into pairs and worked as an 8 plait and so on.
Coachwhipping can be used in many ways, worked in rope; on ship's railing or in leather strands on whip handles.
Fig.l. Bend the cord as shown. Leave enough end sticking up to allow a good grip later.
Fig.2.Begin wrapping as tightly as possible.
118
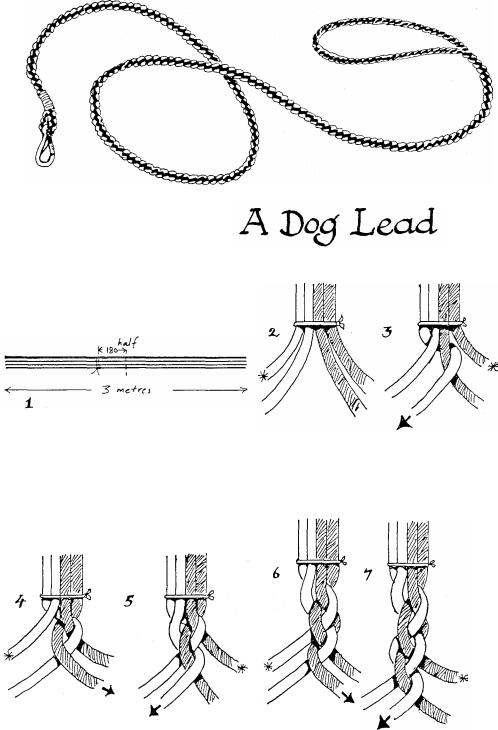
The Doubled Four Plait is a good one to use when you wish to put a
loop or handle at one end of a rope, as for instance when making a dog
lead.
Fig.l. For a lead a little over a metre long you will need four lengths
of cord, each three metres long. By using two different colours an
attractive pattern can be created. Divide the cord in half, come
back 180mm and tie it together with a scrap of thread.
Fig.4. Take this across the back and between the pair on the opposite side. Pick up the one marked *.
Fig.5. Across the back, through and return. Pick up *.
Fig.2. Divide the cords as shown and pick up the one marked *. Fig.3. Take it across the back and between the pair on the opposite side. Pick up the one marked *.
Fig.6. Across the back and through the opposite pair. Pick up *. Fig.7. Across the back, through and return. Pick up *. Plaiting continues in this manner.
119
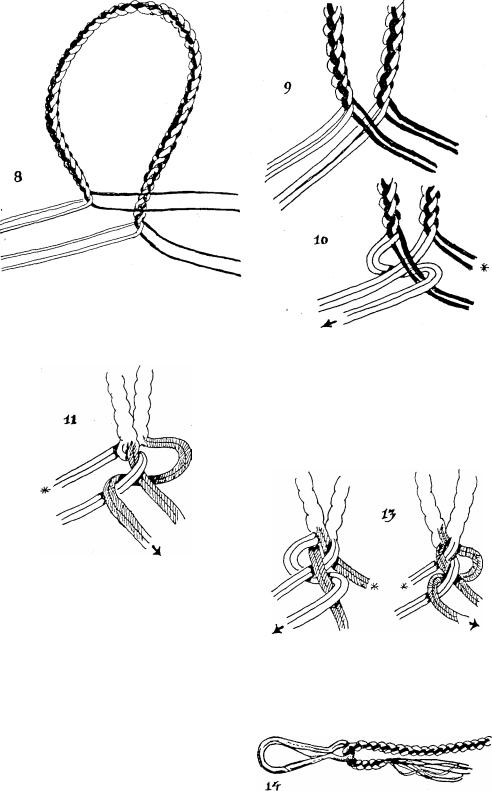
Fig.8. Continue plaiting until there is the same amount each side of the centre line. Form the loop.
Fig.9. The left side goes over the
right. |
The |
same four |
plait |
|||
Fig. 10. |
||||||
continues, |
but |
this |
time |
you |
work |
|
with |
doubled |
cords. |
Take |
the |
upper |
|
left |
pair, bring them around the back |
|||||
and through. Pick up the pair marked
Fig. 11. Take them across the back and through. Pick up the pair marked
Fig.14. When the plaiting is finished slip the end through the loop in the snap-hook.
If you have the patience it is possible to now take all the cords and run them back up the job following the pattern of the previously plaited section.
However this is a slow job and it is much easier to simply whip the end.
12.
Figs 12 & 13. Plaiting continues in this same matter, take the pair through as shown and pick up the pair marked *.
120
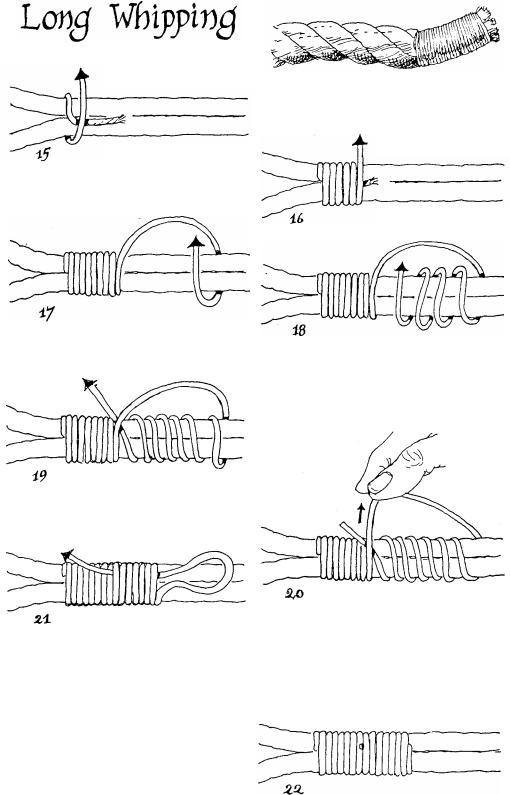
Fig.l6.Continue winding until the end has disappeared.
Fig.15. Bend the end of the cord down and begin winding.
Fig.17. Form a 'bridge' with the cord.
Fig.18. Continue winding in the same clockwise direction but work towards the already wound section.
Fig.19. Take the cord out under the end of the 'bridge'.
Fig.21. When the winding is finished the job will look like this. Pull the end in the direction of the arrow.
Fig.22. Pull the end tight and then cut it off flush.
Long Whipping can be used to form a loop, as in this case, or to bind the end of a rope to prevent it fraying.
Fig.20.
Take the
end of the 'bridge' and begin to wind it tightly around.
121
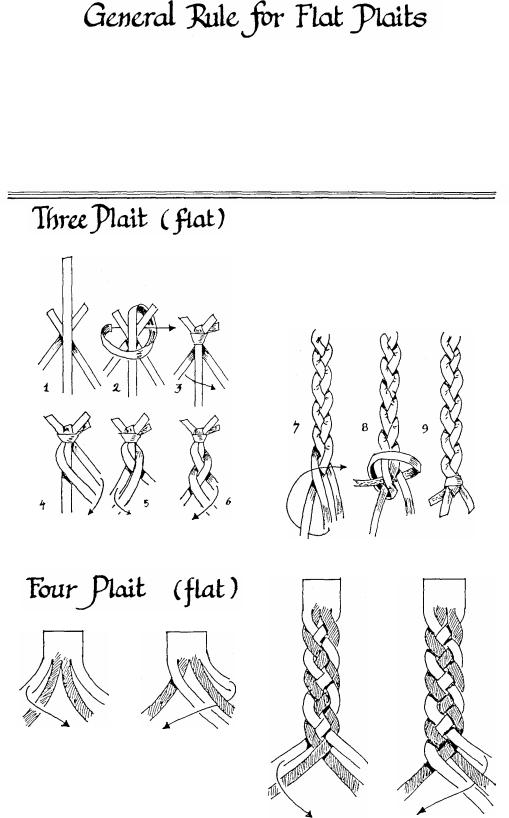
If you care to study the following drawings you will notice that all flat plaits follow the same sequence.
The strands are divided in the middle, then the outside left strand is taken into the middle in an over one - under one sequence.
The outside right strand is then
Bring |
the |
and into the |
|
outside left strand over |
|||
middle, then bring the |
outside |
right |
|
strand under-over. Continue |
this |
||
sequence. |
|
the job over |
|
When finishing turn |
|||
122
brought into the middle in either an over - u n d e r o r a n u n d e r- ove r sequence, depending on whether
the plait is of an odd or even number of strands.
When finishing off the plaiting the neatest system is the one shown for the four plait, this can be used
for any number of strands.
I have already illustrated the working of the three plait at the start of this booklet. This is an easy plait to use for a hat band.
Figs 1-6 show how to begin the plait when using lace, and figs 7-9 show how to finish it off.
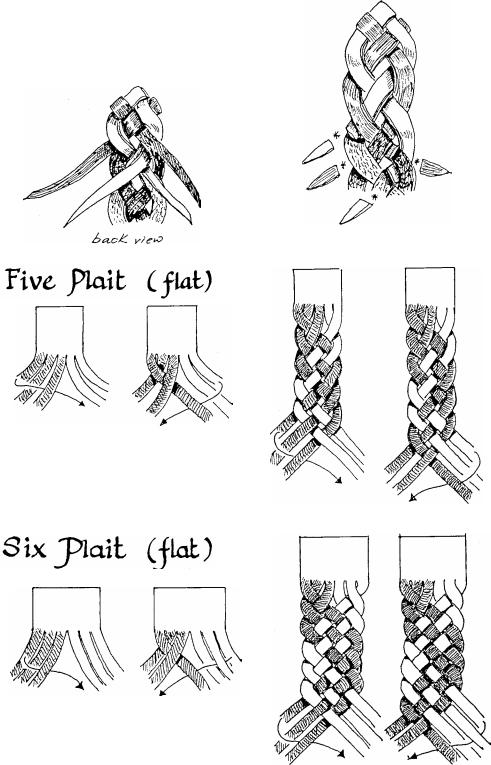
so that the rough side is facing you. Fold each strand down and plait it back onto itself.
Continue plaiting back until all the strands are firm and will not unravel, then trim the ends off neatly.
Bring the outside left strand over-under, then bring the outside right strand over-under.
Finish off the same way as the four plait.
Bring the outside left strand over-under, then bring the outside right strand under-over-under.
Finish off the same way as the four plait.
123