

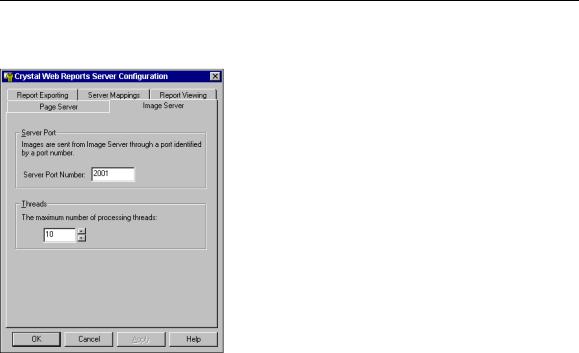
Image Server Tab
Use the Image Server Tab to control the settings for the Seagate Crystal Web Image Server. You can change the TCP/IP port used by the Image Server or set the maximum number of threads the Image Server can generate to handle requests.
Image Server settings are described below:
Server Port
Use this text box to specify a TCP/IP port number for the Image Server to listen for requests and to return information. For valid values for this port, refer to your web server software or TCP/IP documentation. The default port, if available, is 2001. This port must match the port specified for Crystal Image (.cri) files in the
Server Mappings Tab, Page 22.
Threads
The Image Server is a multi-threaded application that generates a new thread for processing every image request it receives. Threads consume system memory and resources, though, and large numbers of threads can slow down the overall performance of a system.
Use this option to specify a maximum number of threads that can be generated by the Image Server. If the number of requests received by the Image Server exceeds the number of threads specified, additional images are not generated until existing threads have been freed up.
Crystal Web Report Server |
20 |
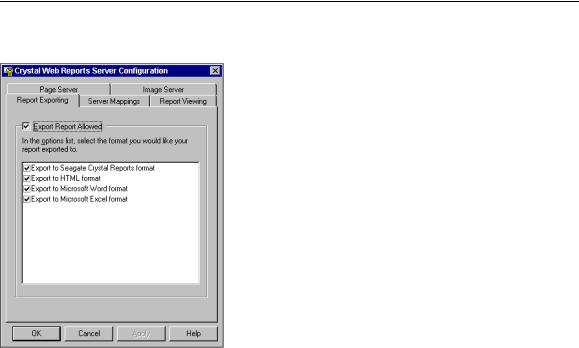
Report Exporting Tab
The Report Exporting Tab lets you determine whether or not users can export reports from a Smart Viewer and which formats they can export to.
Export Report Allowed check box
Make sure this check box is checked if you want to allow users to export reports they view from inside one of the Crystal Smart Viewers. By default it is checked. If you remove the check, users can not export reports at all.
Export Formats list box
If you choose to allow users to export reports from one of the Crystal Smart Viewers, select which export formats they are allowed to export to using the Export Formats list box. Place a check in the check box next to each of the formats you want to allow. Currently, reports can be exported to Seagate Crystal Reports format, HTML, Microsoft Word, or Microsoft Excel.
NOTE: If a user exports to HTML format, the resulting report will not be available through the Web Reports Server.
Crystal Web Report Server |
21 |
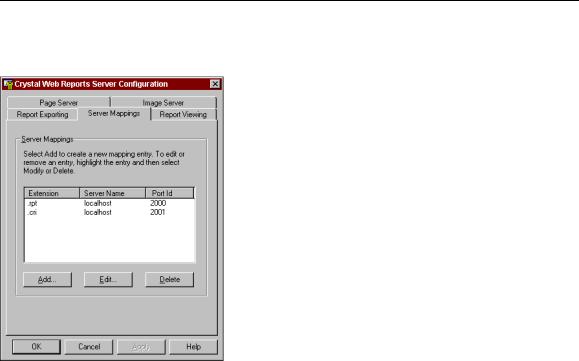
Server Mappings Tab
Use the Server Mappings Tab to map the TCP/IP ports used by the Page Server and Image Server to specific file extensions (.rpt and .cri). These ports must correspond to the ports specified on the Page Server Tab, Page 17, and the Image Server Tab, Page 20.
Server Mappings list box
This list box contains information about each of the file extensions used by the Web Reports Server. Each item in the list contains the file extension being mapped, the name of the Web Reports Server that you are configuring, and the TCP/IP port used by the Web Reports Server application that handles the corresponding file type.
When the Web Reports Server is first installed, the Server Mappings Tab should contain entries for Report (.rpt) files and Crystal Image (.cri) files. The ports specified for each file type should match the port specified on the Page Server Tab, Page 17, and the Image Server Tab, Page 20, respectively.
Add button
Use the Add button to add a new file type mapping for the Web Reports Server. When you click Add, a dialog box appears asking for the file extension of the new file type, the TCP/IP hostname of the server, and the TCP/ IP port used by the application that handles that file type.
NOTE: In most cases, you do not need to add a file type mapping unless upgrading to another Seagate Software product.
Crystal Web Report Server |
22 |
Edit button
Use this button to change information about any of the file types listed in the Server Mappings list box. Select the item in the list, then click Edit. The Edit Mapping dialog box appears and allows you to make changes to the file extension, the TCP/IP host name of the server, or the TCP/IP port used by the application that handles that file type. For example, if the TCP/IP port used by the Page Server is changed on the Page Server Tab, Page 17, then you will also need to change the port setting for the .rpt file extension in the Server Mappings list box.
Delete button
Use Delete to remove any of the entries in the Server Mappings list box. Simply select the item in the list, and click Delete. You will be prompted to verify the delete before it is actually performed.
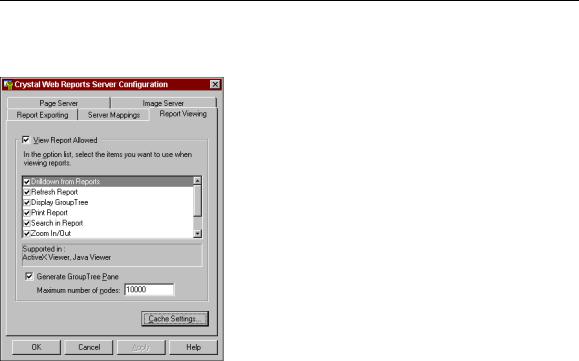
Report Viewing Tab
Use the Report Viewing to control what options are available to users when they view a report inside a browser. Additionally, you can access the cache settings from this tab to control how reports are cached on the server.
Crystal Web Report Server |
23 |
The Report Viewing Tab provides the following options:
View Report Allowed check box
In some environments, you may want to design a web site that allows only exporting of reports, but no onscreen viewing. In such cases, you can remove the check from the View Report Allowed check box. If this check box is not checked, no one may use the Web Reports Server to view reports inside a browser.
Smart Viewer options list box
NOTE: The following doesn’t apply for Crystal Smart Viewers which are accessed via an Applet or Object tag in an HTML page. In that case options viewer options are set via parameter tags in the page.
Use the items in this list box to control the options available to users viewing reports inside one of the Crystal Smart Viewers. If, for instance, you do not want the user to have the ability to refresh report data then remove the check from the Refresh Report check box. Refer to Database Refresh Time, Page 19 for more information on allowing users to refresh report data.
Each of the items in this list box corresponds to a control that appears in the Crystal Smart Viewers. Add and remove checks in the check boxes to turn on and off the availability of each option.
Generate Group Tree Pane check box
Use this check box to control whether or not a Group Tree is generated for Smart Navigation inside Crystal Smart Viewers. Generating a group tree for a report requires that the Web Reports Server make an additional pass through the report data to create the Group Tree. This can cause response delays and requires additional system resources, especially if the report contains a large number of groups or multiple groups within groups. For more information, see Smart Navigation, Page 26.
Maximum number of nodes text box
If you allow Group Trees to be generated for Smart Navigation in reports, you may want to specify a maximum number of nodes that can appear in the Group Tree, limiting the time spent by the Web Reports Server to generate the Group Tree. This may be especially helpful if you are distributing large reports with extremely large numbers of groups.
Crystal Web Report Server |
24 |
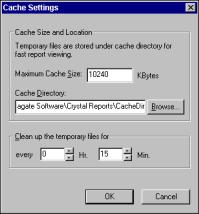
Cache Settings button
Click this button to make changes to the report cache directory. The Cache Settings dialog box is displayed:
This dialog box contains the following controls:
Maximum Cache Size text box
This is the maximum space, in kilobytes, that can be used on the Web Reports server system drive to cache report pages. If report requests begin to exceed this drive space, older pages will be deleted (based upon a LRU algorithm) from the cache until there is room for newer pages.
Cache Directory text box
This is the directory where cached reports are actually stored on the server system. If you accepted default directory settings during installation, this directory will be
C:\Program Files\Seagate Software\Crystal Reports\CacheDir
Clean up the temporary files section
If the space required by pages being cached exceeds the space set by the Maximum Cache Size setting, the Web Reports Server must clean up older report pages. The Clean up time setting indicates how often the Web Reports Server checks the cache to see if it has exceeded the Maximum Cache Size, and, if so, the Web Reports Server begins deleting files.
Crystal Web Report Server |
25 |