Writing Business Reports / How to create a report using Word
.pdf
How to create a report using Word
Using heading, sub-headings and styles
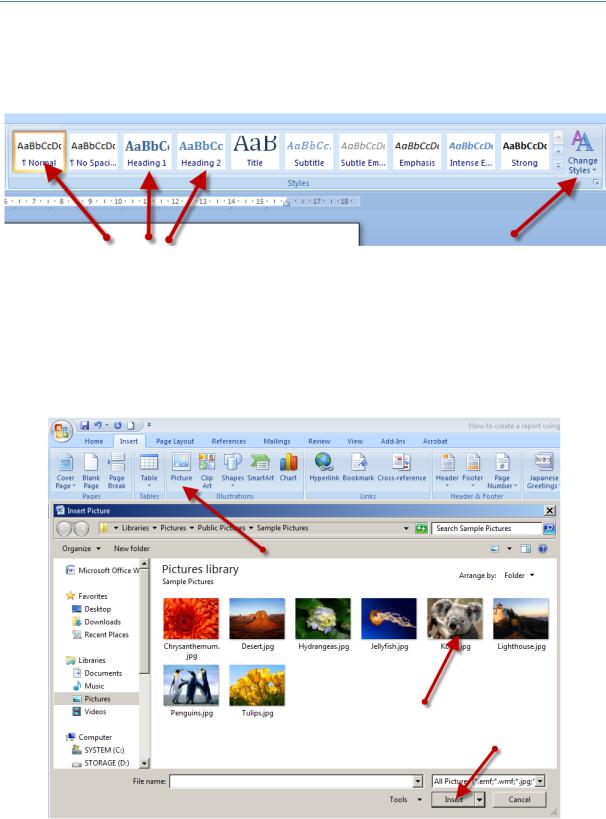
Click on the Home tab, and then Heading 1 for headings, Heading 2 for sub-headings, and Normal for ‘normal’ text. If you want to change the styles, click on Change Styles on the right hand side.
Inserting a picture
Click on the Insert tab, and then Picture. Find the image you want to use and double click on it or click on the image and then click Insert.

Inserting a table
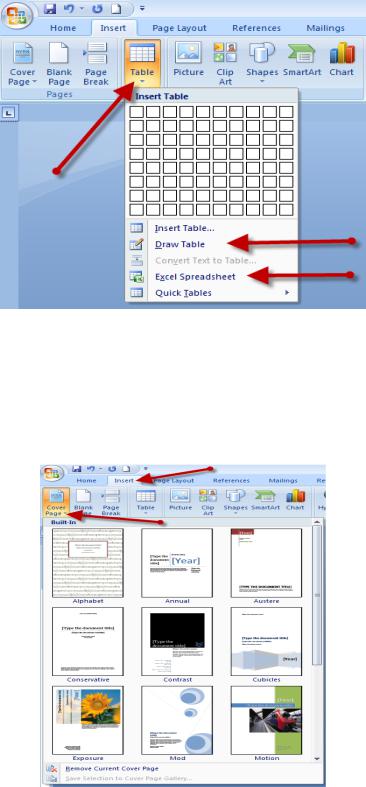
Click on the Insert tab, and then Table. Will then be able to choose how many rows and columns your table will have or you can use the Draw Table function. You are also able to insert a table generated from data in an Excel spreadsheet.
Creating a cover page
To create a cover page, click on the first page of the document, click on Insert and then Cover Page on the left hand side of the menu. You will then be able to choose the design of your cover page. Once you have chosen the design, you can add information such as the title of the report, date it was created, and the authors.

Creating a Table of Contents
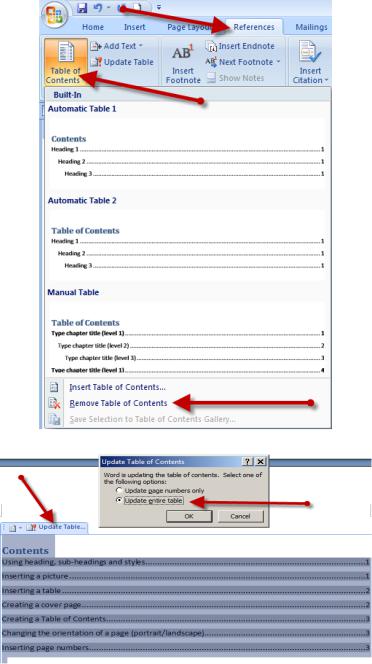
To create a table of contents, click on the References tab and then Table of Contents on the left hand side. You eill be able to choose the design you like. If you have used Headings and Subheadings throughout the report, a table of contents, including the page numbers, will be generated automatically (this is the quickest and easiest option). If not you will need to select Manual Table. As you write your report, you will no doubt add information, change heading titles, insert pictures and charts etc. If so, your table of contents will need to be updated. To do so, click on your table of contents (i.e. not the Table of Contents icon), and then click Update Table. You will most likely want to update the Entire Table as opposed to just the page numbers. If you need to delete the table of contents, click on References, Table of Contents, and then Remove Table of Contents which is down the bottom of the drop down menu.

Changing the orientation of a page (portrait/landscape)
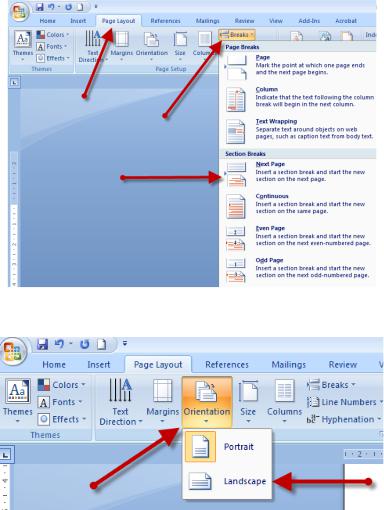
To change one page’s orientation to landscape, you will need to create a section break. To do this click on the first line of the page, go to the Page Layout tab, click on Breaks, and then select Next Page which is under the Section Break heading.
Next, in the Page Layout tab, click on Orientation and then select Landscape, as opposed to Portrait. If you want the following page to be in portrait, create a new section break and then change the layout back to portrait.
Inserting page numbers
To insert page numbers, click on the Insert tab, and then click on Page Number. You will be able to select where on the page you want the page numbers to be displayed and the style. You can also Format the page numbers; for example, you can change from Arabic numbers to Roman numerals.

If you want to use Roman numerals for the Executive Summary and table of contents, you will need to create section breaks as you did when you changed the orientation of the page. See: Changing the orientation of a page (portrait/landscape). For the first two pages (after the cover page which doesn’t require a number), click on the Insert tab, Page Number, and then Format Page Numbers. Change the Number Format to Roman Numerals, select Start At: and the number you want to start at. For the Introduction to start at page 1, again create a Section Break, click on Page Number, Format Page Number, change the Format of the Page Number to Arabic numbers (1, 2, 3 etc) and then click on Start at: 1. Because you created a section break to change the orientation of a page, you will have to insert a page number for that particular page. This time, instead of clicking Start at: click Continue from previous section.
