Writing Business Reports / Creating a Word report_131
.docxBond University |
How to create a report using Word |
Workshop guide |
|
shbrown |
|
|
Executive Summary
The executive summary is generally no longer than one page long and should appear on a separate page after the cover page of your document. The executive summary should highlight the purpose of the report, the scope of the investigation, the methods used, the major findings, the main conclusions and the major recommendations. In other words, it is a summary of the content of your report and the reader should have a clear overview of the main content, findings and conclusions which will be presented in detail in the report. The executive summary should be written after the report is completed.
Table of Contents
Executive Summary i
1) Creating the cover page 1
2) Creating the heading styles 1
a) Major headings 1
b) Secondary headings 1
3) Using the format painter 2
4) Inserting breaks 2
a) Page breaks 2
b) Section breaks 2
5) Adding the Table of Contents 3
6) Changing the page orientation / inserting a picture or graph 3
7) Updating the table of Contents 4
8) Inserting page numbers 4
Creating the cover page
The first step in creating a report is to create the cover page. This involves selecting a suitable template and adding all your details.
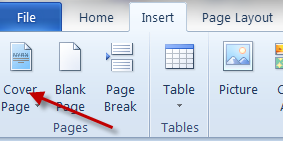
Go to the ‘Insert’ tab and select ‘Cover page’, which is the first item on the left. Select a suitable cover page and add your details.

Creating the heading styles
Start to write your document. Then go to the home page and select the heading styles. ‘Heading 1’ can be used for major headings and ‘Heading 2’ for sub-headings or secondary headings. Go through your document, highlight each heading and then select whether it should be heading 1, 2 or 3 etc.
Major headings
Select headings in the text, then on the ‘Home’ tab, select ‘Heading1’

Secondary headings
For secondary headings, select the appropriate part of text / heading & select ‘Headings 2’ from the ‘Home’ tab.
(If the heading is part of a sentence, highlight the part you want to be the heading and then use ‘Heading 2’)
Using the format painter
Use the format painter to make the headings all the same

Highlight the text that contains the style / font etc. that you want to copy, drag the mouse arrow to the format painter paintbrush and left click, then drag the mouse over the text you want to change. It will automatically change the format of the text you have painted.
Inserting breaks
Page breaks
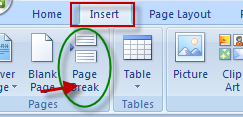
To insert a page break, go to the insert tab and select ‘page break’.

Section breaks
To insert a section break, place the cursor before the heading where you want to create the break. Go to the page layout tab and then select ‘breaks’. You will see that it is divided into ‘page breaks’ and ‘section breaks’. If you want to change the orientation of the page, for example, or you want to use different kinds of numbering for the Contents and Executive Summary in contrast to the main document, you will need to insert section breaks.

Adding the Table of Contents
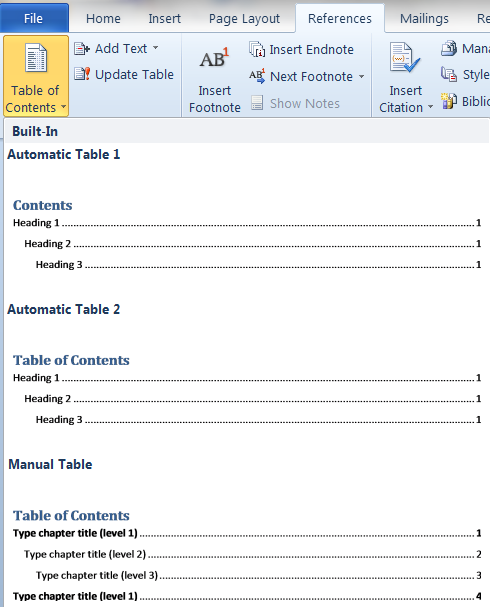
It is best to do this once you have a framework of headings for the document or after the main document has been written, as it will be easier to format and update the table. Once you have organized the headings in your document, you can create a table of contents. First insert a ‘section break’ after the cover page or Executive Summary page). Next, go to the References tab and select ‘Table of Contents’ on the left. Choose a style you like.

Changing the page orientation / inserting a picture or graph
Click before the section where you want to insert your picture. Create 2 section breaks (see above). In the ‘Page Layout’ tab click orientation and select ‘landscape’. This will turn your page around. Next go to the ‘Insert’ tab and select picture. Choose a picture and click insert.
Updating the table of Contents
Whenever you make changes to your document by adding or changing sections and headings, you will need to update your table of Contents. To do this, Click on the part that says ‘Table of Contents’ and you will see a box appear which says, ‘update table’. Click on this, and it will give you the option to update the whole table or just the page numbers. Select the part you want and click ‘OK’.


Inserting page numbers
To insert page numbers, go to the insert tab and select ‘page number’. From here you can select where you want the page numbers to appear and what format you want them to appear in.

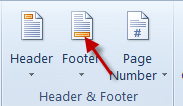
Next, you will need to create ‘footers’ so that you can format the numbers. Go to the ‘insert’ tab and then open up the footers and select the one you want.

Once you’re in the ‘footers’ tab, you can format the numbers.

Go to page number and select ‘format page numbers’

From there you can manipulate which type of numbers you want to use and how you want them to appear in your document. If the ‘Continue from previous section’ button is highlighted, the page number will run consecutively; however, if you want a different numbering system for the Executive Summary page or if you do not want the cover page to be page 1, you need to ensure that there are section breaks between the pages so that you can deal with each one separately.
