

STM32CubeMX user interface |
UM1718 |
|
|
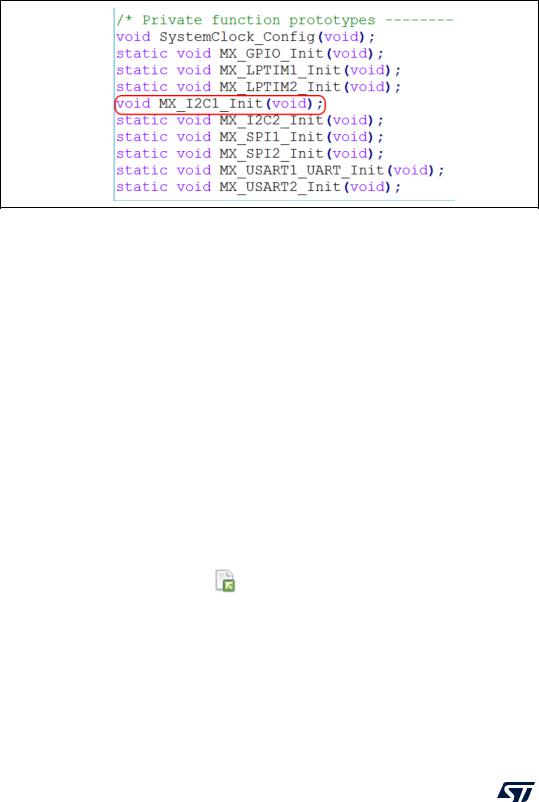
Unselecting the Visibility (Static) option, as shown for MX_I2C1_init function in Figure 112, allows the generation of the function definition without the static keyword, and hence extends its visibility outside the current file (see Figure 113).
Figure 113. Generated init functions without C language “static” keyword
Caution: For the STM32MP1 series only
By default the SystemClock_Config function is called in STM32Cube Cube firmware main() function, as the 'Not generate Function call' box in Project Manager/Advanced Settings panel is not activated by default (see Figure 112).
This configuration is valid for running STM32Cube firmware in engineering mode (Cortex-M4 stand-alone mode).
This configuration is not valid for running STM32Cube firmware in production mode: the 'Not generate Function call' box must be checked under Project Manager/Advanced Settings panel, so that there is no call to SystemClock_Config() in the main() function.
4.10Import Project window
The Import Project menu eases the porting of a previously-saved configuration to another MCU. By default the following settings are imported:
•Pinout tab: MCU pins and corresponding peripheral modes.The import fails if the same peripheral instances are not available in the target MCU.
•Clock configuration tab: clock tree parameters.
•Configuration tab: peripherals and middleware libraries initialization parameters.
•Project settings: choice of toolchain and code generation options.
To import a project, proceed as follows:
1.Select the Import project icon that appears under the File menu after starting a New Project and once an MCU has been selected.
The menu remains active as long as no user configuration settings are defined for the new project, that is just after the MCU selection. It is disabled as soon as a user action is performed on the project configuration.
2.Select File > Import Project for the dedicated Import project window to open. This window allows to specify the following options:
–The STM32CubeMX configuration file (.ioc) pathname of the project to import on top of current empty project.
146/453 |
UM1718 Rev 41 |

UM1718 |
STM32CubeMX user interface |
|
|
–Whether to import the configuration defined in the Power Consumption Calculator tab or not.
–Whether to import the project settings defined through the Project > Settings menu: IDE selection, code generation options and advanced settings.
–Whether to import the project settings defined through the Project > Settings menu: IDE selection and code generation options.
–Whether to attempt to import the whole configuration (automatic import) or only a subset (manual import).
a)Automatic project import (see Figure 114)
Figure 114. Automatic project import
UM1718 Rev 41 |
147/453 |
STM32CubeMX user interface |
UM1718 |
|
|
b)Manual project import
In this case, checkboxes allow the user to select manually the set of peripherals (see Figure 115). Select the Try Import option to attempt importing.
Figure 115. Manual project import
The Peripheral List indicates:
–The peripheral instances configured in the project to be imported
–The peripheral instances, if any exists for the MCU currently selected, to which the configuration has to be imported. If several peripheral instances are candidate for the import, the user needs to choose one.
148/453 |
UM1718 Rev 41 |
UM1718 |
STM32CubeMX user interface |
|
|
Conflicts can occur when importing a smaller package with less pins or a lower-end MCU with less peripheral options.
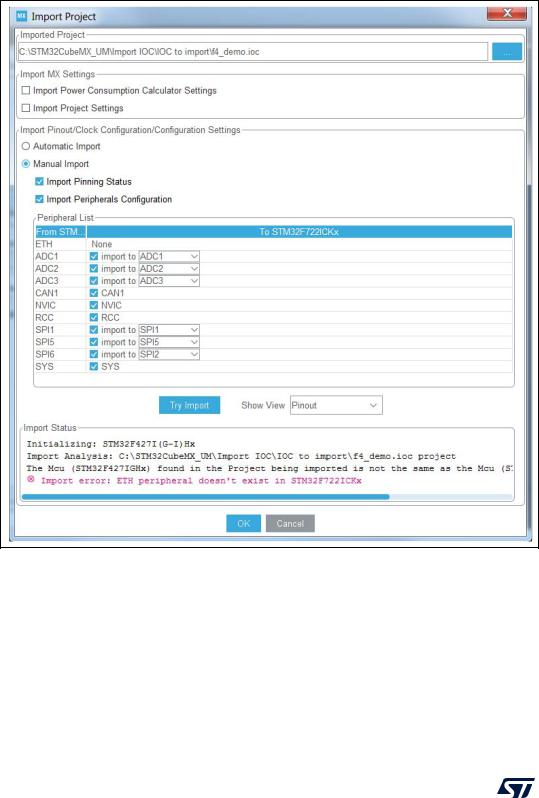
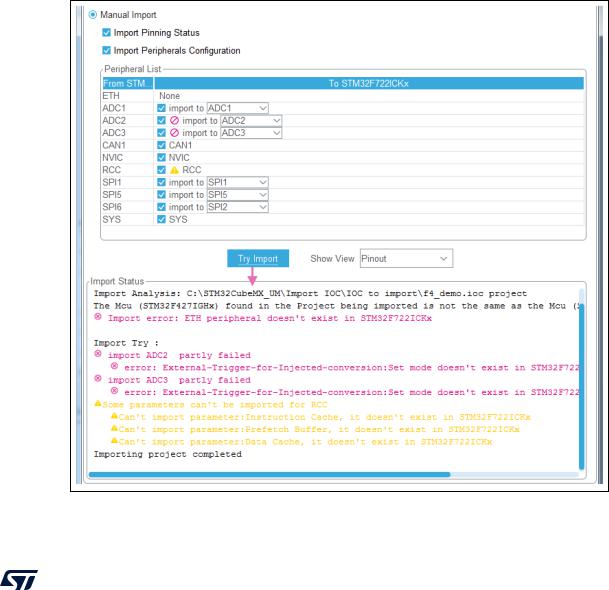
Click the Try Import button to check for such conflicts: the Import Status window and the Peripheral list get refreshed to indicate errors (see Figure 116), warnings and whether the import has been successful or not:
–Warning icons indicate that the user has selected a peripheral instance more than once, and that one of the import requests will not be performed.
–A cross sign indicates that there is a pinout conflict, and that the configuration cannot be imported as such.
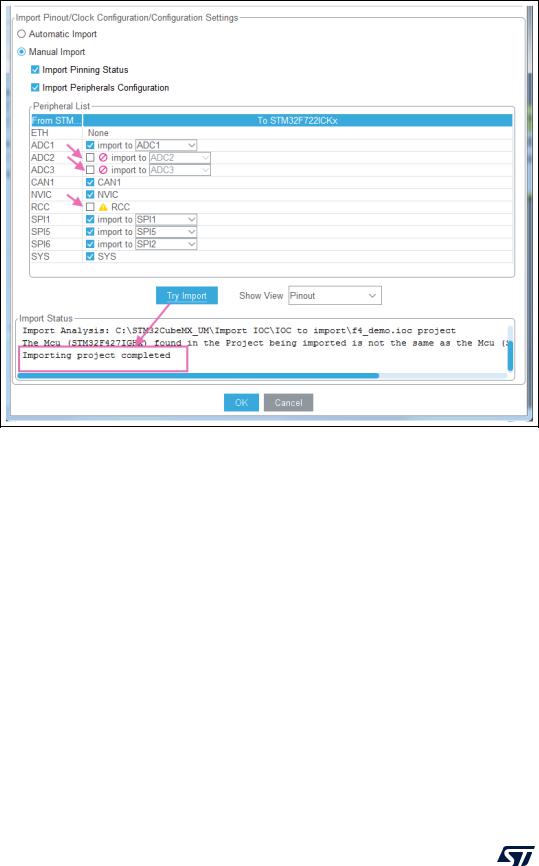
The manual import can be used to refine import choices and resolve the issues raised by the import trial. Figure 117 gives an example of successful import trial, obtained by deselecting the import request for some peripherals.
The Show View function allows switching between the different configuration tabs (pinout, clock tree, peripheral configuration) for checking influence of the “Try Import” action before actual deployment on current project (see Figure 117).
Figure 116. Import Project menu - Try Import with errors
UM1718 Rev 41 |
149/453 |
STM32CubeMX user interface |
UM1718 |
|
|
Figure 117. Import Project menu - Successful import after adjustments
3.Choose OK to import with the current status or Cancel to go back to the empty project without importing.
Upon import, the Import icon gets grayed since the MCU is now configured and it is no more possible to import a non-empty configuration.
150/453 |
UM1718 Rev 41 |