primer_on_scientific_programming_with_python
.pdf9.5 Class Hierarchy for Geometric Shapes |
531 |
|
|
class Shape:
def __init__(self):
self.shapes = self.subshapes()
if isinstance(self.shapes, Shape):
self.shapes = [self.shapes] # turn to list
def subshapes(self):
"""Define self.shapes as list of Shape instances.""" raise NotImplementedError(self.__class__.__name__)
def draw(self):
for shape in self.shapes: shape.draw()
In class Shape we require the shapes attribute to be a list, but if the subshape method in subclasses returns just one instance, this is automatically wrapped in a list in the constructor.
First we implement the special case class Curve, which does not have subshapes but instead (x, y) coordinates for a curve:
class Curve(Shape):
"""General (x,y) curve with coordintes.""" def __init__(self, x, y):
self.x, self.y = x, y
# turn to Numerical Python arrays: self.x = asarray(self.x, float) self.y = asarray(self.y, float) Shape.__init__(self)
def subshapes(self):
pass # geometry defined in constructor
The simplest ordinary Shape class is Line:
class Line(Shape):
def __init__(self, start, stop): self.start, self.stop = start, stop Shape.__init__(self)
def subshapes(self):
x = [self.start[0], self.stop[0]] y = [self.start[1], self.stop[1]] return Curve(x,y)
The code in this class works with start and stop as tuples, lists, or arrays of length two, holding the end points of the line. The underlying Curve object needs only these two end points.
A rectangle is represented by a slightly more complicated class, having the lower left corner, the width, and the height of the rectangle as attributes:
class Rectangle(Shape):
def __init__(self, lower_left_corner, width, height): self.lower_left_corner = lower_left_corner # 2-tuple self.width, self.height = width, height
Shape.__init__(self)
def subshapes(self):
ll = self.lower_left_corner # short form
532 |
9 Object-Oriented Programming |
|
|
x = [ll[0], ll[0]+self.width, ll[0]+self.width, ll[0], ll[0]]
y = [ll[1], ll[1], ll[1]+self.height, ll[1]+self.height, ll[1]]
return Curve(x,y)
Class Circle needs many coordinates in its Curve object in order to display a smooth circle. We can provide the number of straight line segments along the circle as a parameter resolution. Using a default value of 180 means that each straight line segment approximates an arc of 2 degrees. This resolution should be su cient for visual purposes. The set of coordinates along a circle with radius R and center (x0, y0) is defined by
x = x0 + R cos(t), |
(9.45) |
y = y0 + R sin(t), |
(9.46) |
for resolution+1 t values between 0 and 2π. The vectorized NumPy code for computing the coordinates becomes
t = linspace(0, 2*pi, self.resolution+1) x = x0 + R*cos(t)
y = y0 + R*sin(t)
The complete Circle class is shown below:
class Circle(Shape):
def __init__(self, center, radius, resolution=180): self.center, self.radius = center, radius self.resolution = resolution Shape.__init__(self)
def subshapes(self):
t = linspace(0, 2*pi, self.resolution+1) x0 = self.center[0]; y0 = self.center[1] R = self.radius
x = x0 + R*cos(t)
y = y0 + R*sin(t) return Curve(x,y)
We can also introduce class Arc for drawing the arc of a circle. Class Arc could be a subclass of Circle, extending the latter with two additional parameters: the opening of the arc (in degrees) and the starting t value in (9.45)–(9.46). The implementation of class Arc will then be almost a copy of the implementation of class Circle. The subshapes method will just define a di erent t array.
Another view is to let class Arc be a subclass of Shape, and Circle a subclass of Arc, since a circle is an arc of 360 degrees. Let us employ this idea:
class Arc(Shape):
def __init__(self, center, radius,
start_degrees, opening_degrees, resolution=180): self.center = center
self.radius = radius

9.5 Class Hierarchy for Geometric Shapes |
533 |
|
|
self.start_degrees = start_degrees*pi/180 self.opening_degrees = opening_degrees*pi/180 self.resolution = resolution Shape.__init__(self)
def subshapes(self):
t = linspace(self.start_degrees,
self.start_degrees + self.opening_degrees, self.resolution+1)
x0 = self.center[0]; y0 = self.center[1] R = self.radius
x = x0 + R*cos(t)
y = y0 + R*sin(t) return Curve(x,y)
class Circle(Arc):
def __init__(self, center, radius, resolution=180): Arc.__init__(self, center, radius, 0, 360, resolution)
In this latter implementation, we save a lot of code in class Circle since all of class Arc can be reused.
Class Wheel may conceptually be a subclass of Circle. One circle, say the outer, is inherited and the subclass must have the inner circle as an attribute. Because of this “asymmetric” representation of the two circles in a wheel, we find it more natural to derive Wheel directly from Shape, and have the two circles as two attributes of type Circle:
class Wheel(Shape):
def __init__(self, center, radius, inner_radius=None, nlines=10): self.center = center
self.radius = radius
if inner_radius is None:
self.inner_radius = radius/5.0 else:
self.inner_radius = inner_radius self.nlines = nlines Shape.__init__(self)
If the radius of the inner circle is not defined (None) we take it as 1/5 of the radius of the outer circle. The wheel is naturally composed of two Circle instances and nlines Line instances:
def subshapes(self):
outer = Circle(self.center, self.radius) inner = Circle(self.center, self.inner_radius) lines = []
t = linspace(0, 2*pi, self.nlines)
Ri = self.inner_radius; Ro = self.radius x0 = self.center[0]; y0 = self.center[1]
xinner = x0 + Ri*cos(t) yinner = y0 + Ri*sin(t) xouter = x0 + Ro*cos(t) youter = y0 + Ro*sin(t)
lines = [Line((xi,yi),(xo,yo)) for xi, yi, xo, yo in \ zip(xinner, yinner, xouter, youter)]
return [outer, inner] + lines
For the fun of it, we can implement other shapes, say a sine wave
y = m + A sin kx, k = 2π/λ,
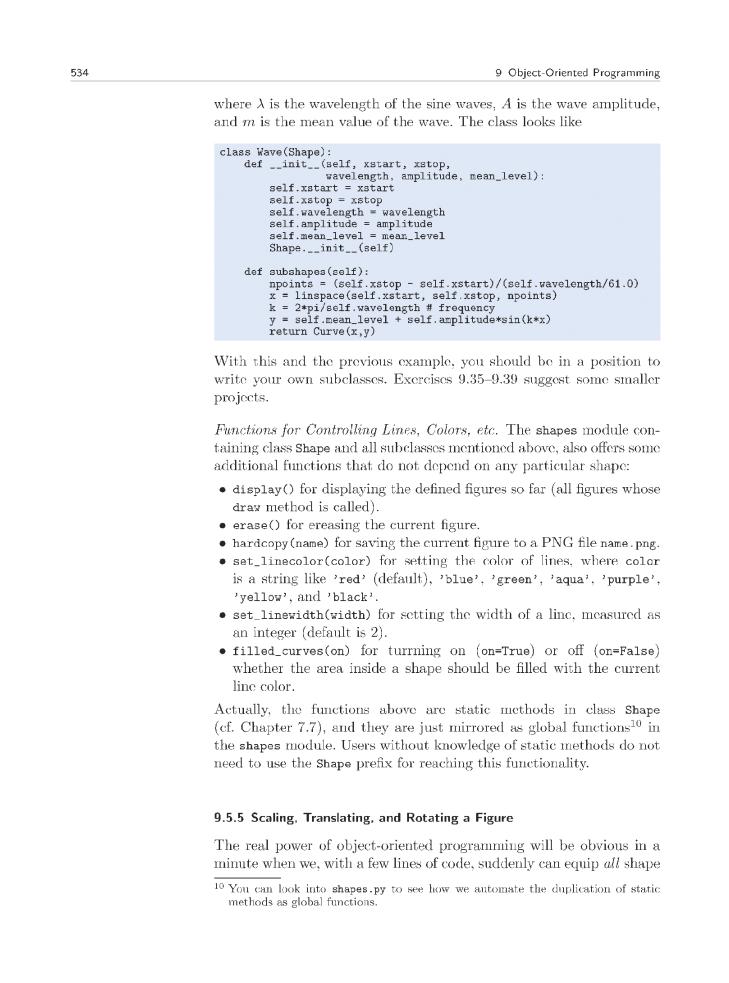

9.5 Class Hierarchy for Geometric Shapes |
535 |
|
|
objects with additional functionality for scaling, translating, and rotating the figure.
Scaling. Let us first treat the simplest of the three cases: scaling. For a Curve instance containing a set of n coordinates (xi, yi) that make up a curve, scaling by a factor a means that we multiply all the x and y coordinates by a:
xi ← axi, yi ← ayi, i = 0, . . . , n − 1 .
Here we apply the arrow as an assignment operator. The corresponding Python implementation in class Curve reads
class Curve:
...
def scale(self, factor): self.x = factor*self.x self.y = factor*self.y
Note here that self.x and self.y are Numerical Python arrays, so that multiplication by a scalar number factor is a vectorized operation.
In an instance of a subclass of Shape, the meaning of a method scale is to run through all objects in the list self.shapes and ask each object to scale itself. This is the same delegation of actions to subclass instances as we do in the draw method, and all objects, except Curve instances, can share the same implementation of the scale method. Therefore, we place the scale method in the superclass Shape such that all subclasses can inherit this method. Since scale and draw are so similar, we can easily implement the scale method in class Shape by copying and editing the draw method:
class Shape:
...
def scale(self, factor):
for shape in self.shapes: shape.scale(factor)
This is all we have to do in order to equip all subclasses of Shape with scaling functionality! But why is it so easy? All subclasses inherit scale from class Shape. Say we have a subclass instance s and that we call s.scale(factor). This leads to calling the inherited scale method shown above, and in the for loop we call the scale method for each shape object in the self.shapes list. If shape is not a Curve object, this procedure repeats, until we hit a shape that is a Curve, and then the scaling on that set of coordinates is performed.
Translation. A set of coordinates (xi, yi) can be translated x units in the x direction and y units in the y direction using the formulas
xi ← x + xi, yi ← y + yi, i = 0, . . . , n − 1 .
536 |
9 Object-Oriented Programming |
|
|
The corresponding Python implementation in class Curve becomes
class Curve:
...
def translate(self, x, y): self.x = x + self.x self.y = y + self.y
The translation operation for a shape object is very similar to the scaling and drawing operations. This means that we can implement a common method translate in the superclass Shape. The code is parallel to the scale method:
class Shape:
....
def translate(self, x, y): for shape in self.shapes:
shape.translate(x, y)
Rotation. Rotating a figure is more complicated than scaling and translating. A counter clockwise rotation of θ degrees for a set of coordinates (xi, yi) is given by
x¯i ← xi cos θ − yi sin θ, y¯i ← xi sin θ + yi cos θ .
This rotation is performed around the origin. If we want the figure to be rotated with respect to a general point (x, y), we need to extend the formulas above:
x¯i ← x + (xi − x) cos θ − (yi − y) sin θ, y¯i ← y + (xi − x) sin θ + (yi − y) cos θ .
The Python implementation in class Curve, assuming that θ is given in degrees and not in radians, becomes
def rotate(self, angle, x=0, y=0): angle = angle*pi/180
c = cos(angle); s = sin(angle)
xnew = x + (self.x - x)*c - (self.y - y)*s ynew = y + (self.x - x)*s + (self.y - y)*c self.x = xnew
self.y = ynew
The rotate method in class Shape is identical to the draw, scale, and translate methods except that we have other arguments:
class Shape:
....
def rotate(self, angle, x=0, y=0): for shape in self.shapes:
shape.rotate(angle, x, y)

538 |
9 Object-Oriented Programming |
|
|
Here, xxx is a space-separated list of all the PNG files, and tmp_movie.gif is the name of the resulting animated GIF file. We can easily make xxx by collecting the names of the PNG files from the loop in a list object, and then join the names. The convert command can be run as an os.system call.
The complete rolling_wheel function, incorporating the mentioned movie making, will then be
def rolling_wheel(total_rotation_angle):
"""Animation of a rotating wheel.""" set_coordinate_system(xmin=0, xmax=10, ymin=0, ymax=10)
import time center = (6,2) radius = 2.0 angle = 2.0 pngfiles = []
w1 = Wheel(center=center, radius=radius, inner_radius=0.5, nlines=7)
for i in range(int(total_rotation_angle/angle)): w1.draw()
display()
filename = ’tmp_%03d’ % i
pngfiles.append(filename + ’.png’) hardcopy(filename) time.sleep(0.3) # pause 0.3 sec
L = radius*angle*pi/180 # translation = arc length w1.rotate(angle, center[0], center[1]) w1.translate(-L, 0)
center = (center[0] - L, center[1])
erase() # erase the screen before new figure
cmd = ’convert -delay 50 -loop 1000 %s tmp_movie.gif’ \ % (’ ’.join(pngfiles))
import commands
failure, output = commands.getstatusoutput(cmd) if failure: print ’Could not run’, cmd
The last two lines run a command, from Python, as we would run the command in a terminal window. The resulting animated GIF file can be viewed with animate tmp_movie.gif as a command in a terminal window.
9.6 Summary
9.6.1 Chapter Topics
A subclass inherits everyting from its superclass, both attributes and methods. The subclass can add new attributes, overload methods, and thereby enrich or restrict functionality of the superclass.
Subclass Example. Consider class Gravity from Chapter 7.8.1 for representing the gravity force GM m/r2 between two masses m and M