

Полезные материалы за все 6 курсов / Учебники, методички, pdf / INBDEBooster Endodontics Notes
.pdfENDODONTICS |
11 |
Extraction
• Complete removal of tooth with dead or dying pulp
• Extract primary teeth
 When it is non-restorable
 When tooth is symptomatic and exhibits root resorption
 Extract molars when anatomy is too complex for pulpectomy
Figure 3.01 Pulpectomy
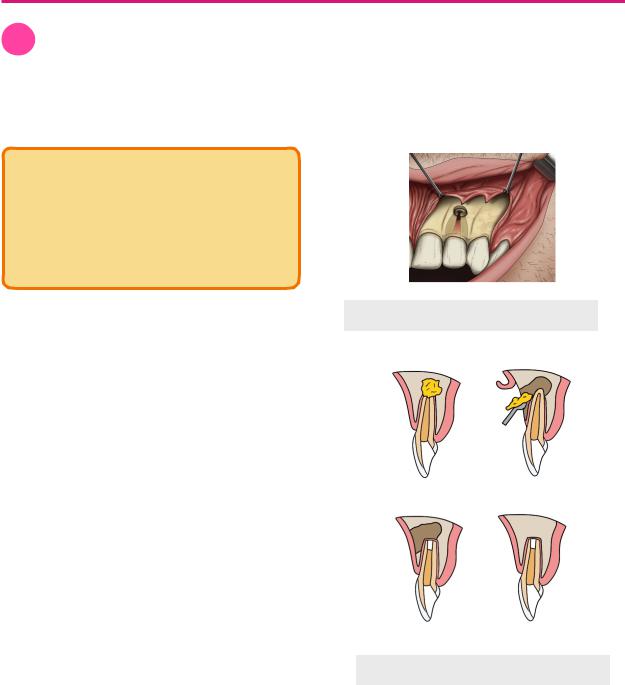
Root Canal Treatment
•Pulp is diseased or dead
•Involves complete removal of pulp, followed by cleaning, shaping and filling with gutta percha
•More detail in root canal section (page 12)
Apexification
•Induction of calcific barrier/artificial barrier of an open root apex to achieve root end closure
•Dead or dying pulp removed, followed by CaOH or MTA is placed at base of canal (artificial barrier)
•Occurs in any pulpectomy in an immature permanent tooth
Figure 3.02 Apexification
INBDE Booster | Booster PrepTM

ENDODONTICS
ROOT CANAL
1 Introduction
Root canal treatment is usually performed when a tooth has necrotic or dying pulp. Steps for a root canal can be divided into the following:
1.Access Prep
2.Cleaning & Shaping
3.Filling/ Obturation
Figure 1.01 Root Canal Steps
Microbiology
A common cause for necrotic pulp comes from endodontic infection.
•Primary endodontic infection - the first time a tooth had infected pulp
 Predominantly Bacteroides (gram negative obligate anaerobe)
•Secondary endodontic infection - re-infection due to failed endodontic treatment
 Predominately Enterococcis faecalis
2 Sequence of Treatment
Access Cavity Preparation
•Tooth prep that allows access to the pulp chambers and canals
•Must de-roof the pulp chamber → exposed pulp horns and canal opening (orifice), while trying to conserve as much tooth structure as possible
 Try to avoid prepping cusp tips and marginal ridges
12
•Most important step of root canal treatment for technique
•Aim to create straight line access to orifice and root apex
•Usually performed with high-speed round bur or tapered bur
•Patient should be wearing a rubber dam before pulp tissue is exposed
 Prevents infection
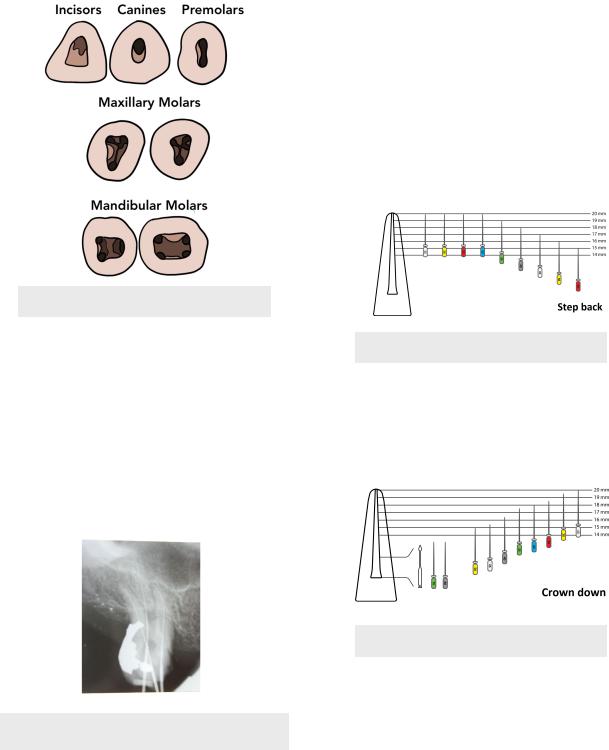
Tooth |
Access Prep Shape |
|
|
Incisors |
Triangular or Ovoid on |
|
lingual surface |
|
|
Canines |
Ovoid |
|
|
Premolars |
Ovoid (narrow) |
|
|
Maxillary Molars |
4 canals (2 in MB root) → |
|
Blunted triangle/ |
|
rhomboidal |
|
3 canals → Triangular |
Mandibular Molars |
4 canals (2 canals/root) → |
|
Rectangular |
|
3 canals (more common, 2 |
|
canals in D root) → |
|
Trapezoidal |
|
|
INBDE Pro-Tip:
A common question on the exam is which premolar is the most common to have 2 roots and 2 canals. The answer is the maxillary first premolar.
INBDE Booster | Booster PrepTM
ENDODONTICS
Figure 2.01 Access Cavity Prep
Working Length
The goal for a root canal is to clean, shape and obturate the root canal up until 0-2mm from the root apex. This can be achieved by measuring the working length. Working length is the length of the tooth from a reference point (ex. cusp tip) to the tooth apex. It can be determine using the following:
•Radiograph of hand file in the canal
•Electronic apex locator
Figure 2.02 Radiograph for Working Length
13
Cleaning & Shaping
Using files and rotary instruments, cleaning and shaping can be done primarily through either of two methods.
1.Step-back - shape coronal third → apical third → middle third of canal (small to big)
i.Usually use hand instruments
ii.Shaping coronal third allows access for a file to reach the apical third, at which the operator can then shape from apical to coronal
Figure 2.03 Step-back Example
2.Crown-down - coronal to apical direction
i.Usually use rotary instruments
ii.Use progressively smaller files as you reach more apical
a. Change files when you feel resistance
Figure 2.04 Crown-down Example
Filling
Obturation refers to filling and sealing the cleaned and shaped canal system with
•Often gutta percha filler + ZOE sealant
•Compaction techniques
1.Cold Lateral - using a finger spreader for placement of multiple gutta percha cones to working length until spreader can no longer penetrate the coronal part of the canal
INBDE Booster | Booster PrepTM
ENDODONTICS
Figure 2.05 Lateral Compaction
2.Warm Vertical - seating gutta percha cone to working length and using a heated plugger instrument to compress the gutta percha
Figure 2.06 Vertical Compaction
3 Cleaning and Shaping (continued)
Instruments for Canal Prep
Specific instruments are used to remove pulp from the canals in a controlled and conservative manner and shape and the canals.
1.NiTi rotary instruments
i.0.04 or 0.06mm taper
ii.Uses an electric hand piece that rotates according to rpm
14
Figure 3.01 NiTi Rotary File
2.Stainless steel (SS) hand files
i.0.02 taper
ii.Often colour coded (ISO colour coding)
a.Small to large: pink, grey purple, white, yellow red, blue, green, black (then repeats from white to black)
iii.K-files (Kerr) - twisted-square in cross section
a.Rotate clockwise-counterclockwise
iv.H-files (Hedstrom) - spiral grooves
a.Agressive
b.Cuts in retraction
3.Gates-Glidden drill - used to open 1/3 of canal
i.Used in straight-line access
Figure 3.02 Gates Glidden
4.Reamer - twisted-triangle cross section
i.Rotated clockwise
5.Barbed broaches - to remove entangled and difficult to remove substances
Figure 3.03 From Left - Lentulo (applies
sealant), Reamer, K-file, & H-file
INBDE Booster | Booster PrepTM
ENDODONTICS
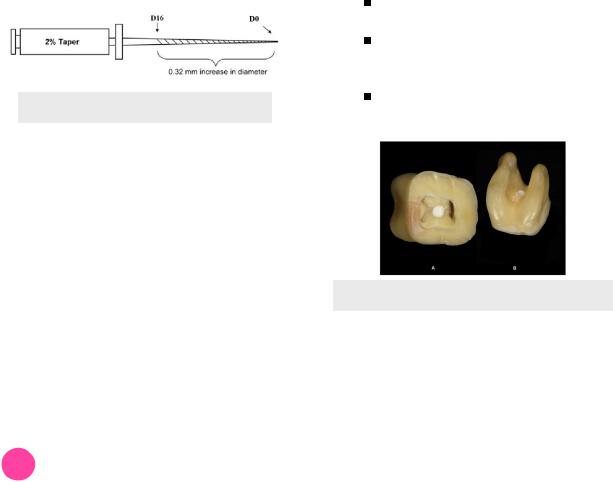
File Diameter
Files are usually chosen based on their diameters. Specific notation of diameters are used in the following manner:
•D0 = tip diameter (end of file)
•Size 10 K-file = 0.10mm at the tip
•D16 or D2 - diameter at the location of the file 16mm from the tip (where the cutting flutes end)
•For every 1mm up the file, the diameter increase 0.02mm
•Therefore for a size 10 K-file, D16= 0.1 + 0.02*16) = 0.42mm
Figure 3.04 File Diameter
Irrigation
During the cleaning and shaping phase, it is important to irrigate the canal system between the changing of files. Irrigation cleans the canal system of its constituents.
1.Sodium hypochlorite (NaOCL)
i.Irritant
ii.Dissolves tissue (organic matter)
iii.Antibacterial
2.EDTA
i.Dissolves in inorganic material = smear layer
ii.Lubrication
3.Choloform
i.Used in re-treatment to dissolve gutta
percha
4
Complications
Different complications can arise during root canal treatment due to poor technique and instrumentation. It should be noted that these types of errors can occur in surgical endodontic procedures as well (next section).
15
Perforation
•When a pathway is created and allows communication between the root canal and periodontium
•Signs of perforation
•Sudden pain
•Immediate hemorrhage
•Treat using internal repair with MTA
•Perforation locations
 Furcal - through pulp floor
 Coronal - through the crown
 Strip - from too much coronal flaring
Commonly occurs in mandibular molars on the distal surface of the mesial root
Mesial side of mandibular molars has thicker dentin (always favour this side)
 Root - through the root surface
Better prognosis the more apical the perforation is
Figure 4.01 Filled Furcal Perforation
Ledges
•Irregularity, created by the operator, on the root canal wall
•Occurs when original pathway of canal is lost during instrumentation
 Often occurs in longer and smaller diameter canals
 Files naturally tend to straighten out in curved canals, hence NiTi files are less likely to created ledges due to their flexibility
•Renegotiation - bypass the ledge by using a smaller instrument/file
•Can also bypass the ledge by slightly curving the file
INBDE Booster | Booster PrepTM
ENDODONTICS |
16 |
INBDE Pro-Tip:
The later the complication/error occurs in the the root canal process, the better the prognosis is compared to if it occurred earlier in the process. This is because more instrumentation and disinfection occurred prior to the fracture = greater proportion of bacteria removed and killed.
Figure 4.02 Ledge Formation
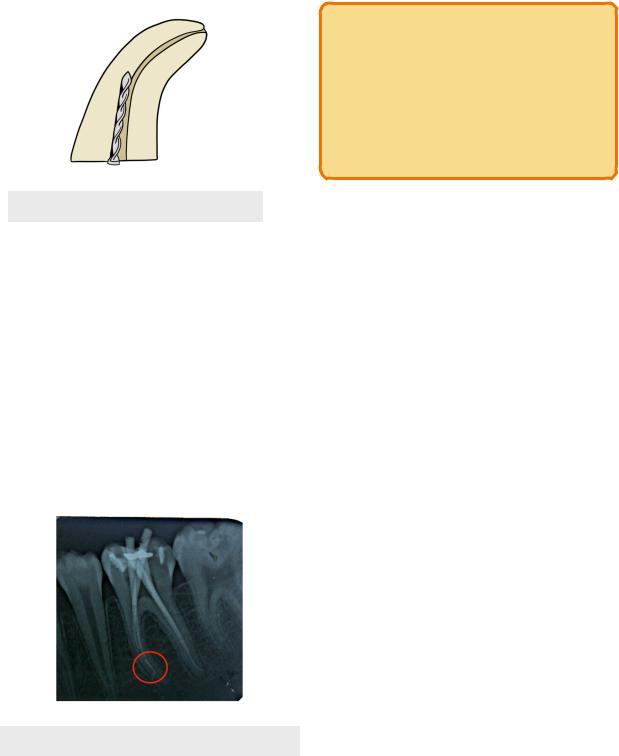
Endodontic Instrument Fractures
•Also known as instrument separation
•When an instrument breaks and remains within the canal
•Occurs when
 Inadequate irrigation to allow instrument to move in and out
 Files are too big and get lodged in canal
 Used, weak files and more prone to fracture
  Flexible NiTi files more prone to fracture
•Can bypass the fractured instrument using a smaller instrument/file
 Often times, removal is too difficult
Figure 4.03 Broken File in Mesial Root
INBDE Booster | Booster PrepTM
ENDODONTICS |
17 |
SURGICAL ENDODONTICS
1 Types of Procedures
Surgical root canal treatment occurs when there is persistent infection of the tooth around the apex despite previous root canal treatment.
INBDE Pro-Tip:
If a root canal fails, there are the two options of re-treatment or surgery depending on where the problem is located.
Canal → Re-treatment Apex → Surgical root canal
Drainage
•Done for localized and fluctuant swollen areas
•Incision to open soft tissue to drain exudate and relieve pressure
•Trephination - surgical access into hard tissue (drilling into bone) for the release of exudate and pressure
Periapical Microsurgery
Periapical microsurgery is used in surgical root canal therapy, where access to the pulp is through the apical aspect of the tooth. This contrasts with conventional root canal treatment, where access to the pulp is through the coronal aspect of the tooth. Steps for periapical microsurgery are as follows:
1.Anesthesia
2.Soft tissue flap to reveal underlying bone
3.Drill through the bone to access tooth apex
i.Trephination may occur
4.Apicoectomy - resect 3mm of the root apex
i.Traditionally done with round bur at an 45° bevel (more chance of leakage)
ii.Modern-technique uses ultrasonic tip at 0-10° (less chance of leakage)
5.Prepare 3mm of the canal from the root end with an ultrasonic instrument
6.Fill the root end of canal with MTA i. Biocompatible
7.Suture the soft tissue and allow the bone to heal
Figure 1.01 Flap and Drill
Figure 1.02 Surgical Root Canal
INBDE Booster | Booster PrepTM