

Chapter 4 Unit Testing
How to Measure Code Coverage in Visual Studio
Code Coverage indicates what portion of your code is covered by Unit Tests. To guard against bugs, it becomes obvious that the more code is covered by Unit Tests, the better tested it is.
IntelliTest is only available in Visual Studio Enterprise edition.
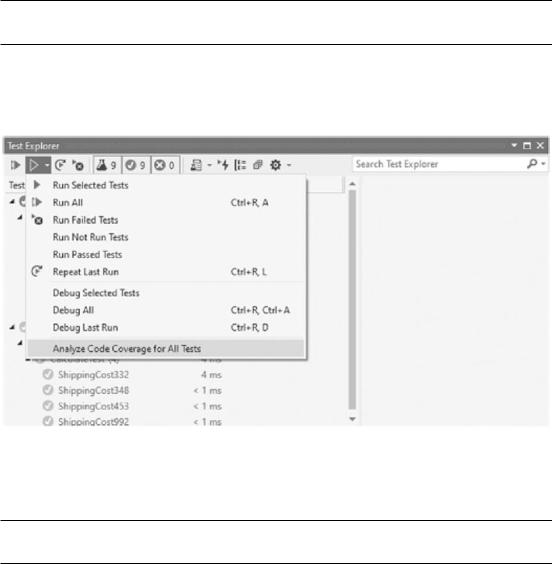
The Code Coverage feature in Visual Studio will give you a good idea of your current Code Coverage percentage. To run the Code Coverage analysis, open up Test Explorer, and click the drop-down next to the play button (Figure 4-22).
Figure 4-22. Analyze Code Coverage
Click Analyze Code Coverage for All Tests in the menu.
You can also go to the Test menu, click Windows, and click Test Explorer.
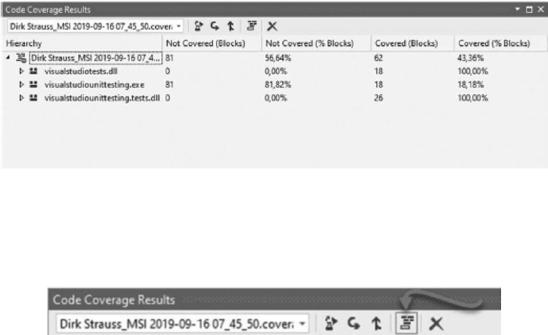
The Code Coverage Results are then displayed in a new window (Figure 4-23). You can access this window from the Test menu and then select Windows Code Coverage Results or hold down Ctrl+E, C on the keyboard.
241
Chapter 4 Unit Testing
Figure 4-23. Code Coverage Results
In the Code Coverage Results window, you can Export the results, Import Results, Merge Results, Show Code Coverage Color (Figure 4-24), or Remove the results.
Figure 4-24. Toggle Code Coverage coloring
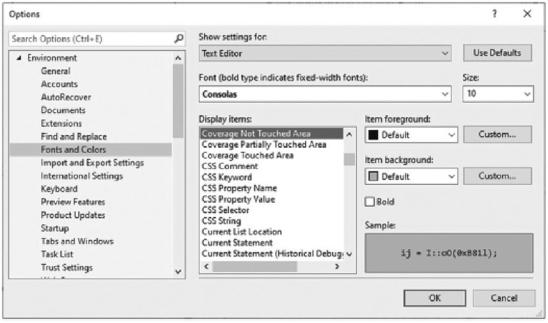
This will toggle colors in your code editor to highlight areas touched, partially touched, and not touched at all by tests. The colors used to highlight the code can also be changed. To do this, head on over to Tools Options Environment Fonts and Colors (Figure 4-25).
242
Chapter 4 Unit Testing
Figure 4-25. Change Fonts and Colors
This should give you a good understanding of how much code is covered by unit tests. Developers should typically aim for at least 80% Code Coverage. If the Code Coverage is low, then modify your code to include more tests. Once you are done modifying your code, run the Code Coverage tool again as the results are not automatically updated as you modify your code.
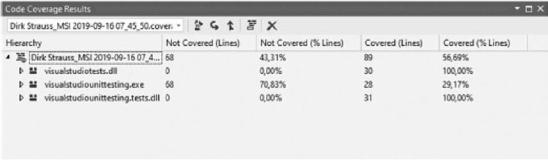
Code Coverage is typically measured in blocks. A block of code is a section of code that has exactly one entry point and one exit point. If you prefer to see the Code
Coverage in terms of lines covered, you can change the results by choosing Add/Remove Columns in the results table header (Figure 4-26).
243
Chapter 4 Unit Testing
Figure 4-26. Code Coverage expressed in lines
Code Coverage is a great tool to allow you to check if your code is sufficiently covered by unit tests. If you aim for 80% Code Coverage, you should be able to produce welltested code. The 80% Code Coverage is not always attainable. This is especially true if the code base you’re working on has a lot of generated code. In instances such as these, a lower percentage of code cover is acceptable.
Summary
Unit testing in Visual Studio helps developers maintain the health of their code and find errors quickly, before shipping their applications to their customers. While some features are not available in all editions of Visual Studio, the free Visual Studio Community does offer developers some unit test functionality. This is enough to get them by. In the next chapter, we will be looking at a feature that all developers should be very familiar with. Source control management is essential to any project. We will explore this and some new features of Visual Studio 2022 such as multi-repo support, comparing branches, Checkout Commit, and line staging but to name a few. Let’s look at source control next.
244

CHAPTER 5
Source Control
If you have worked on projects in a team environment, or if you need a place to keep your own code safe, then you’ll agree that using a source control solution is essential. It doesn’t matter if it’s a large enterprise solution or a small Pet project, Visual Studio makes it extremely easy for developers to use Git and GitHub.
Git is a tool that developers install locally on their machine. GitHub is an online service that stores code safely that has been pushed to it from computers using the Git tool.
In 2018, Microsoft acquired GitHub for $7.5 billion in Microsoft stock. This acquisition of GitHub brought about changes to their pricing tiers. Previously, developers could only create public repos on the free tier. In January 2019, however, GitHub announced that developers can now create unlimited private repositories on the free tier.
This is great, especially if you are working on a side project that you do not want to share with anyone just yet. In this chapter, we will be looking at using Git and GitHub inside Visual Studio 2022. We will see how to
•\ |
Create a GitHub account |
•\ |
Create and clone a repository |
•\ |
Commit changes to a repository |
•\ |
Create a branch from your code |
•\ |
Create and handle pull requests |
These are all things that developers will do on a daily basis when working with Git and GitHub. While the process might change slightly if you use a different source control strategy, the concepts remain the same.
245
© Dirk Strauss 2023
D. Strauss, Getting Started with Visual Studio 2022, https://doi.org/10.1007/978-1-4842-8922-8_5