


Chapter 4 Unit Testing
Using IntelliTest to Generate Unit Tests
IntelliTest helps developers generate and get started using Unit Tests. This saves a lot of time writing tests and increases code quality.
IntelliTest is only available in Visual Studio Enterprise edition.
The default behavior of IntelliTest is to go through the code and try to create a test that gives you maximum Code Coverage. To illustrate how IntelliTest works, I will create a simple class that calculates shipping costs as seen in Listing 4-9.
Listing 4-9. Calculate ShippingCost Method
public class Calculate
{
public enum ShippingType { Overnight = 0, Priority = 1, Standard = 2 } private const double VOLUME_FACTOR = 0.75;
public double ShippingCost(double length, double width, double height, ShippingType type)
{
var volume = length * width * height; var cost = volume * VOLUME_FACTOR; switch (type)
{
case ShippingType.Overnight: cost = cost * 2.25; break;
case ShippingType.Priority: cost = cost * 1.75; break;
case ShippingType.Standard: cost = cost * 1.05; break;
default:
break;
}
229
Chapter 4 Unit Testing
return cost;
}
}
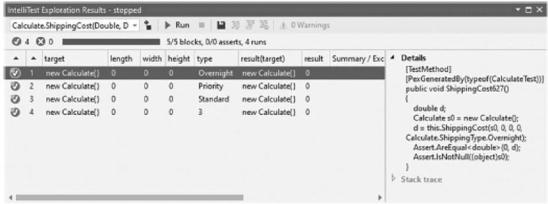
To run IntelliTest against the ShippingCost method, right-click the method, and click IntelliTest Run IntelliTest from the context menu. The results will be displayed in the IntelliTest window that pops up as seen in Figure 4-15. You can also see the details of the generated unit test in the Details pane.
Figure 4-15. IntelliTest results
IntelliTest has taken each parameter going to the method and generated a parameter value for it. In this example, all the tests succeeded, but there is still a problem. This is evident from the result value which is always zero.
We can never allow a parcel to be shipped with zero shipping cost, no matter how small it is. What becomes clear here is that we need to implement minimum dimensions. We, therefore, need to modify the Calculate class as in Listing 4-10.
Listing 4-10. Modified Calculate Class
public class Calculate
{
public enum ShippingType { Overnight = 0, Priority = 1, Standard = 2 } private const double VOLUME_FACTOR = 0.75;
private const double MIN_WIDTH = 1.5; private const double MIN_LENGTH = 2.5; private const double MIN_HEIGHT = 0.5;
230
Chapter 4 Unit Testing
public double ShippingCost(double length, double width, double height, ShippingType type)
{
if (length <= 0.0) length = MIN_LENGTH; if (width <= 0.0) width = MIN_WIDTH; if (height <= 0.0) height = MIN_HEIGHT; var volume = length * width * height; var cost = volume * VOLUME_FACTOR; switch (type)
{
case ShippingType.Overnight: cost = cost * 2.25; break;
case ShippingType.Priority: cost = cost * 1.75; break;
case ShippingType.Standard: cost = cost * 1.05; break;
default:
break;
}
return cost;
}
}
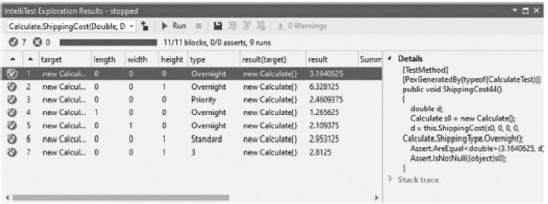
Running IntelliTest again yields a completely different set of results as seen in Figure 4-16.
231
Chapter 4 Unit Testing
Figure 4-16. IntelliTest results on the modified class
This time, you can see that no matter what the value of the parcel dimensions is, we will always have a result returned for the shipping costs. To create the unit tests generated by IntelliTest, click the Save button in the IntelliTest window.
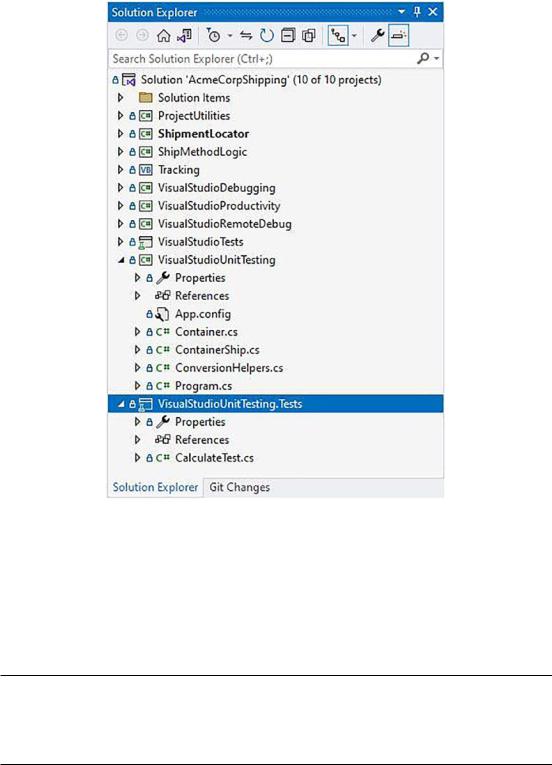
This will create a new Unit Test project for you in your solution as seen in Figure 4-17.
232
Chapter 4 Unit Testing
Figure 4-17. Generated Unit Tests
You can now run the generated Unit Tests as you normally would with Test Explorer. As you continue coding and adding more logic to the Calculate class, you can regenerate the Unit Tests by running IntelliTest again. IntelliTest will then crawl through your code again and generate new Unit Tests for you to match the logic of your code at that time.
The underlying engine that IntelliTest uses to crawl through your code and generate the Unit Tests is Pex. Pex is a Microsoft Research project that was never productized or supported until IntelliTest started using it.
233
Chapter 4 Unit Testing
For a moment, I want you to think back to the code in Listing 4-10. Remember how we modified the code to include constant values to cater for IntelliTest setting the default parameter values to zero? Imagine for a minute that we will never receive a zero as a parameter and that this check is built into the calling code. We can tell IntelliTest to assume values for these parameters.
Have a look at Figure 4-17, and locate the CalculateTest partial class generated for you by IntelliTest. The code generated for you is in Listing 4-11.
Listing 4-11. Generated CalculateTest Partial Class
[TestClass]
[PexClass(typeof(Calculate))]
[PexAllowedExceptionFromTypeUnderTest(typeof(ArgumentException), AcceptExceptionSubtypes = true)] [PexAllowedExceptionFromTypeUnderTest(typeof(InvalidOperationException))] public partial class CalculateTest
{
[PexMethod]
public double ShippingCost( [PexAssumeUnderTest]Calculate target, double length,
double width, double height,
Calculate.ShippingType type
)
{
double result = target.ShippingCost(length, width, height, type); return result;
//TODO: add assertions to method CalculateTest. ShippingCost(Calculate, Double, Double, Double, ShippingType)
}
}
We are now going to tell the Pex engine that we want to assume certain values for the parameters. We do this by using PexAssume.
234

Chapter 4 Unit Testing
PexAssume is a static helper class containing a set of methods to express preconditions in parameterized Unit Tests.
Modify the code in the CalculateTest partial class’ ShippingCost method by adding PexAssume.IsTrue as a precondition for each parameter as illustrated in Listing 4-12.
Listing 4-12. Modified CalculateTest Partial Class
[PexMethod]
public double ShippingCost( [PexAssumeUnderTest]Calculate target, double length,
double width, double height,
Calculate.ShippingType type
)
{
PexAssume.IsTrue(length > 0);
PexAssume.IsTrue(width > 0);
PexAssume.IsTrue(height > 0);
double result = target.ShippingCost(length, width, height, type); return result;
//TODO: add assertions to method CalculateTest.ShippingCost(Calculate, Double, Double, Double, ShippingType)
}
By doing this, I can now modify my Calculate class to remove the constant values ensuring that the length, width, and height parameters are greater than zero. The Calculate class will now look as in Listing 4-13.
Listing 4-13. Modified Calculate Class
public class Calculate
{
public enum ShippingType { Overnight = 0, Priority = 1, Standard = 2 } private const double VOLUME_FACTOR = 0.75;
235
Chapter 4 Unit Testing
public double ShippingCost(double length, double width, double height, ShippingType type)
{
var volume = length * width * height; var cost = volume * VOLUME_FACTOR; switch (type)
{
case ShippingType.Overnight: cost = cost * 2.25; break;
case ShippingType.Priority: cost = cost * 1.75; break;
case ShippingType.Standard: cost = cost * 1.05; break;
default:
break;
}
return cost;
}
}
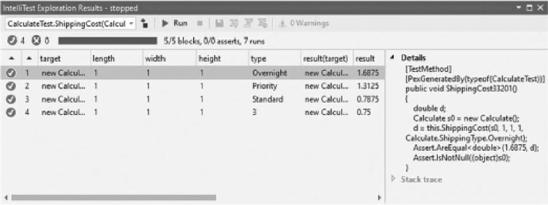
Run IntelliTest again, and see that the parameter values passed through are never zero (Figure 4-18).
236
Chapter 4 Unit Testing
Figure 4-18. IntelliTest results with PexAssume
You can modify the CalculateTest partial class by adding assertions to the ShippingCost method. When you expand CalculateTest in the Solution Explorer (Figure 4-19), you will see several ShippingCost test methods listed.
237
Chapter 4 Unit Testing
Figure 4-19. ShippingCost generated tests
These correspond to the IntelliTest results as seen in Figure 4-18. Do not modify these code files, as your changes will be lost when IntelliTest is run again and it regenerates those tests.
238