

CHAPTER 4
Unit Testing
Many developers will have strong opinions on unit testing. If you are considering using unit tests in your code, then start by understanding why unit tests are useful and sometimes necessary.
Breaking down your code’s functionality into smaller, testable units of behavior allows you to create and run unit tests. Unit tests will increase the likelihood that your code will continue to work as expected, even though you have made changes to the source code. In this chapter, we will have a look at
•\ |
Creating and running unit tests |
•\ |
Using live unit tests |
•\ |
Using IntelliTest to generate unit tests |
•\ |
How to measure Code Coverage in Visual Studio |
Unit tests allow you to maintain the health of your code and find errors quickly, before shipping your application to your customers. To introduce you to unit testing, we will start off with a very basic example of creating a unit test.
Creating and Running Unit Tests
Assume that you have a method that calculates the temperature in Fahrenheit for a given temperature in Celsius. The code that we want to create a unit test for will look as in Listing 4-1.
Listing 4-1. Convert Celsius to Fahrenheit
public static class ConversionHelpers
{
private const double F_MULTIPLIER = 1.8;
215
© Dirk Strauss 2023
D. Strauss, Getting Started with Visual Studio 2022, https://doi.org/10.1007/978-1-4842-8922-8_4
Chapter 4 Unit Testing
private const int F_ADDITION = 32;
public static double ToFahrenheit(double celsius)
{
return celsius * F_MULTIPLIER + F_ADDITION;
}
}
We have constant values for the multiplier and addition to the conversion formula. This means that we can easily write a test to check that the conversion is an expected result.
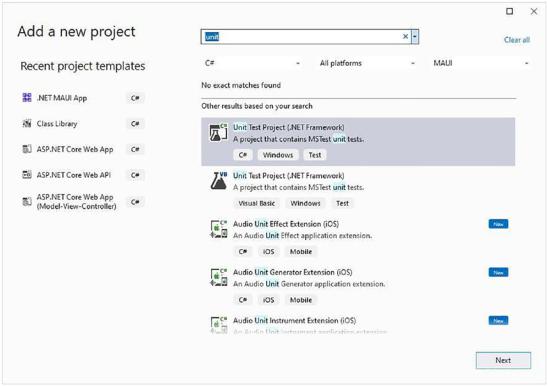
Figure 4-1. Add a new Unit Test project
Start off by adding a new Unit Test project to your solution. You will see (Figure 4-1) that you have the option to add a Unit Test project template for the test framework you prefer to use.
216
Chapter 4 Unit Testing
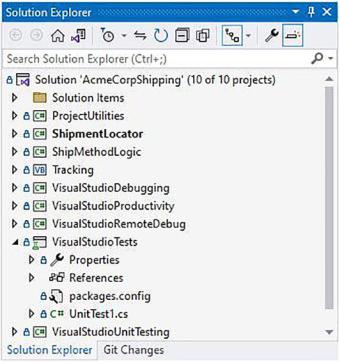
Once you have added your Unit Test project to your solution, it will appear in the solution with a different icon indicating that it is a Unit Test project (Figure 4-2).
Figure 4-2. Unit Test project added to the solution
To effectively test the class that contains the method that converts Celsius to Fahrenheit, we need to reference that class in our Unit Test project. Right-click the Unit Test project and add a reference to the project containing the class we need to test (Figure 4-3).
217
Chapter 4 Unit Testing
Figure 4-3. Reference class to test
When the reference has been added to your test project, create the test as seen in Listing 4-2.
Listing 4-2. Unit Test for Fahrenheit
[TestClass]
public class ConversionHelperTests
{
[TestMethod]
public void Test_Fahrenheit_Calc()
{
//arrange - setup var celsius = -7.0;
var expectedFahrenheit = 19.4;
//act - test
var result = ConversionHelpers.ToFahrenheit(celsius); // assert - check Assert.AreEqual(expectedFahrenheit, result);
}
}
218
Chapter 4 Unit Testing
When you look at the code in Listing 4-2, you will notice that we do three things in each test. These are
•\ |
Arrange – Where we set up the test |
•\ |
Act – Where we test the code to get a result |
•\ |
Assert – Where we check the actual result against the expected result |
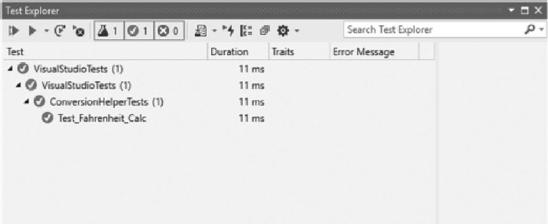
From the Test menu, select Test Explorer, or hold down Ctrl+E, T. In Test Explorer, click the green play button to run the test and see the test results displayed (Figure 4-4).
Figure 4-4. Running your Unit Test
From the results displayed in the Test Explorer, you can easily see which tests failed and which have passed. From our rather simple test in Listing 4-2, you can see that the test passed easily and that the result we expected was indeed the actual result of the test. Note that our test compares two type double values for exact equality. The Assert. AreEqual method has an overload that accepts an error tolerance parameter.
To see what happens when a test fails, modify the Integer value for the constant F_ADDITION variable as seen in Listing 4-3.
Listing 4-3. Modify the Fahrenheit Constant
private const double F_MULTIPLIER = 1.8; private const int F_ADDITION = 33;
public static double ToFahrenheit(double celsius)
{
219
Chapter 4 Unit Testing
return celsius * F_MULTIPLIER + F_ADDITION;
}
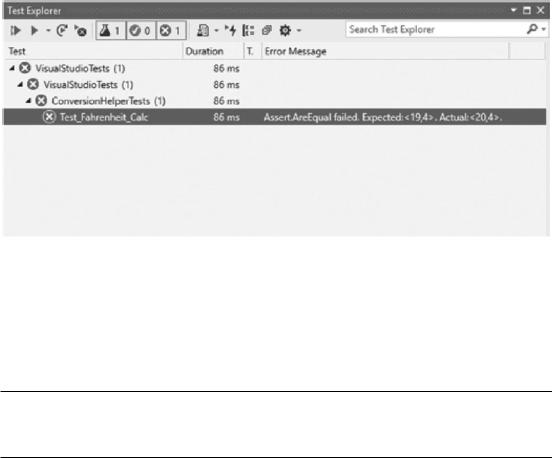
Running the tests again after the change will result in a failed test as seen in
Figure 4-5. The change we made was a small change, but it’s easy to miss this if we work in a team and on a big code base.
Figure 4-5. Failed test results for Fahrenheit calculation
What the unit test does is to keep an eye on the quality of the code as it changes throughout development. This is especially important when working in a team. It will allow other developers to see if any code changes they have made have broken some intended functionality in the code.
In Visual Studio 2022, you can also run the tests by right-clicking the test project and selecting Run Tests from the context menu.
The Test Explorer offers a lot of functionality, and you can see this from looking at the labels on the image in Figure 4-6.
220