

Chapter 1 Getting to Know Visual Studio 2022
development environment. For a full list, refer to the system requirements at the following link: https://docs.microsoft.com/en-us/visualstudio/releases/2022/ system-requirements.
•\ |
Administrator rights are required to install Visual Studio. |
•\ |
.NET Framework 4.5.2 or above is required to run the Visual Studio |
|
Installer and install Visual Studio. |
•\ |
Visual Studio requires .NET Framework 4.8 and will be installed |
|
during setup. |
Visual Studio Is 64-Bit
Visual Studio 2022 on Windows will now run as a 64-bit application, which means that you can open, modify, and debug really large solutions without running out of memory. Being a 64-bit application, Visual Studio 2022 is no longer limited to just 4 GB of memory in the main devenv.exe process.
It is also important to note that even though Visual Studio 2022 is 64-bit, it will not change the types or bitness of the applications you create and that you can still build and deploy 32-bit apps.
Full .NET 6.0 Support
Visual Studio 2022 has full support for .NET 6, and its unified framework is available for both Windows and Mac developers. This includes .NET MAUI which allows developers to develop cross-platform client apps on Windows, Android, macOS, and iOS. Visual Studio 2022 also allows developers to use ASP.NET Blazor to develop desktop apps via
.NET MAUI.
Using Workloads
After Visual Studio has been installed, you can customize the installation by selecting feature sets, also known as workloads. Think of workloads as a collection of individual features that belong together. This allows you to easily modify Visual Studio to include only what you need.
6
Chapter 1 Getting to Know Visual Studio 2022
To launch the workloads screen, find the Visual Studio Installer as can be seen in Figure 1-2.
Figure 1-2. Find the Visual Studio Installer
Clicking the Visual Studio Installer will launch the installer from where you can modify your installation of Visual Studio as seen in Figure 1-3.
Figure 1-3. Installing additional workloads
7
Chapter 1 Getting to Know Visual Studio 2022
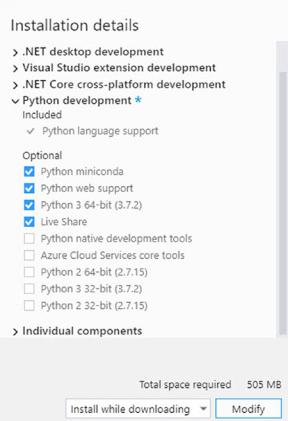
If you want to start doing Python development, you can simply check the Python development workload and install that. As can be seen in Figure 1-4, this will update the installation details section and show you exactly what is being installed and how much additional space you will need to install the selected workload.
Figure 1-4. Workload installation details
The workloads also contain tabs, namely, Workloads, Individual components, Language packs, and Installation locations. If you need to install an additional component such as Service Fabric Tools, you can do so by selecting the component on the Individual components tab.
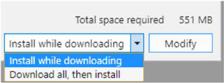
When you have checked all the workloads and individual components you would like to install, you can choose to do the installation while downloading or to download everything before installing as can be seen in Figure 1-5.
8
Chapter 1 Getting to Know Visual Studio 2022
Figure 1-5. Installation options
This will modify your existing installation of Visual Studio 2022 and apply the changes you selected.
Exploring theIDE
The Visual Studio IDE is full of features and tools that help developers do what they need to do, efficiently and productively. Developers start off creating one or more projects that contain the logic for their code. These projects are contained in what we call a solution.
Let’s have a look at the Solution Explorer first.
The Solution Explorer
In Visual Studio, the notion of solutions and projects is used. A solution contains one or more projects. Each project contains code that runs the logic you need for your application to do what it does.
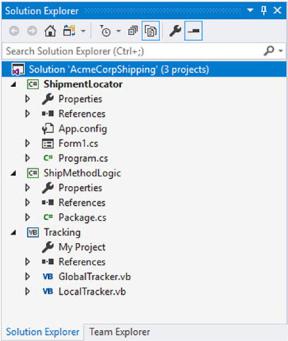
Consider the example of a Shipment Locator application as can be seen in Figure 1-6.
9
Chapter 1 Getting to Know Visual Studio 2022
Figure 1-6. The Shipment Locator solution
It is with this solution that you will add all the required projects to create your application. From the example in Figure 1-6, we can see that the solution contains three projects. The projects are as follows:
•\ |
ShipmentLocator – WinForms application – C# |
•\ |
ShipMethodLogic – Class Library – C# |
•\ |
Tracking – Class Library – VB.NET |
Of particular interest, you will notice that you can have a solution that contains a mix of C# projects and VB.NET projects. The various project templates are discussed in Chapter 2 of this book, but if you would like to read more on creating a new project in Visual Studio, refer to the documentation at the following link: https://docs. microsoft.com/en-us/visualstudio/ide/create-new-project?view=vs-2022.
10

Chapter 1 Getting to Know Visual Studio 2022
Take note that you do not need the AcmeCorpShipping source code for this chapter. The project is illustrative and is used to explain the concepts of Visual Studio solutions and projects. If, however, you would like to view the code, it is available from the GitHub repository for this book at the following URL: github.com/ apress/getting-started-vs2022.
You are therefore not limited by a particular language and can create applications containing a mix of .NET languages.
The reason that we can mix .NET languages in the same solution is due to something we call IL (Intermediate Language). IL is used by the .NET Framework to create machine-independent code from the source code used in your projects.
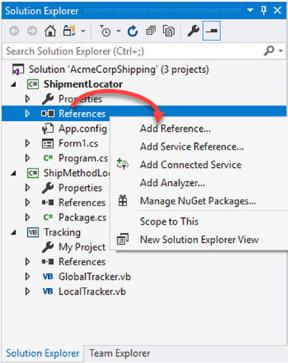
The WinForms application will contain the UI needed to track and trace shipments. For the WinForms application to be able to use the logic contained in the other two class libraries, we need to add what is called a reference to the other projects.
This is done by right-clicking the project that you want to add the reference to and selecting Add Reference from the context menu (Figure 1-7).
11
Chapter 1 Getting to Know Visual Studio 2022
Figure 1-7. Adding a project reference
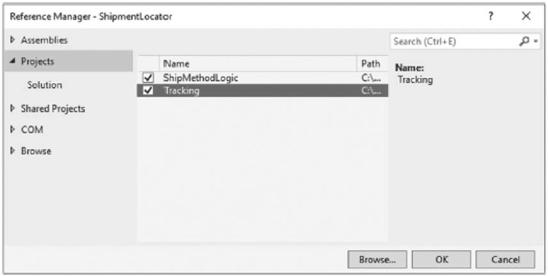
When you click the Add Reference menu item, you will be presented with the Reference Manager screen as seen in Figure 1-8.
12
Chapter 1 Getting to Know Visual Studio 2022
Figure 1-8. The Reference Manager screen
Under the Projects tab, you will find the other two Class Library projects in your solution. By checking each one and clicking the OK button, you will add a reference to the code in these projects.
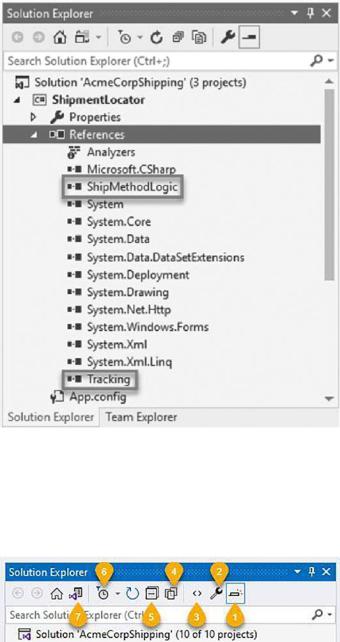
If you had to expand the References section under the ShipmentLocator project, you will see that there are two references to our Class Library projects ShipMethodLogic and Tracking as can be seen in Figure 1-9.
13
Chapter 1 Getting to Know Visual Studio 2022
Figure 1-9. Added references
This will now make all the code you write in the ShipMethodLogic and Tracking projects available to the ShipmentLocator project. Having a look at the toolbar on the Solution Explorer (Figure 1-10), you will notice that it contains several buttons.
Figure 1-10. The Solution Explorer toolbar
The buttons contained here are displayed as needed. The View Code button, for example, will only show up in the toolbar when a file containing code is selected in
14

Chapter 1 Getting to Know Visual Studio 2022
the Solution Explorer. These buttons give you quick access to the following features as outlined in the following:
\ 1.\ Preview Selected Items
\ 2.\ Properties
\3.\ View Code
\4.\ Show All Files
\5.\ Collapse All
\6.\ Pending Changes Filter
\7.\ Toggle between Solution and Folder views
I will not go through each one in detail, but of particular interest, you will notice that the Show All Files will display unnecessary files and folders such as the bin folder in your Solution Explorer. Go ahead and click the Show All Files button, and look at the Solution Explorer again.
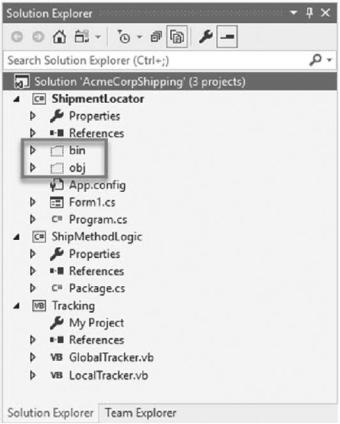
By looking at Figure 1-11, you can see that it now displays the bin folder and the obj folder. These folders are not necessary for your code but are important to your solution.
The obj folder contains bits of files that will be combined to produce the final executable. The bin folder contains the binary files that are the executable code for the application you are writing.
15
Chapter 1 Getting to Know Visual Studio 2022
Each obj and bin folder will contain a Debug and Release folder that simply matches the currently selected build configuration of your project.
Figure 1-11. Solution Explorer displaying all files
You can now right-click the bin folder as seen in Figure 1-12 and click the Open Folder in File Explorer menu to quickly have a look at the contents of the folder.
16
Chapter 1 Getting to Know Visual Studio 2022
Figure 1-12. Open Folder in File Explorer
This is a nice shortcut for anyone needing to navigate to the location of the Visual Studio files in the solution.
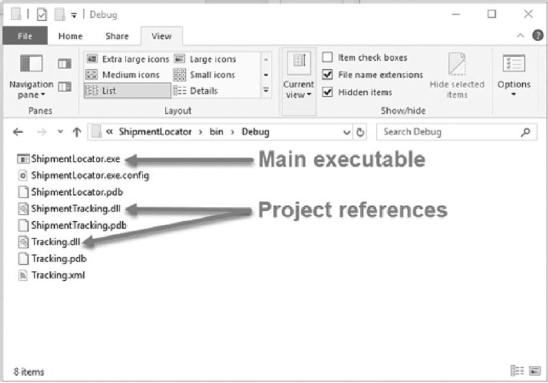
If you open the bin folder and click the Debug folder contained in the bin folder, you will see the main exe as well as any referenced dll files in the project (Figure 1-13).
17
Chapter 1 Getting to Know Visual Studio 2022
Figure 1-13. The contents of the Debug folder
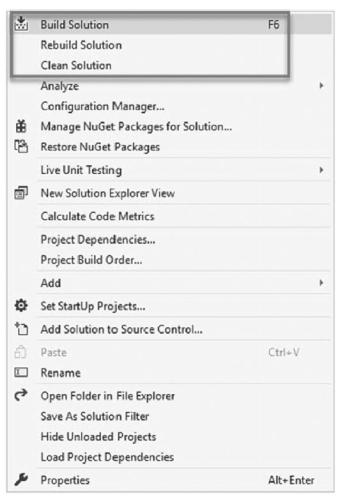
These files will be updated each time you build or run your project. If this folder is blank, perform a build of your solution by pressing F6 or by right-clicking the solution and clicking Build Solution from the context menu as seen in Figure 1-14.
18
Chapter 1 Getting to Know Visual Studio 2022
Figure 1-14. Right-click solution options
You might be wondering what the difference between Build Solution, Rebuild Solution, and Clean Solution is. The differences are as follows:
•\ |
Build Solution will do an incremental build of the solution of |
|
anything that has changed since the last build. |
•\ |
Rebuild Solution will clean the solution and then rebuild the solution |
|
from scratch. |
•\ |
Clean Solution will only clean the solution by removing any build |
|
artifacts left over by the previous builds. |
19