

Chapter 2 Working with Visual Studio 2022
Figure 2-46. Add a new project
Creating and Using Code Snippets
Code snippets in Visual Studio are small blocks of reusable code that you can insert into your code file by using a shortcut and tabbing twice or using the right-click menu.
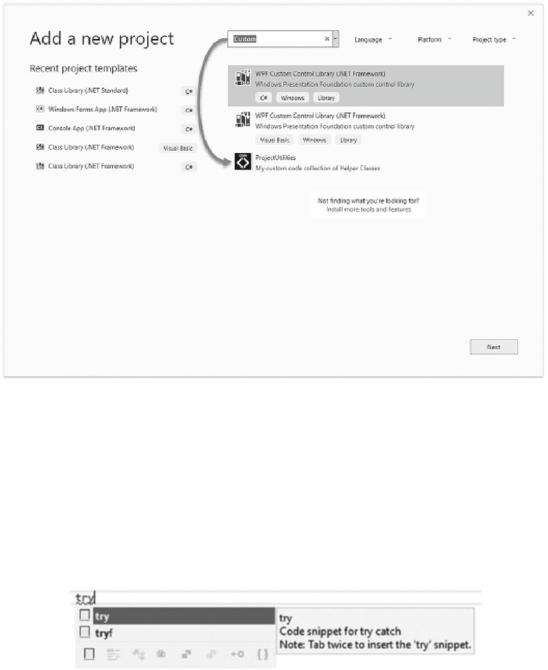
As an example (Figure 2-47), open a C# code file in Visual Studio and type the word try and hit the tab key twice.
Figure 2-47. Inserting a try code snippet
125
Chapter 2 Working with Visual Studio 2022
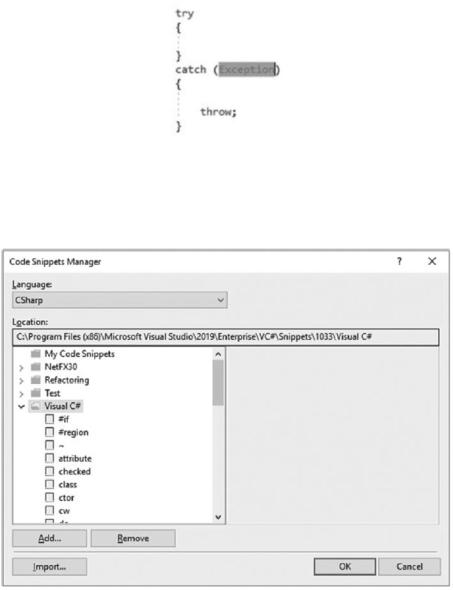
This inserts a try-catch into your code file and allows you to enter the specific exception type being handled, as seen highlighted in Figure 2-48.
Figure 2-48. The inserted try-catch block
If you want to see all the available code snippets, you can open the Code Snippets Manager (Figure 2-49) by going to the Tools menu and clicking Code Snippets Manager.
Figure 2-49. Code Snippets Manager
You can also hold down Ctrl+K, Ctrl+B to open the Code Snippets Manager window. Clicking each code snippet displays the description, shortcut, snippet type (expansion or surrounds with), and author. While some shortcuts are obvious (do, else, enum, for,
126
Chapter 2 Working with Visual Studio 2022
and so on), others are not and might take some getting used to remembering to enter the shortcut and tabbing twice to insert the snippet.
If you can’t remember the shortcut, you can invoke the snippets by hitting Ctrl+K, Ctrl+X (as seen in Figure 2-50) while inside the code file you are editing. This will display a menu in place that will allow you to search for and select the specific code snippet you want to use.
Figure 2-50. Ctrl+K, Ctrl+X to invoke a code snippet
You can also right-click and select Snippets and Insert Snippet from the context menu. The last way to insert a code snippet is via the menu bar by going to Edit, IntelliSense, and clicking Insert Snippet. Visual Studio also allows developers to create their own code snippets. Let’s have a look at that process next.
Creating Code Snippets
If there is one thing I wish, it is that there was a friendly interface baked into Visual Studio for creating and adding code snippets. Perhaps one day, but we have to use what we have now.
This is through the use of an XML file. The basic snippet template XML looks as in Listing 2-21.
Listing 2-21. Basic Snippet Template
<?xml version="1.0" encoding="utf-8"?>
<CodeSnippets xmlns="http://schemas.microsoft.com/VisualStudio/2005/ CodeSnippet">
<CodeSnippet Format="1.0.0"> <Header>
<Title></Title>
</Header>
<Snippet>
127

Chapter 2 Working with Visual Studio 2022
<Code Language=""> <![CDATA[]]>
</Code>
</Snippet>
</CodeSnippet>
</CodeSnippets>
Let’s assume we have created a Custom project template that includes a logging class in our helper classes.
Refer to the previous section regarding creating project templates.
This logging class will always be added to all new projects going forward, and I have to include it in the catch block of every try. The code for the logging class is basically as in Listing 2-22.
Listing 2-22. Basic Logging Class
public static class Logger
{
public static void Log(string message)
{
// Perform some sort of logging
}
}
Inside my code, I would like to be able to automatically add the code to log the error every time I insert a try-catch. The code snippet (Listing 2-23) file I create must import the namespace and expand or surround the required code. Replacement parameters have also been defined in the snippet file for the Exception type by surrounding the word to replace (namely, expression) with the $ characters.
Listing 2-23. Custom Try-Catch Snippet
<?xml version="1.0" encoding="utf-8"?>
<CodeSnippets xmlns="http://schemas.microsoft.com/VisualStudio/2005/ CodeSnippet">
128
Chapter 2 Working with Visual Studio 2022
<CodeSnippet Format="1.0.0"> <Header>
<Title>Try Catch Log</Title>
<Author>Dirk Strauss</Author>
<Description>Creates a try catch that includes logging. </Description>
<Shortcut>tryl</Shortcut>
<SnippetTypes>
<SnippetType>Expansion</SnippetType>
<SnippetType>SurroundsWith</SnippetType>
</SnippetTypes>
</Header>
<Snippet>
<Declarations>
<Literal>
<ID>expression</ID> <ToolTip>Exception type</ToolTip>
<Function>SimpleTypeName(global::System.Exception)
</Function>
</Literal>
</Declarations>
<Code Language="CSharp"> <![CDATA[
try
{
$selected$
}
catch ($expression$ ex)
{
Logger.Log(ex.Message); $end$
throw;
}
]]>
</Code>
129

Chapter 2 Working with Visual Studio 2022
<Imports>
<Import>
<Namespace>ProjectUtilities</Namespace>
</Import>
</Imports>
</Snippet>
</CodeSnippet>
</CodeSnippets>
It is also worth noting that the code snippet might be XML, but the file extension must be .snippet for Visual Studio to be able to import it. If you refer to Figure 2-49, you will notice an Import button on the Code Snippets Manager screen.
Click that button; browse for and import your newly created code snippet for the custom try-catch. You will notice that I have defined the shortcut as tryl for trycatch log.
This time, if you type the tryl shortcut into your code window, you will see that the description and title of the custom try-catch are displayed, as seen in Figure 2-51.
Figure 2-51. Custom try-catch to include logging
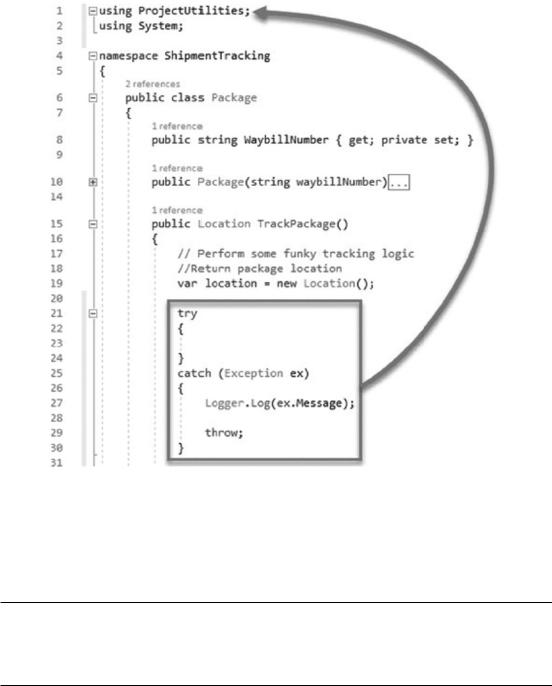
When you hit the tab key twice, the custom code snippet is inserted, and the required namespace, ProjectUtilities, which we created earlier as a project template, is imported along with the code snippet. This can be seen in Figure 2-52.
130
Chapter 2 Working with Visual Studio 2022
Figure 2-52. Added try-catch including namespace
This new code snippet is now available in all your future projects. Your C# code snippets live in the Documents folder in \Visual Studio 2022\Code Snippets\Visual C#\My Code Snippets.
The code snippet schema reference is available on Microsoft Docs at the following link: https://docs.microsoft.com/en-us/visualstudio/ide/code- snippets-schema-reference?view=vs-2019.
131