

Chapter 2 Working with Visual Studio 2022
Building the MainPage View
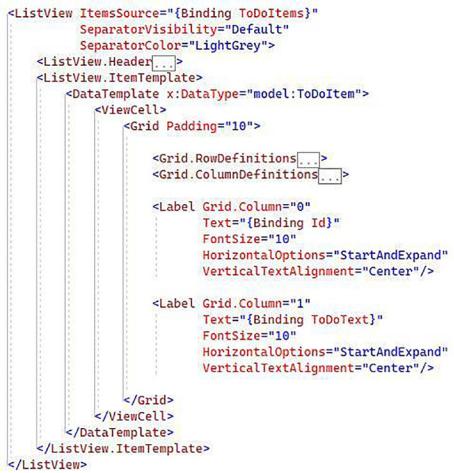
The XAML for the view is contained in the MainPage.xaml file, as seen in Figure 2-27. I won’t post the entire XAML code here. You can get all this code from the GitHub repo at github.com/apress/getting-started-vs2022. I will, however, highlight some of the parts in the XAML that we use to bind to our MainViewModel class.
Listing 2-16. Exposing Namespaces and Models
<?xml version="1.0" encoding="utf-8" ?>
<ContentPage xmlns="http://schemas.microsoft.com/dotnet/2021/maui" xmlns:x="http://schemas.microsoft.com/winfx/2009/xaml" xmlns:model="clr-namespace:HelloMAUI.Model" xmlns:viewmodel="clr-namespace:HelloMAUI.ViewModel" x:Class="HelloMAUI.MainPage" x:DataType="viewmodel:MainViewModel">
As seen in Listing 2-16, we can tell our XAML page that it needs to be aware of the MainViewModel to which it needs to bind. The isRefreshing field in the MainViewModel with the [ObservableProperty] attribute is bound to the RefreshView XAML element, as seen in Listing 2-17.
Listing 2-17. The IsRefreshing Binding
<RefreshView Command="{Binding RefreshCommand}" IsRefreshing="{Binding
IsRefreshing}">
To bind to the to-do items data contained in our ObservableCollection object on the view model, we can create a ListView XAML element.
As seen in Figure 2-29, we can set its ItemsSource to the ToDoItems object and tell it to use the ToDoItem model to bind its elements. When the Get button is
clicked, the ListView populates with to-do items, if any exist in the database. The code for the Get button references the command on our MainViewModel, which is the GetAllTodoItemsCommand that was generated for us. The code for the Get button is seen in Listing 2-18.
105
Chapter 2 Working with Visual Studio 2022
Listing 2-18. The Get Button
<Button Text="Get"
Command="{Binding GetAllTodoItemsCommand}" Grid.Row="1"
Margin="5" />
Figure 2-29. The to-do ListView
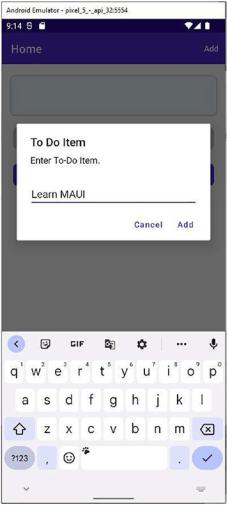
We also have another button on the view to create a new to-do item. This will call the AddTodoCommand that prompts the user for a to-do item to add. The code for the Add button is seen in Listing 2-19.
106
Chapter 2 Working with Visual Studio 2022
Listing 2-19. The Add Button
<Button Text="Add"
Command="{Binding AddTodoCommand}" Grid.Row="1"
Margin="5" />
All the moving parts should now be hooked up for our to-do application to read and write data to the SQLite database.
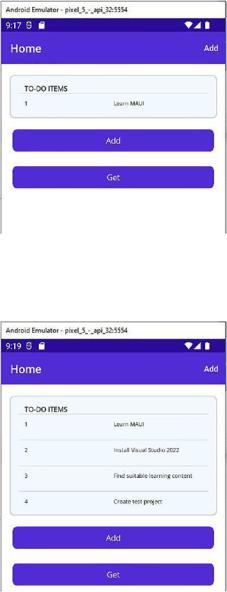
Running the application for the first time will not display anything when we click the Get button as seen in Figure 2-30.
107

Chapter 2 Working with Visual Studio 2022
Figure 2-30. The empty to-do app
Clicking the Add button prompts you for input, as seen in Figure 2-31.
108
Chapter 2 Working with Visual Studio 2022
Figure 2-31. The add to-do item prompt
After adding the to-do item, it is displayed in the list view on your UI, as seen in Figure 2-32.
109
Chapter 2 Working with Visual Studio 2022
Figure 2-32. The added to-do item
As you add more to-do items, your list view grows, as seen in Figure 2-33.
Figure 2-33. Additional to-do items
If you are seeing this page, you are debugging your application in an Emulator. Stop debugging and open the deployed application in the Emulator directly. The added to-do items will still be returned if you click the Get button. This is because the SQLite database still contains the items you added earlier. SQLite is an excellent solution for persisting data, especially when using mobile applications.
110