

Chapter 2 Working with Visual Studio 2022
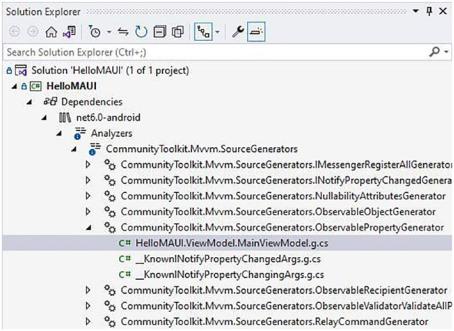
Figure 2-25. The generated MainViewModel observable properties
Registering Dependencies
To use our dependencies in our application, we need to register those dependencies with the built-in IServiceCollection .
Listing 2-7. The MauiProgram Class
using HelloMAUI.Services; using HelloMAUI.ViewModel;
namespace HelloMAUI;
public static class MauiProgram
{
public static MauiApp CreateMauiApp()
{
var builder = MauiApp.CreateBuilder(); builder
93
Chapter 2 Working with Visual Studio 2022
.UseMauiApp<App>()
.ConfigureFonts(fonts =>
{
fonts.AddFont("OpenSans-Regular.ttf", "OpenSansRegular"); fonts.AddFont("OpenSans-Semibold.ttf", "OpenSansSemibold");
});
builder.Services.AddSingleton<IConnectivity>(Connectivity.Current);
builder.Services.AddSingleton<IWeatherService,
WeatherService>();
builder.Services.AddSingleton<MainViewModel>();
builder.Services.AddSingleton<MainPage>();
return builder.Build();
}
}
The code for the MauiProgram class can be seen in Listing 2-7. You will notice that I have simply registered the dependencies by calling the AddSingleton method. This tells my code to create this service once and keep it around, returning the same instance to me whenever required. Because we only have one main page, using AddSingleton is fine for this demo. There are two other methods, too, called AddTransient and AddScoped. The differences between these are
•\ |
AddTransient creates a new service each time it is requested. |
•\ |
AddScoped creates a new service once for each request. |
•\ |
AddSingleton will be created the first time they are requested, and |
|
any subsequent request will be served the same instance. |
Your mileage will vary here, and you need to decide on the appropriate use case for your application. Please take notice of the line that registers our weather service with the IServiceCollection as seen in the following line of code: builder.Services. AddSingleton<IWeatherService, WeatherService>();. This is the reason we
use Interfaces. We are telling our application that whenever something requests IWeatherService, give it the WeatherService class that contains the implementation for our IWeatherService Interface. This loose coupling allows us to easily swap
out the implementation contained in the WeatherService class and replace it with
94
Chapter 2 Working with Visual Studio 2022
some other implementation. We have now registered our page (MainPage), our view model (MainViewModel), and our weather service (IWeatherService) with the
IServiceCollection. We can now go ahead and start building the UI for our application.
Building the MainPage View
The XAML for the view is contained in the MainPage.xaml file, as seen in Figure 2-22. I won’t post the entire XAML code here. You can get all this code from the GitHub repo at github.com/apress/getting-started-vs2022. I will, however, highlight some of the parts in the XAML that we use to bind to our MainViewModel class.
Listing 2-8. Exposing Namespaces and Models
<?xml version="1.0" encoding="utf-8" ?>
<ContentPage xmlns="http://schemas.microsoft.com/dotnet/2021/maui" xmlns:x="http://schemas.microsoft.com/winfx/2009/xaml" xmlns:model="clr-namespace:HelloMAUI.Model" xmlns:viewmodel="clr-namespace:HelloMAUI.ViewModel" x:Class="HelloMAUI.MainPage" x:DataType="viewmodel:MainViewModel">
As seen in Listing 2-8, we can tell our XAML page that it needs to be aware of the MainViewModel to which it needs to bind. To bind the values of current city, current temperature, current condition, feels like, and current icon (these are the fields in the MainViewModel with the [ObservableProperty] attribute), we can bind to XAML elements as seen in Listing 2-9.
Listing 2-9. The CurrentCity Binding to a Label
<Label
Text="{Binding CurrentCity}" SemanticProperties.HeadingLevel="Level2" FontSize="15" HorizontalOptions="Center" />
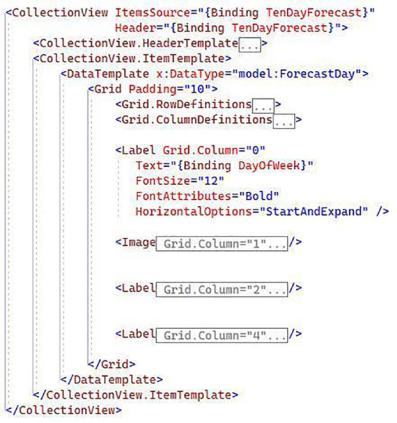
To bind to the forecast data contained in our ObservableCollection object on the view model, we can create a CollectionView XAML element.
95
Chapter 2 Working with Visual Studio 2022
As seen in Figure 2-26, we can set its ItemsSource to the TenDayForecast object and tell it to use the ForecastDay model to bind its elements. When the refresh button is clicked, the CollectionView will be populated with the forecast data. The code for the refresh button simply references the command on our MainViewModel, which is our GetWeatherCommand generated for us, seen earlier in Figure 2-24. The code for the refresh button is seen in Listing 2-10.
Listing 2-10. The Refresh Button
<Button Text="Refresh"
Command="{Binding GetWeatherCommand}" Grid.Row="1"
Margin="5" />
Figure 2-26. The forecast CollectionView
96