

Chapter 2 Working with Visual Studio 2022
Next, we need to use the HTTP Client to asynchronously get a response from our API call using the GetAsync method of the HTTP Client. This means the data is fetched on a background task so that it doesn’t lock up our UI in any way.
Because we are fetching data, we are using GetAsync, but the HTTP Client also allows us to call PUT, POST, and PATCH, by using the appropriate async method calls if we want to change data.
We will then use the new JSON Deserializer that is part of .NET. This will be surfaced as a helper method on our response. Our response will contain the content returned from the API call and a status code. The status code allows us to check to see if our GET request was successful. We do this using if (response.IsSuccessStatusCode) before deserializing the data.
Listing 2-4. Reading the Weather Data
weather = await response.Content.ReadFromJsonAsync<WeatherResults>();
The code we are referring to is seen in Listing 2-4. Earlier in the WeatherService class, we newed up a WeatherResults object called weather to contain the data from our API call. We then call the Content method on the response. The content will contain the JSON data from the GetAsync API call. Because we added a using statement to System.Net.Http.Json, we can call the ReadFromJsonAsync to give me a WeatherResults object containing the JSON data from the API call. The ReadFromJsonAsync will then deserialize the JSON data and return it as a WeatherResults object.
This is all the code you need to consume the API to return the weather results for Los Angeles. Excluding the URL construction, this logic amounts to five lines of code to do the actual API call. Next, we need to consume our weather service in the view model.
The MainViewModel
We are using an MVVM approach in our weather forecast application. MVVM stands for Model View ViewModel. Start by creating a folder called ViewModel and create a partial class called MainViewModel, as seen in Listing 2-5.
87
Chapter 2 Working with Visual Studio 2022
Listing 2-5. The MainViewModel Class
using System.Collections.ObjectModel; using System.Diagnostics;
using CommunityToolkit.Mvvm.ComponentModel; using CommunityToolkit.Mvvm.Input;
using HelloMAUI.Model; using HelloMAUI.Services;
namespace HelloMAUI.ViewModel
{
public partial class MainViewModel : ObservableObject
{
readonly IWeatherService _weatherService;
public ObservableCollection<ForecastDay> TenDayForecast { get; } = new();
[ObservableProperty] string currentCity; [ObservableProperty] int currentTemp; [ObservableProperty] string currentCondition; [ObservableProperty] int feelsLike; [ObservableProperty] string currentIcon;
public MainViewModel(IWeatherService weatherService)
{
_weatherService = weatherService;
}
[RelayCommand]
async Task GetWeatherAsync()
{
try
{
88
Chapter 2 Working with Visual Studio 2022
if (!_weatherService.CanConnectToInternet())
{
await Shell.Current.DisplayAlert("Error!", "You are not connected to the Internet", "OK");
}
else
{
var weatherResults = await _weatherService. GetCurrentWeather();
CurrentCity = weatherResults.location.name; CurrentTemp = (int)weatherResults.current.feelslike_f; CurrentCondition = weatherResults.current. condition.text;
FeelsLike = (int)weatherResults.current.feelslike_f; CurrentIcon = $"https:{weatherResults.current. condition.icon}";
foreach (var forecast in weatherResults.forecast. forecastday)
{
var dow = "Today";
if (DateTime.Parse(forecast.date) != DateTime.Today)
{
dow = DateTime.Parse(forecast.date). ToString("ddd");
}
var forecastDay = new ForecastDay()
{
DayOfWeek = dow,
MinTemp = (int)forecast.day.mintemp_f, MaxTemp = (int)forecast.day.maxtemp_f,
ImageUrl = $"https:{forecast.day.condition.icon}"
};
TenDayForecast.Add(forecastDay);
89

Chapter 2 Working with Visual Studio 2022
}
}
}
catch (Exception ex)
{
Debug.WriteLine(ex);
await Shell.Current.DisplayAlert("Error!", "Weather Service Call Failed", "OK");
}
}
}
}
There is a lot going on here, so let’s break it down a bit. We want to give our view the ability to display the forecast data. We do this by creating an observable collection of ForecastDay. This can be seen in the line of code public ObservableCollection<Fore castDay> TenDayForecast { get; } = new();. An observable collection has built-in notifications when things are added or removed. This means that I do not need to add any observable properties because I will not be raising a property change notification on the observable collection. I will just add and remove items into the observable collection, which will take care of raising the notifications to .NET MAUI.
The next thing we want to do is use our weather service. After adding the appropriate using statement, we need to provide access to that service by injecting it into the view model via the constructor, as seen in Listing 2-6.
Listing 2-6. The MainViewModel Constructor
public MainViewModel(IWeatherService weatherService)
{
_weatherService = weatherService;
}
This is dependency injection in action.
You would also have noticed it being used in the WeatherService constructor earlier in Listing 2-3 for IConnectivity.
90

Chapter 2 Working with Visual Studio 2022
This means that when we create the view model, we can tell it what it needs to be aware of. Essentially, we are telling it what its dependencies are in order for it to be able to fulfill its role as a view model in our application. We now need to create a method to call our weather service. This is the GetWeatherAsync method. Here, we can utilize the CanConnectToInternet method to check if our application is connected to the Internet before attempting to call the weather service. If we are connected to the Internet, we can call our weather service to get the current weather using the code var weatherResults = await _weatherService.GetCurrentWeather();. We then just add to our observable collection using a foreach loop.
The forecast data is small, so I am adding this data to the observable collection using a foreach loop. If you are dealing with thousands of items, you might want to use another, more performant method of adding to your observable collection. James Montemagno has a fantastic MVVM Helpers library that adds essential methods such as AddRange, RemoveRange, Replace, and ReplaceRange to the ObservableCollection. The link to this library on GitHub is https://github.com/ jamesmontemagno/mvvm-helpers.
We now need to provide a way to call this method to get the weather data from our UI. To do this, we will turn our GetWeatherAsync method into a command by decorating it with the [RelayCommand] attribute. This is made possible by all the goodness contained in the Community Toolkit. The relay command attribute automatically generates ICommand properties from declared methods.
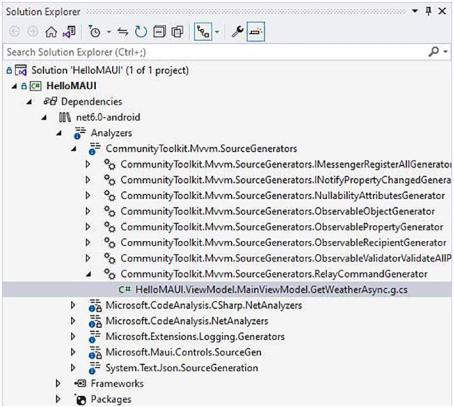
You can see the generated code contained in the project Dependencies for the GetWeatherAsync method, as seen in Figure 2-24.
91
Chapter 2 Working with Visual Studio 2022
Figure 2-24. The generated RelayCommand
Lastly, before we step off from the topic of our view model, I want to discuss the ObservableObject class and ObservableProperty attributes seen in the view model. Our view model inherits from the ObservableObject base class which is provided to us by the Community Toolkit. The ObservableObject base class allows other classes to inherit it to make their properties observable. This means that we can decorate our fields with the [ObservableProperty] attribute, and the magic of code generation does the rest for us.
To see these properties, again, under Dependencies, open up the generated file for the MainViewModel, as seen in Figure 2-25. A lot of code was generated for us without worrying about how it’s done. The Community Toolkit is an excellent resource. Our view model is now ready for prime time. Before we can build our UI, we need to link the view model, our weather service, and the view itself. We, therefore, need to register those dependencies in the MauiProgram class. Let’s look at this next.
92