

6 - The Resources
With Save history list  you can save the query results carried out up until that point in an external text file. The dialogue 'Save file as' will appear, in which you can enter a file name with the extension „.bhl" (Browser History List). The command Print last command opens the standard dialogue to print. The current query plus the output data in the message window can be printed.
6.14Tools
The object 'Tools' will be available in the 'Resources' tab if the functionality is enabled for the currently set target system. It shows all available shortcuts (connections) to executable files of external tools, which can be activated by a double-click in order to call these external programs from within CoDeSys. It is defined by the target file which and how many shortcuts are allowed. Depending on this definition the user can add or delete new shortcuts in the 'Tools' folder.
For example the Tools folder in the Object Organizer might look like this:
In this example four tools-shortcuts are installed. One serves for starting another CoDeSys programming system, one for opening the assembler listing in a text editor and two further shortcuts are available to open PDF-files. Shortcuts marked with a "<R>" cannot be modified in CoDeSys. The shortcuts may contain the connection to an editor, e.g. notepad.exe, or to a certain PDF-file, so that a double-click on the entry would open a notepad window showing the assembler listing respectively would open the Acrobat Reader showing the PDF-file.
Additionally you can define certain files which should be downloaded to the PLC as soon as the shortcut is activated.
6.14.1Properties of available Tool Shortcuts (Object Properties)
By a mouse-click on the plus sign at entry 'Tools' in the Resources tab of the Organizer a list of the available shortcuts will open. If you are just starting to set up a new project, you will just see those which are defined in the target file as fix entries. But if the Tools folder already had been modified you might find another shortcuts, added by a user in CoDeSys.
You can view the global tool properties (valid for all shortcuts listed in 'Tools') as well as the properties of single shortcuts.
1. Tool Properties:
If 'Tools' is marked in the Resources tree, you will find the command 'Object Properties' in the context menu or in the menu 'Project' 'Object', which will open the dialog 'Tool Properties'.
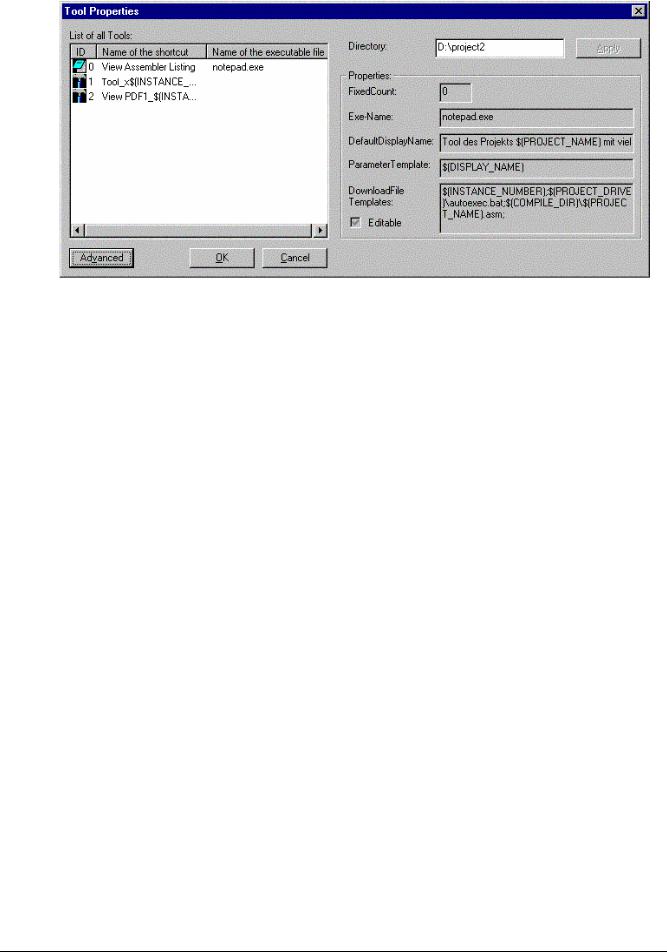
There you get a table listing all tool shortcuts which might be used for the currently set target. The following parameters are shown: The Id (unique identification number) of the tool, the Name of the shortcut which is used to reference the shortcut in the Object Organizer, and the Name of the executable file of the tool. The button Advanced expands the dialog resp. closes the extension of the dialog:
CoDeSys V2.3 |
6-71 |
Tools
Dialog 'Tool Properties'
The expanded dialog shows the global properties of the shortcut as defined in the target file. Further on an edit field is available where a (working) Directory can be defined which should be used for actions of the executable file. The path will be saved without closing the dialog as soon as you press the Apply button.
Properties of the Tool:
FixedCount
Number of shortcuts of the tool, which are inserted unalterably and automatically in the Tools folder. Only if "0" is entered here, the user will be able to create as many shortcuts as desired.
Please regard: For shortcuts which are defined as "fix" ones by the target file, the number of possible usage in the Tools folder is predetermined and the properties cannot be modified by the CoDeSys user (cognizable by a "<R>" in the Object Organizer).
Exe-Name:
DefaultDisplayName:
Parameter Template:
File name or full path of the executable file of the tool. Here you also can enter a registry path pointing to an exe-file: "[registry path].<registry entry in this path pointing to an exe-file>"If there is no entry, the file extension of the file, which is given in "Parameter Template", automatically will cause via Windows the start of the exe file of the according tool.
Examples: "C:\programme\notapad.exe", "345.pdf"
Name which is used to represent the tools in the Object Organizer. Possibly the template $(INSTANCE NUMBER) is used (see below 'Parameter Template').
Templates for determining the file which should be opened by the tool. The following templates can be used, connected by the appropriate special characters:
$(PROJECT_NAME) Name of the currently opened project (File name without extension *.pro").
$(PROJECT_PATH) Path of the directory where the project file is (without indication of the drive).
$(PROJECT_DRIVE) Drive where the currently opened project is. $(COMPILE_DIR) Compile directory of the project (including indication of the drive) $(TOOL_EXE_NAME) Name of the exe-file of the tool.
$(DISPLAY_NAME) Name of the current shortcut, as used in the 'Tools' folder.
$(INSTANCE_NUMBER) Number of the shortcut (Instance number, running number, starting with "1")
$(CODESYS_EXE_DIR) Path of the directory where the Codesys exe-file is (including indication of the drive).
The conversion of a template you will see in the dialog for the Shortcut Properties (see below)
Example: "$(PROJECT_NAME)_$(INSTANCE_NUMBER).cfg"
6-72 |
CoDeSys V2.3 |
|
6 - The Resources |
|
The cfg-file with the name <name of current CoDeSys project>_<shortcut |
|
number>.cfg will be opened in the tool. |
DownloadFile |
Files, file pathes resp. templates for file which will be copied to the PLC during |
Templates: |
download.. If option Editable is activated, the list of these files will be editable in the |
|
properties dialog of the shortcut. If a file name is entered without path, the file will be |
|
searched in the directory where the codesys-exe-file is. |
|
Example: |
|
"a.up;$(PROJECT_NAME).zaw;$(INSTANCE_NUMBER).upp" |
|
the files a.up, <current CoDeSys Projekt>.pro and <shortcut number>.upp will be |
|
copied to the PLC during the next download |
2. Shortcut Properties:
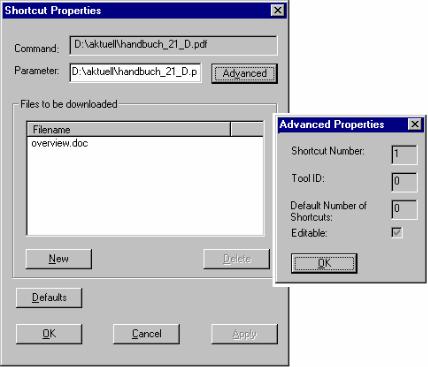
Mark a shortcut entry in the 'Tools' tree in the Object Organizer and select the command 'Object Properties' in the context menu or in the 'Project' 'Object' menu. The dialog 'Shortcut Properties' will open, containing the following items:
Command
Parameter
Files to be downloaded
Calling the tool; paths of the exe-file and of the file which is named in 'Parameter' (predefined by the 'Parameter Template', see above)
e.g.: C:\programs\notepad.exe D:\listings\textfile.txt
Path of the file which should be called by the tool. This is defined in the target file and can be edited here, if the option 'Editable' (see below) has been activated.
Primarily you find here the Filenames which are defined by the target file and which are also described in the Tool Properties (DownloadFileTemplate, see above). If option 'Editable' is activated in the extended dialog (see below) then you can modify the list. For this purpose press button New to open the dialog 'Filename', where you can enter another file resp. a file path. If you enter a file without path, then it will be searched in that directory, where the codesys-exe-file is. Button Delete will remove the currently marked list entry.
Button Standard resets the entries of the dialog to the default values defined by the target file. Button Apply saves the done settings without closing the properties dialog.
Button Advanced expands the dialog so that it will look as follows :
Dialog 'Advanced Properties' of a shortcut
CoDeSys V2.3 |
6-73 |
Shortcut Number:
Tool ID:
Default Number of
Shortcuts:
Editable:
Tools
Running number, starting with 1. New shortcuts of the current tool will each get the next higher number. If a shortcut will be removed later, the numbers of the remaining shortcuts will stay unchanged. The shortcut number can be inserted in other definitions by using the template $(INSTANCE_NUMBER) (e.g. see above, 'Parameter Template').
Unique identification number of the tool; defined in the target file.
Number of shortcuts (instances) for a tool. Corresponds to the "FixedCount" defined in the target file. See above, Tool Properties.
If this option is activated, it will be possible to edit the field 'Parameter' resp. the list of files which should be downloaded.
Button OK applies the done settings and closes the Properties dialog.
6.14.2Managing Tool Shortcuts
Creating new Tool Shortcuts
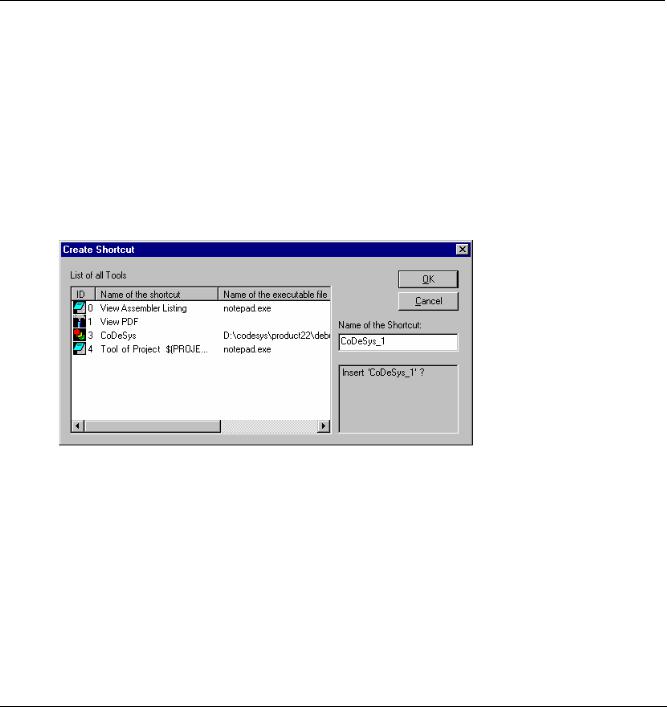
Select the entry 'Tools' or a shortcut entry in the Resources tree of the Object Organizer and select command 'Add Object' in the context menu or in the 'Project' 'Object' menu to open the dialog 'Create Shortcut', see below.
The table lists all tools for which new shortcuts (connections) can be created. According to the definitions in the target file the following parameters are displayed: ID of the tool, default Name of the shortcut and the Name of the executable file.
In order to create a(nother) shortcut for one of the offered tools, select this tool by a mouse-click in the 'ID' column. Hereupon you can modify the default name of the shortcut in the edit field Name of the shortcut and confirm with OK. This will only work if you enter a name which is not yet used.
Dialog 'Create Shortcut'
OK closes the dialog and the new shortcut will be inserted in the Resources tree, represented by the shortcut name and a shortcut number which is 1 higher than the highest one used for a instance of this tool up to now.
In the area below the name field appropriate hints concerning the user inputs will be displayed.
Deleting Tool Shortcuts
Deleting a shortcut can be done via the command Delete in the context menu (right mouse button) or in the 'Project' 'Object' menu. The command is only available, if there is no fix number of shortcuts defined for the currently marked shortcut. The shortcut numbers of the remaining shortcuts will not change if you delete a shortcut.
6-74 |
CoDeSys V2.3 |